

A pristine model is not a finished model; it is merely a blank canvas waiting for its history to be written. You likely understand the frustration of finishing a detailed OO9 or GN15 locomotive kit only to find that your weathering looks like "paint" rather than genuine "dirt." While the risk of over-weathering an expensive 3D-printed miniature is a common concern, applying advanced weathering techniques for models through a structured process provides a reliable path to hyper-realism.
This masterclass promises to teach you the professional layering and textural techniques required to transform pristine kits into hard-working industrial miniatures. Although managing multiple mediums can seem complex, utilizing a chronological approach to grime and rust allows you to build depth without creating a messy finish. We will explore the logic of debris accumulation, the latest 2026 pigments such as Monroe Models' chalky white, and specific methods for protecting your underlying paintwork while you layer your effects.
Key Takeaways
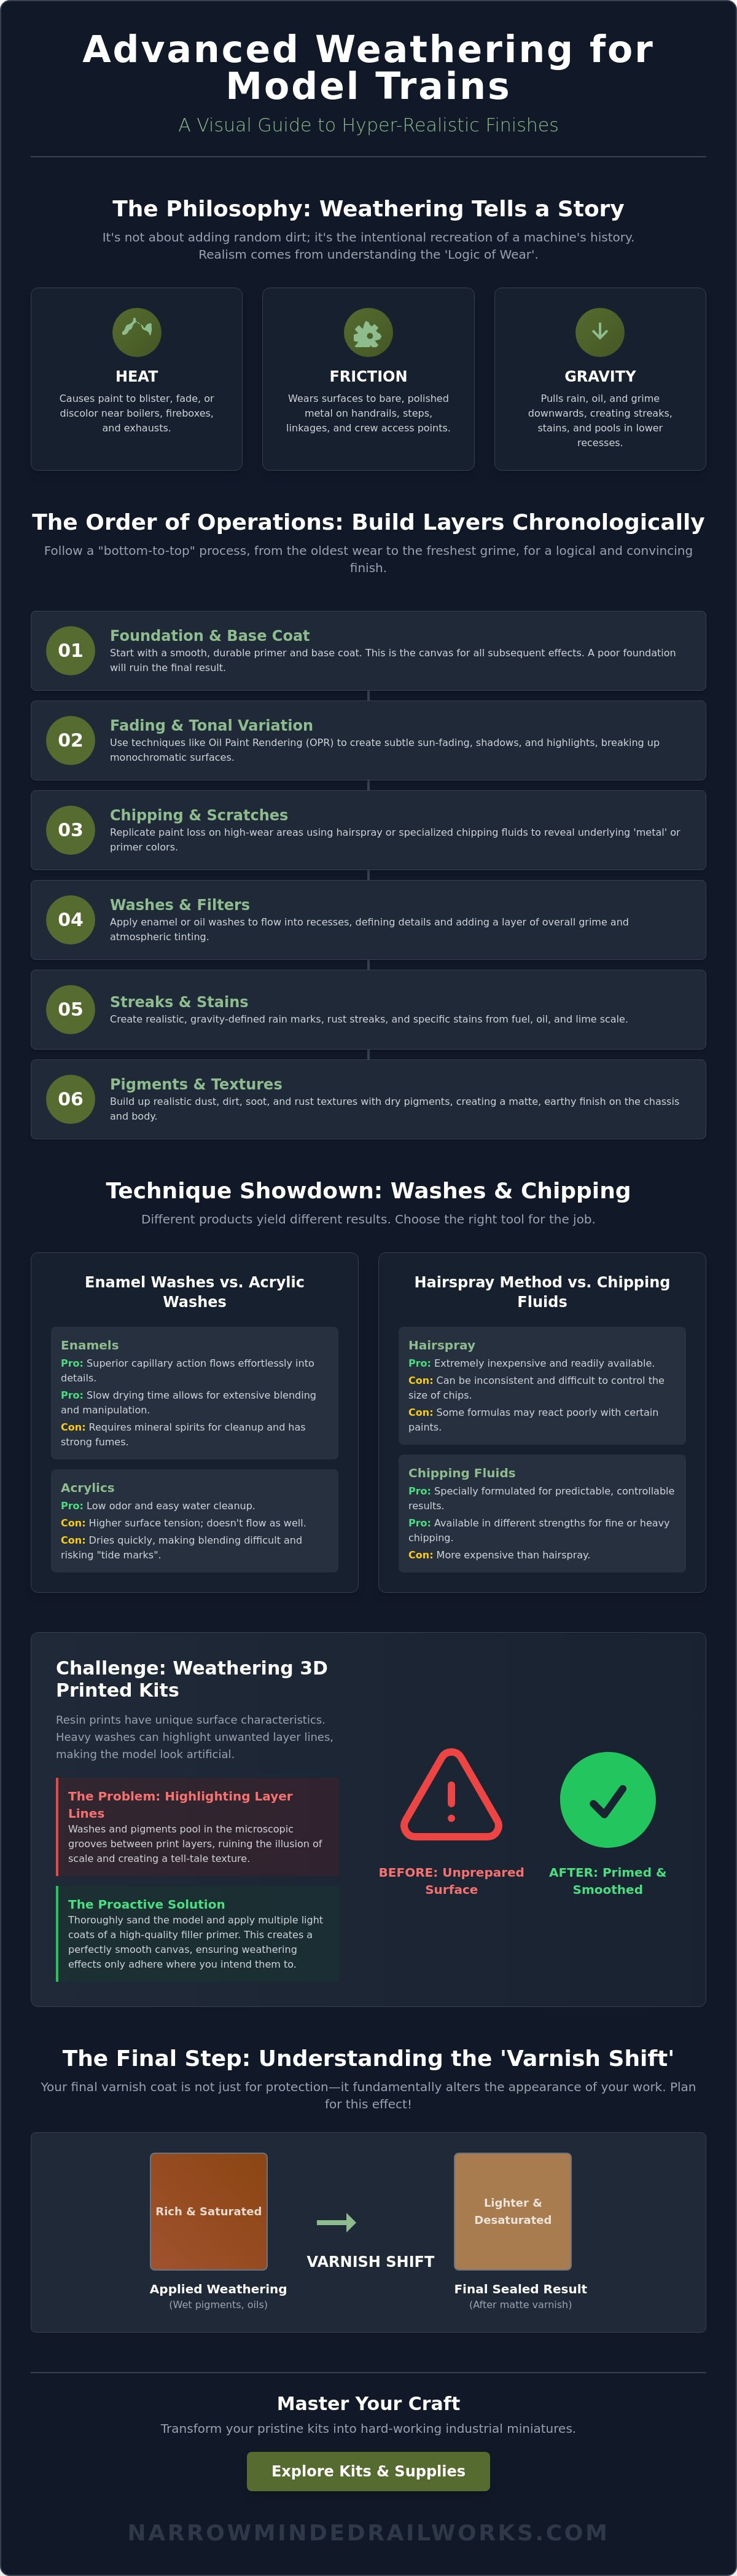
- Learn to apply the "Logic of Wear" to ensure your grime accumulates exactly where heat and gravity would naturally pull it on industrial machinery.
- Discover how to use advanced weathering techniques for models like oil paint rendering to create subtle, professional tonal variations on monochromatic surfaces.
- Master the technical differences between chipping fluids and the hairspray technique to replicate realistic paint loss on hard-working OO9 and GN15 kits.
- Identify proactive solutions for 3D-printed resin kits to prevent heavy washes from highlighting unwanted layer line textures during the weathering process.
- Understand the "Varnish Shift" to accurately predict how your final matte or satin seal will alter the color and depth of your completed weathering layers.
The Philosophy of Advanced Weathering: Building an Industrial Narrative
Advanced weathering is the intentional recreation of a machine's environmental history. It isn't just about adding dirt; it's about telling the story of where a locomotive has been and what it has done. When you approach a scale model with this mindset, you move beyond simple aesthetics into the realm of historical reconstruction. You must distinguish between "clean" weathering, such as sun-fading and light dust, and "heavy" weathering involving deep rust and thick grease. Both have their place, but they shouldn't be applied without a clear narrative goal for the specific kit you're building.
To achieve realism, you must understand the "Logic of Wear." This is the intersection of heat, friction, and gravity. Heat causes paint to blister or fade near the boiler; friction wears surfaces down to bare metal on handrails; gravity pulls grease and rainwater into the lowest recesses of the chassis. While mapping these forces can feel overwhelming, utilizing advanced weathering techniques for models through a structured approach provides a proactive solution for managing this complexity. Observe these forces on prototype photos before you ever pick up a brush.
To better understand how these elements interact on a miniature scale, watch this helpful tutorial:
Understanding the Narrow Gauge Environment
While standard gauge models often follow predictable wear patterns, narrow gauge kits require a more aggressive approach to reflect their industrial heritage. Environments like quarries or mines produce distinct textures that define the character of the model. For instance, limestone quarry dust is fine and alkaline, appearing as a light grey film that differs significantly from the oily, black soot found on a mainline locomotive. If your layout is set near the coast, you'll need to account for salt air, which creates a specific, crusty oxidation pattern. Because these machines often worked in harsh conditions with minimal maintenance, the weathering should reflect a life of hard labor rather than a pristine museum piece.
The Order of Operations: Planning Your Layers
While it's tempting to rush into the details, following a strict order of operations ensures your layers remain distinct and purposeful. Successful weathering follows a chronological order, meaning you should work from "bottom to top." This involves starting with overall paint fading and ending with fresh mud or wet oil leaks. Before applying any effects, map out high-traffic areas where crew members frequently step or grab. A successful project begins with the foundation of painting 3d printed models correctly. If the base coat isn't durable and smooth, subsequent advanced weathering techniques for models will fail to adhere properly or may highlight unwanted textures.
Mastering Oil Paint Rendering and Enamel Washes
Flat, monochromatic paint often makes even the most detailed kit look like a toy. While acrylic paints are excellent for base coats, they dry too quickly to allow for the subtle blending required for realistic industrial grime. A proactive solution is Oil Paint Rendering (OPR), which serves as the gold standard for achieving multi-dimensional tonal variation. By utilizing the slow drying time of oils, you can blend highlights and shadows directly on the model's surface, creating a finish that mimics the way light interacts with heavy machinery. Mastering these advanced weathering techniques for models allows you to break up the uniform colors of factory finishes with professional precision.
Enamel-based products offer a similar chemical advantage, particularly regarding capillary action. Because enamels have a lower surface tension than acrylics, they flow effortlessly into the tightest recesses. This makes them ideal for creating localized grime or rain streaks through a method known as stippling. You may find that the extended drying times of these mediums create a bottleneck in a busy workshop. To manage this constraint, plan your weathering sessions in stages, allowing at least 24 to 48 hours for oil layers to fully oxidize before moving to the next step. The use of washes is frequently cited as one of the Top 5 Weathering Techniques by industry experts because it provides immediate visual depth that dry brushing alone cannot replicate.
Dot Filtering for Tonal Depth
Dot filtering is a powerful technique for breaking up flat surfaces on large wagon sides or locomotive tanks. By applying tiny dots of complementary oil colors, such as light blues for shadows or pale yellows for sun-faded paint, you can introduce life into a static livery. Use a wide, flat brush dampened with odorless thinner to drag these dots vertically. This creates subtle, transparent streaks that suggest years of exposure to the elements. To avoid the common pitfall of "tide marks," ensure your brush is only damp, not dripping, so the thinner evaporates cleanly without leaving harsh edges behind.
Pin Washes and Capillary Action
While a general wash covers the entire model, a pin wash targets specific details like rivets, hinges, and panel lines. High-flow enamels are the preferred tool here because they rely on surface tension to travel along details automatically. A gloss coat is essential before you begin; it provides a smooth surface that encourages the wash to flow rather than staining the flat paint. Once the wash is touch-dry, you can clean up any excess with a clean cotton bud moistened with mineral spirits. This ensures the grime stays exactly where it belongs. When you are ready to apply these skills to a new project, our OO9 locomotive and wagon kits provide the perfect high-detail surface for advanced rendering.
Textural Realism: Advanced Rust, Chipping, and Pigment Work
Realism in industrial miniatures is achieved through physical volume as much as color. While washes provide visual depth, they cannot replicate the physical buildup of oxidized metal or caked-on quarry debris. Transitioning from color-based effects to textural work is a critical step in mastering advanced weathering techniques for models. This process involves creating a physical narrative of decay where the paint isn't just discolored, but actually failing and falling away from the surface. By adding three-dimensional elements, you bridge the gap between a painted kit and a convincing heavy-duty machine.
To replicate realistic paint loss, you must choose between the "Hairspray Technique" and specialized chipping fluids. Both methods rely on a water-soluble layer placed between the base "rust" coat and the final livery color. While household hairspray is an accessible option, it can be unpredictable in its bonding strength. A proactive solution is using dedicated chipping fluids, which offer more consistent control when you apply water to agitate and "chip" the top layer of paint. This reveals the underlying colors with a level of randomness that a brush or sponge alone cannot achieve. Working with dry powders can be messy, but utilizing a dedicated pigment fixer provides a proactive solution for permanent adhesion without losing the matte texture.
The Multi-Stage Rust Process
Rust is rarely a single shade of orange. To create a realistic patina, you must layer different stages of oxidation. Start with "Old Rust" using dark browns and deep purples to represent long-term exposure. Follow this with "Fresh Rust" using bright oranges and burnt siennas in areas where water actively runs or pools. For micro-detail on locomotive cab edges or footplates, use sponge chipping to apply tiny, irregular flecks of color. If you want to simulate heavy pitting on an old wagon, mix fine sand or specialized rust pastes into your paint to add physical grit to the model's surface.
Working with Dry Pigments and Powders
Narrow gauge environments like peat bogs or slate quarries present unique challenges that standard weathering products don't always address. For OO9 locomotive kits working in slate environments, simulating pervasive blue-grey dust requires heavy pigment application around the frames and wheels. You can achieve heavy industrial build-up by using the "Wet-on-Wet" technique, where you drop dry pigments into a pool of wet white spirit. This allows the powder to settle naturally into corners. To simulate the greasy, oily stains found around axle boxes, mix a drop of gloss varnish with dark pigments. This creates a thick, viscous texture that remains shiny even after the rest of the advanced weathering techniques for models have dried to a matte finish.
Weathering 3D Printed Kits: Overcoming Unique Challenges
3D printed resin behaves differently than traditional styrene. While it offers incredible detail for narrow gauge subjects, it's susceptible to "layer line ghosting" if you use heavy washes without preparation. Aggressive solvents can also make the material brittle over time if they penetrate the surface. A proactive solution is to master the foundational steps for finishing 3D printed kits before applying any weathering fluids. By creating a chemical barrier, you ensure that advanced weathering techniques for models enhance the aesthetic rather than exposing the manufacturing process.
Layer lines are a common constraint of the printing process. Dry brushing is dangerous on 3D prints because the bristles catch the top of every microscopic ridge, highlighting print artifacts instead of realistic wear. A proactive solution is using satin primers to create a smooth, non-porous shield. This prevents washes from soaking into the print and allows you to control the flow of grime with precision. If you notice micro-imperfections, utilize "sludge washes" (pigments thickened with a small amount of binder) to fill these gaps. This turns a potential manufacturing flaw into a smooth, weathered surface ready for further industrial detailing.
Managing Layer Lines and Porosity
Porosity is a significant issue with some resins. While a matte primer might seem ideal for paint adhesion, it can act like a sponge for oil washes, causing unsightly staining. A proactive solution is to apply a thin satin varnish before you begin your weathering layers. This gives you the "slip" required to move oil paints around the surface without them becoming permanently stuck in the print grain. This technique is essential when you want to create the subtle tonal shifts discussed in previous sections without fighting the texture of the kit itself.
Weathering Narrow Gauge Rolling Stock
Resin kits often lack the physical mass of metal or heavy injection-moulded plastic. A proactive solution is to use advanced weathering techniques for models to simulate "heft" and weight. When working with OO9 wagon kits, you can achieve "faded wood" effects on 3D printed planking by dragging thin streaks of grey and buff oils over a brown base. To simulate metal weight, focus your heaviest weathering on the underframe and axle boxes. Applying thick, dark grease effects and localized rust textures to these areas tricks the eye into perceiving the model as a heavy, industrial machine rather than a lightweight resin print.
If you're ready to apply these specialized methods to your next project, explore our full range of OO9, GN15, and O-16.5 scale kits designed specifically for the discerning industrial modeler.
From Bench to Layout: Final Sealing and Scene Integration
The final application of a clear coat is often the most stressful part of a build. While you might be tempted to simply spray the entire model with a matte finish, this can flatten the tonal variety you worked hard to achieve in previous stages. A proactive solution is to utilize selective varnishing to maintain a range of surface textures. Gloss, satin, and matte finishes should coexist on a single model to represent different materials and conditions. This attention to detail is what separates standard projects from those utilizing advanced weathering techniques for models to their full potential.
When you apply a sealant, you will likely encounter the "Varnish Shift." This effect occurs because the liquid varnish fills the microscopic textures of matte pigments, causing them to appear significantly darker and more saturated. To manage this constraint, always perform a test on a spare piece of material or apply your weathering effects about 15% lighter than you want the final result to be. This proactive adjustment ensures that the finished locomotive maintains the correct contrast once the fixative dries. Once sealed, your model is ready to move from the workbench to the layout for final scene integration.
The Art of Selective Varnishing
Using a single finish across the entire model is a common constraint that limits realism. A proactive solution is to apply a matte coat for general protection, then go back with a brush to add gloss varnish to "wet" oil leaks and grease points. Delicate pigment work requires a light "mist" coat of fixative from a distance; spraying too closely will drown the texture and turn your dust into a flat sludge. Some modellers choose not to seal the final layer of pigments at all to preserve the maximum "airy" quality of dry dust, though this requires careful handling of the model during operation.
Final Integration with Scenery
Your model should never look like it's floating above the track. To ensure a cohesive look, match the mud and dust on your GN15 scale models directly to the soil and ballast used on your layout. Using the same pigments for both the ground and the rolling stock creates a visual bond between the machine and its environment. You can add further life to the scene by utilizing figures and tools from our scenery collection. A locomotive is only truly "service-ready" when it looks like it has just spent a full shift working in the very dirt it stands upon. If you are ready to start your next project, explore our latest 3D printed locomotive kits to find your next industrial subject.
Before placing your model into permanent service, use this final checklist to ensure it meets professional standards for advanced weathering techniques for models:
- Exhaust and Soot: Verify that the roof and chimney area have a deep, matte black texture without any unnatural sheen.
- Crew Wear: Check that high-traffic handrails, handles, and footplates show subtle metallic highlights where paint would naturally wear away.
- Environmental Match: Confirm that the color and texture of the dirt on the lower frames match the specific geology of your layout's scenery.
- Operational Lubrication: Ensure there are subtle gloss highlights on axle boxes, connecting rods, and other active lubrication points to simulate fresh grease.
Bringing Industrial History to Your Workbench
Mastering the art of realistic decay transforms a static kit into a functional piece of industrial history. You've explored how to apply the "Logic of Wear" through oil rendering and how to navigate the specific texture challenges of 3D printed resin. While the complexity of layering different mediums can feel daunting, utilizing advanced weathering techniques for models in a chronological order provides a proactive solution for achieving professional results. These methods ensure that every rust streak and mud splatter serves a narrative purpose on your OO9 or GN15 subjects.
A successful weathering project depends on starting with a high-quality foundation. While finding the right industrial subject can be a constraint, our specialist narrow gauge designs serve as a proactive solution for your next build. These kits utilize high-resolution 3D prints and are designed by modellers for modellers to ensure maximum detail and durability. Browse our range of high-detail narrow gauge kits and start your weathering journey today. With the right tools and a structured approach, you can confidently turn any pristine kit into a hard-working miniature that looks right at home in its environment.
Frequently Asked Questions
What is the best type of oil paint for advanced model weathering?
Artist-grade oil paints are the superior choice because they contain finer pigments that won't look grainy on small scales like OO9 or GN15. While student-grade paints are more affordable, they often lack the tinting strength required for professional rendering. A proactive solution is to squeeze your paint onto cardboard before use. This leeches out excess linseed oil, which prevents unsightly grease halos from forming on your model's finish.
How do I prevent enamel washes from cracking the plastic or resin?
Enamel thinners can occasionally cause resin or styrene to become brittle if the fluid pools in tight joints or structural corners. This constraint is manageable by applying a high-quality acrylic gloss coat before you begin any weathering. This protective barrier shields the underlying material while allowing the wash to flow smoothly. Always use odourless mineral spirits rather than industrial-strength thinners to minimize the chemical risk to your kits.
Can I use real rust or dirt on my models for better realism?
Real materials often have a grain size that is far too large for 7mm or 4mm scales, which quickly breaks the illusion of realism. While some modellers sift real soil, a proactive solution is using specialized weathering pigments. These are ground to a microscopic level and provide the same chemical properties as real rust without the risk of biological contamination or scale-distortion on your industrial miniatures.
What is the difference between a pin wash and a sludge wash?
A pin wash is a precise application of fluid directly into specific details like rivets or panel lines using a fine-tipped brush. In contrast, a sludge wash involves covering a larger surface area and wiping away the excess once it is touch-dry. While a sludge wash is faster, a pin wash is often preferred for advanced weathering techniques for models because it keeps the base livery clean.
How do I fix mistakes in my weathering without stripping the base paint?
You can remove oil or enamel-based weathering without damaging your base paint if you utilized an acrylic foundation. Since these chemicals don't react with cured acrylics, a cotton bud dampened with odourless thinner will lift the mistake away cleanly. This proactive solution allows you to experiment with aggressive textures and heavy grime without the fear of ruining an expensive locomotive kit during the creative process.
Is an airbrush necessary for advanced weathering techniques?
An airbrush is not strictly necessary for most advanced weathering techniques for models, although it is helpful for achieving perfectly smooth paint fading. Most industrial effects like rust pitting, grease leaks, and mud accumulation are actually better achieved with sponges, brushes, and pigments. You can create a professional, multi-layered finish entirely by hand using the stippling and rendering methods described in this masterclass.
How do I weather 3D printed models without highlighting layer lines?
Dry brushing should be avoided on resin prints as it catches on the microscopic ridges of the manufacturing process. A proactive solution is to use a satin primer to seal the surface before applying thin enamel washes. These washes will flow into the intended recessed details rather than the print grain. If lines remain visible, a thick sludge of pigment and fixer can fill and hide these artifacts.
Should I seal my weathering with a clear coat at the end?
Sealing your work is essential to protect delicate pigments from fingerprints and operational handling on a layout. While a single matte coat is a common choice, a proactive solution is selective varnishing. Use a matte spray for the main body, but use a brush to apply gloss varnish to oil spills or fresh grease. This maintains the textural variety that makes narrow gauge models look realistic.