

A generic plastic kit often fails to capture the unique architectural soul required for a convincing narrow gauge layout. While mass-produced structures serve a purpose, they rarely reflect the specific quirks of a Welsh slate quarry or a remote industrial line. Using 3d printed model railway buildings allows you to move beyond these standard limitations, though it's natural to feel hesitant about visible layer lines or the complexities of weathering resin. We understand that transitioning from traditional materials can feel daunting, but the level of detail achievable with modern printing technology is a transformative solution for the serious modeller.
You're likely looking for structures that feel authentic to your specific scale, whether that's OO9, GN15, or O-16.5. In this guide, you'll discover how these high-detail kits offer unparalleled architectural precision and learn the exact steps to finish them for a professional, realistic look. We will cover everything from surface preparation to advanced painting techniques, ensuring your 3D printed scenery is as durable and visually striking as any traditional kit. By the end, you'll have the confidence to integrate unique, scale-accurate buildings that truly bring your narrow gauge world to life.
Key Takeaways
- While FDM printing is suitable for large terrain, utilizing resin technology is essential for capturing the fine architectural details required in narrow gauge modelling.
- Although generic kits are widely available, 3d printed model railway buildings provide the unique character and prototype accuracy that mass-produced options often lack.
- While resin components require careful degreasing, following a precise cleaning routine ensures a professional surface for painting and weathering.
- Although finding unique structures for niche scales can be difficult, specialized kits for OO9, GN15, and O-16.5 offer a direct solution for layout realism.
- While 3D printed materials differ from traditional plastic, employing the correct tools and adhesives guarantees a durable and high-quality finish.
What are 3D Printed Model Railway Buildings?
Modern 3d printed model railway buildings represent a significant departure from the static hobby shop shelves of the past. These structures are created layer-by-layer from digital CAD files, utilizing either liquid resin or thermoplastic filament to build complex geometries. This technology has revolutionized narrow gauge modelling, specifically for scales like OO9 and GN15 where traditional commercial support has been historically thin. While major manufacturers prioritize standard gauge due to production volume, 3D printing empowers boutique designers to create niche, prototype-accurate buildings. This on-demand approach means you can finally find the specific water tower or tool shed that matches your prototype's history.
To better understand this concept, watch this helpful video:
The Evolution of Scenery Production
Scenery production has moved from labor-intensive card and plaster methods to the precision of digital design. Traditional materials often struggle to represent the intricate textures of weathered stone or grain-heavy wood at smaller scales. While physical moulds have strict geometric limits, digital sculpting allows for microscopic detail to be captured in every print. This evolution ensures that even the smallest weighbridge or engine shed carries the architectural character essential for a realistic narrow gauge setting. It's no longer necessary to settle for "close enough" when digital tools can replicate specific stonework patterns from real-world railway buildings.
Kits vs. Ready-to-Run Structures
Modellers often find that ready-to-run structures feel generic or out of place on a carefully crafted layout. While we don't provide finished, painted models, our 3d printed model railway buildings offer a more rewarding path to realism. These kits are designed by modellers for modellers, ensuring that every rivet and stone is scale-accurate for O-16.5, GN15, or OO9 settings. Building from a kit allows you to maintain total control over the weathering process, which is vital for narrow gauge themes where working structures often appear heavily used. By taking a proactive role in the assembly, you ensure that your scenery matches the high detail of your locomotive and wagon kits. This approach transforms a simple building into a unique piece of industrial history that fits your layout's specific narrative.
Resin vs. FDM: Choosing the Right 3D Printing Material
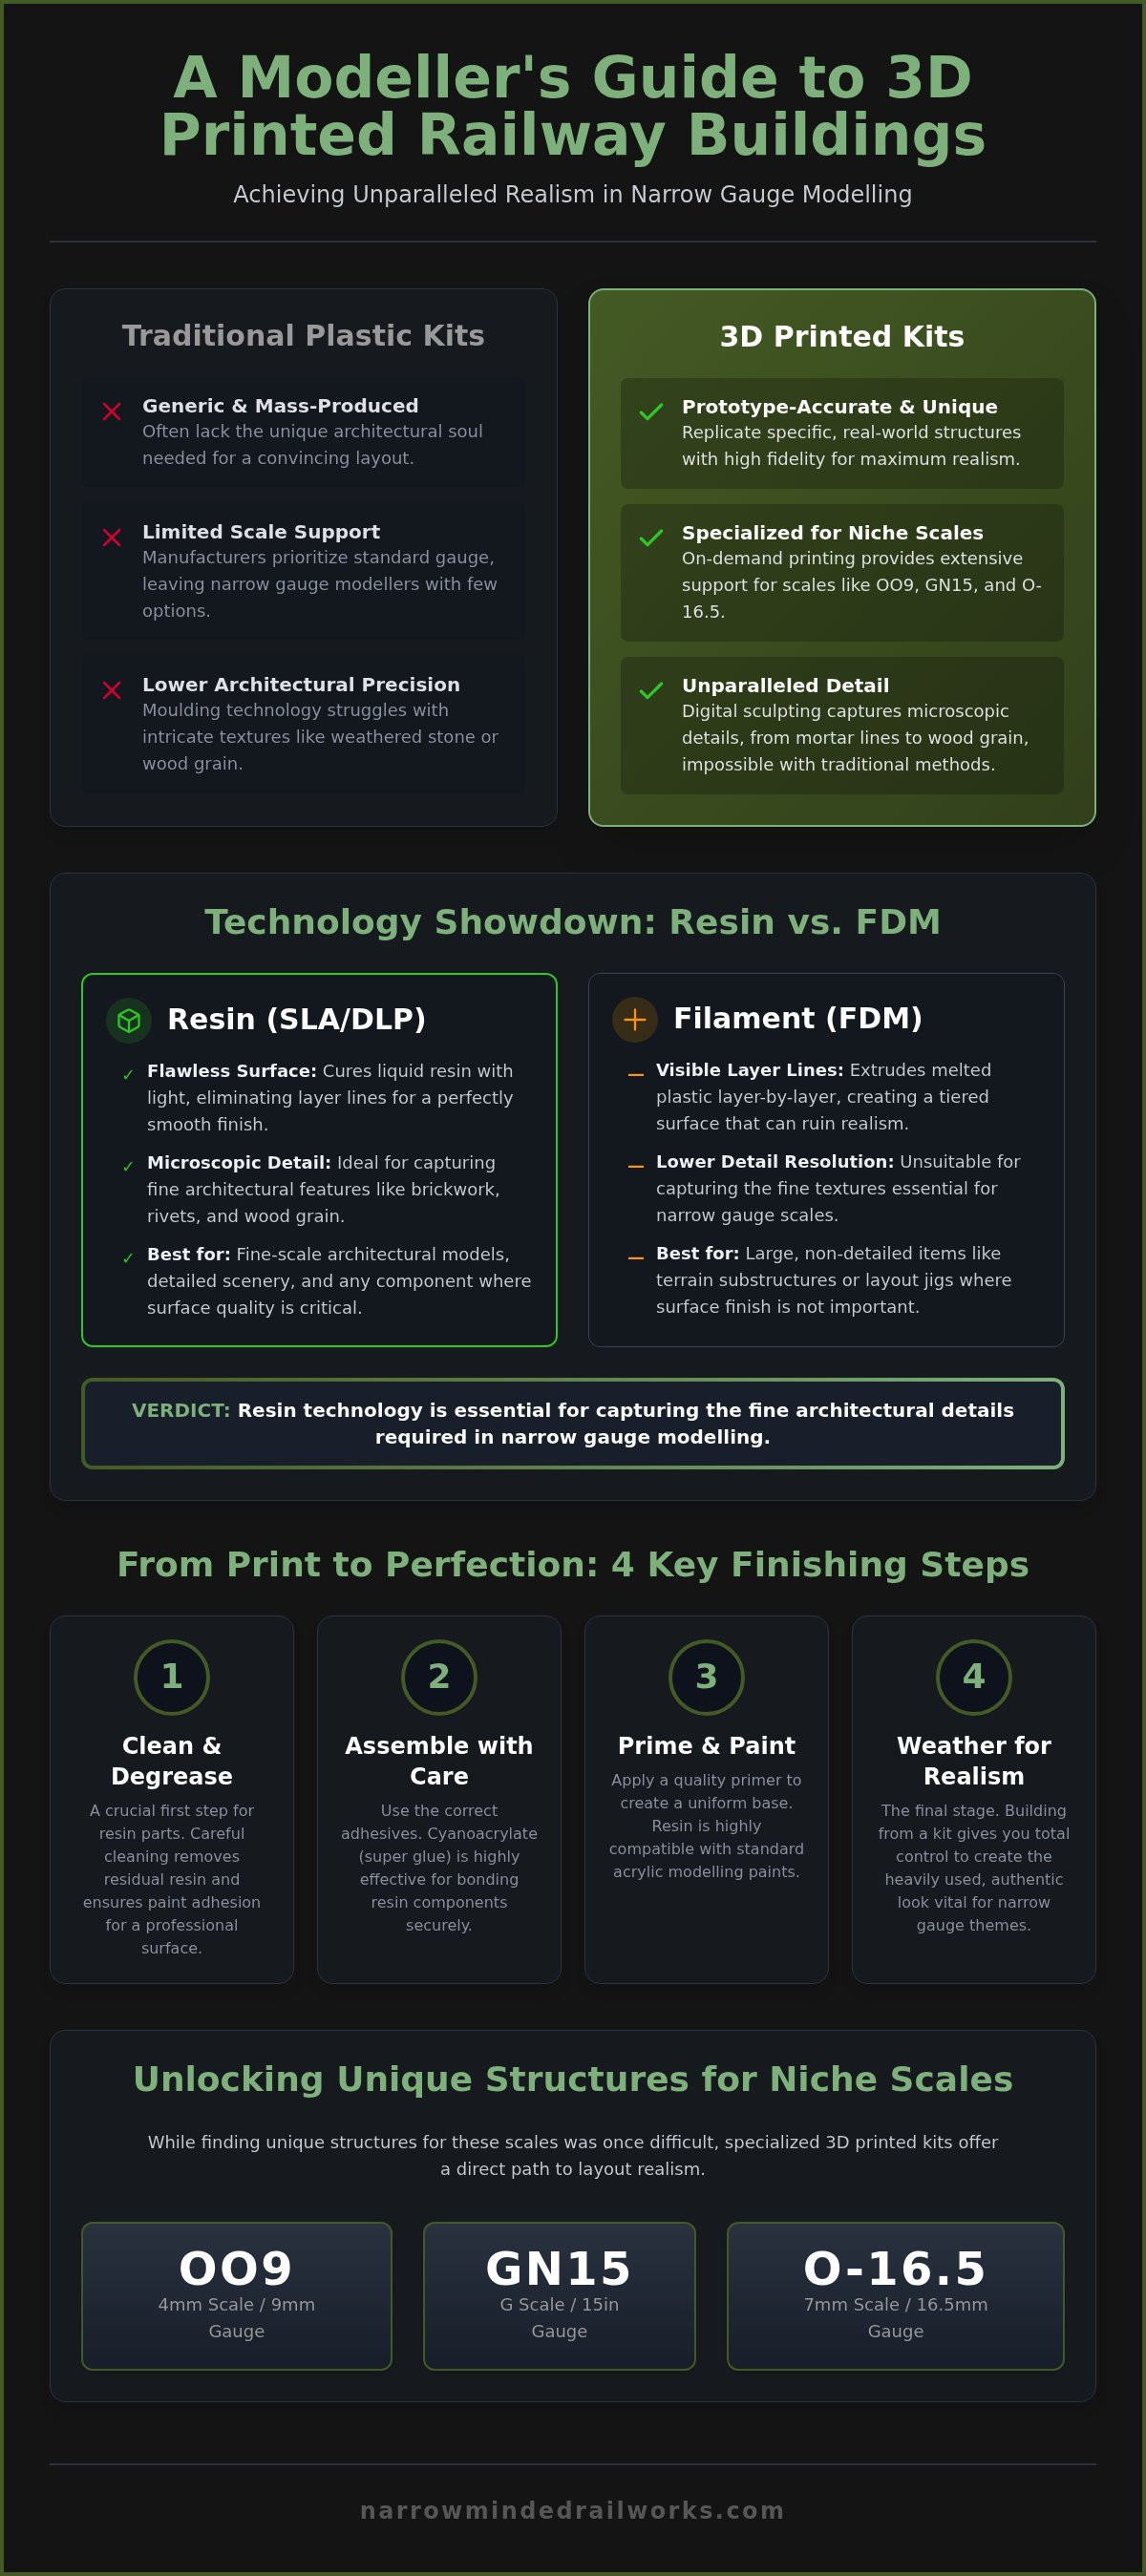
Selecting the appropriate material is the most critical decision in the production of 3d printed model railway buildings. While many home hobbyists start with Fused Deposition Modeling (FDM) due to its lower equipment costs, this method often fails to meet the exacting standards required for narrow gauge architecture. Resin printing, specifically Stereolithography (SLA) or Digital Light Processing (DLP), serves as the gold standard for enthusiasts who prioritize surface quality. While resin requires more specialized handling, the proactive solution is a structure that looks like a miniature building rather than a series of plastic tiers.
Why Resin Wins for Narrow Gauge
Narrow gauge modelling often involves tiny footprints and intricate textures. While larger scales can sometimes hide imperfections, an OO9 scale shed relies on microscopic mortar lines and realistic wood grain for its visual impact. Resin printing excels here because it uses a liquid photopolymer cured by light, which eliminates the distracting layer lines typical of filament based prints. This smooth finish is essential for vertical walls where even the slightest ripple can ruin the illusion of stone or brickwork. Additionally, resin is highly compatible with standard acrylic modelling paints and cyanoacrylate glues. If you are looking to enhance your layout with these high-detail structures, you can explore our range of GN15 locomotive and scenery kits to see the difference resin makes.
When to Use Filament (FDM)
While FDM is generally unsuitable for fine architectural kits, it remains a useful tool for specific layout elements. Large scale terrain features, such as bridge abutments or massive retaining walls, can be produced cost effectively using PLA or PETG filament. These materials are better suited for structural supports hidden beneath the layout surface where aesthetic detail is secondary to strength. However, in 7mm scales and smaller, the nozzle diameter of an FDM printer creates a stair-step effect on curved or angled surfaces. This constraint makes filament a poor choice for the visible windows, doors, and fine trim found on narrow gauge buildings.
Durability is a common concern among modellers, yet modern resins are designed for longevity. While early 3D printing materials were sometimes brittle, contemporary engineering grade resins offer the toughness needed for handling and assembly. We prioritize high-resolution resin for all our building kits because it ensures that the unique architectural character of narrow gauge prototypes is preserved for decades. This commitment to material quality allows you to focus on the creative aspects of painting and weathering without worrying about structural degradation. It's a professional approach that sets realistic expectations for the life of your layout scenery.
3D Printed Kits vs. Traditional Plastic Buildings
Traditional plastic kits are designed for the mass market, which often leaves narrow gauge modellers with structures that feel too generic. While these kits are accessible, they rarely capture the unique architectural soul of a Welsh slate quarry or a remote industrial siding. Choosing 3d printed model railway buildings provides a proactive solution to this lack of variety. Unlike injection-moulded plastic, which requires expensive tooling and high production runs, 3D printing allows for the creation of buildings that never existed in traditional plastic form. This technology makes it possible to own scale-accurate structures that reflect the specific grit and character of narrow gauge history.
Prototype Accuracy and Niche Subjects
Narrow gauge railways are defined by their character, often featuring weathered stone, irregular timber, and industrial grit. Standard plastic kits tend to look too clean and are usually scaled for standard gauge layouts, making them look oversized or out of place on an OO9 or GN15 line. While we acknowledge the utility of basic kits, our focus remains on providing accurate architectural scenery that complements our locomotive and wagon ranges. This approach allows you to build a layout that feels historically consistent rather than a collection of mismatched parts. You'll find that 3D design can replicate specific stonework patterns and timber textures that injection moulding simply cannot achieve.
The Modeller's Experience
Working with resin is different from working with polystyrene, but it isn't necessarily more difficult. One primary advantage is the ease of assembly. Because 3D prints are built digitally, they often arrive in fewer parts than complex plastic kits, which reduces the time you spend on basic construction. However, you must adapt your toolkit. Traditional plastic cement won't work on resin; instead, you'll need cyanoacrylate (Superglue) to ensure a strong bond between components.
For those just starting their journey into niche scales, choosing the right components is essential. You might find our guide on Your First OO9 Loco Kit helpful for understanding how to balance locomotive choices with your architectural scenery. Customisation is another area where 3D kits excel. If a building doesn't quite fit your diorama, the resin can be easily sanded or kit-bashed with standard hobby tools. While the investment in a boutique 3D kit reflects the high level of detail provided, the result is a unique piece of scenery that justifies the cost through its unparalleled realism.
How to Prepare and Finish 3D Printed Building Kits
While resin kits arrive with high architectural detail, they often possess small support marks or "pips" that can mar the final aesthetic. The proactive solution is to adopt a methodical preparation routine that ensures your 3d printed model railway buildings look like authentic structures rather than plastic miniatures. While removing these marks takes patience, using fine-grit sanding sticks allows you to achieve a seamless finish without damaging the underlying brick or wood texture. This initial investment of time pays dividends once you begin the painting process.
Preparation and Cleaning
Although resin surfaces can feel clean to the touch, they frequently carry microscopic residue that prevents paint from adhering correctly. Washing your kit in warm, soapy water is the first step to ensuring a professional result. While you might be tempted to use standard plastic cement, you'll find it ineffective on these materials. Since resin does not react to solvent-based cements, cyanoacrylate (CA) glue is essential for creating strong resin-to-resin bonds. After washing, use a soft toothbrush to gently clear any debris from mortar lines or window frames, ensuring the surface is perfectly prepped for the next stage.
Painting for Realism
While applying color is the most rewarding stage, a poor-quality primer can cause the paint to flake or peel over time. Utilizing a high-quality surface primer provides the necessary "bite" for your acrylics and helps reveal any support marks you might have missed during sanding. Techniques like dry-brushing are particularly effective for highlighting the 3D textures of stone, weathered brick, or corrugated iron. If you want to master these finishes, our guide on Painting 3D Printed Models offers a deep dive into specific color palettes and application methods.
While weathering a building might feel like a risk, it's the only way to ensure your scenery matches the hard-working appearance of your narrow gauge locomotives. Applying thin washes of dark grey or brown can settle into the recessed details, instantly adding depth to the structure. You can find specialized diorama tools and scenery to help you achieve these realistic industrial effects. By layering these techniques, you transform a grey resin print into a convincing piece of railway history that anchors your layout's atmosphere.
Unique Narrow Gauge Buildings for Your Layout
Narrow gauge layouts often suffer from a lack of scale-accurate scenery because standard gauge buildings dominate the commercial market. While using oversized structures can ruin the perspective of a small-scale line, 3d printed model railway buildings offer a proactive solution by providing architecture specifically designed for OO9, GN15, and O-16.5 scales. These kits allow you to move beyond generic station designs and embrace the industrial grit of an engine shed or the practical necessity of a lineside weighbridge. Industrial architecture for narrow gauge lines often requires a more compact, rugged aesthetic than its standard gauge counterparts. Structures like slate dressing sheds or remote water towers must reflect the harsh environments they inhabit. By selecting buildings that match the specific era of your rolling stock, you create a cohesive world that feels lived-in and historically grounded.
Architecture for OO9 and GN15
Narrow gauge structures are frequently defined by their quirky, non-uniform appearance. While traditional manufacturing methods favor straight lines and right angles, 3D design can replicate the leaning walls and sagging roofs common in rural industrial settings. This "quirky" look is essential for capturing the rural charm of lineside huts and small station buildings. Although determining the right size for a new layout can be difficult, our GN15 scale guide helps you plan your layout's footprint to ensure every building fits perfectly. This planning stage is vital for matching your unique architecture to the specific requirements of your locomotive kits and ensuring the diorama feels balanced.
Detailing with Scenery Accessories
Integrating small details often makes the biggest impact on a viewer’s immersion. While a station building provides a focal point, accessories like vintage petrol pumps, phone boxes, and milk churns add the necessary layers of narrative to your scene. We also offer 3D scanned figures to bring life to your platforms, providing a sense of scale that static buildings alone cannot achieve. These figures and tools allow you to tell a story of a working railway, from the busy activity of a goods yard to the quiet isolation of a remote halt. If you're ready to enhance your diorama, you can browse our full range of 3D printed buildings and scenery kits here. Using these accessories alongside your main structures creates a rich, detailed environment that reflects the true character of narrow gauge railroading.
Transform Your Layout with Authentic Scenery
Standard plastic kits often lack the specific character required for a realistic narrow gauge setting. While mass-produced structures serve a general purpose, 3d printed model railway buildings offer a proactive solution for modellers seeking prototype accuracy. We've seen that high-resolution resin is the essential choice for capturing fine details, from weathered stonework to industrial textures. Although the preparation process differs from traditional plastic, following a structured routine of cleaning and priming ensures a professional finish that lasts. Integrating these unique structures allows you to tell a more compelling story on your OO9, GN15, or O-16.5 layout.
Our high-detail resin kits are designed by narrow gauge enthusiasts to ensure every stone and rivet is scale-accurate. We provide worldwide shipping from our UK workshop, making it easier than ever to access specialist scenery that complements your locomotive and wagon kits. Shop our unique 3D printed building and scenery kits to find the perfect addition for your next project. Your layout deserves architecture that reflects the true spirit of narrow gauge railroading, and we're here to help you achieve that professional look with ease.
Frequently Asked Questions
Do 3D printed buildings have visible layer lines?
High-resolution resin prints typically don't show visible layer lines to the naked eye. While older FDM technology often left distinct ridges on vertical surfaces, the liquid resin process we use creates a smooth finish suitable for architectural detail. If any minor lines are detected under harsh lighting, a light pass with a fine sanding stick usually resolves the issue. This ensures your 3d printed model railway buildings maintain a realistic appearance even in smaller scales like OO9.
What is the best glue for 3D printed resin buildings?
Cyanoacrylate, commonly known as superglue, is the best adhesive for assembling resin kits. Traditional plastic cement doesn't work on 3D printed materials because it relies on melting polystyrene to create a bond. We recommend using a medium-viscosity CA glue for most joints as it provides enough working time for alignment. For smaller details, a thin-grade glue allows for precise application without leaving unsightly residue on the building's surface.
Can I use standard acrylic paints on 3D printed kits?
Yes, you can use standard modelling acrylics on resin kits once the surface is properly prepared. While resin is non-porous, a high-quality primer provides the necessary surface tension for acrylic paints to adhere without peeling. We suggest using a dedicated plastic primer from a spray can or airbrush. This creates a stable foundation for the dry-brushing and washing techniques that bring out the intricate textures found in narrow gauge architecture.
Are 3D printed buildings durable enough for outdoor layouts?
Resin structures are durable but require specific protection if used on outdoor layouts. While the material is physically tough, standard resins can become brittle when exposed to prolonged sunlight and UV radiation. If you intend to use our kits outside, applying a UV-resistant clear coat is a proactive solution to prevent degradation. You should also ensure the building is mounted on a stable base to handle temperature-related expansion and contraction throughout the seasons.
How do I remove support marks from my 3D printed model?
Removing support marks is a straightforward process using a sharp scalpel and fine-grit sanding sticks. While most pips are located in inconspicuous areas, some may appear on visible walls. We suggest gently nipping the support away with side cutters before sanding the remaining nub flush with the surface. If a small pit remains, a tiny amount of modelling filler can be applied and sanded back to restore the original architectural texture.
Why should I choose a 3D printed kit over a ready-to-run building?
Choosing a kit allows for a level of personal customization that ready-to-run models simply can't offer. While pre-painted buildings are convenient, they often look generic and appear on many different layouts. A 3D printed kit serves as a canvas for your specific weathering and painting style. This approach ensures your 3d printed model railway buildings fit the exact industrial or rural atmosphere of your personal narrow gauge project.
What scales are available for Narrow Minded Railworks buildings?
Our range focuses specifically on the most popular narrow gauge scales, including OO9 (4mm), GN15, and O-16.5 (7mm). While we don't offer standard gauge models, our kits are designed to perfectly complement our existing locomotive and wagon ranges. This specialist focus ensures that every building, figure, and scenery accessory is scale-accurate. It helps you maintain a consistent visual perspective across your entire diorama or layout without searching for mismatched parts.
Do I need to wash my 3D printed kit before painting?
Washing your kit in warm, soapy water is a vital first step in the assembly process. Although the prints are cured, they can occasionally retain a thin film of residual resin or cleaning alcohol that interferes with paint adhesion. Using a soft toothbrush to gently scrub the surface ensures all architectural details are clear of debris. This simple preparation step sets realistic expectations for a professional, long-lasting finish on your finished scenery.