

The secret to a hyper-realistic finish isn't how much paint you apply, but how much you choose to remove. Many modellers hesitate when considering using oil paints for weathering trains because they fear a single mistake might ruin an expensive 3D-printed kit or a custom-built OO9 locomotive. While the slow drying time of oils can feel intimidating, it actually offers a unique "working window" that acrylics cannot replicate. This flexibility allows you to subtract and blend pigments until the grime looks exactly like the real thing.
You might worry that harsh solvents will damage your resin or plastic surfaces, yet selecting the right odorless mineral spirits provides a safe way to achieve professional results. This guide will help you master the art of oil weathering to transform your rolling stock into weathered masterpieces. We'll explore the best artist-quality pigments, explain which thinners are safe for your Narrow Minded Railworks kits, and provide a step by step approach to creating organic, layered effects that stand the test of time.
Key Takeaways
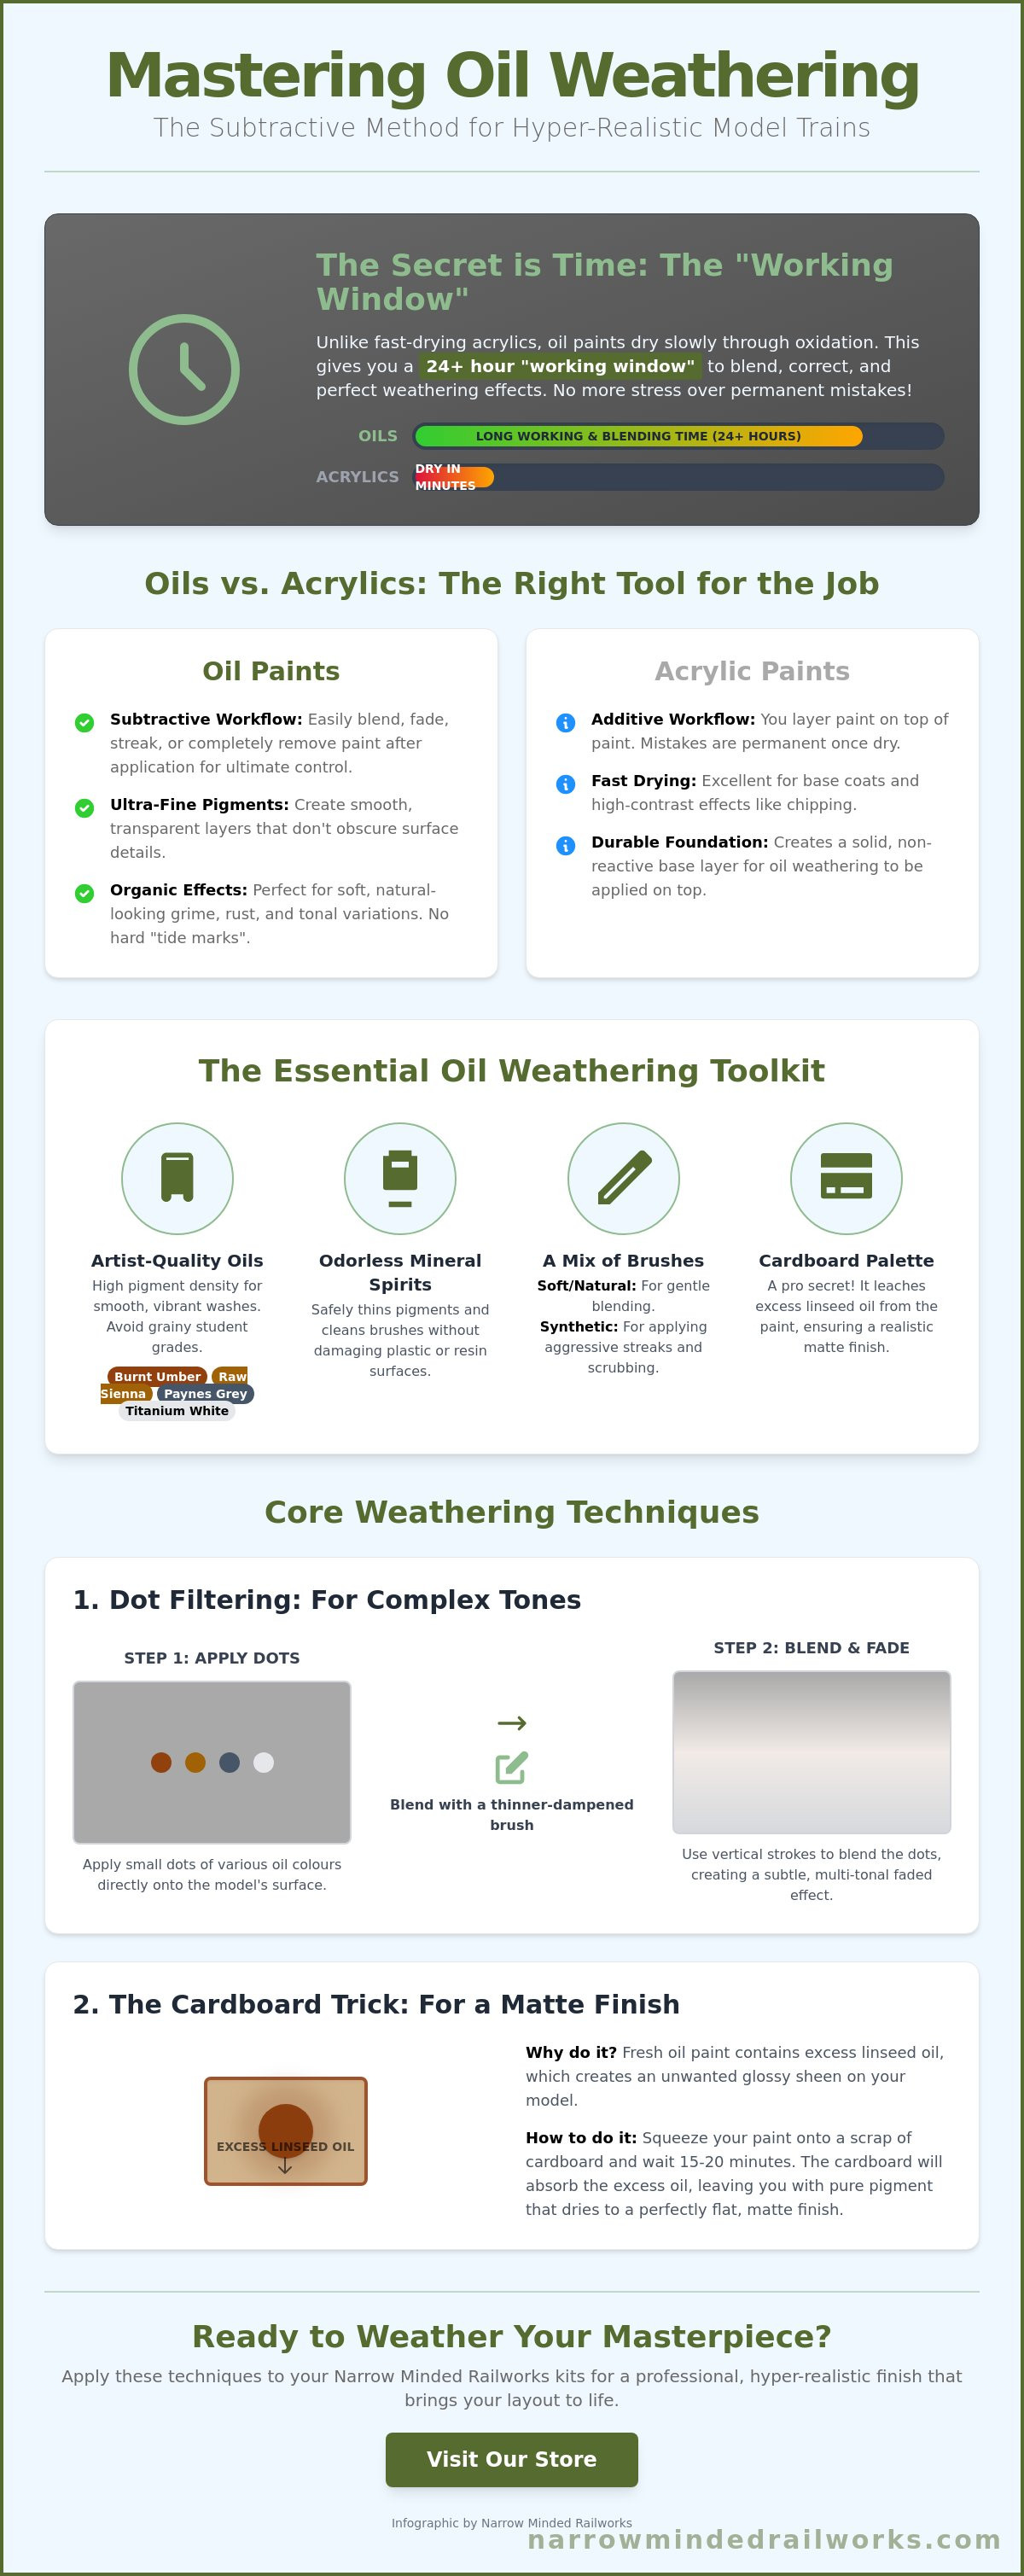
- Learn how the extended "working window" of oil paints enables a subtractive weathering process that is far more forgiving than traditional acrylics.
- Identify the specific artist-quality pigments and solvents necessary when using oil paints for weathering trains to avoid damaging your plastic or resin surfaces.
- Master the "Dot Filtering" technique to add complex, multi-tonal fading and grime to locomotive boilers and wagon sides.
- Discover how to use the "cardboard trick" to manage oil drying times and distinguish between touch-dry and fully cured finishes.
- Apply safe weathering practices specifically tailored for 3D-printed resin kits to ensure your narrow-gauge locomotives achieve a realistic, professional appearance.
Why Oil Paints are the Secret to Realistic Model Weathering
Most modellers start with acrylics because they're familiar and dry quickly. However, this speed is often a disadvantage when attempting to replicate the complex patterns of rust and soot found on real-world locomotives. While acrylics are an additive medium where you layer paint on top of paint, using oil paints for weathering trains introduces a subtractive workflow. You apply the pigment, then use a brush dampened with thinner to blend, move, or remove it entirely. This approach prevents the unsightly "tide marks" or hard edges that often ruin a delicate finish on a scale model. Because the pigments are ground much finer than those in student-grade products, the resulting finish is smooth and transparent, allowing the underlying details of your locomotive to show through.
To better understand this concept, watch this helpful video showing the fluid nature of these pigments in action:
The Science of the Working Window
Unlike water-based paints that set in minutes, oil paints dry through oxidation. The linseed oil binder reacts slowly with oxygen, providing a "working window" that typically lasts 24 hours or more. This duration is a modeller’s best friend. When using oil paints for weathering trains, you have the luxury of time. If a streak of rust looks too heavy or a layer of grime appears unnatural, you don't have to strip the whole model. You simply take a clean brush, dip it in a safe thinner, and wipe the mistake away. This flexibility significantly reduces the stress associated with detailing expensive Narrow Minded Railworks kits, as you're never locked into a decision until the paint fully cures.
Acrylics vs. Oils: Knowing When to Use Which
Choosing between these mediums isn't about picking a favorite; it's about understanding their specific roles. Acrylics are excellent for base coats and creating sharp, high-contrast chipping effects because they won't react with subsequent layers. Once your base is set and sealed, oils act as a "filter" layer that harmonizes the different colours and softens harsh transitions. We recommend establishing a durable foundation first, as detailed in our guide to painting 3d printed models. By combining the speed of acrylics with the organic blending of oils, you achieve a level of depth and realism that a single medium simply cannot provide. This multi-layered approach is the standard for professional-grade weathering.
The Modeller’s Oil Weathering Toolkit
Achieving a professional finish requires more than just technique; it demands the right set of tools. While it's tempting to repurpose budget materials, student-grade oils often contain coarse pigments that appear grainy on a small model. Professional artist oils provide a significantly higher pigment density. This is crucial when using oil paints for weathering trains because you need the paint to remain vibrant and smooth even when you thin it into a delicate wash. As noted in the NMRA's guide to weathering, selecting high-quality materials is the first step toward achieving a realistic scale finish that mimics the heavy wear of industrial railways.
Your core palette should focus on four essential colours. Burnt Umber is perfect for deep rust and grease, while Raw Sienna replicates the light dust found on lower chassis components. Paynes Grey serves as an ideal base for soot and coal grime, and Titanium White is indispensable for creating sun-bleached fading on locomotive roofs. To manage these pigments effectively, you'll need a mix of brushes. Soft natural hair brushes are best for gentle blending, whereas cheaper synthetic brushes are better suited for applying aggressive streaks or scrubbing grime into tight corners.
One professional secret involves the use of plain cardboard as a palette. While plastic palettes are common, squeezing your oil paint onto a scrap piece of cardboard for twenty minutes leaches out excess linseed oil. This simple step ensures your weathering dries with a realistic matte finish rather than an unwanted oily sheen. If you're currently preparing a new project, our OO9 locomotive kits offer the fine surface detail necessary to make these pigments truly stand out.
Choosing Your Oil Paint Brands
Quality varies significantly between manufacturers. The Winsor & Newton Artist series is a gold standard for consistency and pigment fineness. Alternatively, Abteilung 502 offers a range specifically formulated for the scale modelling hobby, featuring colours that match common railway tones. While water-mixable oils exist, they don't offer the same blending "slip" as traditional oils. For the most organic results, stick to traditional artist pigments paired with high-quality solvents.
Solvents and Thinners Safety Guide
Safety and material compatibility are vital when detailing 3D-printed models. While hardware store white spirits are affordable, they are often too aggressive and can cause resin to become brittle or crack. Using high-quality Odorless Mineral Spirits (OMS) provides a safer alternative that is gentle on plastic and much more pleasant for indoor use. Before you begin, always test your thinner on a piece of spare support material or a hidden area of the chassis to ensure there is no adverse reaction with the resin or base coat.
Core Oil Weathering Techniques: A Step-by-Step Guide
Before you open a tube of paint, your model requires a protective barrier. A matte surface is porous and will "grab" oil pigments, making them nearly impossible to blend or remove once they touch the plastic. While this constraint can lead to permanent staining, applying a satin or gloss varnish first provides a smooth surface for easy blending. This layer allows the thinner to glide across the model, which is the foundation of successful results when using oil paints for weathering trains. By preparing the surface correctly, you ensure the paint sits on top of the varnish rather than soaking into the base coat.
Mastering the Dot Filter Technique
This method replicates the sun-bleached appearance of narrow gauge locomotives that spend years working outdoors. It adds visual interest to large, flat areas like boiler jackets or cab sides.
- Step 1: Apply tiny dots of various oil colours, such as Titanium White for fading, Raw Sienna for dust, and even subtle blues for shadows, randomly across the surface.
- Step 2: Dampen a flat brush with Odorless Mineral Spirits (OMS). The brush must be moist rather than dripping wet to maintain control.
- Step 3: Use vertical strokes to blend the dots away until only a translucent colour shift remains. This creates a complex, multi-tonal finish that looks far more realistic than a single flat shade.
Pin Washes and Capillary Action
A pin wash targets specific details like rivets, hinges, and panel lines on your Narrow Minded Railworks wagon kits. To achieve this, mix your oil paint with thinner at a ratio of roughly 10% paint to 90% thinner. When you touch the tip of a fine brush to a rivet, the wash will pull itself around the detail through capillary action. While applying a wash can occasionally lead to overspill, waiting several minutes and wiping the excess with a clean, dry brush offers a quick correction. This technique provides deep shadows that make small-scale details "pop" without darkening the entire model.
Simulating Rust and Grime Streaks
Real locomotives are subject to the elements, and rain often carries rust and soot down the bodywork. To replicate this, place a tiny dot of Burnt Sienna at a logical source point, such as a metal bracket or window frame. Using a flat brush dampened with thinner, drag the pigment downward in a single, confident motion to simulate the pull of gravity. You should then feather the edges of the streak with a clean brush to ensure the transition looks soft and natural. This subtractive process allows you to refine the streak until it looks like a genuine weather-beaten mark rather than a painted line.
Managing Drying Times and Varnish Protection
While the extended working window of oils is a significant benefit, it introduces the specific constraint of vulnerability during the drying phase. When using oil paints for weathering trains, you must distinguish between the paint being "touch dry" and "fully cured." Most artist-quality oils require at least 48 hours to cure completely, depending on the layer thickness and ambient humidity. Handling the model too early can result in permanent fingerprints or smudges that are difficult to repair without stripping the entire layer. While this waiting period requires patience, planning your workflow in batches allows you to progress on other projects while your locomotives set in a dust-free environment.
Mastering the timeline of using oil paints for weathering trains allows you to plan your builds more efficiently. While the slow oxidation process can't be entirely bypassed, certain techniques provide a proactive solution to manage the oily sheen and set times. By understanding how the carrier oil interacts with the surface, you can ensure your weathering remains exactly where you placed it, preserving the delicate streaks and fades you worked hard to create.
The Role of Cardboard in Weathering
A simple piece of scrap cardboard is one of the most effective tools for controlling oil paint behavior. By squeezing your pigment onto cardboard for roughly 20 minutes before use, you leach out the excess linseed oil. This process serves a dual purpose. First, it makes the paint significantly more matte, which is essential for replicating dry soot or sun-bleached paint. Second, it makes the paint thicker and easier to control for vertical streaking. Because the cardboard absorbs the carrier oil, the remaining pigment is far less likely to "run" or bleed uncontrollably on your OO9 locomotive and wagon kits.
Final Finishing and Protection
Once the oils are fully cured, you must seal the work to prevent the delicate layers from rubbing off during layout operations. A final coat of matt varnish is necessary for achieving the "dead flat" look common on hard-working narrow gauge locomotives. However, applying a heavy wet coat of varnish can reactivate the oils and cause the colours to bleed together. While this risk exists, applying several light, misty coats of a high-quality matt varnish like Testors Dullcote or an acrylic alternative provides a safe solution. This builds a durable barrier without disturbing the underlying weathering effects.
Proper protection ensures your weathered masterpiece remains intact for years of exhibition use. If you're looking for a new project to test these techniques, explore our range of GN15 and O-16.5 scale kits to find your next challenge. By balancing drying times with professional-grade protective coatings, you transform a temporary paint effect into a permanent part of your model's history.
Weathering Your Narrow Minded Railworks Kits
Weathering a 3D-printed resin model requires a specific understanding of the material's properties. While our resin is durable, any uncured residue could potentially react with aggressive solvents. You must ensure your kit is fully washed, cured, and primed before using oil paints for weathering trains. This preparation is especially important for OO9 locomotive kits, where the fine surface detail captures washes beautifully but can be sensitive to pooling if not managed correctly. By applying a thin, protective varnish layer first, you create a safe environment to experiment with heavy industrial grime and oil stains without risking the integrity of the underlying kit.
Accentuating 3D-Printed Detail
3D-printed models often feature crisp, recessed details that are difficult to replicate in traditional injection-moulded plastic. While these details are a significant strength, they can sometimes highlight minor support marks or very fine print lines in certain lighting. A dark oil wash settles into these crevices, effectively hiding print artifacts while adding structural depth. This technique is particularly effective when using oil paints for weathering trains in our GN15 scale range. Industrial models in this scale benefit from a hard-worked, greasy aesthetic that is more prototypical than a factory-fresh finish. You can use a concentrated mix of Paynes Grey and Burnt Umber to create the look of leaked lubricants around axle boxes and gear assemblies, which naturally draws the eye toward the engineering detail of the model.
- Apply a thin wash of Burnt Umber around rivet heads to create a "halo" of rust.
- Use a nearly dry brush to apply streaks of soot on the roof of industrial diesel locomotives.
- Focus on the lower chassis with Raw Sienna to replicate the build-up of dried mud and track dirt.
The Final Reveal: Bringing Your Kit to Life
The final step of the weathering process is where the model truly transforms. While a raw kit looks like a collection of resin parts, the application of oils turns it into a convincing miniature machine with a history of its own. Seeing the light catch a weathered boiler or a dusty wagon side provides a deep sense of satisfaction that mass-produced models often lack. While the process requires patience, the result is a unique piece of rolling stock that reflects your personal modelling style. We encourage you to share your finished masterpieces with the Narrow Minded Railworks community. Your unique approach to weathering not only improves your own fleet but also inspires other modellers to explore the creative possibilities of narrow gauge kit building.
Elevate Your Next Narrow Gauge Build
Mastering the nuances of oil pigments provides a professional alternative to the limitations of fast-drying acrylics. While the curing process requires patience, it offers the unique ability to blend and refine your finish until every rust streak and soot stain looks authentic. By using oil paints for weathering trains, you move beyond basic painting and start telling a story of hard work and industrial history on your layout. Whether you are detailing a boiler or adding grime to a wagon chassis, these techniques ensure your models stand out with a depth that is difficult to achieve otherwise.
If you are ready to put these skills into practice, we provide a variety of specialist OO9 and GN15 designs that serve as the perfect canvas for your artistry. Our high-detail 3D resin prints are designed specifically for the discerning narrow gauge modeller. Browse our range of 3D-printed narrow gauge kits and start your weathering project today! We offer worldwide shipping to support modellers across the globe. Take the next step in your hobby and transform a simple kit into a weathered masterpiece that you can be proud to showcase.
Frequently Asked Questions
Will oil paint thinners damage my plastic or 3D-printed model?
High-quality Odorless Mineral Spirits (OMS) are generally safe, but industrial-grade white spirits can cause plastic or resin to become brittle. Always test a small amount on a hidden area or a piece of support material first. While some solvents are aggressive, choosing a dedicated hobby thinner or a high-grade artist solvent provides a proactive solution to protect your Narrow Minded Railworks kits from structural damage.
How long do oil paints take to dry on a model train?
Oil paints typically become touch-dry within 24 hours, but they require 48 to 72 hours to cure fully. This long duration is due to the oxidation process of the linseed oil binder. While this wait can be frustrating, it allows for extensive blending and adjustments that aren't possible with other mediums. Ensure the model is kept in a dust-free environment until the surface is no longer tacky.
Do I need to prime my model before using oil paints for weathering?
Yes, you must always apply a primer and a base coat before using oil paints for weathering trains. Bare resin or plastic is too porous and will absorb the oil pigments, causing permanent staining and preventing you from blending the paint. A solid acrylic foundation acts as a barrier, ensuring that the oil layers sit on the surface where they can be manipulated or removed as needed.
Can I use cheap artist oils from a craft store?
You should avoid "student-grade" or budget oils because they contain larger pigment particles and more filler. These coarse pigments look grainy on a small-scale locomotive and don't thin well for washes. While professional artist oils are more expensive, they offer a much higher pigment density. This allows you to create smooth, transparent filters that look realistic on a highly detailed 3D-printed model.
What is dot filtering and why is it used in model railroading?
Dot filtering is a technique used to create subtle, multi-tonal variations in a locomotive's paintwork. By applying tiny dots of different oil colours and blending them with a damp brush, you simulate the natural fading caused by sun and rain. This process breaks up the "flat" look of a single factory colour, adding a layer of visual complexity that makes the model appear like a real, weather-beaten machine.
How do I fix a mistake if I apply too much oil paint?
You can easily remove excess oil paint using a clean brush dampened with Odorless Mineral Spirits. Because oils dry slowly, you have a large window to "undo" any heavy streaks or dark washes without damaging the underlying paint. Simply wipe the area gently until the mistake disappears. This subtractive nature makes using oil paints for weathering trains one of the most forgiving techniques for beginners and experts alike.
Should I use a gloss or matt varnish before weathering with oils?
A satin or gloss varnish is the best choice for the initial weathering stage. These smooth surfaces allow oil washes to flow into crevices via capillary action and make it easier to blend pigments without staining the base coat. While a matt varnish is necessary for the final finish, using it before you start weathering will "grab" the oil paint and make it very difficult to move or remove.
Can I mix oil paints with acrylics?
No, you cannot mix oil paints directly with acrylics because they use different binders that don't bond together. While they don't mix in the palette, they work perfectly when layered. You should apply your acrylic base coats first, let them dry completely, and then apply the oils on top. This layered approach utilizes the strengths of both mediums to create a durable and realistic finish on your kits.