

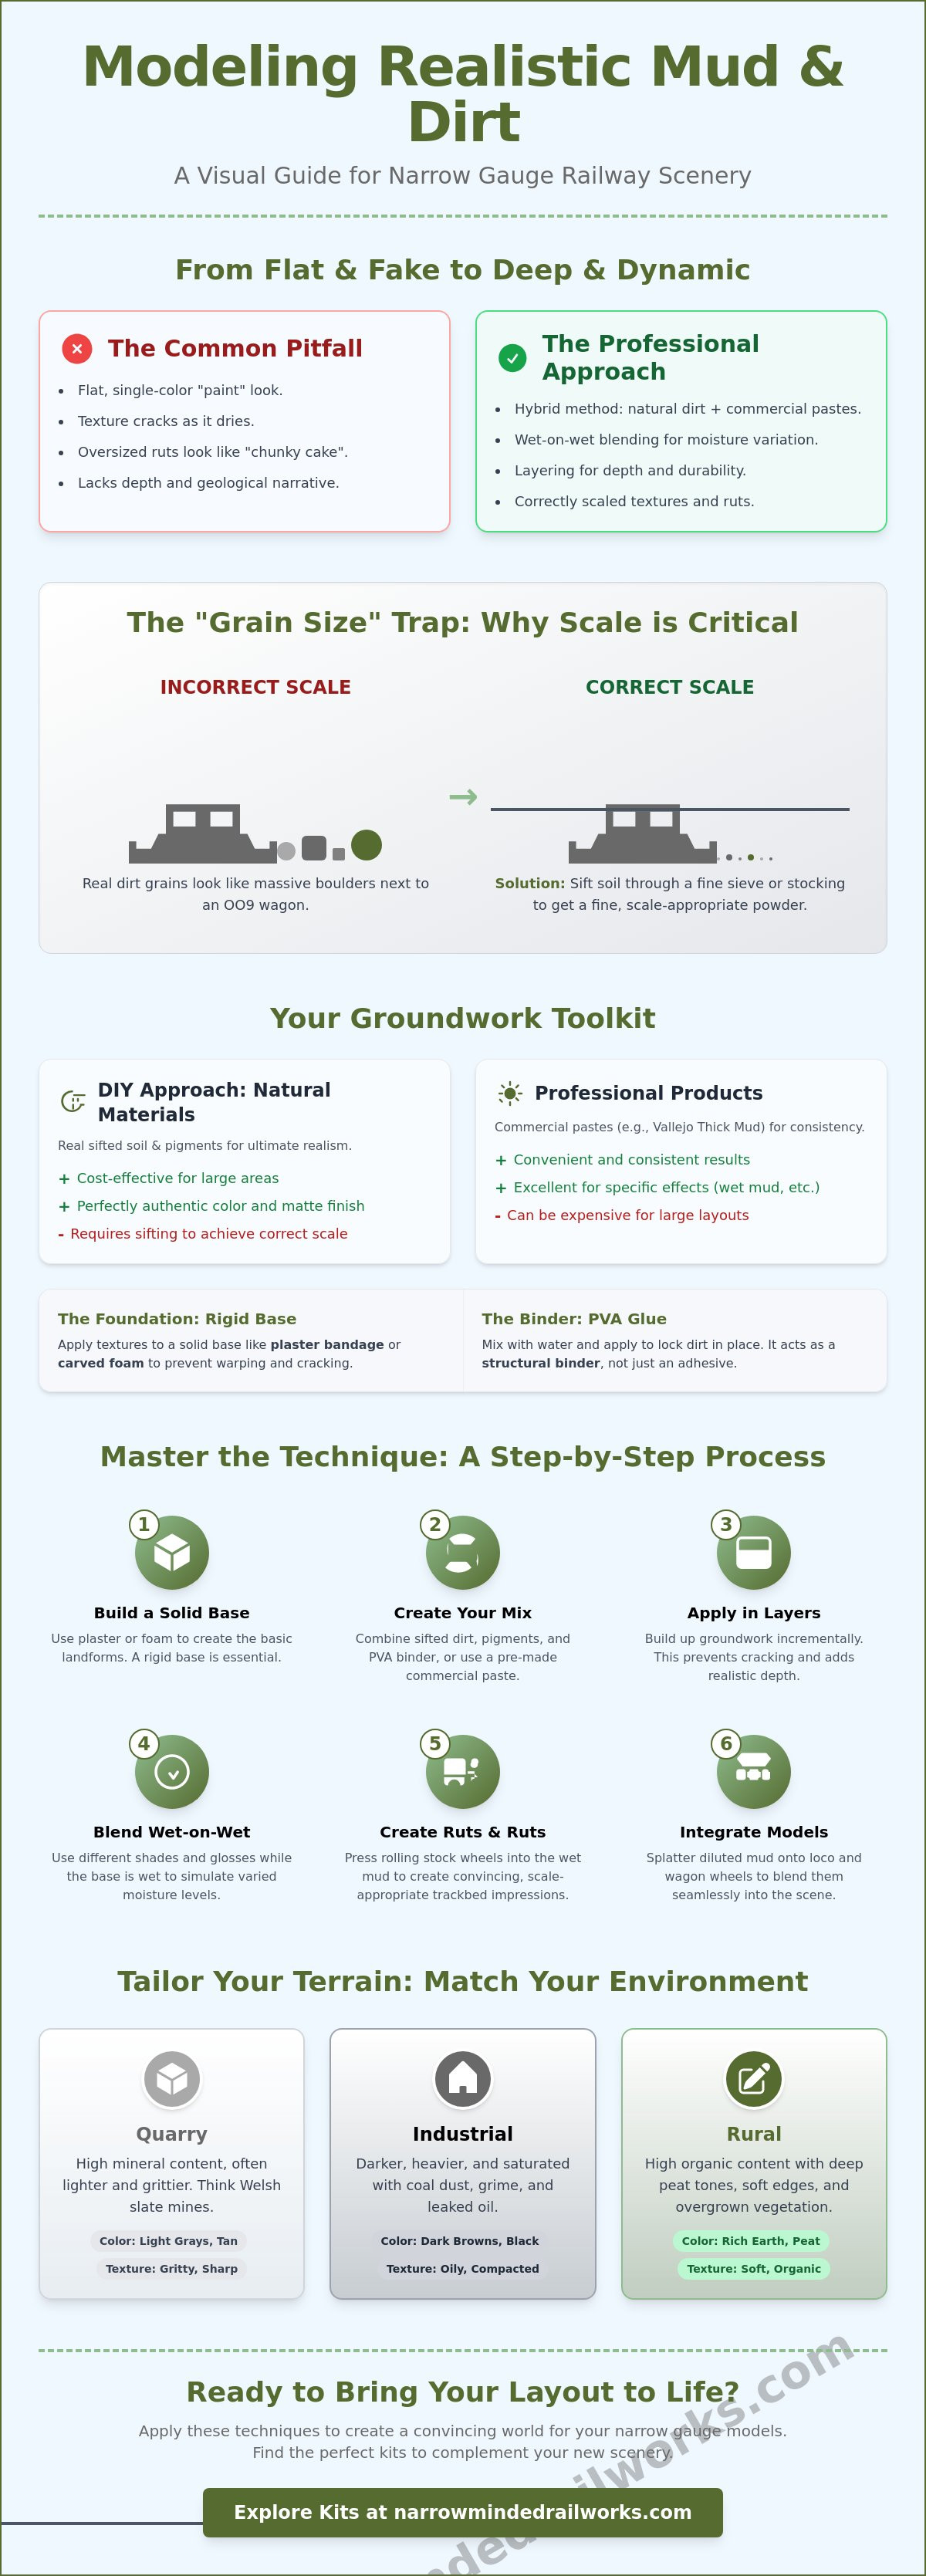
If your layout scenery looks like a layer of flat brown paint, you haven't failed at art; you've simply missed the geological story of your narrow gauge line. Learning how to model realistic mud and dirt requires moving beyond basic pigments to understand how moisture and scale interact in a 1:76 or 1:43 environment. You likely know the frustration of watching a carefully applied texture crack as it dries or seeing ruts that look more like chunky chocolate cake than an industrial peat bog.
While achieving perfect scale texture is difficult with standard household materials, utilizing a hybrid approach of specialized products and refined DIY methods provides a professional solution. You will learn exactly how to achieve a distinct wet versus dry look, create scale-appropriate ruts, and use products like Vallejo European Thick Mud to blend your narrow gauge locomotive and wagon kits seamlessly into the scenery. This guide ensures you can master the art of creating lifelike ground textures that bring industrial and rural narrow gauge scenes to life.
Key Takeaways
- Recognize why narrow gauge lines demand more textured groundwork than standard gauge layouts to create a convincing industrial narrative.
- Discover how to model realistic mud and dirt by combining natural sifted materials with specialized commercial pastes for depth and durability.
- While dry pigments often lack volume, implementing wet-on-wet blending techniques allows you to simulate varied moisture levels and realistic ruts.
- Adapt your weathering palette to your specific region, whether you are replicating Welsh slate quarries or North American timber lines.
- Learn the precise steps to integrate your finished OO9 or O-16.5 kits into the scenery for a cohesive, weathered appearance.
The Role of Mud and Dirt in Narrow Gauge Modelling
Standard gauge mainlines often prioritize clean ballast and manicured embankments, yet a narrow gauge railway typically exists where the earth is most unforgiving. These lines were frequently built for temporary industrial use, meaning they lack the drainage and infrastructure of their larger counterparts. This inherent messiness isn't a flaw; it's a vital storytelling tool. When you master how to model realistic mud and dirt, you move beyond simple decoration and begin to establish a sense of history and weight for your rolling stock. A locomotive that looks heavy because it's slightly "sunk" into a soft trackbed creates a psychological impact that flat, clean scenery cannot match.
Achieving a convincing finish can be difficult when materials dry flat or crack, but understanding diorama construction allows you to build depth through specific layering techniques. Realistic mud isn't just a single shade of brown. It's a complex interaction of texture, light reflection, and scale. By varying the moisture levels across your scene, you suggest a narrative of recent rainfall or decades of industrial neglect. This groundwork serves as the stage for your models, grounding them in a tangible, believable world.
To better understand this concept, watch this helpful video:
Identifying Your Environment: Quarry, Industrial, or Rural
While many modelers reach for a generic brown paint, different environments demand unique geological profiles. Quarry mud is often high in mineral content, resulting in lighter, grittier textures like those found in North Wales slate mines. Industrial grime is darker and "heavier," often saturated with coal dust or leaked oil from stationary machinery. In contrast, rural pathways should feature high organic matter with deep peat tones and soft, overgrown edges. Matching your dirt to your layout's industry ensures the scenery feels earned rather than applied.
The Science of Scale: Why Fine Texture is Critical
The "grain size" trap is the most common pitfall in 4mm and 7mm modelling. Real dirt often looks like massive boulders when placed next to an OO9 wagon. While natural materials offer the best color, they must be processed. Sifting real soil through a fine nylon stocking or a dedicated laboratory sieve solves the scale issue by removing over-sized particles. This creates a fine powder that retains its natural matte finish. Remember that texture intensity should decrease as your viewing distance increases; what looks like a rut in person should look like a subtle shadow from three feet away.
Essential Ingredients: From Backyard Dirt to Professional Pastes
Choosing the right materials is the first hurdle in learning how to model realistic mud and dirt. You might feel pressured to buy expensive pre-mixed imports for every square inch of your layout, but a combination of natural elements and professional binders often yields the best results. While commercial pastes offer convenience and consistency, they can be cost-prohibitive for large layouts; a homebrew mix provides a scalable alternative without sacrificing quality. Before applying any texture, you must establish a rigid base. Applying wet mixtures to unsupported cardboard or thin foam leads to warping and structural failure. A solid foundation of plaster bandage or carved high-density foam provides the necessary resistance for heavy weathering applications.
PVA glue remains a staple for ground stability in narrow gauge modelling. It's not just an adhesive; it acts as a structural binder that prevents your dirt from flaking off during layout transport. For those seeking a professional finish, this diorama groundwork tutorial from IPMS Stockholm highlights how building up layers incrementally prevents the cracking common in thick, single-stage applications. Using pigments versus acrylics also changes the final narrative. Pigments offer a dusty, matte finish perfect for dry summer tracks, while acrylics provide the "body" and color depth needed for saturated sludge. Mixing the two creates a variegated surface that looks organic and lived-in. If you're currently assembling one of our O-16.5 or OO9 kits, having a range of these materials on hand allows you to match the vehicle's weathering to the specific trackside environment.
The Professional Homebrew: A Step-by-Step Mix
Creating a reliable "mud goop" requires three main components. Start with a base of sifted garden soil (sterilized in an oven to kill organic hitchhikers) or fine tile grout for a consistent grain. Add a binder of matte medium or PVA glue to ensure permanent adhesion to your baseboard. Finally, introduce Burnt Umber or Raw Sienna acrylics to adjust the tonal depth. Mix these until you reach a "peanut butter" consistency that holds its shape when peaked with a palette knife.
Advanced Texturing Agents and Additives
To elevate your groundwork, consider adding specialized additives. Mixing short 2mm static grass fibers directly into your mud mix simulates "root-bound" earth found on rural embankments. For areas of high moisture, a few drops of gloss varnish or "Still Water" resin create the appearance of fresh puddles in ruts. If your scene depicts a parched industrial yard, mixing plaster or Polyfilla into your dirt allows you to scribe fine cracks into the surface once it's partially dry, replicating baked earth.
Mastering Application: Techniques for Realistic Groundwork
Applying scenery to a narrow gauge layout presents unique challenges, as the uneven terrain often makes traditional flat-surface techniques ineffective. While many modelers rely on plaster bandages for speed, carved high-density foam offers superior durability when you need to sculpt deep, water-logged ruts. Before you begin the messy process of learning how to model realistic mud and dirt, you must protect your rails. Masking tape is a standard solution, but it can leave residue; applying a thin layer of petroleum jelly to the rail heads is a proactive alternative that ensures easy cleanup after your textures have dried. Once your track is safe, focus on varying the thickness of your application. Real mud isn't a uniform sheet. It pools in depressions and thins out on ridges, so use a palette knife to build up material in low-lying areas while leaving high spots nearly bare.
Blending different soil tones is best achieved through a wet-on-wet approach. Instead of waiting for one color to dry, apply your dark, saturated "wet" tones directly into your lighter "dry" base while both are still tacky. This creates a soft, natural gradient that mimics how moisture wicks through real earth. If you find your groundwork looks too uniform, stipple the surface with a stiff-bristled brush to break up the light reflections. This technique is particularly effective for those using professional diorama tools and scenery to blend their trackwork into the surrounding environment.
Creating Depth: Layering Wet and Dry Textures
Start by applying dry, dusty tones as a base across high-traffic areas where feet and wheels have packed the earth tight. You can then stipple wet mud into the center of the tracks where drainage is typically at its poorest. To transition from muddy ruts to grassy verges, gradually thin your mud paste with water as you move toward the layout's edge. This allows the underlying green base or static grass to show through, suggesting a natural boundary where the industrial activity meets the rural landscape.
Detailing the Scene: Ruts, Footprints, and Puddles
Detailing requires a delicate touch to maintain scale accuracy. While it's tempting to use your fingers, utilizing an old wagon wheel from a spare OO9 or O-16.5 wagon kit allows you to press perfectly scaled ruts into the drying paste. For footprints, a small piece of square-profile styrene can simulate the heel of a boot when pressed at an angle. To create standing water, use the hole-and-fill method. Carve a small depression into your baseboard before applying your mud, then fill the resulting pit with gloss resin once the surrounding dirt is fully dry. This ensures the "water" sits within the terrain rather than on top of it.
Site-Specific Weathering: Tailoring Dirt to Your Layout
Narrow gauge modeling often requires a departure from generic brown earth. While a single jar of pre-mixed weathering paint might seem convenient, it often fails to capture the geological nuance of specific industrial environments. Utilizing site-specific textures provides a more cohesive narrative for your layout. For example, recreating the slate quarries of North Wales requires grey, sharp-edged debris rather than rounded soil. You can achieve this by sifting actual slate or using grey-toned tile grout to represent the harsh, mineral-heavy environment. In contrast, modeling the timber lines of North America demands a softer, needle-strewn forest floor. Mastering how to model realistic mud and dirt in these contexts means looking at the specific vegetation and mineral waste present at the prototype site.
Peat railways present a distinct challenge for the modeler. These tracks often look dark, spongy, and treacherous, requiring a mix of deep brown acrylics and high-volume texture pastes to simulate a water-logged bog. Even estate railways in GN15 scale benefit from this localized approach. These lines often run through manicured gardens where the mud is localized to the trackbed, contrasting sharply with the surrounding lawn. If you want to achieve this level of detail on your own layout, you can browse our selection of diorama tools and scenery to find the right materials for your specific region.
Industrial Sludge and Grime
Engine sheds and coal stages require a specialized "heavy" mud that reflects industrial neglect. While matte finishes are standard for dirt, engine oil leaks often create a distinct oily sheen in these areas. You can recreate this by mixing a small amount of gloss varnish into a dark brown or black wash. Adding real coal fines into your mud paste provides a gritty, soot-stained appearance that suggests years of steam-era activity. When applying these textures, ensure you weather the sleepers to look "half-buried." Narrow gauge track is rarely pristine; the earth often creeps over the edges of the wood, grounding the trackwork into the environment.
Rural Pathways and Overgrown Sidings
In damp, rural areas, mud often takes on a "green" tint due to algae and moss growth. While fresh mud is often purely brown, damp areas eventually develop an organic green tint. Dry-brushing olive tones over your ruts provides a realistic simulation of moss and algae growth. To model nature reclaiming the line, trap short strands of "dead" beige static grass within your drying paste. This suggests vegetation that has been crushed by passing wheels or buried by seasonal runoff. Using static grass around the edges of these ruts further reinforces the transition from a used pathway to an abandoned siding. Understanding how to model realistic mud and dirt in these overgrown spaces is the key to creating a layout that feels truly alive.
Finishing Your Narrow Minded Railworks Kits with Realistic Grime
You've mastered the trackside terrain, but a pristine locomotive sitting on a water-logged peat bog breaks the visual illusion of your layout. Achieving a seamless transition between your groundwork and your rolling stock is the final, vital step in learning how to model realistic mud and dirt. While 3D printed resin provides exceptional detail, its smooth, non-porous surface can struggle to hold heavy weathering products. To solve this, you must follow a structured approach to painting 3D printed models before applying any grime. A high-quality matte primer creates the necessary "tooth" that allows powders and pastes to adhere without sliding off the model's surface.
Once your base coats are secure, you can utilize the splatter technique to simulate movement through wet terrain. Load a stiff-bristled toothbrush with a highly thinned mud paste, then flick the bristles against a toothpick to create a random, scale-appropriate spray on the lower bodywork. Protecting this work requires a specific choice of varnish. While a matte varnish is ideal for dried, dusty earth, a satin varnish better suggests the tacky, semi-reflective state of fresh mud. Applying these varnishes selectively allows you to tell a complex story of a vehicle that has traveled through both parched yards and damp valleys.
Weathering 3D Printed Resin Surfaces
Resin surfaces lack the natural texture found in wood or cast metal, which can make mud applications look "painted on" rather than accumulated. Although this smoothness is a constraint, you can overcome it by using dark washes to highlight the intricate "nooks and crannies" found on OO9 locomotive kits. Dry-brushing high-relief details like rivets and hinges with a lighter dirt tone creates a three-dimensional effect that mimics real-world buildup. This layering ensures the fine details of the print aren't lost under a single, thick coat of weathering.
Integrating Locomotives into the Environment
The most common mistake in weathering is a color mismatch between the vehicle and the trackbed. To avoid this, ensure the "mud on the wheels" utilizes the exact same pigment or paste used on the ground. Focusing your efforts on the underframe is essential, as this is where the heaviest dirt naturally accumulates during operation. Finish the scene by applying a light dusting of weathering powders across the lower panels of your wagons. This creates a subtle transition that grounds the model into the environment, proving that mastering how to model realistic mud and dirt is as much about the vehicle as it is the terrain.
Elevating Your Narrow Gauge Groundwork
Groundwork serves as the foundation of your layout's story. You've learned that geological accuracy, from the grey debris of a slate quarry to the oily sludge of an engine shed, creates a sense of place. Mastering how to model realistic mud and dirt transforms your scenery from a flat backdrop into a tangible, industrial world where every rut and footprint has a purpose. By matching the moisture levels and textures to your specific region, you ensure your rolling stock looks heavy and grounded.
While achieving these intricate textures requires patience, using components designed specifically for the scale provides a proactive solution. Our specialist 3D printed OO9 and GN15 kits are designed by modellers for modellers to ensure they integrate perfectly with professional weathering. We offer worldwide shipping on our entire catalog, providing the high-quality materials you need for your workshop. Explore our range of Narrow Gauge kits and diorama accessories to start your next project. Your narrow gauge railway deserves a setting that looks as authentic as the locomotives running on it.
Frequently Asked Questions
What is the best household material for model mud?
Sifted garden soil or tile grout mixed with PVA glue provides a reliable household-based texture for groundwork. While raw dirt from the yard contains organic debris that is too large for OO9 or O-16.5 scales, baking it and passing it through a fine sieve removes these over-sized particles. This process leaves you with a fine mineral powder that bonds well with acrylic paints to create a durable, matte finish.
How do I make model mud look permanently wet?
Applying a clear gloss varnish or a dedicated "still water" resin over your textured areas creates a permanent wet look. Standard acrylic mixtures often lose their shine once the water content evaporates, leaving a flat appearance. By stippling gloss varnish into the base of ruts or the center of trackbeds, you simulate the reflective surface of standing water or saturated sludge without the risk of the material drying out.
Will real dirt rot or grow mould on my model railway layout?
Real soil can grow mould if it isn't properly sterilized before application. You should bake your sifted dirt in an oven at 100°C for at least 30 minutes to kill any organic spores or bacteria. Once treated, the soil is inert and won't rot. Sealing the material with a 50/50 mix of PVA glue and water further prevents moisture from reaching any remaining organic particles.
How do I create realistic tyre ruts in 1:76 scale?
Pressing a spare wagon wheel or a scale vehicle tyre into your mud paste while it is still tacky creates the most realistic ruts. If you wait until the material is fully dry, you'll be forced to carve the ruts, which often looks too sharp for 1:76 scale. By using a "wet-press" method, the displaced material naturally bunches up at the edges of the track, mimicking the weight of a real vehicle.
Can I use coffee grounds for model railway dirt?
You can use dried coffee grounds, but they are prone to mould and often look too uniform in texture. While they offer a rich color, the grain size can be deceptive in smaller scales. If you choose this material, ensure it is completely dry and mixed with a strong acrylic binder. For a more stable result, many modellers prefer tile grout or sterilized soil when learning how to model realistic mud and dirt.
How do I stop my model mud from cracking as it dries?
Applying your mud in multiple thin layers instead of one thick application prevents shrinkage cracks. When a heavy layer of paste dries, the surface tension pulls the material apart. You can also add a flexible acrylic matte medium to your mix. This provides a bit of "stretch" as the moisture evaporates, ensuring the groundwork remains solid and intact on your baseboard without the need for constant repairs.
What is the difference between weathering pigments and real dirt?
Real dirt provides the physical volume needed for ruts and embankments, whereas weathering pigments are ultra-fine powders used for surface shading. Pigments don't have the "body" to create physical textures on their own. When learning how to model realistic mud and dirt, use sterilized soil to build the landscape and then apply pigments to create the soft, dusty transitions between the mud and your locomotive's chassis.
How do I remove mud weathering if I make a mistake on my kit?
Removing mistakes is easiest if you act while the mud is still damp using a cotton bud dipped in warm water. If the texture has already dried on your OO9 or O-16.5 kit, you can gently soften it with a mild acrylic thinner. Be careful not to scrub the surface, as this can damage the primer. For stubborn areas, a wooden toothpick can carefully chip away dried clumps without scratching the resin print.