

The most characterful narrow gauge layouts aren't found in a box on a hobby shop shelf; they're built on a workbench using a mix of patience and specialized components. While standard gauge enthusiasts often rely on ready-to-run models, you know that the true magic of the narrow tracks lies in the "maker" spirit. Finding the right narrow gauge model railway parts to bridge the gap between a bare commercial chassis and a finished locomotive can feel like a daunting search. You might struggle to find bodies that fit a Kato 11-109 or worry if 3D-printed resin can truly deliver the crisp detail your layout deserves.
It's frustrating when your vision for a unique industrial scene is stalled by a lack of specific figures or wagon kits. This guide changes that by showing you how to master 3D-printed kit building and scale selection for OO9, GN15, and O-16.5 projects. We'll explore how modern 14K resolution printing has effectively eliminated visible layer lines, making it easier than ever to achieve a professional finish. You'll learn expert techniques for assembling locomotive bodies, sourcing unique scenery, and transforming basic mechanical parts into a one-of-a-kind railway that tells a real story.
Key Takeaways
- Understand the distinction between scale and gauge to ensure your OO9, GN15, or O-16.5 components align perfectly with your chosen track.
- While mass-produced models are often limited, high-resolution resin printing produces narrow gauge model railway parts with superior detail for building niche prototypes.
- Although sourcing a motor requires independent research, adopting a "chassis-first" philosophy ensures your locomotive kit fits accurately and performs reliably.
- Enhance your layout’s realism by utilizing specialized diorama tools and scanned figures to create a unique, story-driven industrial environment.
- Master the essential preparation and painting techniques needed to transform raw 3D-printed components into professional-standard rolling stock.
What Are Narrow Gauge Model Railway Parts?
Narrow gauge model railway parts are the specific components used to construct or enhance models representing railways where the rails are closer together than the standard 4ft 8.5in. While standard gauge modelling often focuses on mainline giants, narrow gauge is about the small, the industrial, and the quirky. Narrow gauge parts are the building blocks for characterful, non-standard layouts.
It is helpful to distinguish between spares and kit parts. Spares are replacement items for ready-to-run (RTR) models, such as a broken buffer or a lost whistle. In contrast, narrow gauge model railway parts for builders are designed for creation from the ground up. Because narrow gauge prototypes are often niche or one-off industrial designs, the hobby relies heavily on a cottage industry of specialist designers. This is where 3D printing has become a transformative force. Traditional manufacturing is often too expensive for small-run prototypes; however, high-resolution resin printing allows for a comprehensive overview of narrow gauge scales to be represented through detailed, affordable kits.
The Shift from Ready-to-Run to Kit Building
Mainstream manufacturers have expanded their narrow gauge ranges, yet RTR models remain limited to the most famous prototypes. If you want a layout that reflects a specific local slate quarry or a unique peat bog railway, you'll likely find that off-the-shelf models don't exist. This constraint is actually an opportunity for creativity. By using kits and parts, you can engage in kit-bashing, where you modify a base kit or combine components to create something entirely new. For those just starting, it helps to understand what is a narrow gauge railway before diving into the specific parts needed for a build.
Essential Components for Every Modeller
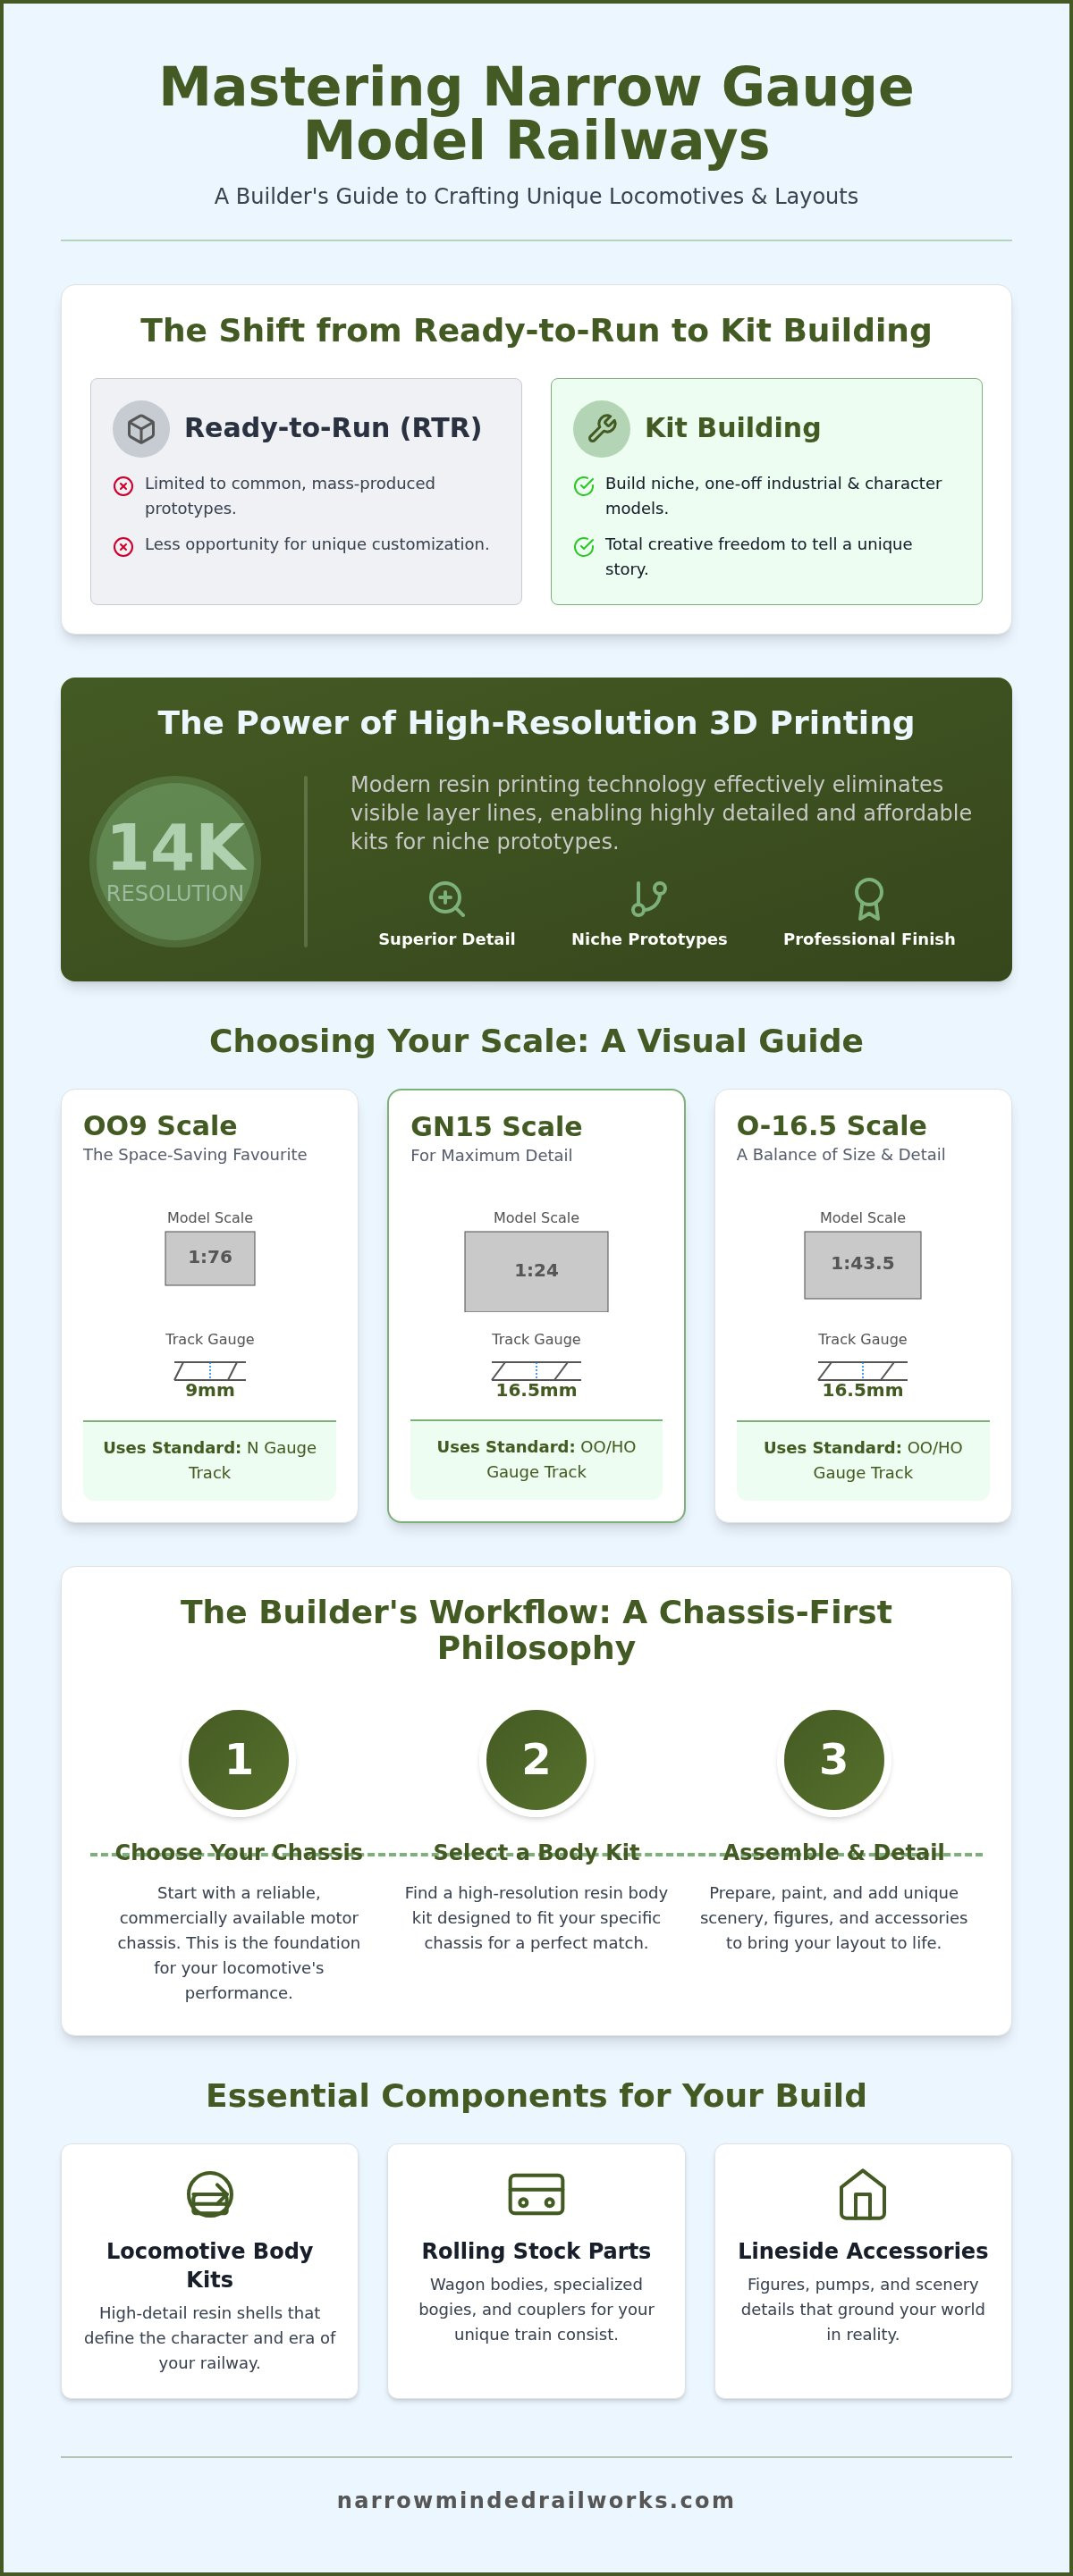
Building a layout requires a hierarchy of components. The process usually begins with the locomotive body kit, which provides the visual identity of your engine. Since we don't sell the internal motors, these bodies are engineered to fit onto reliable commercial chassis from other brands. Beyond the engine, you'll need several other categories of narrow gauge model railway parts:
- Locomotive Body Kits: 3D-printed resin shells that define the era and purpose of your railway.
- Rolling Stock Parts: Wagon bodies, specialized bogies, and couplers that ensure your train stays together on tight curves.
- Lineside Accessories: The bits and pieces like petrol pumps, post boxes, and phone boxes that ground your railway in a specific time and place.
These components allow you to move beyond generic sets and build a miniature world with genuine narrative depth. By focusing on specialized parts, you ensure your layout remains unique to your vision.
Choosing Your Scale: OO9, GN15, and O-16.5
Distinguishing between the physical size of the model (scale) and the distance between the rails (gauge) can be confusing; however, focusing on the track width helps clarify the options. While we don't sell ready-to-run locomotives, our kits are specifically designed to help you navigate these scale-to-gauge relationships. Narrow Minded Railworks focuses on providing high-quality OO9 and GN15 kits, though we also offer 7mm options for those working in O-16.5.
OO9 Scale: The Space-Saving Favourite
OO9 is the most popular narrow gauge scale in the UK. It utilizes a 1:76 scale (standard OO scale) but runs on 9mm track, which is the same width as N gauge. This allows you to build detailed industrial or rural scenes in a very small footprint. Sourcing track for niche scales can be difficult; however, OO9's use of 9mm track makes finding rails and points simple. If you're ready to start your journey, it's worth reading Your First OO9 Loco Kit Guide to understand how these kits integrate with standard chassis.
GN15 and O-16.5: Larger Scales for Greater Detail
If you prefer models with more physical presence, GN15 and O-16.5 offer excellent alternatives. GN15 models are typically 1:24 or 1:22.5 scale, representing minimum gauge railways. They run on 16.5mm track, which is the standard for OO/HO layouts. This scale is perfect for those who enjoy scratch-building and high-level detailing. Your choice of scale dictates the types of narrow gauge model railway parts you'll need to source, especially when detailing locomotive cabs or adding lineside features. Finding parts for larger scales can feel limited; however, GN15's use of 16.5mm track opens up a wide range of standard gauge components for repurposing.
Similarly, O-16.5 (7mm scale) represents narrow gauge prototypes running on 16.5mm track. This scale is supported by organizations like The 7mm Narrow Gauge Association, which provides a wealth of information for the serious modeller. Sourcing specialized narrow gauge model railway parts for these larger scales often involves looking for more robust detailing items that stand up to closer inspection. For a deeper dive into the larger end of the spectrum, check out our guide on Getting Started in GN15 Scale.
Finding the right balance between layout size and detail can be tricky. However, by selecting a scale that matches your available space, you can ensure a successful build. You can explore our full range of OO9 and GN15 kits to find the perfect starting point for your next project.
The Evolution of 3D Printed Model Railway Parts
High tooling costs previously prevented large manufacturers from producing niche industrial prototypes. 3D printing has changed this by making small-batch narrow gauge model railway parts financially viable for the first time. While FDM (filament) printing is useful for large scenery structures, it lacks the precision needed for fine locomotive details. Modern resin printing, specifically using 14K resolution screens, produces layers thinner than 17 microns. This effectively eliminates the "3D printed look" of visible layer lines that once discouraged modellers. 3D printing allows for complex geometries like rivet heads and cab interiors that were previously impossible in traditional kits.
The shift toward resin has democratized the hobby, allowing for a wider variety of prototypes from different eras. You no longer have to settle for a generic engine when you can source a body that matches a specific historical prototype. For those new to the technical side of the hobby, the National Model Railroad Association's guide to narrow gauge offers a helpful foundation for understanding these technological shifts. This evolution ensures that even the most obscure industrial railway can be recreated with high fidelity.
Working with Resin Kits
Handling uncured resin requires strict safety protocols; however, all Narrow Minded Railworks parts arrive fully cured and safe to handle straight from the box. Even with high-quality prints, a microscopic layer of residue or dust may remain from the manufacturing process. You should wash all components in warm, soapy water and allow them to dry completely before applying any primer. This simple step is a proactive solution to ensure your paint adheres correctly and doesn't flake over time. Once your parts are clean and dry, you can refer to our guide on Painting 3D Printed Models for a professional finish.
Removing Support Marks and Finishing
Small nubs or marks may be visible where the print was attached to its supports during production. These are a natural part of the 3D printing process, but they are easily managed with basic tools. You don't need heavy machinery; instead, use fine-grit sandpaper (400 to 600 grit) or small needle files to gently level these areas. If you find a minor imperfection, high-build automotive primers are an excellent solution for filling tiny gaps without obscuring fine details. Taking the time to smooth these points ensures that the final model looks like a solid, single-piece casting rather than a collection of parts.
The Practical Guide: Matching Body Kits to Chassis
Successful narrow gauge modelling often begins with a "chassis-first" philosophy. Because the motor dictates the reliability and slow-speed performance of your engine, it's logical to select a proven runner before choosing the body shell. While we don't sell the chassis or motors, our instructions specify the exact donor model required for each kit to ensure a seamless integration. This approach allows you to benefit from the engineering of major manufacturers while creating a unique, prototype-accurate locomotive.
For OO9 projects, the Kato 11-109 is a primary staple. It's estimated to be compatible with approximately 85% of the small industrial narrow gauge bodies currently available. Other popular donors include the Bachmann Percy chassis and various Graham Farish N gauge mechanisms. By designing our 3D-printed narrow gauge model railway parts around these specific commercial motors, we provide a reliable bridge between a bare mechanism and a finished, characterful model. This eliminates the guesswork often associated with kit building.
Steps to Fit a 3D Printed Body to a Chassis
Assembling your locomotive requires a structured approach to ensure the mechanism remains protected. You should follow these steps for a successful fit:
- Step 1: Disassembly: Carefully remove the original body from your donor model. Clean the chassis of any excess factory grease that might transfer to your resin parts during the fitting process.
- Step 2: Dry-fitting: Place the resin body over the chassis without adhesive. Check for any points of resistance or "high spots" where the resin might be catching on the motor housing.
- Step 3: Securing the body: Once you're satisfied with the alignment, secure the body using the provided screw holes or a small amount of non-permanent adhesive. This allows for easy removal during future maintenance.
Troubleshooting Common Fitment Issues
High-resolution 3D prints feature tight tolerances, which can sometimes result in a snug fit. If the interior of the body feels too tight, a proactive solution is to use a needle file or fine-grit sandpaper to gently ease the internal walls. You must also check for gear and wheel interference; the resin shell should never touch moving parts, as this will cause friction and overheating. Because 3D-printed resin is lighter than traditional white metal, your locomotive may lack the traction needed for heavy hauls. A simple solution is to add weight, such as lead shot or tungsten putty, into the boiler or side tanks. This extra mass improves electrical pickup and ensures your narrow gauge model railway parts perform as well as they look.
If you're ready to start your next build, explore our full range of narrow gauge locomotive kits designed for popular commercial chassis.
Detailing and Scenery: Bringing Your Layout to Life
The character of a narrow gauge layout is defined by the "small world" details that ground a scene in reality. While standard gauge enthusiasts might focus on expansive mainlines, narrow gauge modelling thrives in the gritty, neglected corners of industrial and rural environments. Incorporating narrow gauge model railway parts such as phone boxes, vintage petrol pumps, and post boxes helps build a narrative that goes beyond the tracks. These items transform a simple loop of rail into a specific place and time, whether it is a remote Welsh quarry or a busy sugar beet line. Mainstream scenery ranges often lack the specific character needed for these niche settings; however, specialized 3D-printed components allow you to recreate these unique details with precision.
Creating a Realistic Narrow Gauge Environment
A pristine locomotive often looks out of place on a narrow gauge line, as these railways were frequently overworked and under-maintained. Weathering your wagons and lineside structures is essential for achieving an authentic look. You can't simply buy "neglect" off a shelf, but you can build it through layered painting and the strategic use of vegetation. Overgrown trackbeds and moss-covered sheds are hallmarks of the narrow gauge aesthetic. It is also vital to consider scale-specific textures. For example, ground cover that looks like fine gravel in O-16.5 might appear as large boulders in OO9. Matching your ballast and foliage to the specific scale ensures the forced perspective of your diorama remains convincing.
Must-Have Detail Parts for Your Workbench
True "maker" projects extend detailing into the locomotive cab and onto the chassis. Adding fine narrow gauge model railway parts like handrails, lamp irons, and interior cab details such as gauges and firebox doors adds immense depth to a kit-built engine. These small touches distinguish your model from a generic "out of the box" display. To place these tiny components accurately, you will need specialized diorama tools. Standard household pliers are often too bulky; instead, precision tweezers and fine-point applicators are proactive solutions for handling delicate resin parts. For hobbyists who want to keep their workspace and component bins perfectly organized, you can check out DymoOnline for high-quality labeling systems.
Storytelling is further enhanced through the use of figures. Traditional plastic figures often appear stiff and unrealistic because they are sculpted by hand; however, our range of scanned real people provides a proactive solution for adding genuine human character to your platforms. Because these figures are based on 3D scans of actual people, they possess natural clothing folds and lifelike poses that generic alternatives cannot replicate. By combining these unique figures with historical accessories, you create a layout that feels lived-in and historically grounded.
Narrow gauge modelling is fundamentally a "maker" hobby that rewards patience and creativity. By understanding the relationship between scale and gauge, and mastering the assembly of resin components, you can move beyond the limitations of mass-produced models. Sourcing high-quality narrow gauge model railway parts is often the biggest hurdle for modellers; however, our specialized kits provide a proactive solution by bridging the gap between a bare commercial chassis and a detailed, prototype-accurate engine.
Whether you're building a compact OO9 industrial scene or a highly detailed GN15 diorama, the right components make all the difference. Our kits are expertly designed to fit reliable Kato and Bachmann mechanisms, ensuring your models run as smoothly as they look. With unique 3D-scanned figures and worldwide shipping, we help you bring lifelike character to your tracks regardless of your location.
Ready to transform your workbench? Browse our full range of 3D-printed narrow gauge kits and parts to find your next project. It's time to stop searching for the perfect model and start building it yourself.
Frequently Asked Questions
Do your locomotive kits come with a motor or chassis?
No, our kits do not include a motor or chassis. We specialize in designing 3D-printed body kits that are engineered to fit onto reliable, commercially available mechanisms from brands like Kato and Bachmann. This approach allows you to utilize a high-quality runner while focusing your creative efforts on the aesthetic build. You'll need to source the recommended donor model separately to complete your functional locomotive.
What is the best glue to use for 3D-printed resin parts?
Cyanoacrylate, commonly known as super glue, is the most effective adhesive for joining 3D-printed resin components. Standard plastic cements designed for injection-moulded kits won't work because they rely on melting the surface of the plastic. For a stronger bond, you can use a medium-viscosity glue, which provides a bit more working time before it sets. Always ensure the parts are clean and dry before application to ensure a permanent hold.
How do I remove the white support marks from my 3D-printed kit?
You can easily remove support marks using fine-grit sandpaper or small needle files. These marks occur where the part was attached to the printer bed during the manufacturing process. Start with 400-grit paper to level the surface, then move to 600-grit for a smooth finish. If any tiny pits remain, a high-build automotive primer or a small amount of modelling putty is a proactive solution to fill imperfections before painting.
Are OO9 kits compatible with N gauge track?
Yes, OO9 scale models are fully compatible with standard 9mm N gauge track. While the scale of the models is 1:76, the gauge matches the 9mm width used in N scale. This allows you to use widely available track and points for your layout. For the most realistic appearance, many modellers prefer specialized narrow gauge track with wider sleeper spacing, but standard N gauge track remains a functional and cost-effective alternative.
Can I paint your 3D-printed models with standard acrylic paints?
You can certainly use standard acrylic paints from brands like Tamiya, Humbrol, or Vallejo on our models. However, it's essential to apply a high-quality primer first to ensure the paint adheres correctly to the resin surface. We recommend washing the parts in warm, soapy water to remove any microscopic residue before priming. Once the primer is dry, you can apply acrylics using either a brush or an airbrush for a professional finish.
Do you offer worldwide shipping for your narrow gauge parts?
We provide worldwide shipping for all our narrow gauge model railway parts and locomotive kits. Whether you're based in the United Kingdom or further afield, we can deliver our 3D-printed products directly to your door. Shipping rates and delivery times vary depending on your specific location, so we recommend checking the current rates at checkout. This ensures enthusiasts everywhere can access our unique range of OO9 and GN15 components.
What is the difference between OO9 and O-16.5 scale?
The primary difference lies in the physical size of the models and the track they use. OO9 is 1:76 scale running on 9mm track, making it ideal for compact, space-saving layouts. O-16.5 is a larger 7mm scale running on 16.5mm track, which is the same width as standard OO/HO gauge. While OO9 is perfect for small shelf displays, O-16.5 offers a much larger physical presence and more room for fine detailing.
How do I know which chassis I need for a specific loco body kit?
Each of our locomotive body kits includes clear instructions that specify the exact donor chassis required for the build. We design our narrow gauge model railway parts with tight tolerances to fit specific models like the Kato 11-109 or Bachmann Percy. Before purchasing, you should check the product description on our website to ensure you can source the correct mechanism. This proactive approach ensures your finished locomotive will perform reliably.