

The success of your narrow gauge layout isn't determined when the public arrives at the exhibition hall; it's decided weeks earlier on your workbench. Every modeller understands the anxiety of a locomotive stalling in front of a crowd or the frustration of finding a broken detail after a long drive. While these mechanical and structural failures are common risks, they aren't inevitable. By focusing on mechanical endurance and transit-proofing during the process of preparing a model for an exhibition, you can transition from hoping for the best to knowing your work is show-ready.
This guide provides a systematic checklist to help your narrow gauge models perform flawlessly and look spectacular under harsh exhibition lighting. We'll show you how to move beyond a toy-like appearance and ensure your locomotive is reliable for eight hours of continuous running. We acknowledge that transporting delicate OO9 or O-16.5 kits presents significant logistical challenges. Therefore, we offer proactive solutions for safe transport and professional display. You'll learn how to audit your stock for mechanical reliability, implement robust packing strategies, and utilize diorama tools to create an exhibition-standard presentation that captures every visitor's attention.
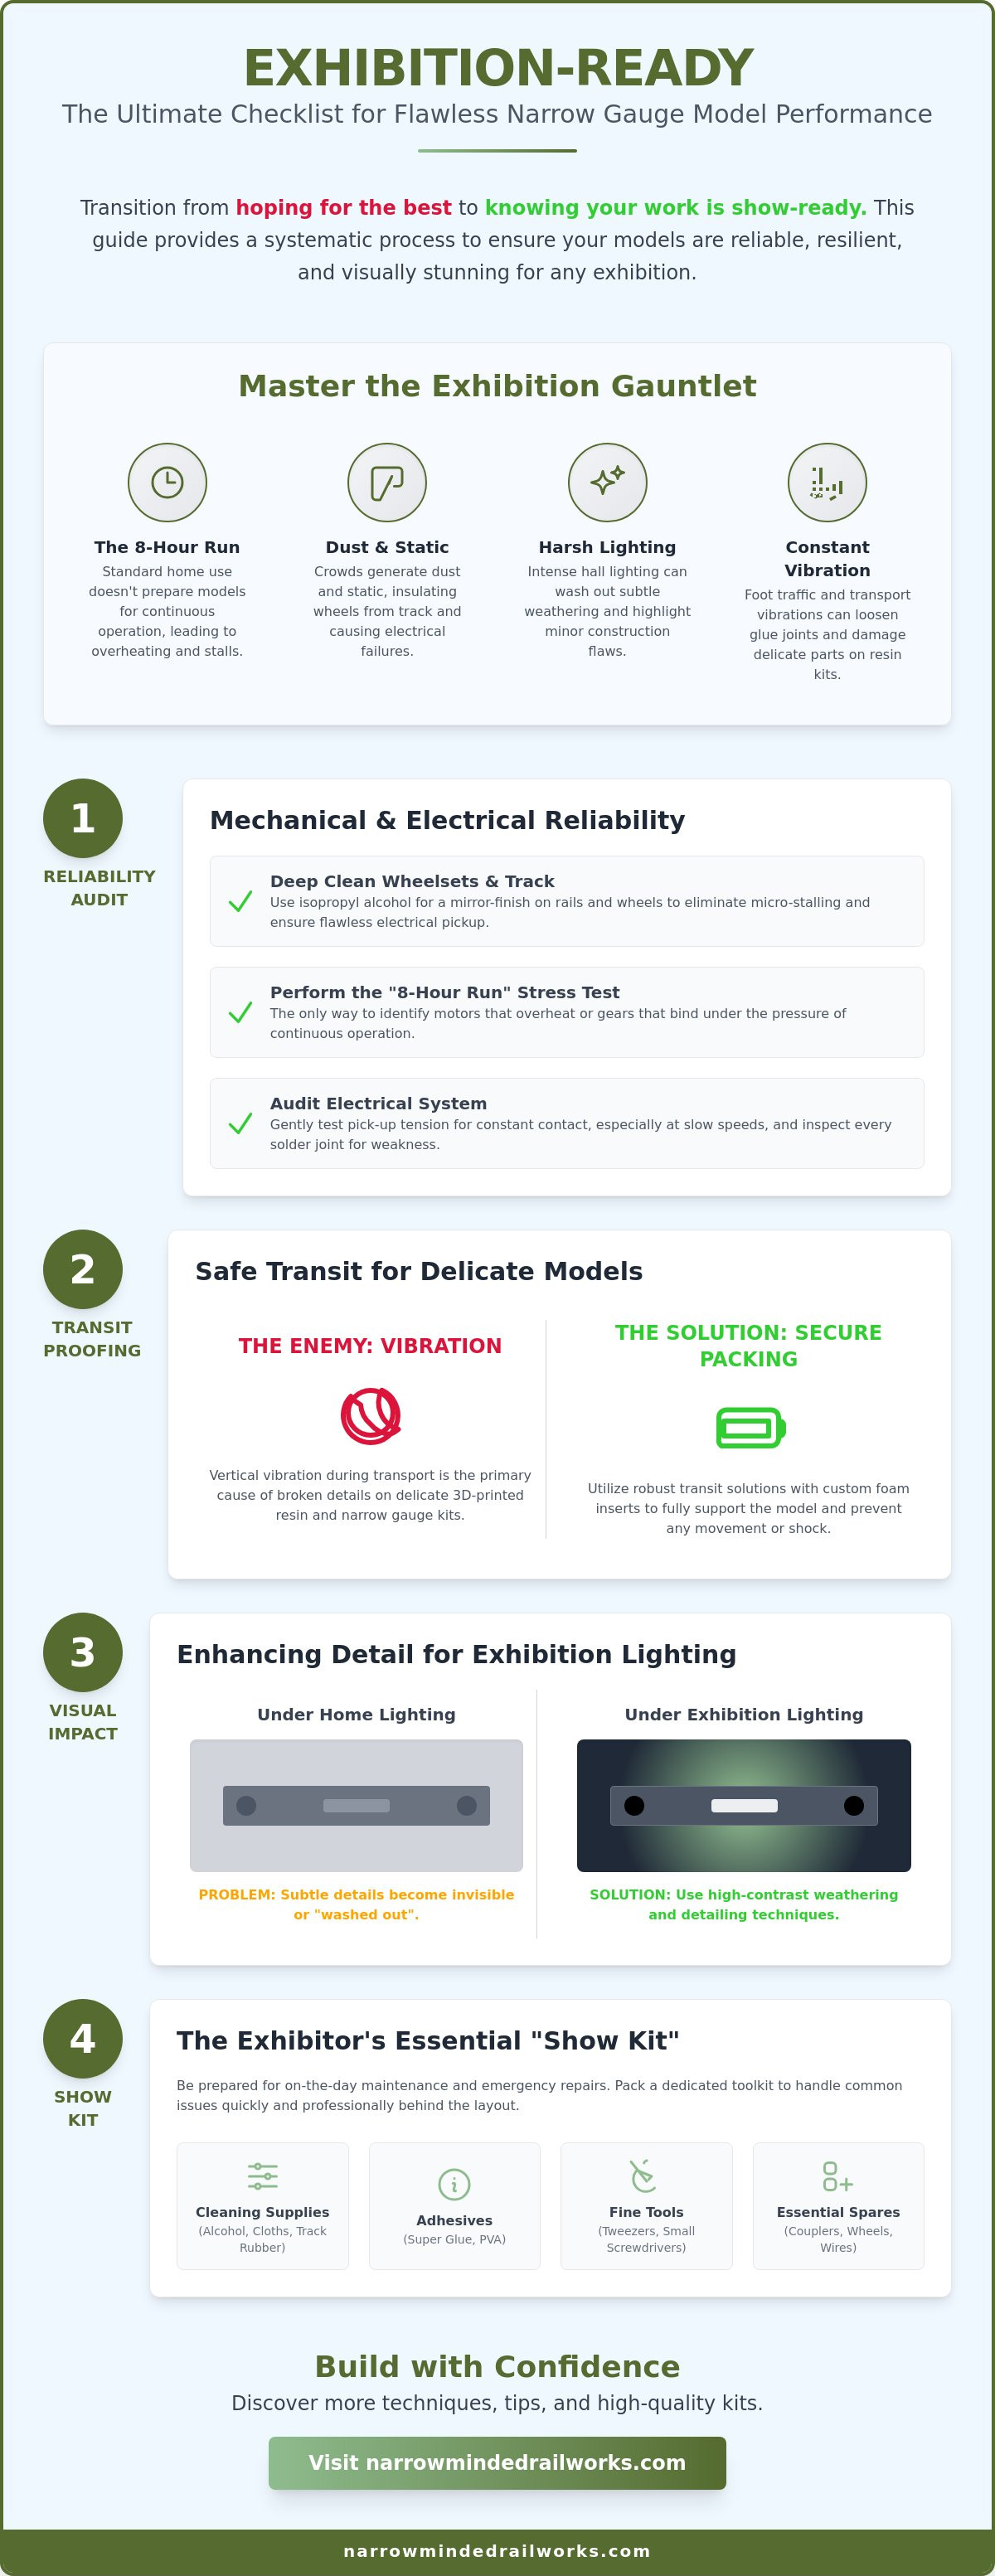
Key Takeaways
- Understand why standard home maintenance is insufficient for the "8-hour run" and how deep cleaning wheelsets ensures electrical reliability during long shows.
- Discover how to protect delicate narrow gauge kits from vertical vibration by selecting the right transit solutions for 3D-printed resin models.
- Learn high-contrast weathering and detailing techniques that prevent your models from looking "washed out" under harsh exhibition hall lighting.
- Master the systematic process of preparing a model for an exhibition by using a dedicated checklist to eliminate common mechanical and electrical failures.
- Identify the essential items for a professional "Show Kit" to handle emergency repairs and on-the-day maintenance behind the layout.
The Challenges of the Exhibition Circuit: Why Preparation is Paramount
Exhibition halls are unforgiving environments that test the limits of any scale model. While a locomotive might perform perfectly on a shelf or a small home layout, the transition to a public show introduces variables that can cause immediate failure. Preparing a model for an exhibition involves more than just a quick oiling; it requires a complete audit of the model’s mechanical and aesthetic integrity. Most hobbyists find that railway modelling at home doesn't prepare them for the "8-hour run" where a locomotive must operate continuously without stalling. We acknowledge that these high stakes can be intimidating, but a structured approach to preparation ensures your models remain reliable under pressure.
To better understand the level of detail and functionality required for public displays, watch this helpful video regarding model project preparation:
Environmental Factors in the Exhibition Hall
Crowds of visitors generate significant static electricity and stir up fine dust particles that settle on the rails. This debris can insulate wheels from the track, leading to frustrating stalls in front of an audience. Additionally, professional hall lighting is often much brighter than domestic bulbs. This intensity can make subtle weathering look invisible or highlight minor construction flaws that were previously hidden. Vibrations from hundreds of people walking past the layout can also loosen delicate parts on narrow gauge railway models, especially those built from lightweight resin kits. We recommend checking all glue joints and scenic attachments before packing your layout for transit.
Setting Realistic Expectations for Your Model
A locomotive is only truly show-ready if it has passed a rigorous continuous running test. We acknowledge that finding time for a multi-hour stress test is difficult, but it's the only way to identify motors that overheat or gears that bind under pressure. The psychological shift from hobbyist to exhibitor is significant. You aren't just running trains; you are providing a performance. Because narrow gauge scales like OO9 or O-16.5 have smaller contact patches than standard gauge models, they require more frequent cleaning. A proactive maintenance schedule, performed every few hours during the show, ensures that your display remains professional and engaging throughout the weekend. This systematic approach to preparing a model for an exhibition reduces show-day stress and keeps the public focused on your craftsmanship rather than your technical difficulties.
Ensuring Mechanical and Electrical Reliability for Continuous Running
Reliability on the exhibition circuit is built upon a foundation of absolute cleanliness. While a small amount of dust on a home layout might cause a minor flicker, the same debris in a high-traffic exhibition hall can lead to a total stall. We acknowledge that cleaning every wheelset on a rake of wagons is a repetitive task, but it's the most effective way to prevent micro-stalling on complex pointwork. When preparing a model for an exhibition, you should treat the electrical system as a single point of failure. Using isopropyl alcohol to achieve a mirror-finish on the rails is a proactive step that pays dividends during an eight-hour show day.
Electrical System Audit
Pick-up tension is often overlooked until a locomotive stops on a dead frog in front of a crowd. We recognize that delicate brass pick-ups are easily bent, so we suggest a gentle tension test to ensure constant contact during slow-speed shunting. You should also inspect every solder joint on the locomotive body. The vibrations from transport and continuous running can cause "mystery failures" where a wire looks connected but has actually fractured. A quick tug-test on all internal wiring will reveal these weaknesses before they become show-stopping problems.
Mechanical Running-In Procedures
A locomotive that runs for ten minutes at home hasn't been properly tested for the demands of a public show. We advise modellers to conduct a two-hour "Stress Test" where the loco runs uninterrupted under a realistic load. This duration allows the motor to reach peak operating temperature, which is when mechanical issues like binding valve gear or "clicking" in the drive train usually appear. If you're building one of our OO9 locomotive kits, this is the ideal time to ensure couplers, such as the Quarry Hunslet type, are at the precise height for consistent shunting.
3D-printed resin kits offer exceptional detail, but they present unique challenges under intense exhibition spotlights. We acknowledge that resin can be sensitive to environmental heat and UV exposure, which may cause subtle expansion or warping in tight-clearance areas. You should check the clearances between the chassis and the body shell while the model is warm to ensure nothing binds. If you find tight spots, utilizing professional diorama tools and scenery accessories can help you refine the fit and finish of your display. Proper lubrication management is also vital; remember that "less is more." Excess oil will only attract the dust and carpet fibers common in exhibition venues, eventually gumming up the gears. A single drop of specialized light oil is usually sufficient for a full weekend of operation.
Safe Transit: Methods for Transporting Delicate Narrow Gauge Models
Even the most mechanically sound locomotive is useless if it arrives at the venue in pieces. We acknowledge that the journey to an exhibition is often more stressful for the model than the show itself. Vertical vibration in a moving vehicle is the primary enemy of 3D-printed resin components. These constant micro-shocks can cause fatigue in delicate chimneys or cab details, leading to snaps that are difficult to repair on-site. When preparing a model for an exhibition, your packing strategy must prioritize structural support over simple enclosure to survive the physics of transport.
Choosing Your Transport Solution
Many modellers consider using original kit packaging for travel, but we recognize that these boxes are designed for static storage rather than the rigors of the road. While cardboard solutions are common, they lack the rigidity needed for high-value OO9 loco kit builds. Commercial foam-lined aluminum boxes offer superior protection against external impacts and crushing. However, custom-made "stock boxes" with rigid plywood dividers allow you to organize entire rakes of wagons efficiently. We recommend weatherproofing your cases with a simple plastic liner. This proactive step protects your models from humidity spikes in the car, which can affect paint finishes and wooden baseboards.
The "Anti-Vibration" Packing Strategy
Preventing "rolling damage" is essential for long-distance travel. We suggest using strategically placed foam blocks to immobilize locos and wagons within their compartments. This prevents them from shifting during sudden braking or cornering. For weathered models, use acid-free tissue paper as a barrier. This prevents the foam from rubbing against the paint and creating unwanted shiny spots. When packing delicate details like phone boxes or petrol pumps, individual foam cocoons are the safest option. A systematic approach to preparing a model for an exhibition ensures that your hard work survives the transit. Clearly labeling every box with "This Way Up" and "Fragile" assists helpers during the chaotic setup period. These proactive measures ensure your display remains professional from the moment you unload.
Enhancing Visual Impact: Weathering and Detailing for Public Display
Exhibition halls utilize high-intensity lighting that often washes out subtle weathering. We acknowledge that heavy weathering can feel intimidating to apply, but increasing the contrast on your paintwork is a proactive solution to ensure your model retains its character from a distance. When preparing a model for an exhibition, you must account for the "bleaching" effect of overhead fluorescent tubes. Utilizing professional techniques for painting 3D printed models allows you to build layers of depth that remain visible even in the harshest environments. While your transit-proofing efforts from the previous section keep the model safe, these aesthetic choices ensure it's actually seen.
Storytelling is what transforms a technical display into a memorable exhibit for the visiting public. We recognize that a moving train is exciting, but adding figures and "cameos" provides the narrative context that keeps an audience engaged. Whether it's a driver checking his pocket watch or a station cat on a luggage trolley, these details provide a human element. They act as visual anchors that help the public relate to your narrow gauge world and appreciate the scale of your work.
Detailing for the "Three-Foot Rule"
Most viewers stand behind a barrier, roughly three feet from the track. We acknowledge that detailing every single rivet is time-consuming, so focusing your efforts on high-impact areas like locomotive cabs, realistic coal loads, and roof grime is a smarter strategy. A coat of high-quality matte varnish is vital for killing the "plastic sheen" that hall lights highlight. This simple step ensures your models look heavy and authentic rather than like shiny toys. You can also add unique 3D-printed accessories to create specific geographic or era-specific scenes that ground your layout in a particular time and place.
Final Finishing Touches
Macro photography is a staple of modern exhibitions, and photographers will often find flaws you've missed. We suggest a final audit to catch details that the naked eye might overlook during the busy build phase:
- Check for remaining 3D-print support marks on the underframe or cab interior.
- Ensure all decals are perfectly settled with a setting solution to prevent silvering.
- Clean all locomotive glazing and lamp lenses to ensure the "face" of the model looks sharp.
To elevate your layout's visual impact and achieve a professional show finish, browse our collection of diorama tools and scenery.
The Exhibitor’s Toolkit: Essential Spares and On-the-Day Maintenance
Even with the most meticulous preparation, the mechanical demands of an eight-hour show day can lead to unexpected failures. We acknowledge that it is impossible to predict every electrical hiccup or broken detail during a busy weekend. However, assembling a dedicated emergency "Show Kit" is a proactive solution that allows you to perform rapid repairs without closing your layout. When preparing a model for an exhibition, you must shift your focus from the workshop to the toolkit. This ensures that a minor derailment or a stalled motor doesn't become a permanent obstacle to your display's success.
The Emergency Repair Kit List
Limited space behind a layout often makes it difficult to perform extensive repairs on a locomotive. We suggest keeping a compact, organized box containing high-impact tools that address common exhibition failures. Your kit should include fine-tipped tweezers for clearing track debris and a fiberglass scratch brush for cleaning stubborn oxidation off electrical contacts. We also recommend carrying a small, battery-operated soldering iron and a multi-meter to diagnose "mystery" electrical breaks quickly. For structural mishaps, a bottle of high-quality cyanoacrylate (super glue) is essential for reattaching details that may have been knocked by a visitor or a fellow operator. A soft makeup brush is another vital addition, as it allows you to dust your models throughout the day without snagging delicate 3D-printed parts.
Show Day Survival Tips
Maintaining the "Public Interface" is just as important as the mechanical health of your trains. We recognize that answering the same questions for two days can be exhausting, but engaging with the public is a core part of the exhibitor's role. Having business cards or layout descriptions ready is a professional way to share information while keeping the trains moving. Rotating your stock is also a critical survival strategy. We acknowledge that you may have a favorite locomotive, but running the same engine for eight hours straight increases the risk of motor burnout. Therefore, you should always have a backup OO9 loco kit chassis ready to swap in if a primary engine begins to struggle.
Keeping a "Log Book" behind the layout is a helpful way to track mechanical issues as they arise. If a particular wagon consistently derails on a specific point, note it down immediately. You don't want to forget these small but critical details when you return to the workshop. By following this systematic approach to preparing a model for an exhibition, you ensure that your display remains reliable, professional, and enjoyable for both you and your audience. Your proactive maintenance and well-stocked toolkit are the final pieces of the puzzle for a successful show weekend.
Mastering the Exhibition Circuit
Success at a show depends on the work done long before the doors open. We acknowledge that the transition from a home layout to a public exhibition is a demanding process. However, by adopting a systematic approach to mechanical audits and transit-proofing, you can eliminate the most common failure points. Focus on deep-cleaning your electrical pick-ups and conducting multi-hour stress tests to ensure your locomotives are truly show-ready. When preparing a model for an exhibition, remember that visual impact and storytelling are what captivate the audience. High-contrast weathering and well-placed figures ensure your craftsmanship stands out under intense hall lighting.
We recognize that building for public display requires precision. Our high-detail 3D printed resin bodies are designed for easy assembly and a reliable chassis fit. These kits are trusted by narrow gauge modellers across the UK and worldwide for their durability and professional finish. Browse our range of exhibition-ready Narrow Gauge kits to find your next show-stopping project. Take these proactive steps today to transform your next exhibition appearance into a stress-free showcase of your modelling skills.
Frequently Asked Questions
How far in advance should I start preparing a model for an exhibition?
You should begin preparing a model for an exhibition at least four to six weeks before the show date. We acknowledge that daily commitments can delay workbench progress, but a long lead time allows for thorough mechanical testing. A proactive schedule ensures you aren't rushing delicate painting or weathering tasks during the final days, which often leads to construction errors.
What is the best way to clean 3D-printed resin models before a show?
Use a soft makeup brush or a can of compressed air to remove dust from 3D-printed resin surfaces. We recognize that these models have intricate details that can snap if handled roughly. A proactive cleaning routine avoids the use of harsh chemicals that might damage the paint or the resin material itself, keeping the model show-ready without risking damage.
Should I use DCC or DC for an exhibition layout?
The choice between DCC and DC depends on your layout's operational complexity and your chosen chassis. We acknowledge that DCC provides independent control for multiple locomotives, though it requires more complex electrical installation. You should check the specifications of your specific power system and locomotive chassis to ensure they meet the demands of an exhibition environment.
How do I prevent my locomotives from stalling on points at low speeds?
Ensure your pick-ups are clean and correctly tensioned to maintain constant electrical contact. We recognize that narrow gauge models have smaller contact patches, making them sensitive to track dirt. A proactive solution involves cleaning the wheel treads with isopropyl alcohol and verifying that the track is level across all rail joints to prevent wheels from lifting.
What should I do if a model breaks during transport to the venue?
Utilize your emergency show kit to perform immediate repairs if a model breaks during transit. We acknowledge that finding a broken chimney or cab detail is discouraging after a long drive. Having cyanoacrylate and fine tweezers ready allows you to fix the part quickly before the public arrives, ensuring your display remains professional.
Is it better to use a fixed carry case or individual boxes for narrow gauge stock?
Fixed carry cases with rigid dividers and foam lining are generally superior for protecting narrow gauge stock during travel. We recognize that individual manufacturer boxes are often too bulky for large collections. A proactive solution is to use a foam-lined aluminum case that prevents models from shifting or rubbing against each other during vertical vibrations in the car.
How often should I clean the track during a two-day exhibition?
You should clean your track at least every two to four hours during a show. We acknowledge that exhibition halls are exceptionally dusty environments due to high foot traffic and static electricity. Using a lint-free cloth and specialized cleaning fluid during quiet periods keeps your locomotives running smoothly without the micro-stalling that frustrates viewers.
What are the most common mechanical failures seen at model railway shows?
Motor overheating and binding valve gear are the most frequent mechanical failures seen during public displays. We recognize that running a locomotive for eight hours is far more stressful than typical home use. You can avoid these issues by rotating your stock throughout the day and including a "stress test" as part of preparing a model for an exhibition.