

Why do some layouts look like a living, breathing slice of the Welsh coast while others look like a collection of plastic toys? Achieving a professional finish is a common challenge for many enthusiasts. You might find that standard scenery looks bulky next to your locomotives, or perhaps support marks on your 3D-printed kits are ruining an otherwise perfect paint job. Finding unique, non-generic figures to populate your world can be equally difficult. If you're looking for fresh narrow gauge diorama ideas, you've likely realised that standard gauge solutions often fall short in these smaller, more intimate scales.
While 3D-printed resin kits offer incredible detail, they often arrive with stubborn support marks that can compromise your final finish. We suggest using specific high-grit sanding sticks and specialised primers to resolve these imperfections before you begin painting. This guide shows you how to master hyper-realistic landscapes by selecting the right precision tools and scenic accessories for OO9, GN15, and O-16.5 scales. You'll learn how to integrate kits seamlessly and choose figures that tell a compelling story. We'll preview the essential toolkit for resin finishing and the best ways to select scenery that maintains a perfect sense of scale for your layout.
Key Takeaways
- Standard scenery materials often look bulky on smaller layouts. We suggest using fine-grade textures and specific static grass lengths to keep your scenery in scale with OO9 and GN15 models.
- While 3D-printed resin kits provide incredible detail, they require careful preparation. We recommend using precision side cutters and high-grit sanding sticks to remove support marks without compromising the finish.
- Exploring unique narrow gauge diorama ideas helps you move away from generic, mass-produced scenes. We focus on integrating scanned-from-life figures and niche accessories like petrol pumps to tell a specific story.
- Professional layouts rely on a seamless transition between trackwork and the landscape. We provide a step-by-step approach to ballasting and ground cover that highlights the focal point of your diorama.
Understanding Diorama Tools and Scenery for Narrow Gauge
A diorama represents more than a simple baseboard for your models; it functions as a self-contained narrative that captures a specific moment in time. When exploring narrow gauge diorama ideas, you'll find that these layouts prioritise character and atmosphere over the sprawling track plans typical of standard gauge. This focus on the "micro" requires a shift in perspective. While standard gauge modelling often relies on mass-produced accessories, a narrow gauge railway diorama demands a more bespoke approach to storytelling.
The distinction between your toolkit and your scenery is vital. The tools you choose directly dictate the final texture of your world. For instance, using generic brushes for fine ground cover might result in a clumpy, unrealistic finish. We suggest using specialised tools designed for precision, as the tool effectively determines the realism of the scene. In narrow gauge, where the viewer's eye is drawn to minute details, the quality of your application is just as important as the materials themselves.
The Role of Scale in Scenic Selection
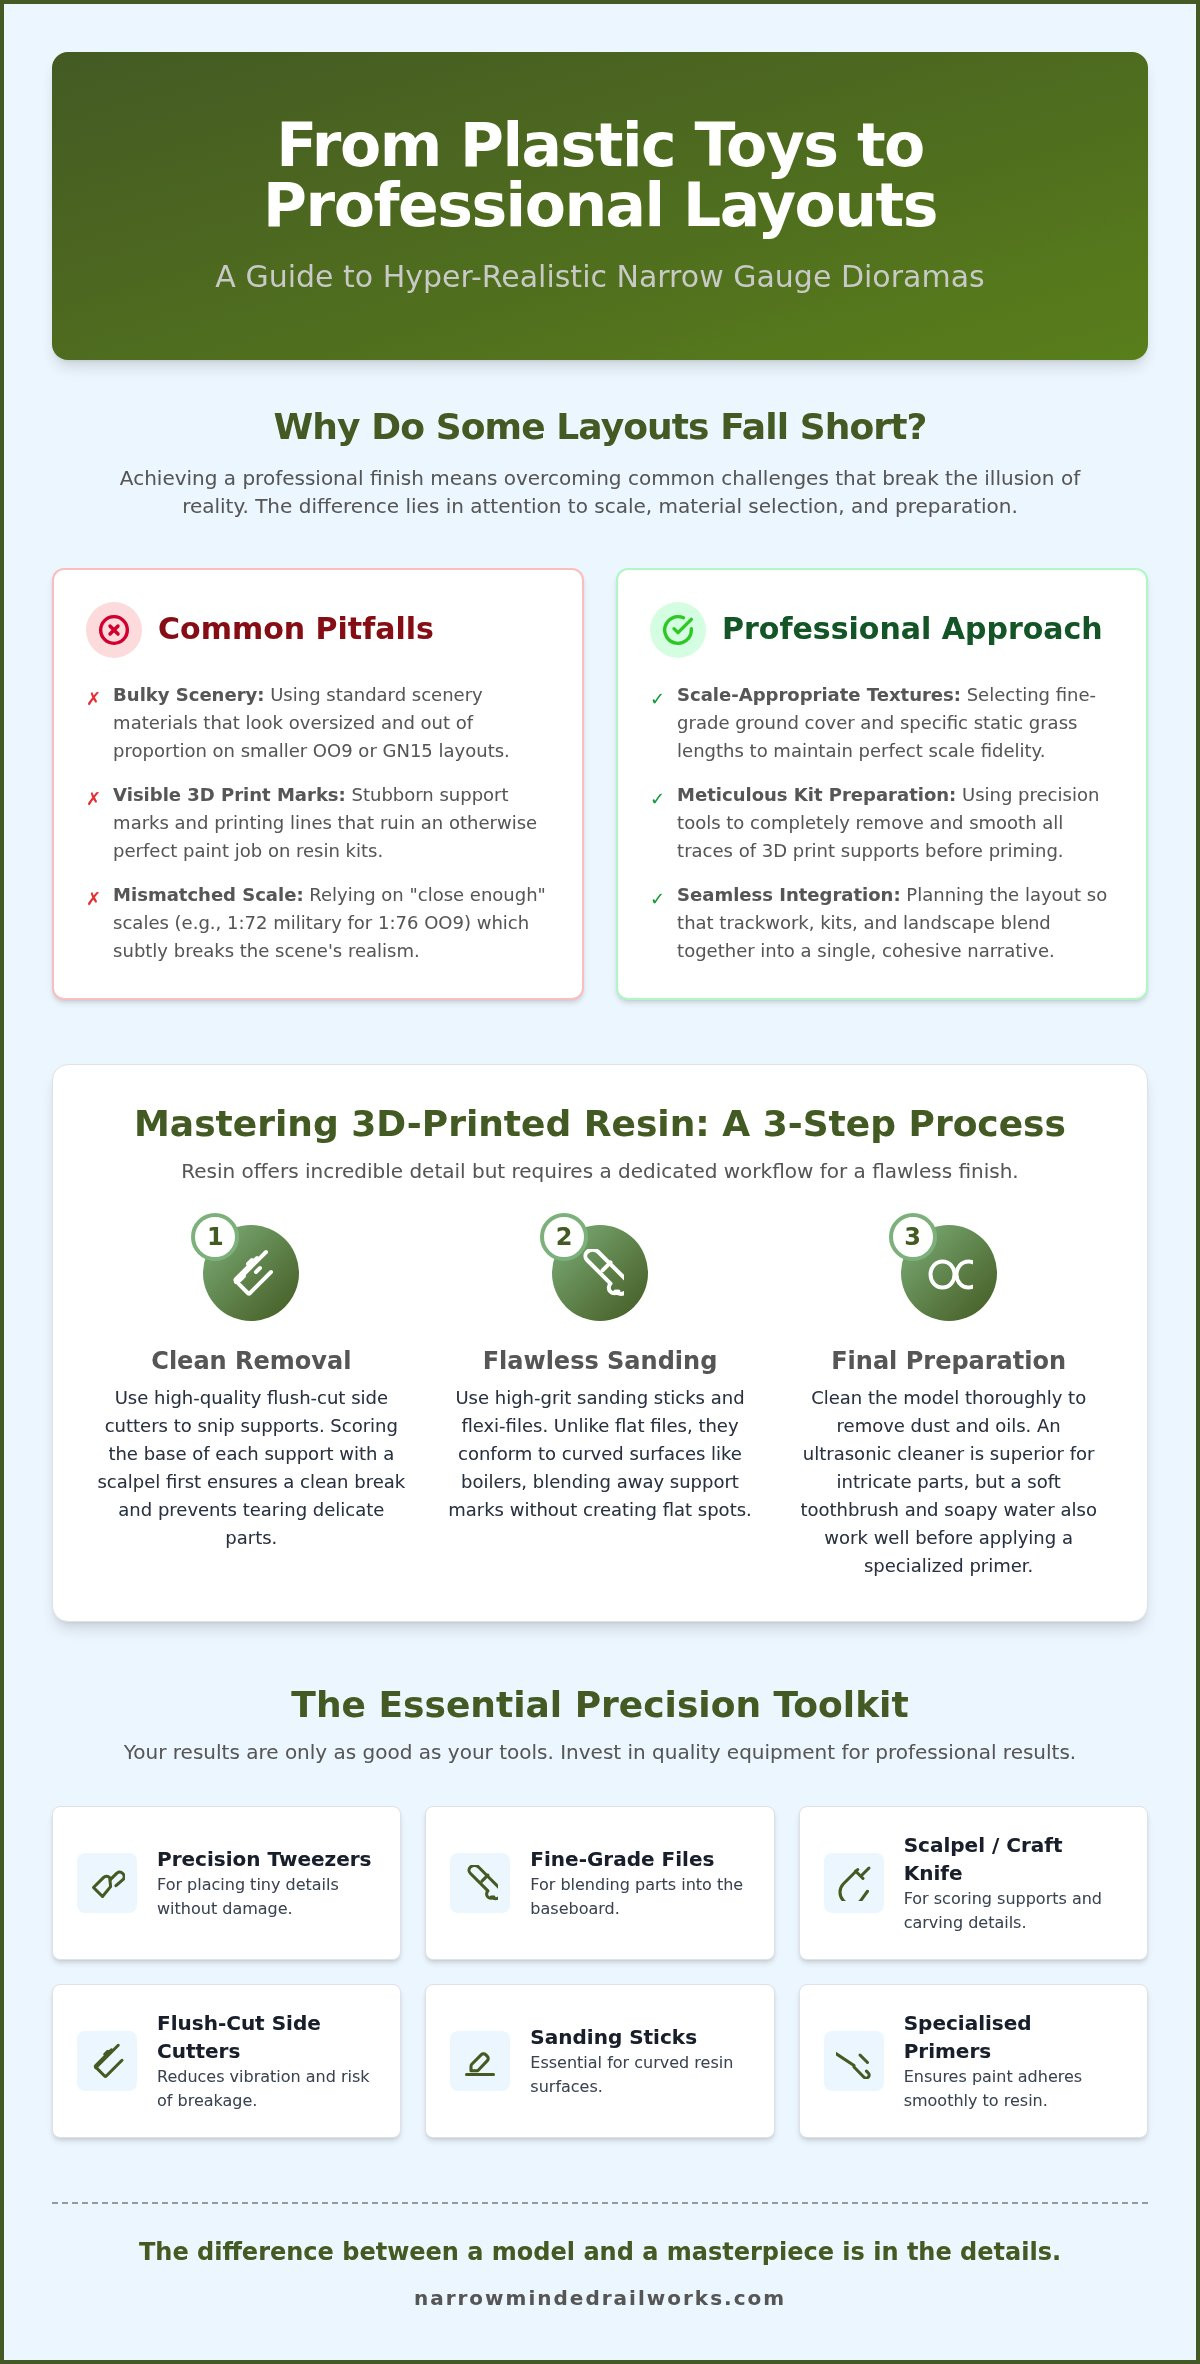
Scale is the most critical factor when building a narrow gauge landscape. OO9 (1:76) and GN15 (1:24) present unique challenges because they occupy different visual spaces. A common mistake is using generic 1:72 military accessories for OO9 or 1:35 items for GN15. While these are close, the slight discrepancy often breaks the illusion of reality. Narrow gauge footprints are usually smaller, requiring tools that can handle tight corners and delicate details. We suggest using the following for maximum precision:
- Precision tweezers for placing individual tufts of static grass in hard-to-reach corners.
- Fine-grade files for blending 3D-printed scenery edges into the baseboard.
- Scalpel blades for carving unique rock faces within limited footprints.
Transitioning from Kits to Landscapes
A locomotive kit, whether it's an OO9 wagon or an O-16.5 engine, requires a context-rich environment to truly shine. A beautifully finished resin kit looks out of place on a bare shelf. We acknowledge that building a diorama involves significant time constraints. Kits require careful assembly and finishing, which means the scenery must be planned in parallel to ensure a cohesive look. Set realistic expectations for your project timeline. A high-quality narrow gauge diorama rarely comes together in a single weekend. By acknowledging that the kit is the star and the scenery is the stage, you can proactively plan a layout that integrates both elements seamlessly.
Essential Precision Tools for 3D-Printed Scenery
The transition to 3D-printed resin has revolutionised how we approach narrow gauge diorama ideas. This technology allows for the production of highly intricate locomotive bodies and scenery items that were previously impossible to cast in traditional materials. Resin behaves differently than injection-moulded plastic. You'll need a dedicated set of precision tools to handle its unique properties. While resin offers superior detail, it's also more brittle. We suggest using high-quality flush-cut side cutters as your first line of defence. These allow you to snip away support structures with minimal vibration, reducing the risk of shattering delicate parts.
Achieving a professional finish on curved surfaces, such as a narrow gauge locomotive boiler, requires specialised abrasives. Standard flat files often create unwanted flat spots on rounded resin prints. We recommend using sanding sticks and flexi-files. These tools conform to the model's contours, allowing you to blend away any remaining support pips seamlessly. For the final assembly of tiny scenic accessories, surgical-grade tweezers are non-negotiable. They provide the grip and reach needed to place 3D-printed door handles, oil lamps, or figures without damaging the surrounding paintwork.
Cleaning and Preparing 3D-Printed Kits
Resin kits often feature complex support networks that can leave small pits if removed carelessly. We suggest using a fresh scalpel blade to score the base of the support before clipping. This proactive approach ensures the resin breaks away cleanly. While manual scrubbing with a soft toothbrush is effective for larger parts, an ultrasonic cleaner is a superior solution for intricate scenery items. It removes any residual uncured resin from deep crevices that manual cleaning might miss. Once clean, the surface must be thoroughly degreased. This preparation is essential for painting 3D printed models to ensure your primer and topcoats adhere correctly for the long term.
Adhesives and Primers for Resin
Standard plastic cement will not work on resin because it relies on melting the plastic to create a bond. Since 3D-printed resin is a thermoset material, it won't react to these solvents. We suggest using a high-quality Cyanoacrylate (CA) glue for all resin-to-resin or resin-to-metal bonds. For larger scenery components, a gel-based CA provides a longer working time, which is helpful for precise alignment. When it comes to finishing, choosing a high-build primer is a smart move. These primers are designed to fill the microscopic layer lines inherent in 3D printing, providing a smooth foundation for your final colours. If you're looking to upgrade your workbench, explore our range of specialised diorama tools and scenery designed specifically for the narrow gauge modeller.
Selecting Scenic Materials: Texture, Scale, and Realism
Selecting the right materials is the most effective way to prevent your layout from looking like a toy. When exploring narrow gauge diorama ideas, you'll find that standard "off the shelf" scenery often looks far too coarse. In OO9 scale (1:76), a single grain of standard ballast can look like a massive boulder. We suggest using extra-fine grade scatters and real stone dust to maintain a realistic sense of scale. While generic materials are easier to find, they rarely provide the delicate textures required for smaller narrow gauge footprints.
Static grass is a powerful tool, but it must be matched to your specific scale. For OO9 layouts, we recommend using 1mm or 2mm fibres for general ground cover. Using 6mm or 12mm fibres in this scale will make your locomotives look as if they are lost in a jungle. Conversely, GN15 (1:24) requires these longer 6mm to 12mm lengths to accurately represent overgrown weeds. To avoid the "mannequin look" that ruins many dioramas, we provide unique figures scanned from real people. These capture natural poses and clothing folds that traditional moulded figures simply cannot replicate.
Vegetation and Landscape Textures
Creating a realistic industrial landscape requires a layered approach. We suggest starting with a base of fine earth-coloured scatter before applying static grass. By layering different lengths and colours, you can create the patchy, unkempt look typical of narrow gauge lines. For industrial settings, focus on the trackside grime. We recommend using dark pigments and gloss varnishes to create realistic mud and oil spills around your locomotive sheds. This proactive detailing ensures your scenery looks lived-in rather than sterile.
Architectural Details and Street Furniture
Unique 3D-printed accessories are essential for dating your scene and adding narrative depth. Items like vintage K6 phone boxes or 1930s-style petrol pumps provide instant historical context. To integrate these items seamlessly, we follow the "two-part rule." First, place the accessory into the landscape, then use weathering powders or fine scatter to "ground" it. Accessories that simply sit on top of the grass look like an afterthought. By blending the base of the item into the soil or pavement, you ensure it looks like a permanent part of the world you've built.
- OO9 Scale: Stick to 1mm-2mm grass and extra-fine grit.
- GN15 Scale: Use 6mm-12mm grass for realistic height.
- Industrial Scenes: Use gloss-tinted resins for oil and water puddles.
Step-by-Step: Creating a Realistic Narrow Gauge Scene
Constructing a diorama requires a methodical approach to ensure the final result looks cohesive. When you're brainstorming narrow gauge diorama ideas, it's easy to get overwhelmed by the possibilities. We acknowledge that space is often a constraint for many modellers; however, this allows you to focus intensely on a small, high-quality footprint. The foundation of your scene begins with baseboard preparation. While a sturdy MDF or plywood base provides the necessary rigidity, we suggest adding a layer of high-density insulation foam. This allows you to carve away terrain for riverbeds or embankments, creating a more dynamic landscape than a perfectly flat surface.
Track laying and ballasting serve as the focal point of any railway diorama. Because narrow gauge lines were often built on tight budgets, the trackwork should reflect this. We suggest using a mix of fine-grade real stone ballast and earth-coloured powders to simulate poorly maintained "permanent way." Once the track is secured, applying base textures is the next critical phase. We recommend moving from bare dirt to your first layer of greenery by using a blend of fine sieved soil and initial scatter materials. This creates a natural "under-layer" that prevents the bright green of static grass from looking artificial.
The Workflow of a Narrow Gauge Diorama
A successful project follows a logical progression to avoid rework. We suggest following these three primary steps:
- Step 1: Planning the narrative. Decide if your scene is a busy slate quarry or a quiet rural halt. Sketch the footprint to ensure your 3D-printed buildings and locomotive kits fit comfortably without looking crowded.
- Step 2: Installing track. Ensure your rails are clean and level. Even though these are static dioramas for many, maintaining electrical continuity is essential if you plan to test your locomotive kits in situ.
- Step 3: Building landforms. Use foam or plaster cloth to create varied elevation. A slight rise in the ground can significantly enhance the sense of scale in OO9 or O-16.5 layouts.
Weathering Your Scenery and Kits
Detailing and weathering represent the final 10% of the work, yet they provide 90% of the visual realism. 3D-printed resin accessories can sometimes look too uniform when first painted. We suggest using dilute acrylic washes to blend buildings into the ground. This technique simulates the way rain splashes dirt onto the base of structures over time. To represent years of industrial use, apply weathering powders to simulate soot and rust on your wagon kits. If a kit looks too new, it can break the immersion of an old industrial line. By proactively adding layers of grime, you give your scene a tangible history. To get started on your next project, you can find everything you need in our range of diorama tools and scenery.
Elevating Your Layout with Narrow Minded Railworks Accessories
Achieving a professional finish often comes down to the quality of the individual components you choose. When you are looking for narrow gauge diorama ideas, generic figures and mass-produced buildings can often detract from the unique charm of a small-scale layout. We acknowledge that finding high-quality, niche accessories for scales like OO9 and O-16.5 is a significant hurdle for many modellers. To solve this, we provide a range of 3D-printed scenery and figures designed specifically for these scales. Every detail matters. By using parts engineered for narrow gauge, you ensure every element remains perfectly in proportion with your rolling stock.
Our scanned-from-life figures are widely regarded as a gold standard in the hobby. Unlike traditional moulded figures that can look stiff or repetitive, our characters are scanned from real people. This process captures natural posture and authentic period clothing, which is essential for creating a believable scene. A driver leaning out of a tram loco cab or a workman resting against a petrol pump adds a layer of narrative that generic figures simply cannot provide. Integrating these characters into your narrow gauge diorama ideas helps move the focus from simple models to a living environment.
Character-Driven Scenery
For those seeking something truly different, the GN15 scale offers a unique advantage. It allows for large-scale detail on a small footprint. We understand that finding bespoke accessories for O-16.5 and On30 gauge can be difficult. To address this, we offer a precision 3D-printed range that includes everything from iconic K6 phone boxes to industrial petrol pumps. These items act as scale cues that make the scene feel grounded in reality. Our locomotive bodies provide the perfect centrepiece, allowing you to build a unique project that stands out from the crowd. We invite you to build your next narrow gauge masterpiece with our precision kits and unique scenery accessories.
Building Your Next Narrow Gauge Masterpiece
Creating a realistic diorama often feels like a balancing act between intricate detail and limited space. We acknowledge that the small footprint of narrow gauge layouts leaves no room for error; however, this constraint allows you to focus on high-quality precision. You have seen how the right toolkit transforms raw 3D-printed resin into a seamless finish and how scale-specific textures prevent your layout from looking like a toy. By applying these narrow gauge diorama ideas, you can move from simple kit assembly to creating a living, breathing narrative that captures the unique atmosphere of the permanent way.
We provide specialist narrow gauge expertise through our UK-designed 3D-printed kits and unique figures scanned from real people for maximum realism. You don't have to settle for generic accessories when bespoke solutions are within reach. Whether you are modelling a busy industrial line or a quiet rural halt, the right components make all the difference. Browse our unique range of diorama tools and scenery kits to find the perfect additions for your workbench. Your journey toward a hyper-realistic layout starts with the first layer of texture and a commitment to detail. We look forward to seeing your vision come to life.
Frequently Asked Questions
What are the most essential diorama tools for a beginner?
Beginner essentials include a sharp craft knife, precision tweezers, and fine-grade sanding sticks. While many start with basic household items, we suggest investing in a set of high-quality side cutters for removing resin supports. These tools allow you to handle delicate 3D-printed parts without causing fractures. A reliable self-healing cutting mat and a small steel rule are also fundamental for maintaining accuracy in smaller scales like OO9.
Can I use standard railway scenery for narrow gauge layouts?
You can use standard gauge scenery, but it often requires careful modification to maintain scale realism. Standard ballast and grass tufts frequently look out of proportion on narrow gauge layouts. We suggest using extra-fine grade scatters and 1mm to 2mm static grass for OO9 to ensure the landscape doesn't dwarf your models. Selecting items specifically designed for narrow gauge scales prevents the toy-like appearance common with generic accessories.
How do I clean 3D-printed resin scenery before painting?
Cleaning 3D-printed resin requires removing any residual uncured material with isopropyl alcohol (IPA). While manual scrubbing with a soft toothbrush is a common starting point, we suggest using an ultrasonic cleaner for intricate scenery items. This proactive step ensures every crevice is clear, which is vital for long-term paint adhesion. Once cleaned and dried, a light wash in warm soapy water removes any remaining IPA before you apply primer.
What glue is best for attaching 3D-printed accessories to a diorama?
Cyanoacrylate (CA) glue, commonly known as superglue, is the best choice for bonding resin accessories to your diorama. Standard plastic cement won't work because it doesn't create a chemical bond with resin. We suggest using a gel-based CA for larger scenery items, as it provides a few extra seconds for precise positioning. For tiny details, a thin-viscosity CA applied with a needle applicator prevents unsightly glue marks on your finished scene.
How do I make my narrow gauge diorama look more realistic?
Realism is achieved through layering and specific scale cues. When brainstorming narrow gauge diorama ideas, focus on blending your trackwork into the landscape using fine powders and washes. We suggest using scanned-from-life figures and unique accessories like vintage petrol pumps to provide historical context. These details act as scale anchors that help the viewer's eye accept the miniature world as a real environment rather than a model.
Are 3D-printed figures better than plastic ones for dioramas?
3D-printed figures are generally superior to traditional plastic ones because they offer higher resolution and more natural poses. Our figures are scanned from real people, capturing authentic clothing folds and lifelike stances that moulded plastic cannot match. While plastic figures are often generic and repetitive, 3D-printed resin allows for unique characters that tell a specific story. This level of detail is especially important in the intimate viewing distances of a small diorama.
Do I need special tools for OO9 locomotive kits?
OO9 locomotive kits require higher precision than standard gauge models due to their diminutive size. We suggest adding a set of micro-drills and a pin vice to your toolkit for clearing out small holes in resin bodies. A set of needle files is also essential for cleaning up edges. Since such intricate work demands excellent visual clarity, check out Nu-Sight Opticians to ensure your eyesight is ready for the challenge. While you don't need heavy machinery, these precision hand tools allow you to assemble delicate kits without damaging the intricate 3D-printed details.
Avoiding support marks starts with careful removal rather than just sanding. We suggest using flush-cut side cutters to snip the support slightly away from the model's surface. This prevents the resin from pitting. Once removed, use high-grit sanding sticks to blend the remaining pips into the bodywork. By being proactive during the removal phase, you significantly reduce the amount of corrective work needed before you begin the painting process.