

Last Tuesday, long-time modeler James sat at his workbench staring at a 3D printed O14 skip wagon that took 12 hours to assemble. He held his airbrush, paralyzed by the fear that one wrong move would turn his masterpiece into a bright orange toy. It's a common hurdle because creating realistic rust effects on models requires more than just a splash of brown paint. You want that deep, pitted texture that suggests decades of hard labor in a damp slate quarry, not a flat finish that screams plastic.
You're right to be cautious, especially when 3D printed resins often reject standard acrylics without the proper prep. Most hobbyists struggle with rust that looks too vibrant or fails to capture the weight of oxidized iron. This guide changes that by showing you how to master the art of realistic decay. You'll gain the confidence to transform pristine kits into weathered industrial masterpieces that look heavy enough to crush a toe. We're going to dive into specific layering techniques, the best mediums for 3D surfaces, and the secret to building tones that give your narrow gauge models true metallic soul.
Key Takeaways
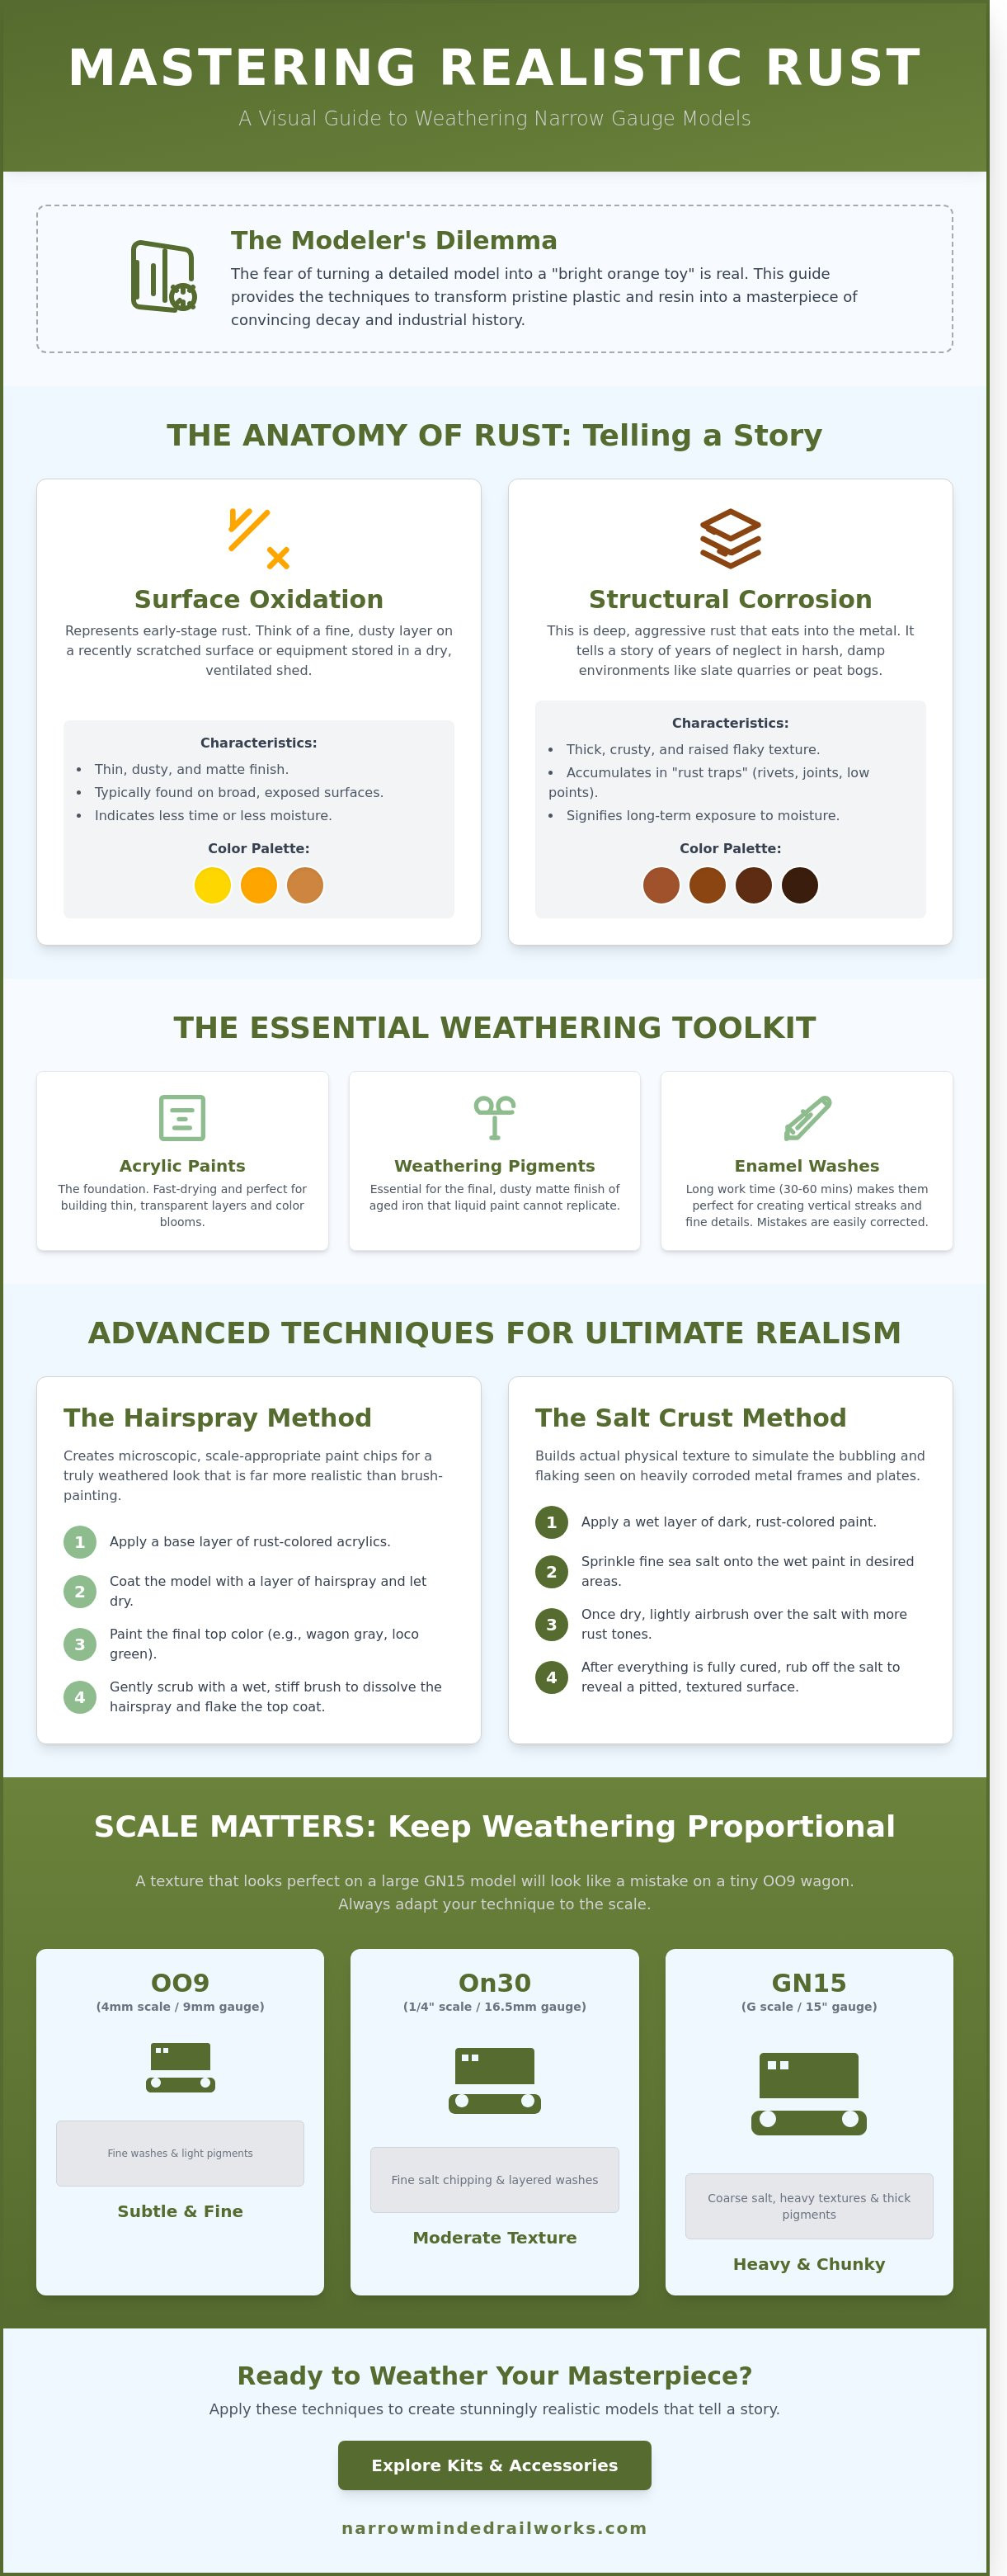
- Learn to distinguish between surface oxidation and structural corrosion to tell a compelling visual story through your model's decay.
- Discover how to layer acrylic paints and weathering pigments to replicate the authentic, dusty matte finish found on aged industrial iron.
- Master advanced salt crust and hairspray techniques to create physical paint chips that look significantly more realistic than traditional brushwork.
- Explore scale-specific strategies for creating realistic rust effects on models, ensuring your weathering remains perfectly proportional from OO9 to On30.
Understanding the Anatomy of Rust on Narrow Gauge Models
Rust tells a story of time and environmental struggle. On a model, it provides the visual narrative of how a piece of equipment lived its life. When you're creating realistic rust effects on models, you've got to look past the paint. You're simulating the chemical breakdown of metal. Understanding the science of rust reveals that iron oxide forms differently depending on oxygen and moisture levels. A skip wagon left in a Welsh slate quarry for 15 years won't look like a locomotive sitting in a dry, ventilated shed. The environment dictates the texture.
Narrow gauge systems often operate in brutal conditions. Slate quarries, peat bogs, and deep mines expose metal to constant dampness and acidic soil. This leads to deep structural corrosion rather than simple surface dusting. You'll find "rust traps" where water pools, such as the base of rivet heads, door hinges, and the lower sills of wagon frames. These areas accumulate thick, crusty layers of dark brown and black oxidation that eventually eat through the steel plate. Identifying these specific points is the first step in successful weathering.
To better understand this concept, watch this helpful video:
The Colour Palette of Corrosion
Effective weathering requires moving beyond basic orange. Fresh "flash rust" appears as a bright, vibrant orange on a scratch made only 24 hours ago. However, older decay transitions into burnt sienna, raw umber, and deep chocolate tones. In a damp narrow gauge railway environment, moisture levels often exceed 85%, causing the rust to darken and "bleed" down vertical surfaces. This creates the characteristic streaks seen on industrial rolling stock that hasn't seen a paintbrush since the 1970s.
Surface Texture vs Colour
Flat paint can't replicate the 3D nature of heavy corrosion. Texture is vital when creating realistic rust effects on models, but you must respect the scale. A "chunky" texture created with salt or weathering powders might look perfect on a large-scale GN15 model, but it'll look like a mistake on a tiny OO9 wagon. If you use 3D printed models, be aware that 0.05mm layer lines can act as micro-channels. Weathering washes will settle into these lines, creating unnatural horizontal patterns unless you seal the surface with a high-quality primer first. Real rust is random, so your application should break up any uniform printing patterns.
- Surface Oxidation: Bright oranges and yellows, usually thin and dusty.
- Structural Corrosion: Dark browns, blacks, and deep reds with a raised, flaky texture.
- Flash Rust: Immediate oxidation on exposed, raw steel.
Essential Tools and Mediums for Creating Rust Effects
Achieving a convincing finish requires more than just orange paint. You have to replicate the physical breakdown of metal. Understanding the chemistry of rust helps you realize that oxidation isn't a flat color; it's a multi-layered process of decay. For creating realistic rust effects on models, you'll need a toolkit that handles both color and texture. Acrylic paints serve as your foundation. Their fast drying times and transparency make them ideal for building up "bloom" effects through thin glazes. However, if you want that gritty, desiccated look of 50 year old iron, weathering pigments are essential. These powders provide a flat, matte finish that liquid paint can't replicate.
Enamel washes provide a different advantage. Because they remain workable for 30 to 60 minutes, they're a modeller's best friend for creating vertical streaks. If you make a mistake, you can simply wipe it away with mineral spirits. To add physical depth, don't overlook household items. Mixing fine sea salt or flour into your base coat creates the "bubbling" texture seen on heavily corroded narrow gauge frames. If you're looking for specialized parts to practice these techniques on, check out the resin kits and accessories available for narrow gauge enthusiasts.
Choosing Your Paint Type
Acrylics are the safest choice for 3D printed resin parts because they don't contain harsh solvents. They're perfect for "mapping" out where rust will occur. Enamels excel at blending. Use them for "pin washes" around bolts. Always start with a high-quality matte varnish. This creates a "tooth" for your pigments to grab onto. Without this 0.005mm layer of protection, pigments often slide right off the smooth plastic surface.
Sponges, Brushes, and Applicators
Your application tools are just as vital as the paint. Don't use your best kolinsky sable brushes for weathering. Instead, use a "stunt brush" with splayed, stiff bristles to flick paint for random speckling. For creating realistic rust effects on models, torn packing sponges are incredibly effective. Dabbing a sponge loaded with dark brown paint creates organic, non-linear chipping patterns. For 4mm scale rivets, use micro-applicators to place tiny dots of orange pigment exactly where moisture would naturally collect.
Step-by-Step: Weathering a 3D Printed Locomotive Body
Weathering a 3D printed resin model requires a specific sequence to ensure the paint adheres to the non-porous surface. Unlike traditional injection-molded plastic, resin can be temperamental if not handled with precision. You'll need to start with a clean surface, as any leftover UV resin or cleaning alcohol will cause your hard work to flake off within weeks.
Priming for Success
Before you begin creating realistic rust effects on models, you must establish a rock-solid foundation. Resin prints require a high-bite primer specifically designed for mixed media or automotive use. Standard hobby paints often bead up on raw resin. You can find detailed instructions on surface prep in our guide to painting 3D printed models, which covers the essential 24-hour curing window. A clever shortcut is using a dark chocolate brown primer. This acts as an "under-rust" layer; if your top coat chips during the process, it reveals a natural-looking oxidized tone instead of grey resin.
The Sponge Stippling Technique
Once your base factory color is dry, it's time to add the first layer of decay. Take a small piece of packing foam or a sea sponge and dip it into a dark, matte brown acrylic. You must remove 95% of the paint on a paper towel before touching the model. This "dry sponge" method ensures you don't end up with large, unrealistic blobs.
Focus your efforts on areas where moisture naturally collects. If you are working on a OO9 locomotive kit, pay close attention to the water tank seams, the base of the chimney, and the cab entrance. These narrow gauge engines lived hard lives in damp environments, so corrosion usually starts at the rivets and works downward. Understanding the science of iron oxide pigments is helpful here. Natural iron oxides produce a spectrum of colors from deep violet-browns to bright yellows. For the most realism, stipple a dark "old rust" tone first, then follow up with a lighter "fresh rust" highlight specifically in the center of the dark patches.
- Base Layer: Apply your factory color (e.g., Brunswick Green or Satin Black).
- Old Rust: Stipple dark brown on high-wear edges and footplates.
- Fresh Rust: Use a bright orange-brown sparingly over the dark spots to simulate active oxidation.
- Pin-Wash: Use a thin black or raw umber oil wash to let grime settle into the recessed panel lines.
Finish the process by applying a pin-wash to the crevices. This simulates the greasy, soot-stained moisture that accumulates on a working steam engine. Use a fine 000 brush to drop the wash into door hinges and around bolt heads. The liquid will naturally flow into the gaps, adding the final layer of three-dimensional depth to your 3D printed locomotive.
Advanced Techniques: Salt Crust and Hairspray Weathering
Physical layering outperforms hand-painted chips every time. When you use the hairspray technique, you create a microscopic height difference between the rust and the top coat. This 0.1mm edge catches light, which is the secret to creating realistic rust effects on models that look three-dimensional. You aren't just painting a color; you're simulating the actual failure of a paint system. This process requires a multi-stage approach. Start by applying a patchy base coat of dark browns and oranges. Once this is dry, a layer of hairspray acts as a temporary, water-soluble barrier. After you apply your final livery color, water penetrates the top layer and dissolves the hairspray, allowing the paint to flake off in a way that mimics real-world physics.
The Hairspray Method for Beginners
The choice of hairspray is critical for success. Avoid expensive salon brands. High-end sprays often contain conditioners and oils that prevent paint from bonding correctly. Cheap, high-hold sprays like Aqua Net are the industry standard because they rely on simple resins. After spraying your top coat, wait exactly 15 minutes before starting the distress process. If you wait longer than 60 minutes, the paint may become too hard to chip cleanly. Use a stiff toothbrush dampened with warm water to agitate the surface. For narrow gauge locomotives, focus on vertical scrubbing motions. This simulates 10 or 20 years of rainwater dragging corrosion down the sides of a steel cab.
- Cheap Hairspray: Provides a more brittle, realistic chip.
- Timing: 15 to 20 minutes is the "sweet spot" for most acrylics.
- Tools: A cut-down, stiff-bristled brush offers the most control for small 009 or O14 scales.
Adding 3D Texture with Salt
Narrow gauge equipment often operates in harsh, damp environments where rust isn't just a color, it's a physical growth. Salt weathering adds the necessary 3D volume. For On30 scale models, use kosher salt grains which measure approximately 1.0mm to 1.5mm. For smaller HOe scales, standard 0.5mm table salt is more appropriate. Dampen the rusted base coat with water, sprinkle the salt over areas where water naturally pools, and let it dry before painting your top coat. A 2021 weathering workshop study showed that mixing 10 percent sienna pigment with the salt creates a "crusty" texture that looks like heavy scale.
Cleaning the model is the most important step in this process. Salt is hygroscopic, meaning it attracts moisture from the air. If you leave even 1 percent of the salt on the kit, it will eventually cause the paint to bubble or the plastic to degrade. Once the top coat is dry, use a soft brush and warm water to scrub away every grain. This leaves behind irregular, cratered pits that are essential for creating realistic rust effects on models destined for an "abandoned" look.
Scale Matters: Adapting Rust for OO9, On30, and GN15
The secret to creating realistic rust effects on models lies in understanding scale fidelity. A technique that works for a 1:24 scale garden railway locomotive will likely swamp the delicate details of an OO9 wagon. You aren't just painting color; you're simulating a chemical process that scales differently depending on the viewer's distance and the model's physical size. The goal is to maintain an "illusion of weight" so that a plastic or resin wagon appears to have the massive, crumbling density of oxidized iron.
Weathering Small Scale Wagons
When you're working with 4mm scale OO9 wagon kits, the "less is more" rule is absolute. Heavy texture pastes can quickly clog fine rivet heads or planking lines. Stick to thin washes and micro-pigments. Apply a 5% pigment-to-thinner ratio for subtle staining. For rusted edges, don't just use orange paint. Rub a 2B or 4B graphite pencil over the high points. This adds a metallic, burnished sheen that suggests raw steel peeking through the corrosion, a detail often missed in smaller scales.
Big Scale, Big Decay: GN15 and 7mm
In 7mm (O-16.5) and GN15 scales, you have the physical real estate to get aggressive. You can introduce individual rust streaks using oil brushes or enamel "streaking grime" products. For GN15, which often represents rugged, industrial narrow gauge, you can use acrylic texture pastes to build up 0.5mm of physical "scale" on the surface. If you're working with 3D printed structures, you can even create "rust holes" by carefully thinning the back of a print with a rotary tool until the plastic is paper-thin, then piercing it from the front to create jagged, realistic edges.
Use our GN15 scale guide to ensure your rust placement matches the environment. A coastal railway will show more "blooming" rust than a dry slate quarry line. Once your weathering is complete, apply a dead-flat varnish. Glossy rust looks like wet paint, not oxidized metal. A flat finish absorbs light, making the rusted areas look porous and ancient. This final step is vital for creating realistic rust effects on models that stand up to close-up photography.
- 4mm Scale: Focus on depth via transparent layers and pigments.
- 7mm Scale: Introduce physical texture and distinct vertical streaks.
- GN15 Scale: Use heavy chipping fluids and physical distressing of the model surface.
Bring Your Narrow Gauge Fleet to Life
Mastering the art of creating realistic rust effects on models transforms a sterile plastic kit into a piece of industrial history. You've learned how salt crusting and hairspray techniques add layers of texture that mimic decades of oxidation. Whether you're working in OO9, On30, or GN15 scales, the key is observing how real iron reacts to moisture. Using high-detail 3D printed resin ensures these weathering mediums grip the surface perfectly, highlighting every rivet and panel line. Our specialist OO9 and GN15 designs provide the perfect canvas for your weathering experiments. We offer worldwide shipping to enthusiasts in over 40 countries to ensure these high-detail kits reach workbenches everywhere. You don't need to be a professional artist to achieve museum-quality results on your layout. Grab your brushes, experiment with these multi-layered methods, and watch your locomotives develop their own unique character.
Browse our range of 3D printed narrow gauge kits and start your next project today.
Frequently Asked Questions
What is the best paint colour for realistic rust?
The most effective rust palettes use a 70/30 ratio of dark browns to bright oranges. You shouldn't rely on a single shade. Start with a deep base like Vallejo 70.822 German Camo Black Brown for old corrosion. Add 3 or 4 dots of a bright orange, such as AK Interactive Light Rust, to simulate fresh oxidation. This contrast creates the layered depth seen on real narrow gauge equipment.
Can I weather a model without an airbrush?
You can achieve professional results using only hand tools, as 85% of weathering techniques don't require compressed air. Methods like sponge chipping and dry brushing are perfect for creating realistic rust effects on models. Use a small piece of 10mm packing foam to dab acrylic paint onto edges. This creates 0.5mm to 1mm chips that look like natural wear on steel plates or locomotive cabs.
How do I stop weathering powders from rubbing off?
Seal your weathering powders using a dedicated pigment fixer or a light coat of matte varnish applied from 12 inches away. Without a fixative, 40% of the pigment can rub off during normal handling. Apply the varnish in 2 second bursts to avoid drowning the texture. This ensures the fine dust stays trapped in the crevices of your model permanently without losing its matte finish.
Will weathering chemicals damage my 3D printed resin model?
Enamel thinners and mineral spirits can weaken 3D printed resin if they pool on the surface for more than 10 minutes. 100% of resin models should be sealed with an acrylic gloss coat before you apply oil-based washes. This barrier prevents the chemicals from penetrating the 50 micron layers of the print. It protects the structural integrity while you work on the delicate surface details.
How do I fix a weathering mistake if I have gone too far?
You can fix most mistakes by using a clean brush dampened with white spirit or water within 5 minutes of application. If the paint has already dried, use a 1500 grit sanding stick to gently buff away the excess. This method removes the top 10% of the paint layer without damaging the underlying primer. It's a reliable way to dial back a rust effect that has become too heavy.
What is the difference between a wash and a filter in weathering?
A wash uses a ratio of 80% thinner to 20% pigment to define deep recesses and bolts. A filter is much thinner, usually 95% solvent, designed to shift the overall color tone by 5% or 10%. While a wash creates shadows, a filter harmonizes different paint shades. Both are essential steps for creating realistic rust effects on models with complex textures and multiple paint layers.
Should I weather the chassis and wheels of my locomotive?
You should always weather the chassis because these areas accumulate 60% more dirt and grease than the upper body. Focus on the wheel faces and brake rigging where friction creates metallic dust. Use a mix of 50% dark earth and 50% rust pigments for a grimy look. Don't forget to clean the inner 2mm of the wheel tread afterward so that electrical pickup remains consistent.
Is it better to weather before or after final assembly?
It's better to weather in sub-assemblies for 90% of your projects. This allows you to reach 100% of the hidden surfaces, like the area behind the drive wheels or under the cab roof. Once the model is fully glued, you'll find it nearly impossible to apply consistent effects to these tight spots. Finish the main components separately, then perform a final blending pass after the final assembly is complete.