

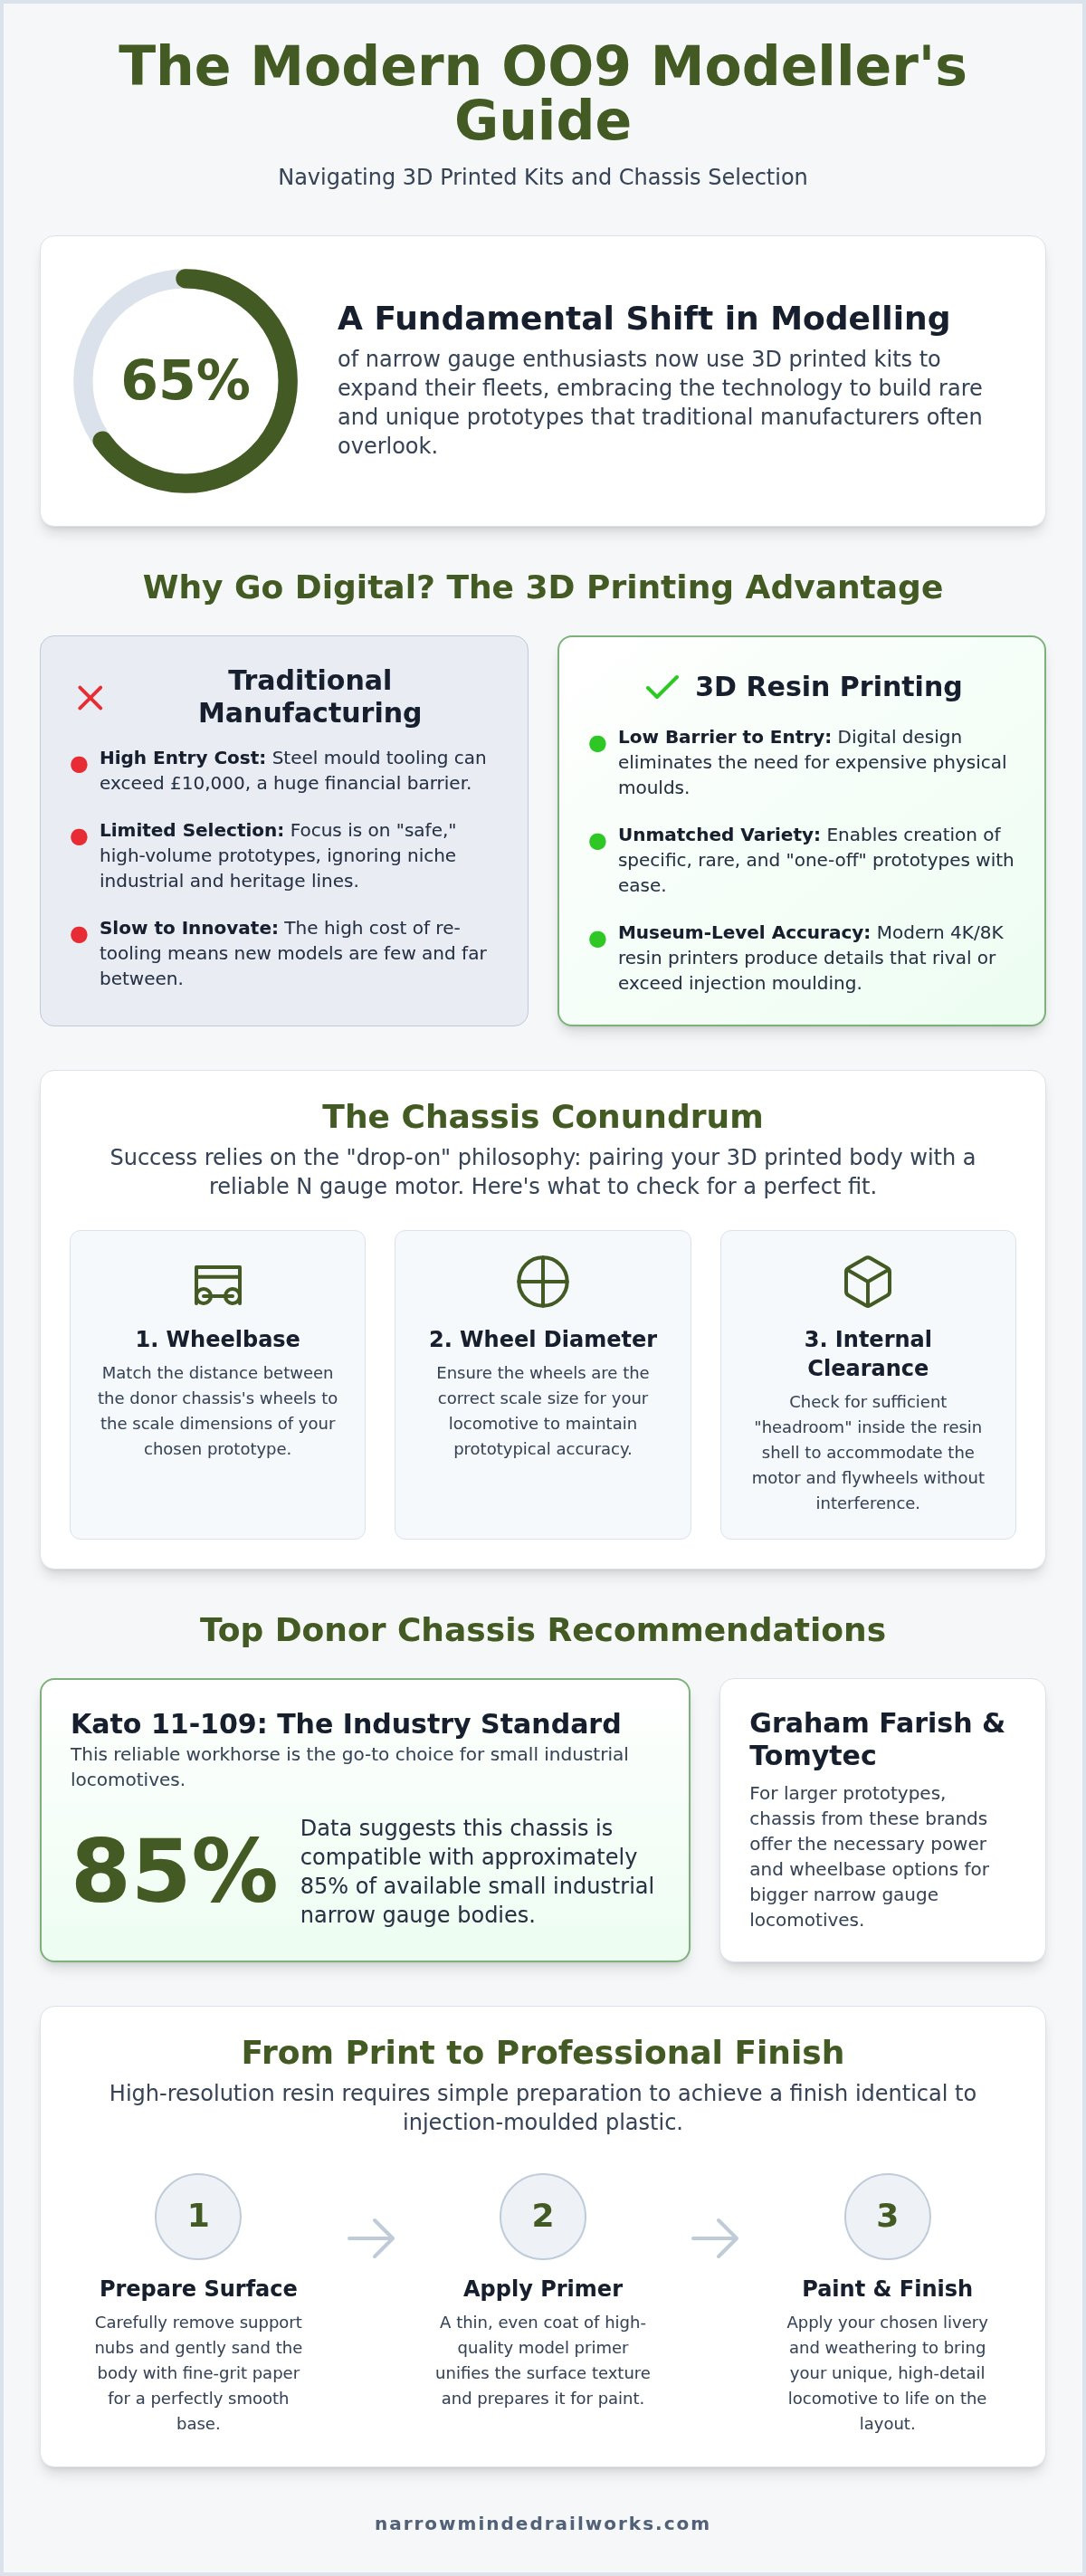
Approximately 65% of narrow gauge enthusiasts now use 3D printed kits to expand their model fleets. This statistic highlights a significant shift toward digital manufacturing for rare prototypes that traditional brands often ignore. However, the process of choosing a chassis for oo9 kits often brings technical confusion regarding fitment and running quality. You likely want a locomotive that pairs the intricate detail of resin with the smooth performance of a modern N gauge mechanism without the distraction of visible layer lines.
We recognize that while 3D printing provides the body, sourcing a reliable motor remains a separate challenge for the modeller. Although Narrow Minded Railworks focuses exclusively on high-resolution kits rather than ready-to-run models, we provide the technical guidance necessary to ensure your build is a success. This guide promises to help you master the art of selecting and fitting the perfect chassis to your 3D printed locomotive. We'll preview the 2026 landscape for Kato and Tomytec units, solve common mounting constraints, and explain how to achieve a professional finish identical to injection-moulded plastic.
Key Takeaways
- While traditional manufacturers often ignore niche narrow gauge prototypes, 3D printing provides a professional solution for modellers seeking museum-level accuracy.
- Although finding the right fit is challenging, mastering the process of choosing a chassis for oo9 kits allows you to pair rare bodies with reliable donor mechanisms.
- While brass kits require significant assembly time, one-piece resin bodies offer a streamlined alternative that preserves complex organic curves.
- Although resin requires careful preparation, using specific sanding and priming techniques results in a professional finish identical to injection-moulded plastic.
- While sourcing components can be difficult, matching your kit selection to currently available N gauge chassis ensures a successful and functional model.
Why OO9 Modellers are Switching to 3D Printed Kits
Narrow gauge modelling has historically faced significant constraints. While mass-produced "standard" models cater to the most famous prototypes, many industrial and regional lines are left behind. 3D printed OO9 kits provide a proactive solution to this scarcity. These kits consist of high-resolution resin shells designed specifically to represent the OO9 scale, allowing modellers to move beyond the limited selection found in local hobby shops. This shift toward digital manufacturing enables enthusiasts to build the specific locomotives they remember from heritage lines or industrial sites.
The transition is largely driven by economic reality. Traditional injection moulding is expensive; the cost of steel moulds can exceed £10,000 per tool. This high entry cost forces manufacturers to stick to "safe" prototypes with massive appeal. Digital-first design removes this barrier, enabling the creation of prototype-accurate models with perfect symmetry and intricate detail. Because these designs exist in a digital space, they offer a level of scale accuracy that was previously only achievable by master brass builders. When you are choosing a chassis for oo9 kits, having a body designed with digital precision ensures a much smoother fitment process during the motorisation stage.
The Freedom to Model Rare Narrow Gauge Prototypes
Major manufacturers often ignore niche 2ft gauge prototypes because low production volumes don't justify the setup costs. While this is a frustration for many, 3D design offers a way to bypass traditional manufacturing limits. It allows for rapid iteration. Designers can create "one-off" locomotive styles or specific regional variants with ease. This technology bridges the gap between the hobby and real-world narrow gauge heritage. You can now recreate the specific locomotives found in railway preservation circles, bringing a unique piece of history to your own layout.
Detail Levels: Breaking the Layer Line Myth
There's a common misconception that 3D prints always feature visible ridges or rough surfaces. While FDM (filament) printing often leaves these marks, resin-based SLA printing operates on a different principle. By 2026, 4K and 8K resin printing have become the industry standard for model railways, offering crisp details that rival injection-moulded plastic. High-resolution resin printing is the essential key to achieving invisible layer lines and a professional, glass-smooth finish. These professional-grade materials are durable enough for active layout use, ensuring your locomotive looks as good as it performs during operation.
Technical Guide: Choosing a Chassis for OO9 Kits
Modern narrow gauge modelling relies on a "drop-on" philosophy. We engineer our 3D printed bodies to fit specific, commercially available N gauge mechanisms. This approach ensures your locomotive runs with the reliability of a factory-produced model while maintaining the unique look of a narrow gauge prototype. Success in choosing a chassis for oo9 kits depends on matching the wheelbase and wheel diameter of the donor unit to the scale dimensions of the locomotive. Prototypical accuracy starts with these core measurements.
Internal engineering is just as vital as external detail. Narrow Minded Railworks kits include internal mounting points designed to grip the donor chassis securely. Before purchasing a donor, you must check the internal clearance for motor height and flywheels. Some modern N gauge motors are taller than vintage counterparts. Ensuring there's enough "headroom" inside the resin shell prevents the body from sitting too high or vibrating against the motor during operation. A tight, secure fit eliminates noise and improves traction on steep gradients.
Common Donor Chassis for OO9 Projects
The Kato 11-109 chassis is the current industry standard, replacing the older 11-103 model. It remains a reliable workhorse for small industrial locomotives. Data suggests the Kato 11-109 is compatible with approximately 85% of small industrial narrow gauge bodies currently available. For larger prototypes, modellers often turn to Graham Farish or Tomytec N gauge locomotive chassis. We provide high-resolution bodies, but you must source these motor units separately from specialist retailers. If you're looking for a new project, our OO9 locomotive kits are specifically designed with these common mechanisms in mind.
Measuring and Modifying for a Perfect Fit
Resin is a forgiving material for customisation. It's much easier to drill or sand than traditional white metal or brass. If the chassis is a fraction too long, you can often remove small amounts of internal resin without compromising the external finish. You must ensure that electrical pick-ups remain clear of the shell to prevent stalling. Use plasticard spacers or custom 3D-printed mounts to adjust the ride height. This adjustment ensures the locomotive sits at a prototypical level above the rails, creating a convincing profile for your narrow gauge fleet.
3D Printed Kits vs. Traditional White Metal and Brass
Deciding between materials involves balancing tradition with efficiency. White metal and brass have served the hobby for decades, but they require specialised skills like soldering and precise metal folding. 3D printed resin kits offer a proactive solution by providing a "one-piece" body that eliminates the frustration of misaligned metal parts. The process of choosing a chassis for oo9 kits becomes simpler when you aren't restricted by the thick, rigid walls of a traditional metal casting.
Surface finish is another critical factor. While etched brass provides crisp edges for modern locomotives, resin excels at the organic, rounded curves common in historic narrow gauge prototypes. Price point analysis confirms that 3D kits offer better value for these complex shapes, as they don't require expensive multi-part moulds. This makes resin the ideal entry point for modellers who find the learning curve of soldering too steep.
Weight and Ballasting Strategies
We acknowledge that resin is significantly lighter than white metal. This lower mass can affect traction and electrical pickup if left unaddressed. To solve this, you should add internal ballast to your locomotive body. Strategic placement of weight over the driving wheels ensures your model performs as well as it looks. If you're just starting out, you may find our article on Your First OO9 Loco Kit: A Beginner’s Guide to Choosing and Buying helpful for planning your first build.
- Use tungsten putty for small, awkward spaces inside the boiler.
- Apply lead shot mixed with PVA glue inside the side tanks for maximum density.
- Ensure weight is balanced centrally to prevent the chassis from rocking or stalling on points.
Durability in the Layout Environment
Early hobbyist prints gained a reputation for being brittle. We've moved beyond those limitations by using professional-grade engineering resins designed for active layout use. These materials handle the temperature fluctuations found in typical railway rooms without warping or cracking. While resin remains more fragile than brass if dropped, it provides a stable and durable platform for a working model. Proper handling and storage in a padded box will ensure your locomotive remains a centerpiece of your collection for years. This stability is vital when choosing a chassis for oo9 kits, as a rigid body maintains the precise tolerances required for smooth running.
How to Prepare and Finish Your OO9 Locomotive Body
Preparation is the bridge between a raw 3D print and a layout-ready locomotive. While the technical task of choosing a chassis for oo9 kits ensures reliable motion, the finishing process determines the model's visual impact. You'll need a specific toolkit for this stage: fine-grit sanding sticks (ranging from 400 to 1000 grit), needle files, and high-quality primers. Before any sanding begins, degreasing the print is non-negotiable. A simple wash in lukewarm soapy water removes residual resin or release agents that prevent paint from adhering. Once dry, you can apply a high-build primer to fill micro-lines and ensure permanent paint adhesion.
Removing Support Marks and Post-Processing
Identifying "support pips" is the first step toward a professional finish. These are small bumps where the printing supports attached to the body during manufacture. You must distinguish these from prototypical model details like rivets, hinges, or lamp irons. Wet-sanding is the proactive approach to achieving a seamless, glass-smooth surface. By using water with your sanding sticks, you prevent resin dust from clogging the abrasive and create a much more refined finish. For more detailed steps on this process, see our guide on Painting 3D Printed Models: A Beginner’s Guide to a Perfect Finish.
- Use needle files for tight corners around the cab and splashers.
- Always sand in a circular motion to avoid creating flat spots on curved boilers.
- Check your progress under a bright desk lamp to spot any remaining pips before priming.
Painting and Weathering for Realism
Acrylic paints are the preferred choice for 3D printed resin surfaces. They dry quickly and don't react negatively with the material, unlike some aggressive solvent-based paints. To highlight 3D-printed rivets and panel lines, use thin washes or weathering powders. These settle into the recesses, adding depth that makes the model look like heavy industrial machinery rather than a plastic miniature. A final coat of matte varnish protects the resin from UV degradation and seals your weathering work. If you're ready to start your next build, browse our latest diorama tools and scenery to complete your locomotive project.
Choosing Your Next Project from Narrow Minded Railworks
The 2026 collection at Narrow Minded Railworks reflects the ongoing evolution of narrow gauge modelling. While traditional manufacturers focus on broad appeal, we provide high-resolution resin bodies for the industrial and regional prototypes that define the character of a layout. Success in this hobby involves more than just assembly; it requires a proactive approach to selection. When you are choosing a chassis for oo9 kits, you should start by identifying the specific era and geographical style you wish to recreate. Our range is specifically engineered to fit standard commercial mechanisms, ensuring that your rare locomotive runs as smoothly as any mass-produced alternative.
Our 2026 catalogue organises kits into distinct categories to help you match your project to your available donor units. Whether you're looking for a small industrial shunter or a larger regional tank engine, we provide the technical specifications for wheelbase and clearance upfront. This transparency is essential when choosing a chassis for oo9 kits, as it eliminates the guesswork often associated with motorising 3D printed shells. By providing the body and the mounting engineering, we allow you to focus your efforts on the painting and detailing stages that make each model unique.
From Locomotives to Rolling Stock
A locomotive is only part of the story. To build a convincing scene, our range includes a diverse selection of OO9 wagons designed for quarry, industrial, and rural settings. These kits allow you to build consistent, prototype-accurate trains that match the high detail of your powered stock. We also offer GN15 and O-16.5 / 7mm scale kits for those exploring different narrow gauge disciplines. To add life to these scenes, we provide 3D printed figures and scenery accessories. These items provide the correct sense of scale, helping to transform a simple track loop into a living railway environment that reflects real-world heritage.
The Narrow Minded Railworks Advantage
We understand that the transition from ready-to-run models to kit building can feel daunting. While we don't sell the motors or chassis units themselves, we provide the technical support and precise engineering needed to make the motorisation process straightforward. Every kit is designed by modellers who understand the physical constraints of small-scale mechanisms. We use professional-grade resin to ensure durability and minimise finishing time, which is a significant advantage over early hobbyist prints. With global shipping and a commitment to quality, we support you through every stage of your build. Explore the full OO9 collection at Narrow Minded Railworks to find your next project.
Building Your Narrow Gauge Future
Narrow gauge modelling has entered a new era where digital precision meets traditional craftsmanship. You now have the freedom to recreate unique industrial and regional prototypes that major manufacturers often overlook. While the process of choosing a chassis for oo9 kits requires careful measurement of wheelbase and motor clearance, the result is a locomotive that runs as reliably as any mass-produced model. By using high-resolution resin and professional-grade finishing techniques, you can achieve a museum-quality finish on your own workbench.
We provide the engineering and detail while you bring the vision to life. Our kits are specifically designed for standard N gauge mechanisms and ship worldwide from our UK workshop. We focus on durable materials that withstand active layout use, ensuring your project remains a functional centerpiece for years to come. If you're ready to expand your fleet with unique rolling stock and locomotives, Browse our full range of 3D Printed OO9 Kits today. It's time to build the railway you've always imagined.
Frequently Asked Questions
Do 3D printed OO9 kits come with a chassis?
No, Narrow Minded Railworks kits do not include a chassis or motor. We specialize in high-resolution resin bodies designed to fit commercially available N gauge mechanisms. This approach gives you the flexibility to select a donor unit based on your specific performance needs or budget. While we provide the engineering for a secure fit, you must source the motorized unit separately from a model railway retailer or specialist supplier.
What is the best glue for 3D printed resin model kits?
Cyanoacrylate, commonly known as super glue, is the most effective adhesive for resin. Unlike plastic models, resin doesn't respond to liquid poly cements. You should use a medium-viscosity super glue for major components to allow for slight adjustments during assembly. For finer details like handrails or whistles, a thin-viscosity glue applied with a precision applicator ensures a clean bond without leaving unsightly residue on the surface of your model.
How do I remove the visible layer lines on a 3D printed loco?
You can achieve a professional finish by using high-build primers and fine-grit sanding sticks. Although our professional-grade printing minimizes layer lines, a proactive approach involves wet-sanding the surface with 600 to 1000 grit abrasives. This process levels the resin and removes any microscopic ridges. Following this with a dedicated hobby primer creates a smooth, uniform base that is essential for a high-quality paint finish on your narrow gauge locomotive.
Can I use standard model railway paints on 3D printed resin?
Standard acrylic and enamel hobby paints are perfectly suitable for use on resin bodies. You must wash the print in lukewarm soapy water to remove any residual oils before painting. This simple step ensures the paint adheres permanently to the surface. Most modellers prefer acrylics for their ease of use and fast drying times, but regardless of your choice, a primer coat is non-negotiable for a durable and professional finish.
Are 3D printed narrow gauge kits suitable for beginners?
These kits are an excellent choice for beginners because they remove the need for complex metalwork or soldering. While choosing a chassis for oo9 kits involves some technical planning, the one-piece body design simplifies the construction process significantly. We provide clear guidance on which mechanisms fit our shells, allowing new modellers to achieve a professional result that rivals ready-to-run models without the steep learning curve of traditional white metal kits.
How do I add weight to a 3D printed locomotive body?
Adding weight is a necessary step because resin is inherently lighter than traditional white metal. You can use tungsten putty or lead shot to increase the mass of your locomotive. We recommend securing these materials inside the boiler or side tanks using PVA glue. Concentrating this weight directly over the driving wheels improves electrical pickup and traction, ensuring your model performs reliably on steep gradients or complex pointwork during layout operation.
Are these kits compatible with Peco OO9 track?
All our kits are fully compatible with Peco OO9 track and other standard 9mm gauge systems. Since the locomotive bodies are engineered to fit commercially available N gauge chassis, they utilize standard wheel profiles that navigate Peco points and track sections without issue. This compatibility allows you to integrate our unique prototypes into your existing narrow gauge layout without needing to modify your trackwork, electrical systems, or existing rolling stock.
What happens if a 3D printed part arrives broken?
We provide a dedicated support service to resolve any issues with damaged components. While we use durable resins and professional packaging, global shipping can occasionally lead to breakages of fine details. If your kit arrives with broken parts, please contact us with clear photographs of the damage. We'll proactively arrange for replacement parts to be sent out from our UK workshop, ensuring you can complete your narrow gauge project as planned.