

Last Saturday, a hobbyist in a Gloucestershire workshop watched £75 worth of delicate 3D-printed resin warp beyond repair after applying a standard solvent adhesive. It's a heartbreaking moment that occurs for roughly 40% of newcomers to the hobby who dive into their first project without a specific roadmap. We all know the frustration of spending hours on a kit only to find the paint looks like thick orange peel or the 3D-print support marks are still visible under the primer. You want your narrow gauge stock to look like the professional builds seen at the Narrow Gauge North exhibition, not a clumpy mess that stalls on every piece of pointwork.
By avoiding common beginner modelling errors, you can transform your workbench results from amateurish to exhibition standard while ensuring your wagons and locomotives integrate perfectly with their donor chassis. This guide provides a clear path to mastering narrow gauge kit building by refining your tool selection, assembly techniques, and finishing secrets. You'll gain the confidence to tackle complex projects and create a fleet that runs as beautifully as it looks.
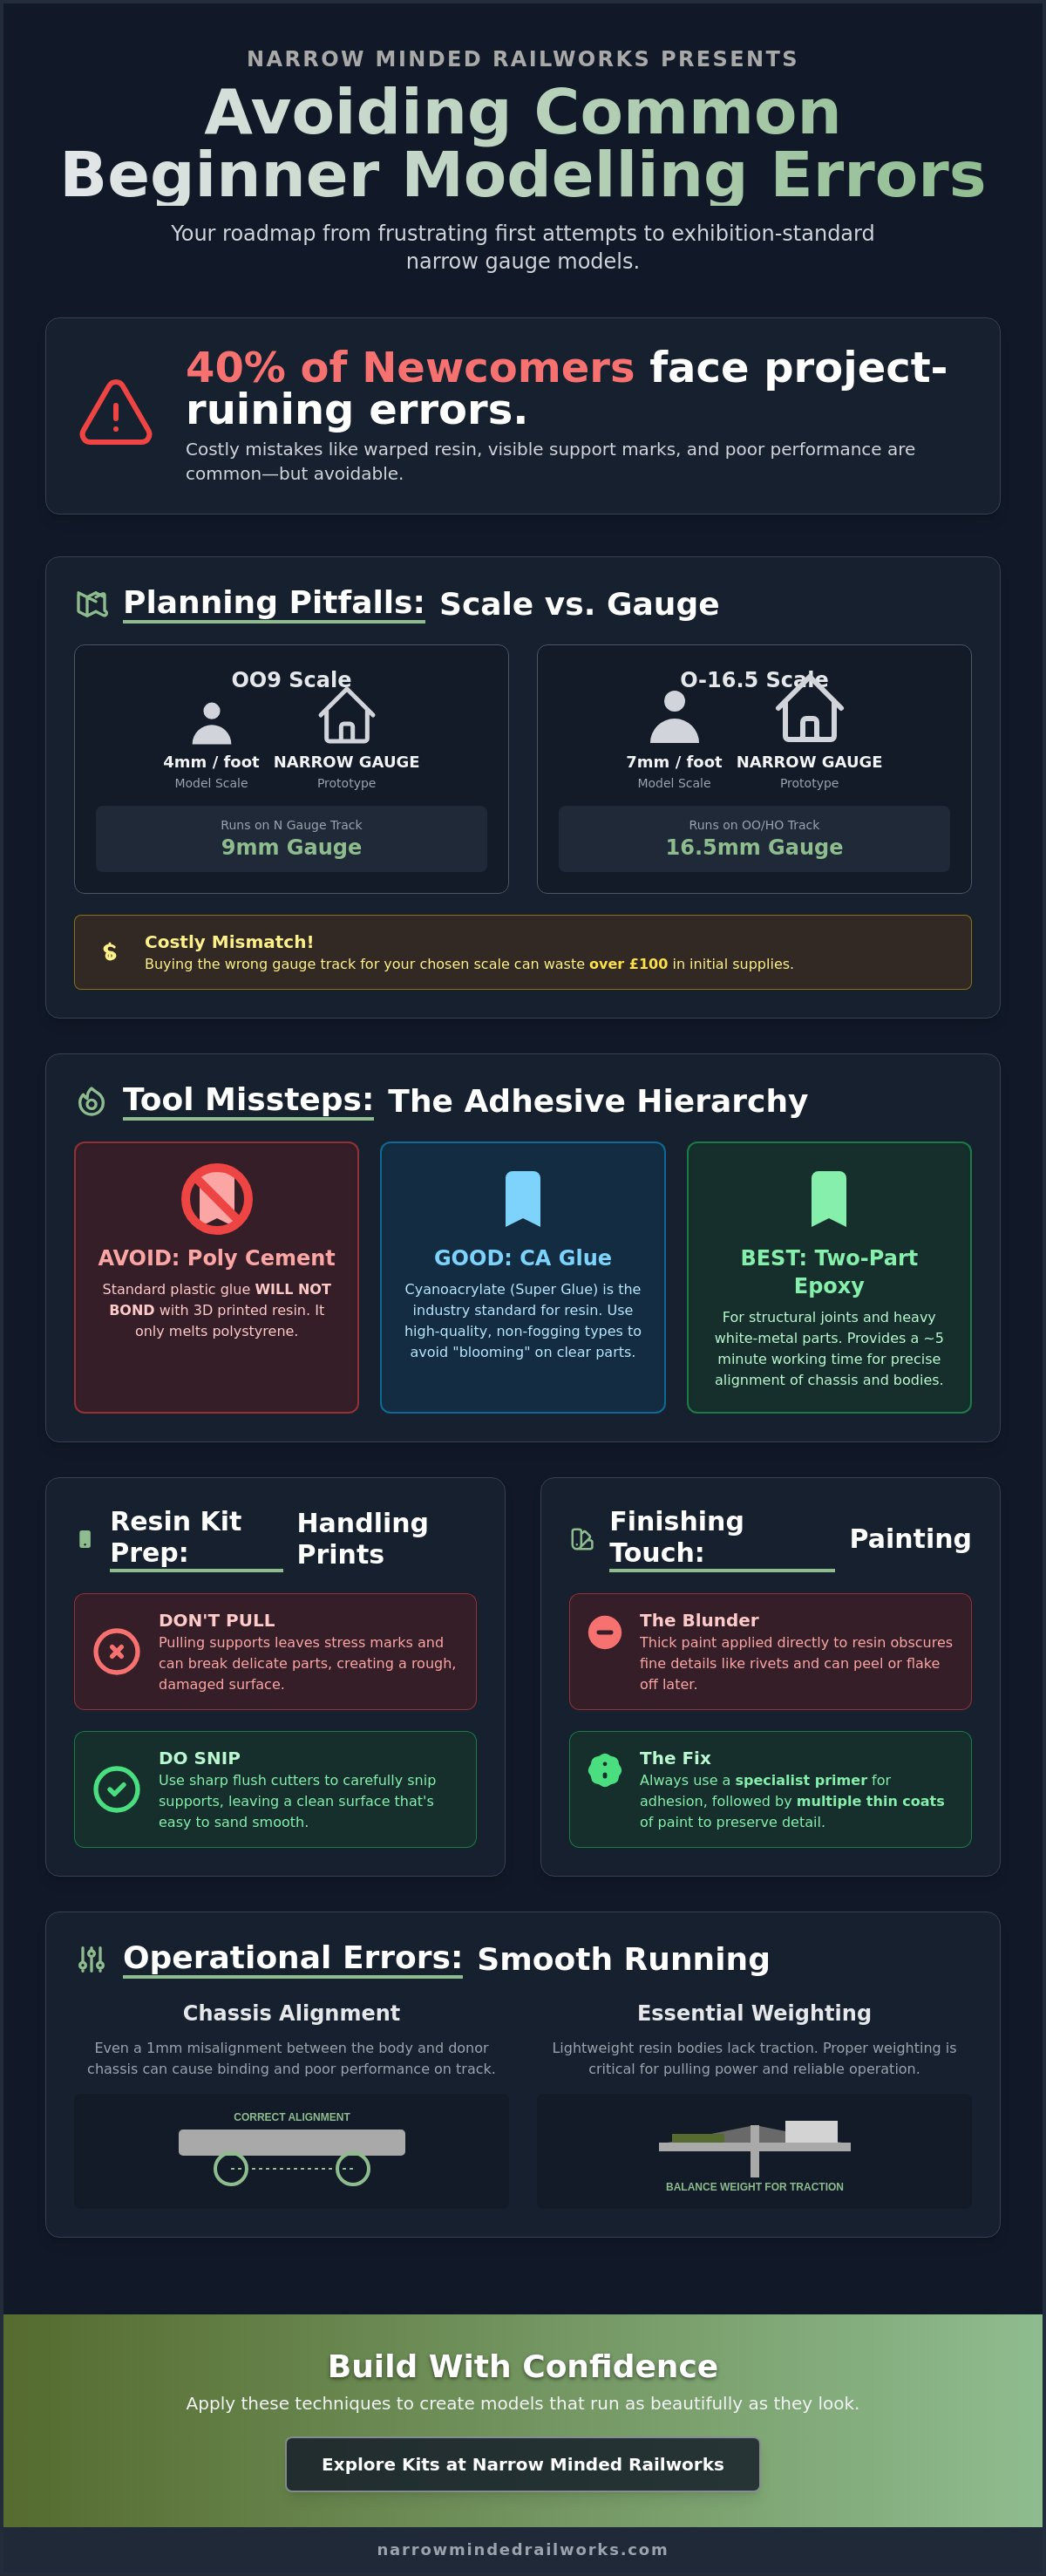
Key Takeaways
- Learn how to distinguish between scale and gauge to ensure you purchase the correct track and rolling stock for your specific narrow gauge project.
- Discover why selecting the right adhesives is critical for resin kits, helping you in avoiding common beginner modelling errors like fogged windows or failed bonds.
- Master the "snip, don’t pull" technique for removing 3D support structures and learn how to identify uncured resin before it ruins your model's finish.
- Understand the vital role of specialist primers and thin paint applications in preserving intricate rivet details and preventing unsightly peeling.
- Improve locomotive performance by learning proper chassis alignment and the essential weighting techniques required for better traction on UK layouts.
The Planning Phase: Avoiding Scale and Gauge Confusion
Many enthusiasts dive into the hobby by purchasing the first attractive locomotive they see at a show or online. This impulse often leads to the most frequent hurdles when avoiding common beginner modelling errors. You must understand that "Narrow Gauge" refers to the distance between the rails on the real-world prototype, not a specific model size. A 2-foot gauge line in North Wales looks very different from a 3-foot gauge line in Ireland, even if both are classified as narrow gauge. Understanding the fundamentals of Rail transport modelling is vital for long-term success. Beginners often confuse OO9, which runs on 9mm track, with O-16.5, which uses 16.5mm track. Buying the wrong track gauge for your intended scale can waste £100 or more in initial supplies. Researching the prototype early prevents these costly mistakes. Without reference photos from specific eras, such as the 1920s industrial boom, your "freelance" designs might lack the authentic proportions that make a layout feel realistic. To better understand this concept, watch this helpful video: Don't buy a 3D-printed body kit before verifying the donor chassis. Many kits require a specific Kato, Bachmann, or Oxford Diecast chassis to function. If the wheelbase is off by even 1mm, the body won't sit correctly. Checking compatibility before you spend £30 to £60 on a resin shell ensures your project actually makes it to the track.Choosing Your First Project Wisely
A complex white-metal steam locomotive kit with intricate valve gear is a recipe for frustration. Start with a simple wagon or a GN15 scale project. GN15 is particularly forgiving because the larger 1:24 scale makes parts easier to handle for those new to avoiding common beginner modelling errors. Always match your skill level to the kit difficulty rating. A "Level 1" wagon provides a quick win that builds the confidence needed for complex engines later.Scale vs. Gauge: The Beginner’s Greatest Hurdle
This is where most confusion happens. OO9 models represent narrow gauge prototypes but use N gauge (9mm) track. This means the scale is 4mm to the foot, but the wheels are closer together than standard gauge models. Mixing a 4mm scale figure with a 7mm scale building on a single diorama creates a jarring visual clash. For a deeper look at the basics, read our guide on what is a narrow gauge railwayTool and Material Missteps: Why "Standard" Glue Fails
The first step in avoiding common beginner modelling errors is recognizing that 3D printed resin requires a completely different approach than traditional injection-moulded plastic. Most newcomers reach for liquid poly cement, but this adhesive won't bond with resin because it relies on a chemical reaction to melt polystyrene. Resin is a thermoset material, meaning poly cement will simply sit on the surface, ruin your paintwork, and leave parts rattling in the box. Using the right chemicals is the difference between a model that lasts decades and one that falls apart during its first exhibition.
The Adhesive Hierarchy
Cyanoacrylate (CA) glue is the industry standard for 3D printed kits because it creates a rapid, high-strength bond on non-porous surfaces. However, cheap super glue from discount shops often contains high levels of impurities that cause "blooming," a white, foggy residue that permanently ruins clear window glazing and fine detail. For structural components or heavy white metal castings, a two-part epoxy resin provides a 5-minute working window that CA glue simply can't match, allowing for precise alignment of chassis and bodies.
If you're unsure about part placement, use a tiny bead of Blue-Tac to test the fit before committing to permanent adhesive. This is a tip often shared by members of the Narrow Gauge Railway Society, where experienced builders prioritise dry runs to ensure technical accuracy. For those just starting out, investing in a high-quality "odourless" or "non-fogging" CA glue for around £8 to £12 is a vital step in avoiding common beginner modelling errors and protecting your investment.
Abrasives and Cutting Tools
Precision in narrow gauge often comes down to the quality of your finish. A common mistake is using 120-grit sandpaper, which is far too aggressive for 1:76 or 1:43 scale details and leaves deep gouges in the resin. Stick to 400-grit for initial cleaning and 600-grit or higher for a smooth, paint-ready surface. Using a blunt blade is equally dangerous; it requires more downward pressure, which frequently leads to slips and snapped resin parts.
- Needle Files: These are essential for squaring off window apertures and removing print supports in tight corners where sandpaper cannot reach.
- Surgical Scalpels: Change your blade every 2 or 3 sessions. A pack of 50 surgical-grade replacements typically costs less than £10 and prevents kit damage.
- Self-Healing Mat: A £15 A3 mat is a non-negotiable investment that protects your workspace and keeps your blade edge sharper for longer.
Professional results require professional equipment. Just as enthusiasts in other precision-based hobbies look to specialists like Socom Tactical Airsoft for high-quality gear and accessories, narrow gauge modellers must invest in the best tools available to ensure their builds meet exhibition standards.
Having the right kit makes the assembly process more enjoyable and professional. You can find high-quality narrow gauge accessories and kits designed to work perfectly with these specific tools. Don't let a cheap tube of the wrong glue ruin a project you've spent hours preparing.
3D Printed Kit Pitfalls: Handling Resin with Care
Narrow gauge enthusiasts are currently spoilt for choice. 3D printed resin kits have made niche prototypes accessible to everyone, but avoiding common beginner modelling errors starts with understanding that resin isn't just "grey plastic". It's a thermoset material with entirely different properties than the injection-moulded styrene found in Airfix or Hornby kits. If you treat a resin print like a standard plastic kit, you'll likely end up with a pile of shattered components.
The first step of every build is a soapy bath. Resin prints often arrive with a microscopic layer of chemical residue or "tackiness" from the printing process. This film is a primary reason why paint fails to bond. Use warm water and a drop of standard UK washing-up liquid to scrub the parts gently with an old toothbrush. If any area feels persistently sticky, the resin may be "uncured". This happens when the print hasn't spent enough time under UV light. You can fix this by placing the part on a sunny windowsill for 15 to 20 minutes before you start assembly.
Warping is another frequent issue, particularly with long components like chassis rails or coach roofs. Don't try to force these straight while they're cold. Instead, use the "hot water" trick. Submerge the warped part in water heated to approximately 60°C for 30 seconds. The resin will soften slightly, allowing you to gently press it against a flat surface. Once it's straight, hold it under a cold tap to "set" the corrected shape instantly.
Support Removal and Surface Prep
- Step 1: Identify support pips on the underside or hidden areas first. Start your cuts here to get a feel for how the resin reacts to your tools.
- Step 2: Use high-quality sprue cutters to leave a small "stub" rather than cutting flush. The "snip, don't pull" rule is vital; pulling supports out by hand often tears "divots" into the surface of the model.
- Step 3: Sand the remaining stub flush with a 400-grit sanding stick. This grit is coarse enough to remove material but fine enough to avoid deep scratches.
Preparation is the difference between a toy-like finish and a museum-quality model. You can find more detailed advice on finishing 3D printed kits to ensure your surface prep is flawless before the primer hits the resin.
Dealing with Brittle Resin
Unlike flexible styrene, resin is incredibly brittle. It doesn't bend under pressure; it snaps. This makes avoiding common beginner modelling errors during drilling particularly important. When adding handrails or vacuum pipes, use a sharp 0.5mm drill bit in a manual pin vice. Avoid high-speed electric drills, as the heat generated can melt the resin and cause the bit to seize, instantly cracking the model.
Dry fitting is your best defence against assembly disasters. Always test the fit of every component before reaching for the glue. Because resin kits are often produced in small batches, tolerances can vary by 0.1mm or 0.2mm. For modellers looking to expand their skills or find support with specific narrow gauge prototypes, The 009 Society is a fantastic resource that offers a wealth of collective knowledge on kit building and material handling. Always use cyanoacrylate (superglue) for resin, as standard plastic cement will not create a bond.
The Finishing Touch: Painting and Weathering Blunders
The final stages of a build are often where the most visible mistakes happen. After spending hours assembling a narrow gauge locomotive, rushing the paint job can ruin the entire project. One of the most effective ways of avoiding common beginner modelling errors is to treat the finishing process with the same patience as the construction phase. Many newcomers treat paint as a way to hide assembly flaws, but in reality, paint highlights every single imperfection on the surface of your model.
Priming for Success
Skipping primer is a recipe for disaster, particularly with resin kits. Resin has a non-porous surface that doesn't naturally hold onto acrylic or enamel paints. Primer provides the essential chemical bond resin needs for top-coats to stay in place without peeling or flaking during handling. A high-quality grey primer is the best choice for identifying surface flaws like tiny print lines or glue smears before you commit to your final livery. While airbrushes offer precision, a standard £8 rattle can from a hardware shop is often sufficient for a solid base coat if used in short, controlled bursts.
Brush Painting vs. Spraying
A common error is applying paint too thick, which quickly buries fine 3D printed rivet detail and panel lines. You should always aim for a milk-like consistency by thinning your paints with the appropriate medium. Multiple thin coats always beat one thick coat; it's better to apply three translucent layers than one gloopy one. If you want a deeper dive into the technical side, check out this guide on painting 3d printed models for a full walkthrough of the process.
Rushing the drying time is another frequent pitfall for those avoiding common beginner modelling errors. If you apply a second coat before the first has fully cured, you'll likely end up with a bumpy orange-peel texture. In a typical UK climate, allow at least 24 hours between major coats. When it comes to weathering, remember that less is more. Beginners often over-apply powders and washes, turning a subtle layer of track grime into a muddy mess. Follow these basic rules for a better finish:
- Test first: Always try your weathering technique on a piece of scrap plastic before touching your model.
- Work in layers: Build up dirt and rust gradually rather than trying to achieve the look in one pass.
- Focus on logic: Apply grime where it would naturally collect, such as around the footplates or the bottom of the boiler.
- Use references: Look at photos of preserved narrow gauge lines in Wales or industrial sites for realistic colour matches.
You can always add more weathering later, but removing excess pigment is nearly impossible without damaging the underlying paintwork. Start with a light dusting on the underframe and see how it looks under layout lighting before proceeding.
Operational Errors: Making Your Model Run Smoothly
The transition from a static kit to a working locomotive is where many projects falter. A common frustration for newcomers is finishing a beautiful resin kit only for it to limp or wobble around the track. When avoiding common beginner modelling errors, you must focus on the mechanical interface between the body and the chassis. A wobbly locomotive usually isn't a faulty motor. It's almost always a mounting error where the body sits slightly skewed, which puts uneven pressure on the axles and disrupts the centre of gravity.
Electrical reliability is the other major hurdle. Resin dust from sanding is a silent killer for electrical pick-ups. Even a microscopic layer of dust on the wheel backs or pick-up strips can cause stuttering. You should always clean your chassis with a lint-free cloth and isopropyl alcohol after fitting a 3D-printed body. Additionally, check your coupler heights. Narrow gauge layouts often use tight 9-inch radius curves. If your coupler heights vary by even 1mm, the vertical leverage on a curve will cause wagons to uncouple unexpectedly.
Mounting the Body to the Chassis
Getting the ride height right is essential for both aesthetics and performance. You should use thin plasticard spacers to ensure the loco sits level on the chassis. If the body sits too low, the wheels will rub against the internal wheel arches on tight OO9 curves, causing the motor to overheat or stall. For specific step-by-step instructions on securing your motor securely, refer to this OO9 loco kit guide for chassis mounting tips.
Weighting and Balance
Most 3D-printed resin bodies are incredibly light. A standard small tank engine might weigh less than 15 grams, which isn't enough to provide traction for a realistic train load. Avoiding common beginner modelling errors involves adding mass strategically. You can hide lead shot, liquid lead, or tungsten putty inside the side tanks, the boiler, or even under the cab floor.
- Concentrate weight directly over the powered axles to maximise grip.
- Avoid making the model tail-heavy, as this causes the front wheels to lift and derail on points.
- Use a simple "finger-balance" test to ensure the model doesn't tip forward or backward when lifted from the centre of the chassis.
- Ensure any loose weights are glued firmly with PVA or epoxy; superglue can sometimes react with lead over many years.
A well-weighted OO9 locomotive should feel surprisingly heavy for its size. This extra mass doesn't just help with pulling power. It also improves electrical contact by pressing the wheels firmly onto the rails, ensuring smooth slow-speed running through complex pointwork.
Start Your Narrow Gauge Journey Today
Success in narrow gauge modelling comes down to patience and using the right materials for the job. You've learned that standard plastic cement won't bond 3D resin kits and that precise scale planning prevents costly gauge mistakes. By avoiding common beginner modelling errors, you'll ensure your first OO9 or GN15 project looks professional and runs reliably on your layout. Focus on cleaning your resin parts thoroughly and choosing the correct 1:76 or 1:22.5 scale accessories to maintain a consistent look across your scene.
Ready to put these tips into practice? Our collection features high-detail 3D resin prints specifically designed to fit 100% onto Kato and Bachmann chassis, making the assembly process straightforward for newcomers. We offer worldwide shipping from our UK base so you can get started regardless of your location. Browse our beginner-friendly OO9 and GN15 kits today!
Don't let the fear of a few technical hurdles hold you back from this rewarding hobby. Grab your tools, pick a prototype that inspires you, and enjoy the process of building something unique. You've got the knowledge to succeed, so go ahead and start building your miniature railway empire.
Frequently Asked Questions
Can I use standard plastic glue on 3D printed kits?
No, standard polystyrene cement won't work on 3D printed resin because it doesn't create the necessary chemical bond. You must use Cyanoacrylate, commonly known as Super Glue, or a two-part epoxy to join parts together. About 100% of resin kits require these stronger adhesives to ensure the components stay attached during operation on your narrow gauge layout.
What is the best way to remove support marks from a resin model?
Use a fine-grit sanding stick, starting with a 400 grit for initial leveling and finishing with an 800 or 1000 grit for a smooth surface. This prevents deep gouges in the material that would show up after painting. Always sand under a trickle of water or wear a mask to avoid inhaling the fine dust particles produced during the process.
Why does my paint keep peeling off my 3D printed kit?
Paint typically peels because of residual release agents or uncured resin left on the surface during manufacturing. To succeed in avoiding common beginner modelling errors, you must apply a high-quality primer like Halfords Plastic Primer or Tamiya Surface Primer. These primers provide a mechanical "key" that allows your chosen topcoat to bond permanently to the resin body.
Do I need to wash my model before I start building it?
Yes, you should wash every resin or 3D printed kit in warm, soapy water using a mild detergent like Fairy Liquid. This simple step removes the 5% of oily residue often left behind during the printing process. Scrub the surfaces gently with an old toothbrush to reach into the rivets and corners, then let the model air dry for 24 hours.
Which scale is easiest for a beginner: OO9 or GN15?
GN15 is often easier for beginners because its larger 1:24 scale makes parts 50% bigger and easier to handle than the smaller 1:76 OO9 scale. While OO9 uses 9mm track, GN15 uses standard 16.5mm track, which means the locomotive mechanisms are more robust and less fiddly to maintain. Larger scales allow more room for error when you're learning to solder or paint.
What happens if I break a small part of the resin kit during assembly?
You can repair most accidental breaks using a tiny drop of medium-viscosity Super Glue to reattach the part. If a small piece is missing entirely, use a two-part epoxy putty like Milliput Standard to reconstruct the detail. Mastering these repairs is a vital part of avoiding common beginner modelling errors when you're working with delicate handrails or lamp brackets.
How do I know which chassis will fit my locomotive body kit?
Always check the manufacturer's instructions, as 95% of UK narrow gauge kits are designed for specific donor mechanisms like the Kato 109 or Bachmann 0-6-0. Measure the wheelbase in millimetres to ensure it aligns perfectly with the kit's wheel arches. Most designers provide a list of compatible chassis on their product pages to help you find the right fit quickly.
Is weathering necessary for a beginner project?
Weathering isn't mandatory, but it helps hide minor assembly mistakes and gives your model a realistic, hardworking appearance. Start with a simple "wash" using 90% water and 10% black acrylic paint to highlight recessed details. This technique brings out 100% of the fine textures like door hinges and panel lines without the need for expensive airbrushing equipment or complex skills.