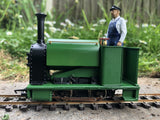
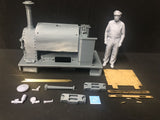
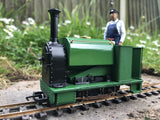
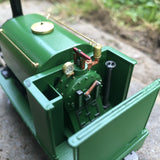
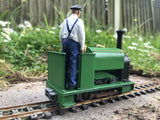
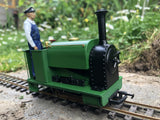
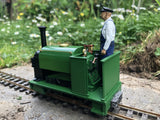
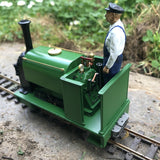
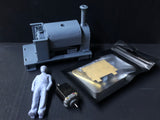
This is a steam locomotive kit for your GN15 layout, suitable for quarry, dockyard, or industrial estate settings - anywhere a reliable steam engine is needed. The kit requires simple assembly, which is very easy and comes with instructions. Superglue is recommended for assembling all the components. I use Simoniz primer and acrylic paints for finishing my models.
The kit is printed with high-detail resin in the UK and includes the chassis, body, driver, and relevant sundry dress-up items. It even comes with laser-cut plastic for the pressure gauge. These kits come unpainted and do not include the Smokey Joe chassis shown for reference; you will need to provide your own. Additionally, we offer an option with a replacement 5-pole motor for the Smokey Joe chassis. These 5-pole motors significantly improve the slow running of the Smokey Joe and are a simple clip-in replacement.
The photos of the painted steam locomotive are for reference purposes.
**GN15** is essentially narrow gauge G-Scale, modeled at 1/22.5 scale on 16.5mm gauge track.
Your kit includes:
- - Chassis suitable for a Smokey Joe chassis
- - Steam Huntsy Body
- - Control Handle
- - Hand brake
- - Whistle
- - Boiler Gauge
- - Cab Back
- - 3D Scanned Driver
- - 2 x Optional Coupling Blocks (if not using the Hornby ones)
- - Brass Rods for Handrails
- - Brass Knobs for Water Tank Handrails
- - Instructions
This listing is for these resin-printed pieces in grey, along with knobs and handrails.
Finishing:
- - All items are cleaned and cured by hand.
- - They are unassembled and ready for you to prime and paint.
- - We do our best to remove support marks, but some fine sanding may be required.
- - All pieces come unprimed and unpainted with all supports removed.
The condition is new and dispatched by Royal Mail in the UK. Our packaging is eco-friendly: the exterior is partly made from recycled materials and is fully recyclable, and the interior packing materials are acid-free and made from 99% recycled pulp fibers.
Please note that resin can be delicate, so avoid dropping your parts. We cannot be held responsible for breakages once your item has arrived. However, if the piece is broken in the post, please provide images, and we will do our best to assist you.
FAQ – Product FAQs
What exactly is this kit, and what scale is it?
This is a resin-printed steam locomotive kit designed for GN15 layouts. GN15 is essentially narrow gauge G-Scale, modeled at 1/22.5 scale running on standard 16.5 mm gauge track. The kit is ideal for quarry, dockyard, or industrial estate scenes, or anywhere you need a small, hard-working steam engine.
What is included in the kit?
Your kit includes all the resin and detailing parts needed to build the body and cosmetic chassis of the locomotive, plus a driver figure and fittings. Specifically, you receive:
- Chassis suitable for fitting a Smokey Joe chassis
- Steam Huntsy body
- Control handle
- Hand brake
- Whistle
- Boiler gauge (with laser-cut plastic for the pressure gauge)
- Cab back
- 3D scanned driver
- 2 x optional coupling blocks (if not using the Hornby ones)
- Brass rods for handrails
- Brass knobs for water tank handrails
- Printed instructions
All parts are supplied unassembled, unprimed, and unpainted in grey resin.
What is not included in the kit?
The Hornby Smokey Joe chassis shown in the photos is not included; you will need to provide your own Smokey Joe chassis to motorise the model. Paints, primer, glue, and tools are also not included. The photos of painted locomotives are for reference only to show a possible finished appearance.
Is this kit suitable for beginners?
The kit is designed for simple assembly and comes with instructions. If you are comfortable using superglue and basic modelling tools, you should find it very approachable. Some fine sanding may be required to tidy up any remaining support marks, so a little patience and care will help you get the best results.
Where is the kit produced and how is it finished before shipping?
The kit is printed in high-detail resin in the UK. Each part is cleaned and cured by hand, and all supports are removed before packing. The parts are supplied unassembled, unprimed, and unpainted, ready for you to prime and paint in your own style.
How is the kit packaged and shipped?
The kit is dispatched by Royal Mail within the UK. Packaging is eco-friendly: the outer packaging is partly made from recycled materials and is fully recyclable, and the interior packing materials are acid-free and made from 99% recycled pulp fibres, helping to protect the model while keeping waste to a minimum.
My kit arrived with a broken part. What should I do?
If your kit appears to have been damaged in the post, please take clear photos of the damaged parts and the packaging, then get in touch. While we cannot be responsible for breakages after delivery, we will do our best to assist you if the damage occurred in transit.
Some parts look slightly rough or show faint marks. Is this normal?
All items are cleaned, cured, and have their supports removed by hand. Very fine support marks or slight surface texture can sometimes remain on resin prints. This is normal and can usually be resolved with a little gentle sanding before priming. The instructions will guide you on where to check and tidy up if needed.
The parts do not seem to fit together perfectly. How can I improve the fit?
Resin parts can sometimes benefit from a light clean-up before assembly. If a joint feels tight or slightly misaligned, carefully:
- Check for any small nubs from support removal
- Lightly sand or file the mating surfaces
- Test-fit the parts before applying superglue
Take your time with dry-fitting; once you are happy with the alignment, fix the parts in place with superglue.
The brass handrails or knobs seem slightly loose or tight. What should I do?
If a brass rod or knob is tight, gently open the hole with a fine drill or needle file, checking the fit frequently. If it is slightly loose, a small drop of superglue in the hole or on the rod will secure it. Always test-fit dry first to avoid gluing anything in the wrong position.
How fragile is the resin, and how should I handle it?
Resin can be delicate, especially at thinner sections such as handrails, whistles, and small fittings. Handle parts carefully, avoid dropping them, and do not force pieces together. Work over a clear, soft surface where possible to reduce the risk of damage if something slips from your fingers.
What glue should I use to assemble the kit?
Superglue (cyanoacrylate) is recommended for assembling all components of this kit. Apply small amounts and allow each joint to set before moving on to the next. Standard plastic cement is not suitable for resin parts.
How do I install the Hornby Smokey Joe chassis?
The resin chassis is designed to be suitable for use with a Hornby Smokey Joe chassis, which you must supply yourself. Follow the included instructions for fitting the Smokey Joe chassis into the resin frame, and take care not to overtighten any fixings or stress the resin. The photos in the listing show the Smokey Joe chassis only as a reference for how the finished model can look when motorised.
Can I upgrade the motor, and how does the 5-pole motor option work?
An option is available with a replacement 5-pole motor for the Smokey Joe chassis. This 5-pole motor is a simple clip-in replacement for the original motor and significantly improves the slow running of the Smokey Joe. You will still need a Smokey Joe chassis; the 5-pole motor replaces its original motor rather than the whole chassis.
What primer and paints do you recommend?
The kit’s creator uses Simoniz primer followed by acrylic paints to finish models, and this combination works very well on resin. Whatever products you choose, ensure they are suitable for plastic or resin surfaces. Always wash parts lightly if needed, allow them to dry, then apply a good primer coat before painting your final colours.
How should I prepare and paint the parts for the best finish?
For a clean, durable finish, follow these steps:
- Inspect parts and gently sand any remaining support marks or mould lines
- Ensure parts are dry and free from dust
- Assemble the main body and chassis components using superglue
- Prime all exposed resin surfaces (for example, with Simoniz primer)
- Apply acrylic paints in thin layers, allowing each coat to dry fully
Take your time and build up the colour gradually; the photos in the listing show an example of how the finished locomotive can look once painted, but you are free to choose your own scheme.


