

What if the final five minutes of your build are actually the most dangerous? After spending dozens of hours meticulously detailing your OO9 locomotive or GN15 scenery kit, the prospect of sealing paintwork on model trains often feels like a high-stakes gamble. You want a finish that's tough enough for regular operation, yet you worry that a bad varnish choice might cloud your colors or leave your decals with that dreaded silvered edge. It is a frustrating bottleneck that many dedicated modelers face when trying to move from a painted kit to a prototypical masterpiece.
While the threat of a ruined finish is real, a systematic approach to varnishing provides a reliable solution. This guide will help you master the nuances of protecting your kits, ensuring your models achieve a professional level of realism. We will explore the specific roles of gloss, satin, and matt finishes, and how to use them to make decal edges virtually invisible. By the end of this article, you will have the confidence to apply the perfect final coat that preserves your work for years of layout use.
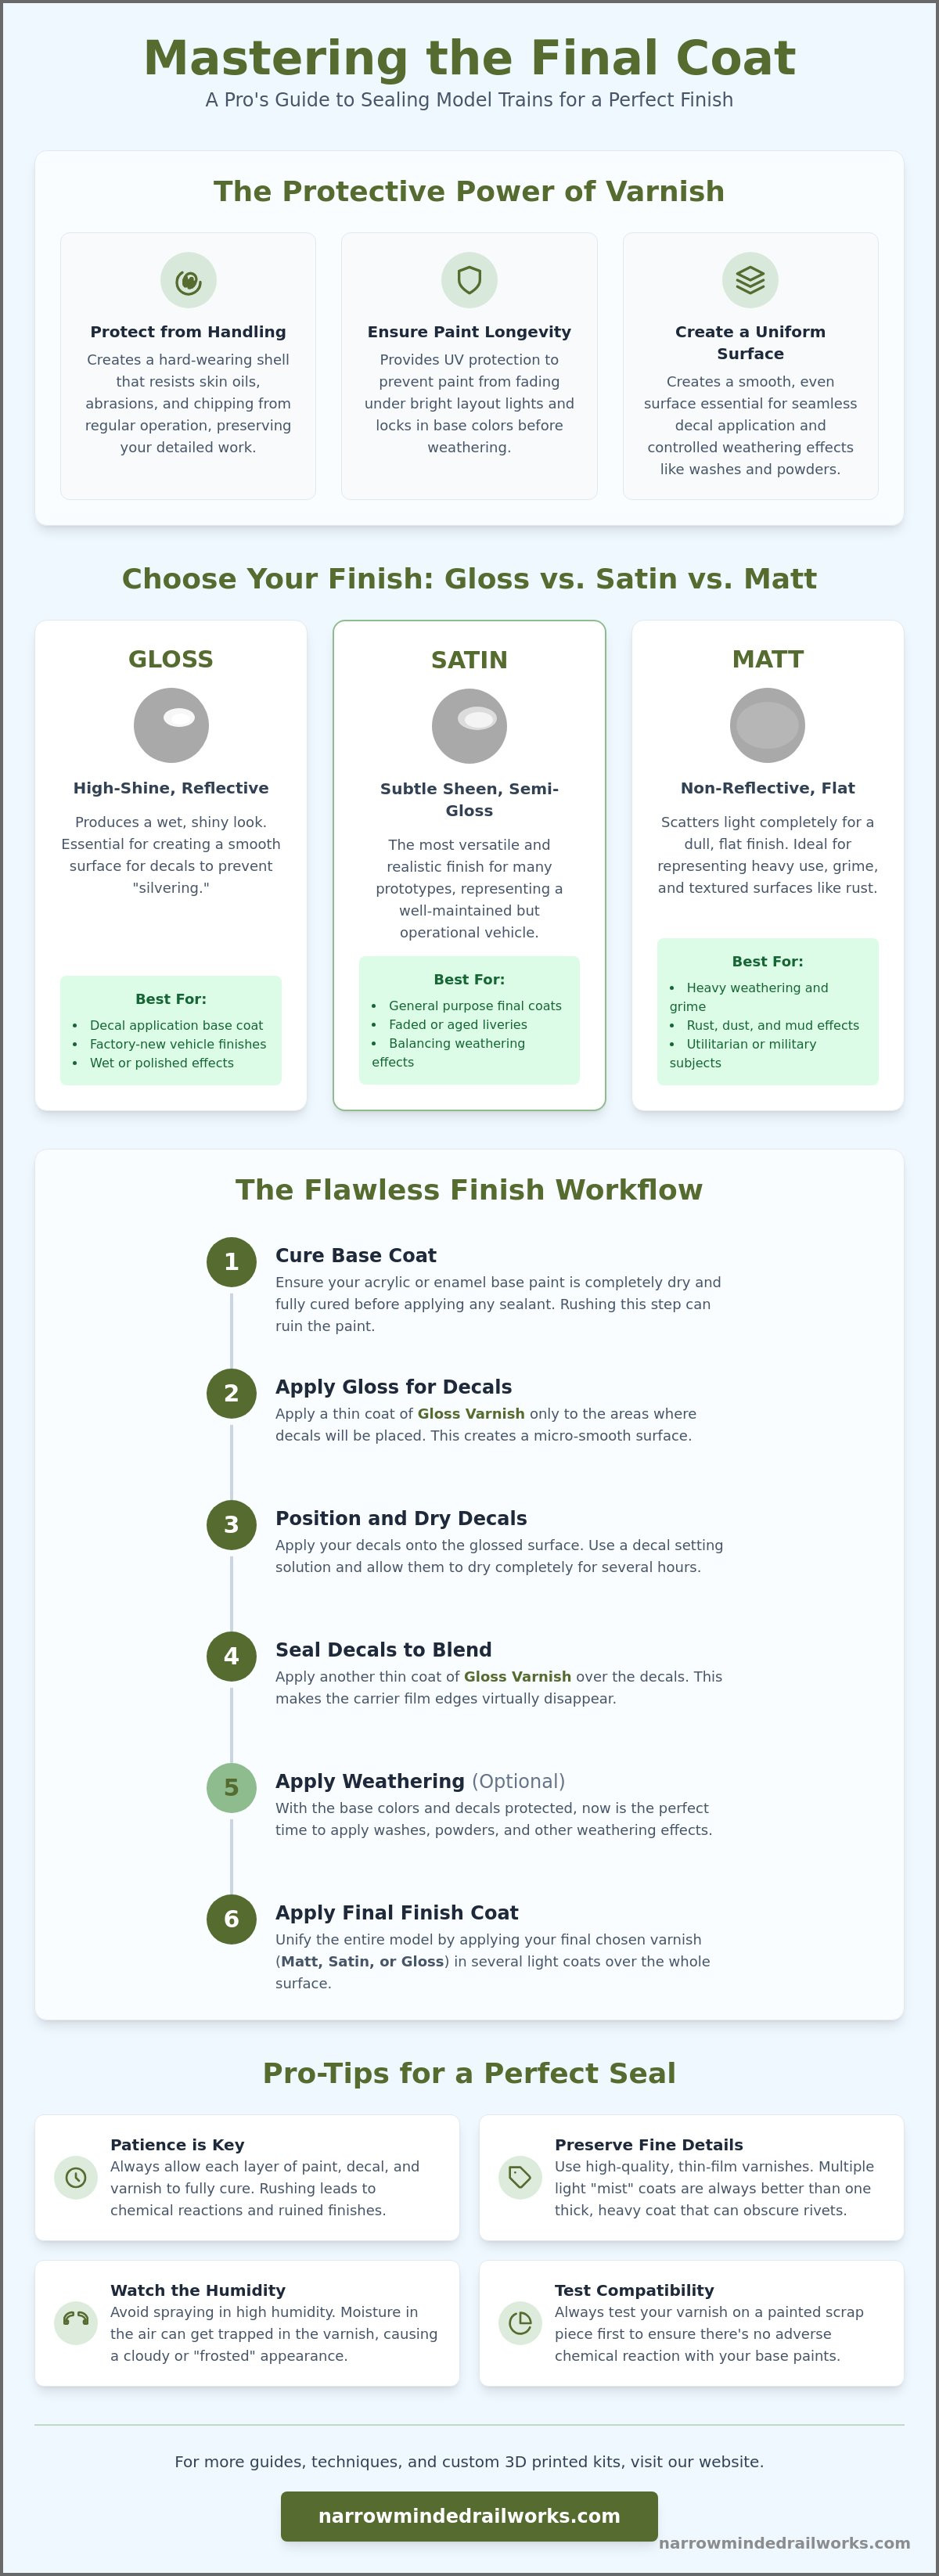
Key Takeaways
- Learn why sealing paintwork on model trains is a vital step to protect your 3D-printed kits from skin oils and handling damage.
- Discover how to choose between gloss, satin, and matt finishes to achieve prototypical accuracy for your narrow gauge locomotives.
- Understand why applying multiple thin coats is more effective than a single thick layer to avoid losing fine rivet and panel line details.
- Master the technique of using clear coats to blend decal edges seamlessly so they look painted on rather than stuck on.
- Identify how to manage environmental factors like humidity to prevent clouding and ensure a professional finish on your resin models.
The Importance of Sealing Paintwork on Model Trains
Completing a custom kit, like an OO9 locomotive or a GN15 wagon, represents a significant investment of time and creative energy. While it's tempting to put your new model straight onto the layout, skipping the final protective layer is a mistake. Sealing paintwork on model trains acts as a vital insurance policy against the hazards of regular operation. Without this barrier, the vibrant colors and delicate finishes you've carefully applied remain vulnerable to the surrounding environment.
You might worry that adding another layer will obscure fine details on a 3D-printed resin model or a small-scale narrow gauge kit. However, the proactive solution for sealing paintwork on model trains is choosing a high-quality, thin-film sealant that preserves these features while providing essential UV protection. This layer prevents your paint from fading under bright layout lights and creates a "unified" surface that prepares the model for its final detailing stages. It acts as a protective skin that keeps the finish consistent across different materials like resin, plastic, and white metal.
To better understand this concept, watch this helpful video:
Protecting Your Hard Work from Handling and Dust
Active layouts require frequent handling of rolling stock for coupling, uncoupling, and general movement. Even with clean hands, natural skin oils can react with certain paint types over time, leading to discoloration or peeling. 3D-printed kits often have sharp edges and intricate rivet details where paint is most likely to rub off during use. Applying a dedicated sealant creates a hard-wearing shell that resists these abrasions. It also makes long-term maintenance much safer. When dust eventually settles on your rolling stock, a sealed surface allows you to use a soft brush or compressed air without the risk of lifting the underlying pigment or damaging the paint bond.
Creating a Uniform Surface for Weathering and Decals
To achieve a professional finish, you need more than just a single coat of paint. Decals often struggle to adhere to the microscopic texture of matt paint, leading to "silvering" where air is trapped beneath the film. By sealing with a varnish, you provide a smooth, level surface that allows decals to sit flush against the model. This step is equally critical for weathering. A clear coat "locks in" your base colors, preventing aggressive oil washes or powders from staining the primary paint layer. If you are just starting your build, refer to our guide on painting 3D printed models for the essential preparation steps needed before you reach the sealing stage.
Selecting the Right Varnish: Gloss, Satin, or Matt?
Choosing a finish requires balancing aesthetic goals with chemical compatibility. While aesthetic preference plays a role, the technical requirements of your build should dictate your choice of varnish. The most common pitfall is a chemical reaction between the sealer and the base coat. Acrylic varnishes are water-based and generally safe for all paint types, making them an excellent choice for beginners. However, solvent-based enamel or lacquer clear coats offer superior durability for models handled daily. You must ensure your base coat is fully cured before applying a solvent-based sealer to avoid bubbling or lifting the paint. When sealing paintwork on model trains, the choice of varnish chemistry determines the longevity of your finish.
Understanding light reflection is equally vital for prototypical accuracy. A high-gloss finish reflects light directly, whereas a matt finish scatters it. For narrow gauge enthusiasts, this distinction defines the character of the rolling stock. Steam-era locomotives frequently featured glossier liveries when new, which eventually faded to a satin sheen through heat and grime. In contrast, modern diesel or industrial narrow gauge units often carry a more utilitarian, low-sheen paint from the factory. While choosing the wrong sheen can make a model look like a toy, researching your specific prototype provides the solution for a realistic result.
Gloss Finishes: The Secret to Perfect Decal Application
Gloss finishes are often misunderstood as purely decorative. In reality, they are a functional necessity for applying transfers. Matt paint has a microscopically rough surface that traps air under decal film. This trapped air creates a shimmering effect known as "silvering" that ruins the illusion of painted-on lettering. While matt finishes provide the best realism for weathered kits, a gloss base layer offers the necessary solution for silvering-free decal application. Professionals use the "sandwich" technique: apply a gloss coat, place the decals, and then seal everything with a final matt or satin layer to restore the desired sheen.
Matt and Satin: Achieving Prototypical Realism
Prototypical realism often involves mixing finishes on a single model. Steam locomotives usually benefit from a satin finish on the boiler to mimic oily, wiped-down metal. Conversely, the wooden frames of our OO9 wagon kits often look best with a dead-flat matt finish to simulate weathered timber. Mixing these sheens differentiates between materials like canvas roofs, metal tanks, and wooden planking. This variety adds depth that a single uniform coat cannot provide. By sealing paintwork on model trains with varied sheens, you replicate how different surfaces age and reflect light in the real world.
Master Methods for Applying Model Railway Sealants
Applying the final clear coat is a technical process that demands patience and the right environmental conditions. While you might want to finish a project quickly, the golden rule for sealing paintwork on model trains is to apply multiple thin coats rather than one heavy layer. Thick applications tend to pool in recesses, obscuring the fine rivet patterns and panel lines of your kit. A proactive solution is to use light, misting passes, allowing each to dry before the next. This builds a durable barrier without sacrificing the intricate textures of the model.
Environmental factors play a decisive role in the quality of your finish. High humidity is a primary enemy of clear coats, often causing a phenomenon known as "blushing" where moisture gets trapped, resulting in a cloudy or white frost effect. If the humidity exceeds 60%, it is best to postpone spraying or move to a climate-controlled environment. Additionally, you must distinguish between drying and curing times. A model might be touch-dry in thirty minutes, but it can take twenty-four to forty-eight hours for the sealant to fully cure. Waiting for a full cure ensures that subsequent weathering layers won't react with the sealer.
Safety is a non-negotiable aspect of using solvent-based sealers. Lacquer and enamel varnishes release strong vapors that require a well-ventilated workspace or a dedicated spray booth. Always wear a respirator fitted with organic vapor cartridges to protect your health. For those working with water-based acrylics, while the odor is lower, a simple dust mask still helps prevent the inhalation of fine spray particles during the process of sealing paintwork on model trains.
Airbrushing vs Aerosol Cans: Which is Better for Kits?
Airbrushes offer the precision needed for the delicate details found in our OO9 and GN15 kits, allowing you to vary the pressure and paint flow. Conversely, aerosol "rattle cans" provide a convenient solution for larger O-16.5 scale models where covering broad surfaces quickly is a priority. While rattle cans lack the fine control of an airbrush, they are effective if you maintain a consistent distance of about 20cm from the model. If you are uncertain about which scale suits your goals, our OO9 locomotive kit guide provides excellent context on scale and detail levels.
Hand-Brushing Varnish: When and How to Do It
Hand-brushing remains a valuable technique for sealing small detail parts or isolated areas without over-spraying the entire locomotive. To avoid unsightly brush marks, use a high-quality, soft-bristle brush and thin the varnish slightly with the appropriate medium. Apply the liquid in one direction and avoid "over-working" the area as it begins to set. This method is particularly effective for 3D-printed textures where you need to ensure the sealant reaches into deep crevices without flooding the surrounding surface.
Advanced Tips for Sealing Decals and Weathering Layers
Weathering provides the final layer of realism to a model, but these delicate effects are easily damaged by handling. While some modelers suggest that powders remain stable on their own, the reality is that they will eventually smudge or rub off during layout operation. The proactive solution is to use sealants to create distinct layers in your weathering process. This layering technique involves applying a light coat of varnish between different stages, such as after an oil wash but before applying dry powders. It allows you to build up complex, prototypical textures without the risk of muddying the previous work.
A common frustration for many hobbyists is the "disappearing weathering" effect. When you apply a final matt coat, the microscopic particles of weathering powder often lose their contrast and seem to vanish into the finish. To counter this, you should apply your powders slightly more heavily than the intended final result. The process of sealing paintwork on model trains will slightly dampen the powder's intensity, bringing it back to the desired level of subtlety. This method ensures your weathering remains visible and durable for years of use.
Avoiding the Dreaded Silvering and White Frosting
White clouding or "frosting" occurs when moisture becomes trapped under the sealant, usually during humid conditions. If you encounter this, the "hairdryer trick" provides a potential rescue. By applying gentle, low-level heat to the affected area immediately after spraying, you can sometimes draw out the moisture before the varnish fully sets. This requires extreme caution to avoid warping 3D-printed resin parts. Additionally, ensure your decals are completely dry, typically for at least 24 hours, before the final stage of sealing paintwork on model trains. Any residual water trapped under the transfer film will cause immediate silvering once the clear coat is applied.
Sealing Weathering Powders and Washes Effectively
Protecting powders requires a specific application method to prevent "blow-off." If you spray with too much pressure, the air from the airbrush will simply remove the powder from the model. The solution is to mist-coat from a distance of at least 30cm, allowing the varnish to settle gently on the surface. Be aware that different varnishes change the visual weight of your effects. A matt varnish is ideal for soot and dry rust, but it will dull the appearance of fresh oil leaks. For locomotive motion parts or hydraulic rams, use a fine brush to apply a targeted gloss coat over the matt finish to achieve a convincing greasy look. If you are ready to start your next highly detailed project, explore our range of locomotive and scenery kits to practice these advanced finishing techniques.
Best Practices for Sealing 3D Printed Resin Model Kits
3D-printed resin has revolutionized the availability of narrow gauge kits, but it requires a different finishing mindset compared to traditional injection-molded plastic. While resin provides exceptional detail, its surface can be slightly more porous, which affects how it absorbs paint and clear coats. When sealing paintwork on model trains made from resin, you must ensure the underlying primer is fully compatible with your chosen varnish. A mismatch here can lead to the sealant "crazing" or failing to bond, potentially ruining the intricate rivet work on an OO9 locomotive or the planking on a GN15 wagon.
One of the most significant risks with resin kits is the loss of fidelity due to over-application. Because the details on a 3D-printed model are often sharper than those on plastic, they are also more susceptible to being "filled in" by a heavy clear coat. The proactive solution is to use a high-quality airbrush at a lower pressure, allowing you to build up the seal in almost invisible stages. This approach maintains the "scale look" of tiny locomotive bodies, ensuring that even the smallest hinges and latches remain crisp and visible after the final coat is dry.
Preparing 3D Printed Surfaces for Final Clear Coats
Before you begin sealing paintwork on model trains, you must verify that the resin is completely cured. If a model feels slightly "tacky" or sticky to the touch, it indicates that the resin or the base coat hasn't fully set. Sealing a tacky surface will trap uncured material, leading to a finish that never hardens and eventually cracks. Additionally, resin is highly prone to static, which attracts dust particles. Using an anti-static cloth or a quick pass with a clean, soft brush in a dust-free environment is the best way to prevent debris from being permanently trapped under your varnish. A well-applied satin or matt sealer can actually help hide minor 3D print layer lines by diffusing the way light hits the surface.
Maintaining Detail on Narrow Gauge Locomotives
For O-16.5 / 7mm and GN15 scale kits, the goal is to highlight the diverse textures of narrow gauge railways. These models often feature a mix of wood, iron, and coal, each requiring a specific visual weight. While a uniform coat is easier, applying "less is more" ensures these textures aren't flattened into a single mass. Use this final checklist for a professional, layout-ready finish:
- Inspect for pooling: Check deep recesses like cab interiors and underframes for excess liquid before it sets.
- Verify sheen levels: Ensure the level of matt or satin matches the prototypical material, such as a flatter finish for weathered wood.
- Clean the nozzle: If you are using an aerosol, clear the nozzle before the final pass to avoid "spitting" droplets onto the model.
- Final Cure: Allow the model to sit for at least 48 hours before placing it in a display case or onto an active layout.
Bringing Your Narrow Gauge Models to Life
Mastering the final protective layer is the vital bridge between a simple kit and a realistic miniature. While the technical constraints of humidity and curing times can be restrictive, following a disciplined approach ensures your hard work remains safe from handling and UV damage. Remember that sealing paintwork on model trains is not just about protection. It is about controlling the final sheen to accurately represent the weathered iron, wood, and steel surfaces of your specific prototype.
Every locomotive and wagon you build offers a new opportunity to refine these finishing skills. We understand the unique challenges of narrow gauge modeling because our kits are designed by modellers for modellers. If you are ready to start your next project, browse our range of high-detail OO9 and GN15 kits today. With specialist narrow gauge designs and worldwide shipping available, you can focus on perfecting your techniques. We look forward to seeing your prototypical masterpieces on the layout.
Frequently Asked Questions
How long should I wait for paint to dry before sealing?
While you might want to finish a project quickly, sealing paint too early traps solvents that can cause the finish to bubble or lift. The proactive solution is to wait at least 24 to 48 hours before applying a sealer. Although paint often feels dry to the touch within an hour, it needs this time to fully outgas and cure. This delay is especially important for enamel paints, which cure more slowly than acrylics.
Can I use a matt varnish directly over a gloss coat?
Achieving a prototypical finish often requires a matt sheen, yet decals need a gloss surface to adhere correctly. The proactive solution is to apply a matt varnish directly over the gloss coat once your transfers are set. This "sandwich" method provides the smooth surface needed for decals while restoring a realistic flat finish. Ensure the gloss layer is completely dry before applying the matt sealer to prevent the layers from reacting or clouding.
Why did my clear coat turn white or cloudy?
Clouding, often called "blushing," typically happens because moisture was trapped under the sealant during application. This occurs most frequently when humidity levels exceed 60% or when spraying in very cold conditions. The proactive solution is to move the model to a warm, dry room immediately. You can also use a hairdryer on a low, gentle setting to draw out the moisture before the coat cures.
Will sealing my model train affect the electrical pick-ups?
Varnish acts as an insulator and will stop electricity from reaching the motor if it coats the wheel treads or pick-up wipers. The proactive solution is to mask off these electrical contact points or clean them immediately with a cotton bud soaked in solvent after sealing paintwork on model trains. Maintaining clean metal-to-metal contact is essential for the reliable operation of your locomotives on any narrow gauge layout.
Is it better to seal the model before or after assembly?
Applying varnish to a fully assembled model often leads to pooling in tight corners or stuck moving parts. The proactive solution is to seal major sub-assemblies before you complete the final assembly. You should still wait until all transfers and base weathering are applied to the body shell before the final stage of sealing paintwork on model trains. This ensures the finish remains uniform across the entire exterior.
Can I use household spray varnishes on my model railway kits?
You should avoid household spray varnishes because their high solvent content can melt delicate 3D-printed resin or fine plastic details. These products are designed for furniture or large DIY projects and apply far too thickly for small-scale kits. The proactive solution is to use dedicated hobby sealants. These are specifically formulated for the fine tolerances and materials used in OO9, GN15, or O-16.5 scale models.
How do I protect the windows and cab glass when spraying a sealer?
Even a small amount of over-spray will permanently fog the cab glass or windows of your locomotive. The proactive solution for many experienced kit builders is to leave the glazing out entirely until the final sealing and weathering steps are finished. If you have already installed the glass, you must use high-quality masking tape or a liquid masking fluid to cover transparent parts before you begin spraying.
What is the best way to clean a sealed model train?
Dusting intricate kits can be difficult without damaging the paint. Because a proper sealant provides a durable barrier, the proactive solution is to use a soft, dry makeup brush for routine cleaning. You can safely use a slightly damp cloth for stubborn grime without the risk of lifting the underlying pigment. Always avoid aggressive chemical cleaners, as these might soften the varnish and ruin the prototypical sheen of your model.