

You don't need a spare room to enjoy the tactile presence of 7mm scale narrow gauge modelling. While many enthusiasts assume that O-16.5 is too bulky for a standard bookshelf, the reality is that this scale thrives when confined to a micro footprint. Finding the right o-16.5 micro layout inspiration starts with embracing the constraints of a small space rather than fighting them. It's true that the lack of ready-to-run options can feel daunting, but utilizing detailed locomotive and wagon kits provides a reliable way to populate your rails. While tight curves often cause concern regarding derailments, careful planning and the use of flexible track ensure smooth operation on even the smallest boards.
We understand that starting a new project in a larger scale requires a clear path forward. This article provides the practical guidance you need to move from a blank baseboard to a finished scene. You'll discover how to design a characterful narrow gauge layout using creative themes and space-saving techniques. We'll provide a clear track plan idea, prove that 7mm scale works beautifully in under four square feet, and offer a curated list of kits to help you begin your build with confidence.
Key Takeaways
- While 7mm scale is physically larger, you can achieve a more substantial presence on standard 16.5mm track without needing a massive footprint.
- Finding the right o-16.5 micro layout inspiration involves selecting themes like slate quarries or brickworks that maximize vertical or repetitive interest.
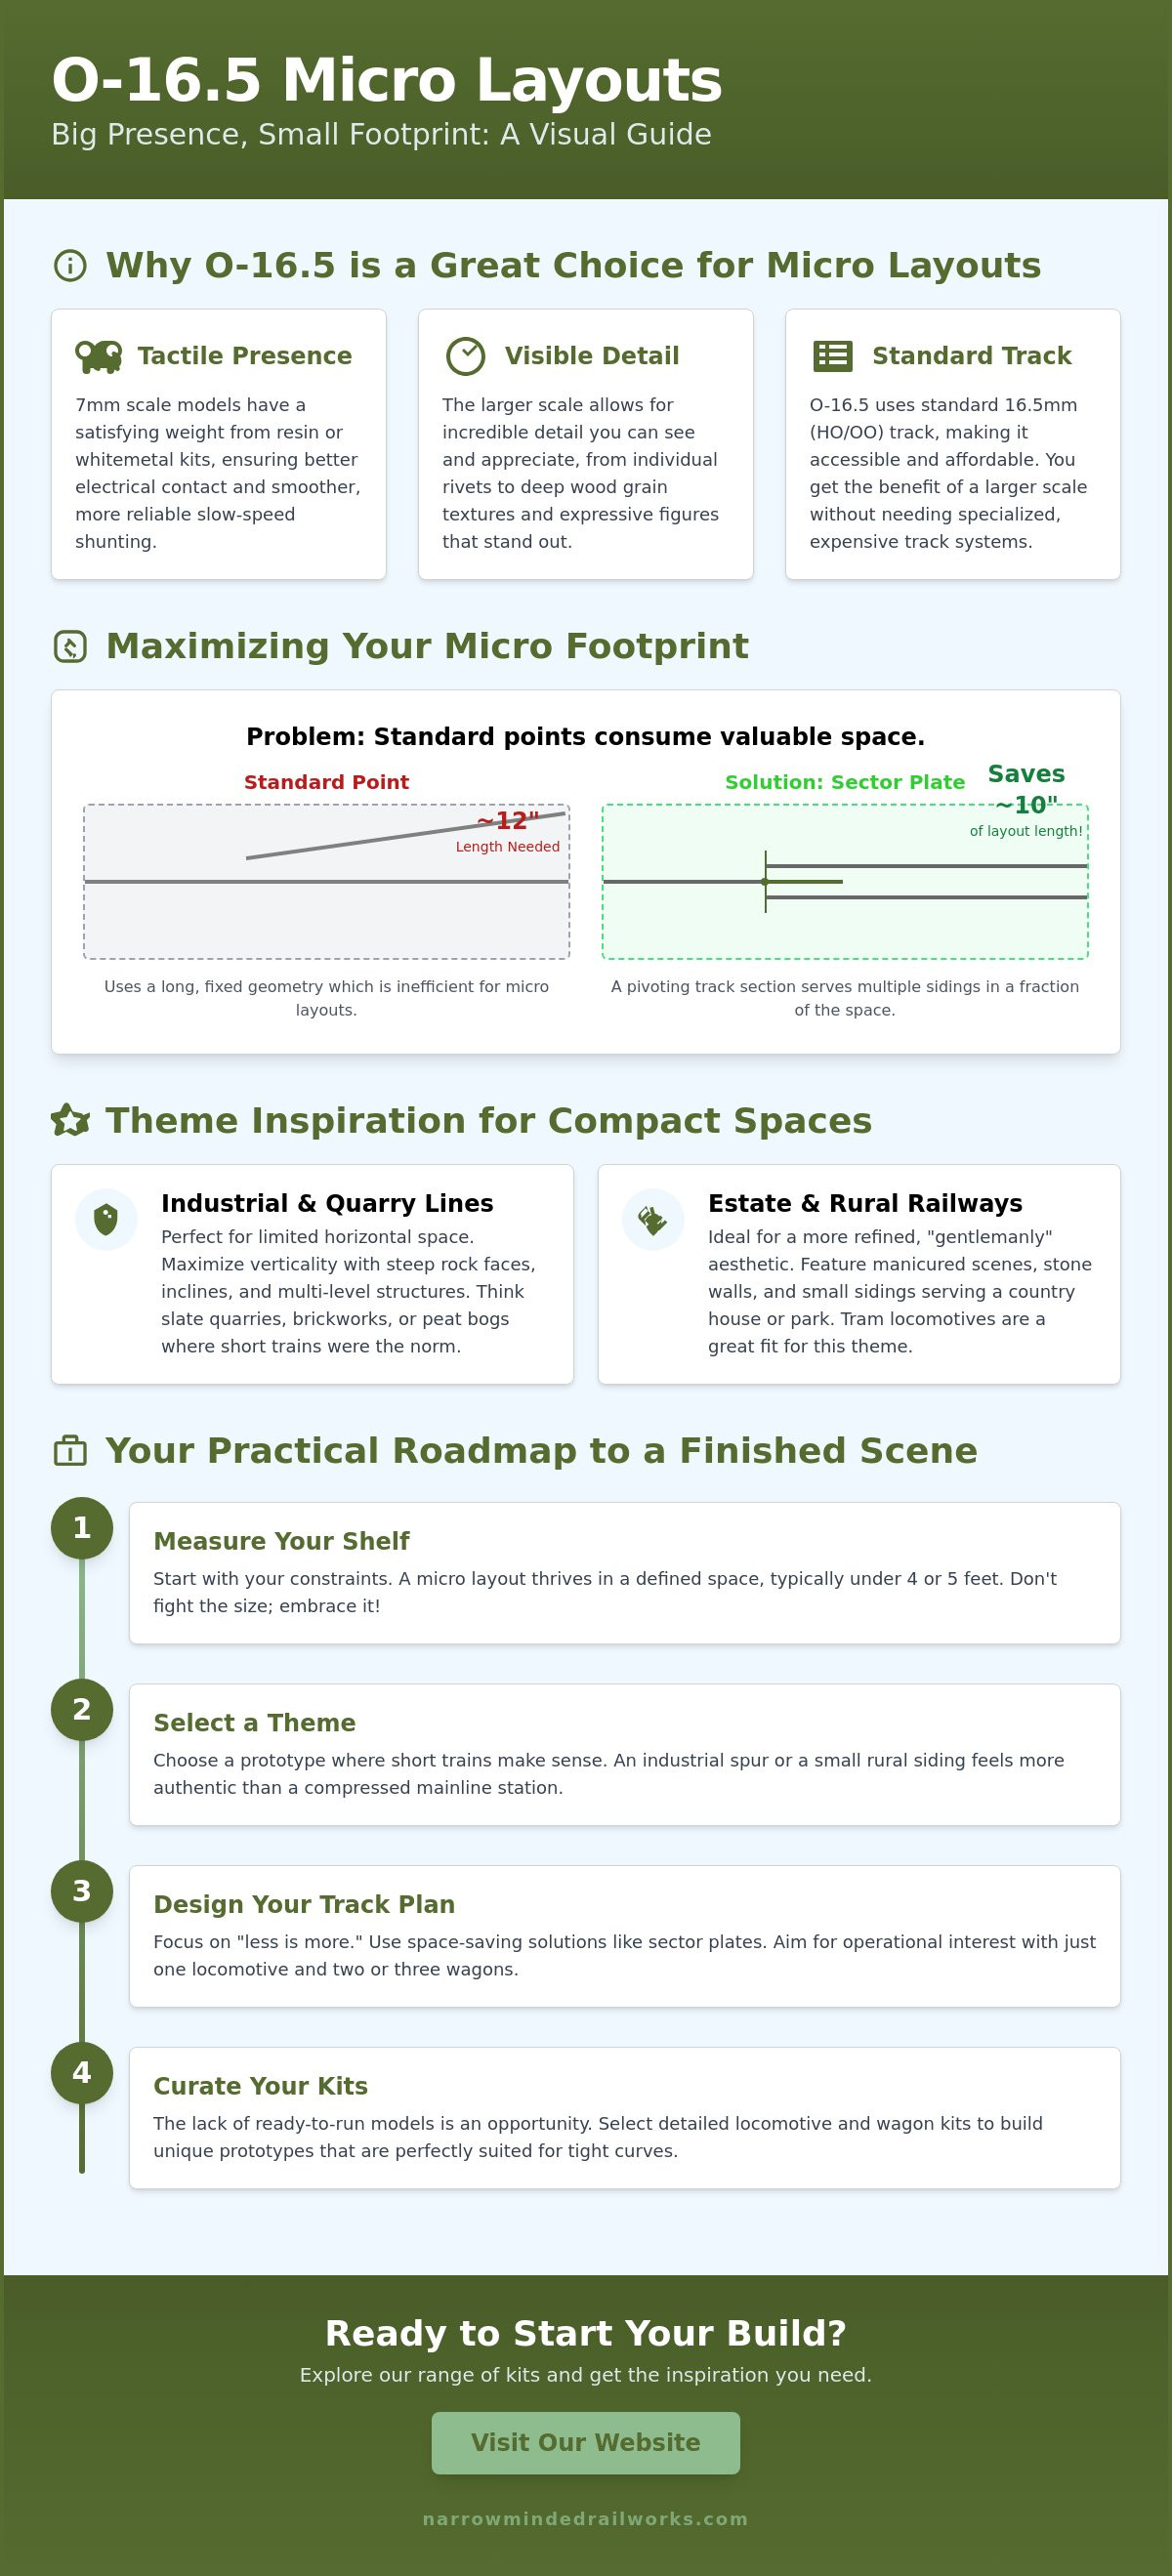
- Limited space often prevents the use of standard points, so we examine how sector plates can save up to ten inches of layout length.
- The lack of ready-to-run models shouldn't be a barrier, as specialized kits allow you to build unique prototypes that handle tight curves with ease.
- Starting a new scale can be daunting, but following a structured roadmap helps you move from measuring your shelf to selecting a final theme.
Why O-16.5 is the Ultimate Scale for Micro Layouts
Choosing a scale for a small shelf often leads modelers toward OO9 or N gauge. While these smaller scales offer more track in a tight area, they sometimes lack the physical presence many enthusiasts crave. O-16.5 provides a proactive solution by combining 7mm scale detailing with the accessibility of 16.5mm track. This specific gauge represents narrow gauge prototypes that ran on tracks roughly 2 feet 3 inches to 2 feet 6 inches apart. It's often discussed alongside the O-16.5 and On30 scale used in American modelling, as both rely on the same reliable track width.
Working in this scale ensures that your models have a satisfying weight. Heavier resin or white metal kits provide better electrical contact and smoother running than lighter alternatives. If you're looking for o-16.5 micro layout inspiration, you'll find that the larger size makes slow-speed shunting far more reliable. We recognize that space is limited, but this constraint actually encourages a focus on quality over quantity. You don't need twenty wagons when three highly detailed models provide a more immersive experience.
To see how a compact 7mm layout functions in a limited space, watch this exhibition example:
The 7mm Advantage: Detail You Can See
The primary benefit of 7mm scale is the level of visible detail. You can easily model individual rivets, deep wood grain on wagon planks, and expressive figures that don't disappear into the background. This scale allows for realistic textures that are difficult to replicate in smaller sizes. Every movement of the locomotive feels deliberate. The "chunky" operation provides a mechanical satisfaction that defines the 7mm experience. It's the perfect bridge between narrow gauge charm and standard track availability.
Understanding the Footprint Constraints
A micro layout in this scale usually occupies a space under 4 or 5 feet in length. While the footprint is small, you can still create a functional scene. The key is to adopt a "less is more" philosophy. Instead of trying to fit a full station, focus on a single siding or an industrial spur. Your consists will likely be short, perhaps one locomotive and two wagons. This keeps the scene from looking cluttered. It ensures the focus remains on the high level of detail you've built into your o-16.5 micro layout inspiration project.
Theme Inspiration: From Industrial Tramways to Rural Sidings
Selecting a theme for a micro layout requires balancing your interests with the physical limits of the baseboard. While a sprawling mainline terminus is impossible, a focused narrow gauge scene allows for deep immersion. Finding o-16.5 micro layout inspiration often starts with industrial prototypes where short trains were the norm. These lines weren't built for speed or distance; they were built for specific tasks in cramped environments.
The slate quarry is a classic choice for those with limited horizontal room. By maximizing vertical space with steep rock faces and inclines, you can create a dramatic scene in a footprint as small as 24 inches. Conversely, a peat bog or brickworks theme offers a flat, minimal landscape. These settings rely on repetitive interest, such as rows of drying bricks or stacked peat, to provide visual texture without requiring complex structures. For modelers seeking historical accuracy or technical data, the 7mm Narrow Gauge Association serves as an invaluable resource for prototype research.
For a more refined look, the estate railway provides a gentlemanly narrow gauge aesthetic. Think manicured lawns and stone walls serving a country house or a private park. This theme often features tram locomotives, which are ideal for concealing the mechanical components of your builds. If you're truly pushed for space, the box file challenge involves fitting a functional scene into a standard office folder. It sounds impossible for 7mm scale, but with a clever track plan, it's a rewarding exercise in minimalism.
Industrial Grit: The Quarry and the Works
Industrial settings thrive on tight curves and short wheelbase wagons. These prototypes were designed to navigate cramped factory floors, making them perfect for micro layouts. You can use 3D printed industrial debris, such as rusted gears or discarded skips, to set a realistic scene. For those interested in the motive power that defined these lines, read A Modeller's Guide to Tram Locos to explore different types and kit options. Utilizing our O-16.5 scale kits allows you to build specific prototypes that larger manufacturers often overlook, ensuring your layout stands out.
Rural Charm: The Village Terminus
If you prefer a gentler pace, a rural village terminus offers plenty of character. A single platform and a short run-around loop provide enough operational interest for a relaxed shunting session. The challenge here is incorporating 7mm scale buildings without overwhelming the baseboard. We suggest using low-relief structures or placing buildings at an angle to create the illusion of depth. Clever backscenes can suggest an off-stage world, making your o-16.5 micro layout inspiration feel part of a much larger landscape. By focusing on a few high-quality details, you ensure the scene remains balanced and professional.
Space-Saving Track Plans: The Art of the Sector Plate and Inglenook
Designing a 7mm layout on a shelf requires a shift in perspective. Standard Peco O-16.5 turnouts, such as the medium radius SL-E595, offer excellent reliability but consume significant linear space. In a four-foot footprint, a pair of points and a short run-around loop can easily occupy half your available scenery. We recognize this physical constraint, so we recommend exploring alternative track geometry to maximize your operational potential without sacrificing detail.
A sector plate acts as a proactive solution for the space-starved modeller. By pivoting a single length of track from one end to serve multiple sidings, you eliminate the need for the long "lead-in" required by traditional turnouts. This technique typically saves between 6 and 10 inches of length. It's a vital component when seeking o-16.5 micro layout inspiration for a bookshelf or box file project. For technical standards and community-tested designs, the 7mm Narrow Gauge Association provides extensive documentation on building reliable moving track sections that maintain electrical continuity.
The Sector Plate: A Micro Modeller’s Best Friend
Building a sector plate doesn't have to be complex. You can construct a simple pivot using a bolt or a specialized bearing, ensuring the track ends align precisely with your fixed sidings. To maintain electrical contact, we suggest using flexible "dropper" wires or phosphor bronze wipers that press against a copper-clad board. This setup allows you to move locomotives between different parts of the layout in a space that wouldn't accommodate a standard point. If you're building onto one of our GN15 or O-16.5 kits, this method ensures your locomotive has enough room to clear the "fouling point" of the next track.
Shunting Puzzles for Operational Interest
Small layouts don't have to be static. The Inglenook Sidings is a classic 3-2-2 shunting puzzle that works perfectly in 7mm scale. The rules are simple: you must assemble a specific train from wagons scattered across three sidings. Because O-16.5 stock is heavier and runs on 16.5mm track, the slow-speed operation required for these puzzles is much smoother than in smaller scales. You'll find that the "clunk" of a 7mm wagon being coupled is far more satisfying than the fiddly operation of N gauge.
If you have a bit more width, you might even attempt a Timesaver layout. While more complex, it offers hours of engagement in a tiny area. To keep the focus on the modelling, utilize our diorama tools and scenery to mark out the uncoupling points clearly. By prioritizing these smart track plans, you ensure your micro layout is a functional railway rather than just a stationary display.
Detailing Your Micro Layout: Using 3D Printed Kits for Maximum Impact
Modellers often feel discouraged by the lack of ready-to-run locomotives in 7mm narrow gauge. While major manufacturers focus on standard gauge, the O-16.5 market relies heavily on the kit-building community. We recognize this as a hurdle, so we offer detailed resin kits as a proactive solution. 3D printing has become the primary method for producing niche prototypes, allowing you to access unique industrial and rural designs that were previously only available through scratch-building. This technology captures the heavy rivets and deep wood grain essential for o-16.5 micro layout inspiration, ensuring your small scene has the physical presence it deserves.
In a micro layout, every wagon acts as a character in a story. Because you're only running two or three vehicles at a time, you can afford to spend more time on individual details. Adding 3D printed oil drums, discarded tools, and realistic figures helps "sell" the 7mm scale. These small touches provide the visual cues that distinguish a narrow gauge industrial site from a standard gauge siding. By focusing on these high-impact accessories, you create a sense of purpose and history within a footprint of just a few square feet.
Motive Power for Tight Spaces
The success of a micro layout depends on choosing locomotives that can handle sharp radii. We suggest selecting short-wheelbase engines, such as small 0-4-0 tank locos or industrial "critters," which navigate tight curves without derailments. Many of our locomotive bodies are designed to fit onto reliable, commercially available 16.5mm chassis. If you're unsure which mechanical components to pair with a kit, read An Introduction to On30 Gauge for advice on selecting the right wheelbase and gearing. Heavier white metal or resin bodies provide the weight necessary for consistent electrical pickup, which is vital for slow-speed shunting.
Finishing and Painting for Realism
A common concern with 3D printed models is the visible "layer lines" or a plastic-like appearance. You can resolve this by using high-quality primers and specific finishing techniques. To help you achieve a professional look, we've created a guide on Painting 3D Printed Models that covers everything from surface preparation to final topcoats. Weathering is the final step in making a micro layout feel lived-in. Applying rust streaks to a skip wagon or soot to a loco cab roof connects the model to its environment. You can explore our full range of O-16.5 scale kits to find the perfect centerpiece for your next project.
Planning Your First O-16.5 Project: A Practical Roadmap
Moving from the conceptual stage to a physical build can feel overwhelming when dealing with the substantial size of 7mm scale. While the footprint of a shelf is small, the height and width of O-16.5 stock require careful spatial management. We recognize that starting without a plan often leads to wasted materials, so we recommend following a structured roadmap to ensure your project remains manageable. This approach transforms o-16.5 micro layout inspiration into a tangible railway that fits your lifestyle.
Your first step is to define your space with absolute precision. Measure your intended shelf or box file, then subtract two inches from all sides to allow for the baseboard frame and backscenes. Once you've established your boundaries, choose a theme that matches your operational goals. If you enjoy complex movements, a shunting puzzle is ideal; if you prefer scenery, a static diorama with a single siding might be more rewarding. After selecting a theme, source your core components. You'll need a length of flexible track, such as Peco SL-500, a power supply, and a high-quality starter kit to provide a focal point for the scene.
Before cutting any timber, mock up the entire scene using cardboard. This stage is vital because it allows you to test clearances for your 7mm stock without committing to permanent fixings. You'll often find that a building needs to be moved or a curve slightly eased to prevent derailments. Finally, build your fiddle yard first. It's the heart of micro operation, providing the "off-stage" area where trains originate. By finalizing the fiddle yard early, you can test your rolling stock and track electrical continuity before the scenic work begins.
Baseboard Basics for Small Layouts
Micro layouts don't require heavy timber frames. You can use lightweight materials like foam board or thin plywood to create a base that's easy to move. Portability is a proactive solution for those who don't have a dedicated hobby room, as it allows you to store the layout in a cupboard or under a bed when it's not in use. To enhance the presentation, consider integrating LED lighting into a "proscenium arch" style frame. This creates a stage effect that draws the eye to the high level of detail found in your 7mm models.
Where to Find Your O-16.5 Kits
Finding the right motive power and rolling stock is the final piece of the puzzle. At Narrow Minded Railworks, we offer a specialized range of O-16.5 / 7mm scale kits designed specifically for narrow gauge prototypes. Buying locally designed UK kits ensures that your models reflect the unique character of British industrial and rural lines. These kits are engineered to fit standard chassis, providing a reliable way to populate your rails with characterful engines and wagons. When you're ready to start your build, explore our O-16.5 and 7mm Scale Kits to find the perfect o-16.5 micro layout inspiration for your next project.
Start Your 7mm Narrow Gauge Journey Today
Building a 7mm layout on a bookshelf might seem like a challenge, but it's a proactive way to enjoy high-quality modelling without needing a dedicated room. We've explored how sector plates and shunting puzzles maximize operational interest in tiny footprints. By choosing industrial or rural themes, you can create a complete world that fits under a bed or in a cupboard. Finding o-16.5 micro layout inspiration is just the first step toward a rewarding hobby that prioritizes detail over distance.
While the lack of ready-to-run models can be a hurdle, our range of kits offers a reliable solution. We provide expertly designed 3D printed kits that are specifically created to fit standard, reliable chassis. Whether you're modelling a slate quarry or a quiet village siding, we offer worldwide shipping from the UK to help you get started. Browse our O-16.5 and 7mm Scale Kits for your next micro layout and discover the satisfaction of building something unique.
Your next project doesn't need to be big to be impressive. With a bit of cardboard mocking and the right kit, you'll soon have a characterful narrow gauge railway that brings big detail into your smallest spaces.
Frequently Asked Questions
What is the minimum radius for an O-16.5 micro layout?
The minimum radius for an O-16.5 micro layout is typically between 9 and 12 inches. While standard 7mm scale models often require larger curves, narrow gauge prototypes were designed for tight industrial environments. You should check the wheelbase of your specific locomotive kit before laying track. If your engine is a short 0-4-0, a 9-inch radius is often achievable, provided you use flexible track to smooth the entry into the curve and prevent buffer locking.
Can I use standard OO/HO track for O-16.5?
You can use standard OO or HO track because the 16.5mm gauge is identical. However, the sleeper spacing on standard track looks too close together for 7mm scale. A proactive solution is to use specialized O-16.5 flexible track, which features correctly proportioned sleepers. If you're on a budget, you can also remove every other sleeper from standard track to create a more convincing narrow gauge appearance for your industrial or rural project.
How big should a micro layout fiddle yard be?
A micro layout fiddle yard should be at least as long as your longest locomotive and wagon combination plus two inches for clearance. In most 7mm micro settings, this translates to roughly 10 to 15 inches. Since space is a constraint, utilizing a sector plate or a cassette system allows you to store multiple consists without adding significant length to the overall footprint. This keeps the layout compact enough for shelf storage and easy portability.
Are O-16.5 and On30 the same thing?
O-16.5 and On30 use the same 16.5mm track gauge, but they represent different scales. O-16.5 is the British standard of 7mm to the foot, while On30 is the American standard of 1:48 scale. Because they share the same track, many modellers use them interchangeably when seeking o-16.5 micro layout inspiration. You'll find that many kits and accessories are compatible across both standards, though you should verify the specific prototype's dimensions before starting.
What is the best chassis for an O-16.5 locomotive kit?
The best chassis for an O-16.5 locomotive kit depends entirely on the specific dimensions of the resin or metal body. Many designers create kits to fit reliable, mass-produced chassis from manufacturers like Hornby or Bachmann. We recommend checking the kit's instructions for a recommended donor unit before purchasing. This ensures that the wheelbase and motor placement align perfectly with the 3D printed shell for smooth operation on your micro layout.
How do I keep my track clean on a small, rarely used layout?
Keeping track clean on a rarely used layout requires a proactive maintenance routine. You should use a high-quality track rubber or a lint-free cloth dampened with isopropyl alcohol before every operating session. Because micro layouts are often stored on shelves, dust is a constant constraint. We suggest building a simple removable cover or keeping the layout in a cupboard to prevent debris from settling on the rails while the railway is not in use.
Do I need DCC for a micro layout, or is DC sufficient?
DC is usually sufficient for a micro layout because you're typically only operating one locomotive at a time. While DCC offers advanced sound and lighting features, it adds complexity and cost that may not be necessary for a simple shunting puzzle. If you prioritize slow-speed crawling, you should ensure your DC controller is a high-quality feedback unit, as this provides excellent control for the small motors found in narrow gauge locomotive kits.
What are the best materials for a micro layout baseboard?
The best materials for a micro layout baseboard are 6mm birch plywood or high-density foam board. Plywood offers a sturdy, long-lasting surface for mounting track and scenery, while foam board provides a lightweight alternative for layouts that need to be portable. When using foam, we recommend adding a thin timber frame to prevent warping over time. This combination ensures your o-16.5 micro layout inspiration remains structurally sound regardless of where you choose to display it.