

A meticulously built OO9 locomotive loses its sense of scale the moment a generic, mainline figure stands next to it. Choosing the right narrow gauge railway figures 4mm scale is essential for maintaining the rural, characterful charm that defines these smaller lines. While many modellers settle for standard OO accessories, these often lack the specific workwear and rugged poses that make a narrow gauge scene feel authentic. It's often difficult to find figures that match the high level of detail found in modern locomotive kits.
It's frustrating when visible print lines or clumsy details ruin a scene you've spent hours perfecting. This guide helps you overcome those hurdles by teaching you how to select, prepare, and paint figures that bring genuine life to your layout. You'll learn professional methods for handling 3D resins and white metal castings, ensuring every character on your platform or in your cab tells a story. We'll examine how to achieve a high-quality finish that elevates your diorama to a professional standard.
Key Takeaways
- Understand the precise relationship between 4mm scale and OO9 standards to maintain consistent proportions across your layout.
- Learn how to differentiate between 4mm and 3.5mm figures so your crew members fit realistically inside tight narrow gauge cabs.
- Select the right narrow gauge railway figures 4mm scale to tell a specific story, from industrial slate workers to quirky rural passengers.
- Gain practical skills for removing 3D-printed supports and selecting the correct primers to achieve a professional finish on resin figures.
- Discover how adding realistic, scanned figures can elevate the visual impact of your OO9 and GN15 locomotive kits.
What are 4mm Scale Narrow Gauge Railway Figures?
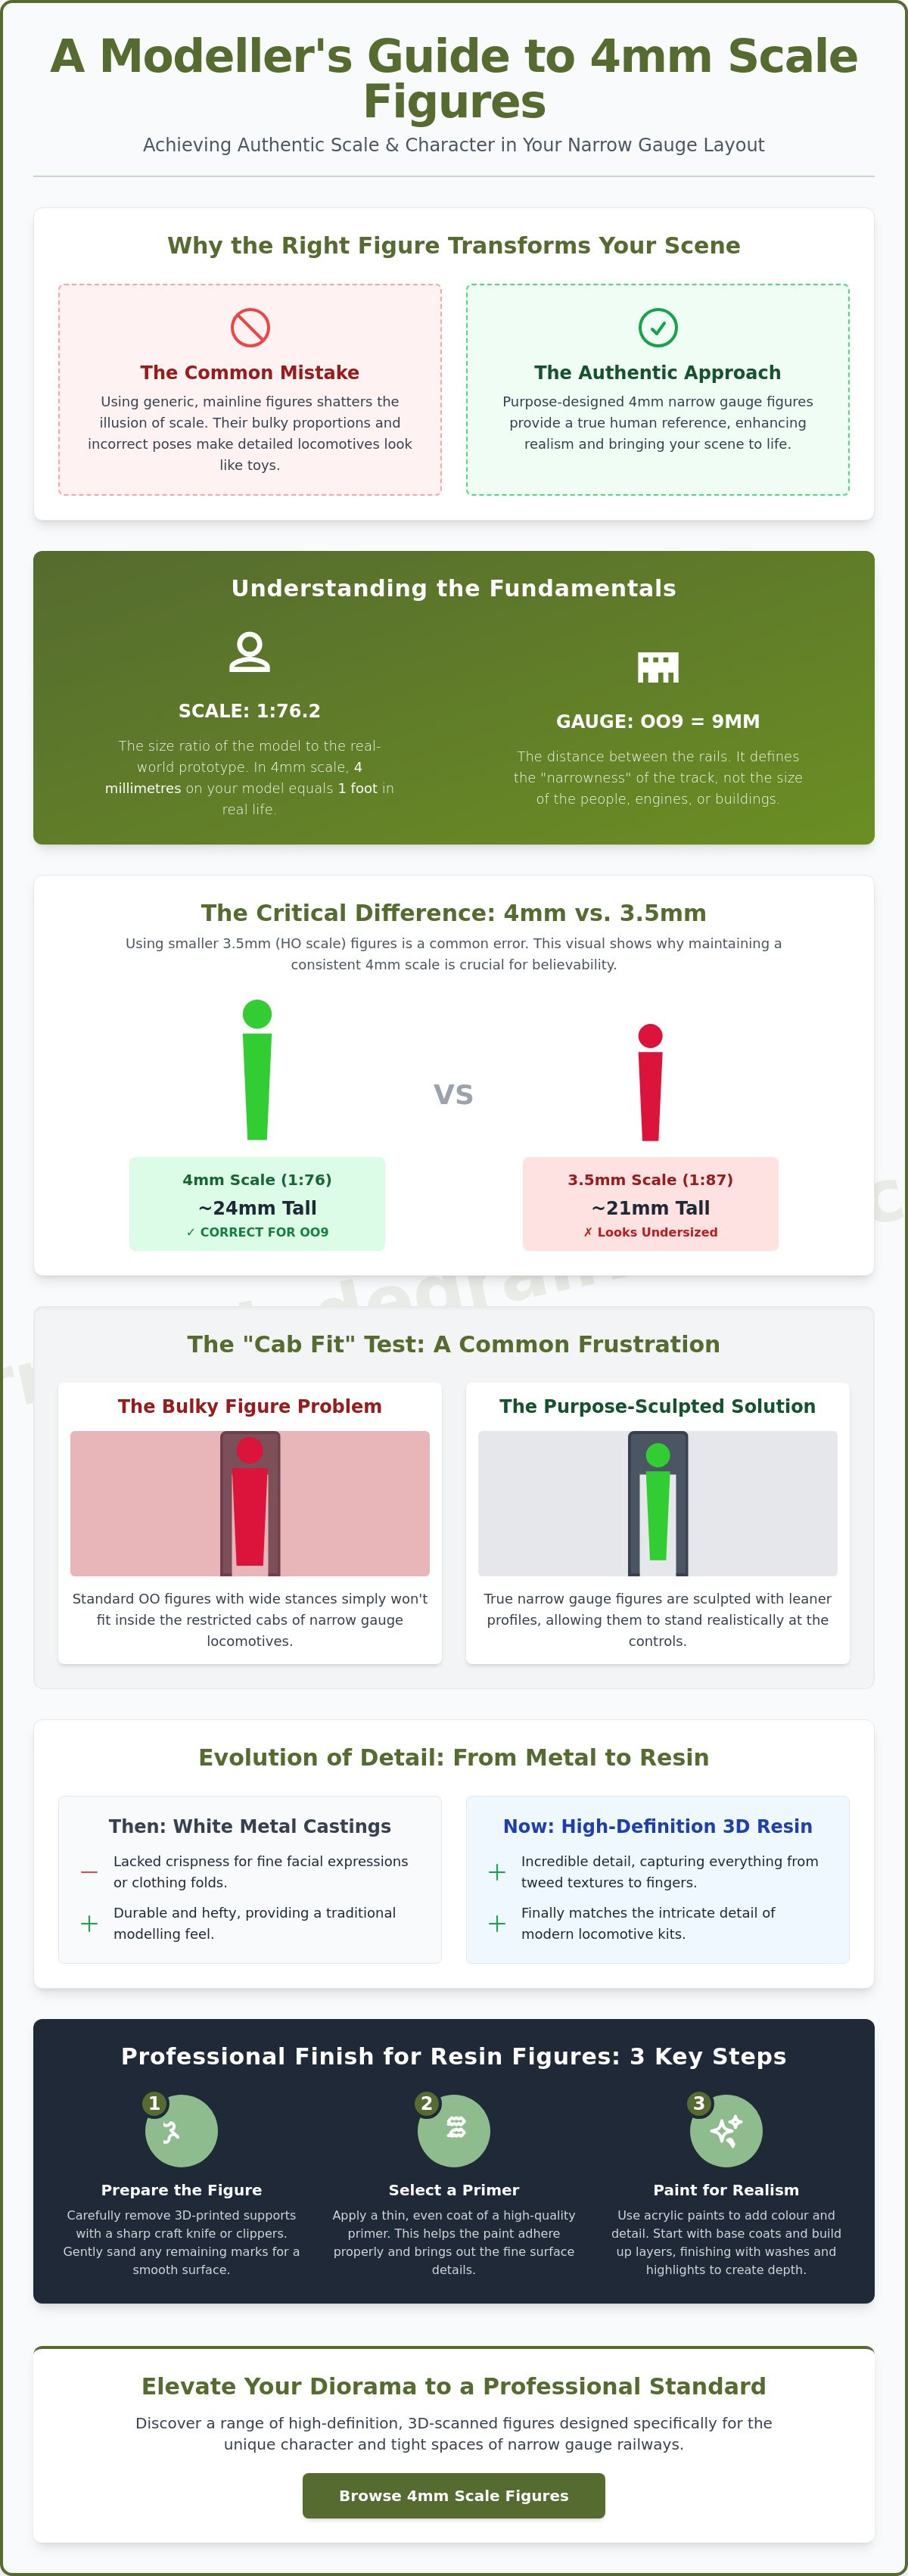
In the world of miniature modelling, 4mm scale (1:76.2) represents a specific standard where four millimetres on the model equals one foot on the prototype. When we talk about narrow gauge railway figures 4mm scale, we're specifically looking at characters designed to populate layouts like OO9 or HOn30. While the tracks are narrow, the people remain full-sized in relation to the world around them. These figures serve a vital purpose; they provide a human reference point that emphasizes just how small and "narrow" the locomotives and rolling stock really are. To understand how these measurements fit into the broader hobby, it helps to review the standard model railway scales used globally.
To see how these elements come together in a finished layout, watch this helpful video:
The history of these figures has changed significantly over the decades. Traditionally, modellers relied on white metal castings. While these were durable, they often lacked the crispness required for fine facial expressions or realistic clothing folds. Recently, the hobby has shifted toward high-definition 3D printed resin. This technology allows for incredible detail, capturing everything from the texture of a tweed jacket to the individual fingers on a driver's hand. This evolution means your figures can finally match the intricate detail found in modern locomotive kits.
Scale vs. Gauge: Getting the Proportions Right
It's easy to confuse scale with gauge. Scale refers to the size of the object (1:76), while gauge refers to the distance between the rails. On a 4mm layout, using HO scale (1:87 or 3.5mm) figures is a common mistake. While the 0.5mm difference sounds negligible, it results in figures that look noticeably undernourished next to a 4mm scale engine. Maintaining a consistent 1:76 ratio ensures your scene remains believable and grounded.
Why Narrow Gauge Requires Specific Poses
Narrow gauge railways weren't just smaller versions of the mainline; they had a distinct operational culture. Staff often performed manual tasks that you wouldn't see on a major passenger line. You'll need figures posed for hand-braking on slate wagons, manually switching points in a muddy yard, or leaning out of a cab to check clearances. These specific "attitudes" help define whether your layout is a gritty industrial site or a sleepy rural branch. If you're new to this side of the hobby, you can learn more about the unique nature of these lines in our narrow gauge railway pillar. The clothing should also reflect the environment, favoring heavy work boots and flat caps over the polished uniforms of the Great Western Railway.
Scale Comparison: 4mm Figures for OO9 and HOn30
Getting the scale right is more than just a numbers game. In the UK, 4mm scale (1:76) is the dominant standard for OO9 modelling, whereas HOn30 often utilizes 3.5mm (1:87). A 6ft man in 4mm scale stands approximately 24mm tall, but his 3.5mm counterpart is only 21mm. This small discrepancy becomes glaringly obvious when figures stand next to each other on a platform. It's particularly problematic when choosing narrow gauge railway figures 4mm scale for your OO9 locomotive kits. If the crew is the wrong size, the locomotive loses its sense of power and purpose. For those just starting, the NMRA's guide to narrow gauge provides an excellent foundation for understanding these spatial relationships.
Beyond height, the "bulk" of a figure determines how well it integrates into a scene. Standard OO figures designed for mainline steam engines often have wide-legged stances or thick, cast-on clothing. These simply won't fit inside the restricted cabs of a Barclay or a Baldwin. True narrow gauge figures are sculpted with these tight tolerances in mind, featuring leaner profiles that allow them to stand realistically at the controls. While it's tempting to use any figure, the results are often disappointing. A better approach involves selecting figures specifically mastered for the cramped environments of narrow gauge prototypes.
The "Cab Fit" Test
Testing a figure's fit before painting is a vital step. Narrow gauge cabs are often half the size of their standard gauge equivalents, meaning a figure's "footprint" is just as important as its height. If a figure has a large integral base, you'll likely need to trim it away to get them through the cab door. You can carefully adjust poses by gently warming resin figures in warm water, allowing you to tuck an elbow or shift a leg to clear a boiler backhead without snapping the material. A figure's footprint is as important as its height when working in such restricted spaces.
Mixing Brands and Materials
You don't have to stick to a single material. It's perfectly acceptable to mix resin, white metal, and plastic figures on one layout. The key to a cohesive look lies in the primer and paint finish. Using a consistent matte primer across all materials hides the different textures of the underlying substrates. If you're struggling with depth, try placing slightly smaller 3.5mm figures in the far background of your diorama. This trick of forced perspective makes your scene feel deeper than it actually is. If you need specific tools to help with these modifications, our range of diorama tools and scenery can assist in achieving that perfect fit.
Choosing Figures Based on Your Railway’s Story
Figures define the story of your layout. They turn a static model into a living snapshot of history. Whether your line represents a bustling industrial quarry or a quiet highland branch, the characters you choose dictate how viewers perceive the scale and purpose of the railway. While finding figures that reflect the specific toil of a Welsh slate quarry is challenging, sourcing authentic narrow gauge railway figures 4mm scale provides the realism necessary for a museum-quality layout. These characters act as a bridge between the machinery and the landscape.
Industrial settings require a specific type of worker. You don't want generic "businessmen" or "policemen" in a grit-filled environment. Instead, look for figures that represent the backbone of narrow gauge operations:
- Slate Quarrymen: Figures in heavy waistcoats and flat caps, often carrying crowbars or lunch tins.
- Timber Workers: Characters posed with saws or chains, ready to secure loads on bogie wagons.
- Coal Miners: Gritty, soot-covered figures that emphasize the harsh conditions of a subterranean line.
Locomotive crews are equally vital. In the cramped confines of a narrow gauge cab, the interaction between the driver and the fireman is intimate. One should be focused on the track ahead while the other is ready with a shovel or checking the water gauge. This creates a sense of teamwork and operational reality. For lineside interest, adding hikers, local villagers, or even livestock helps ground the railway in its geographic context. For those seeking historical accuracy in clothing and equipment, the Narrow Gauge Railway Museum offers an invaluable resource for studying the real-world prototypes of these miniature characters.
The Era Factor: Victorian to Modern
Clothing is the quickest way to "date" your layout. A figure in a high-visibility vest immediately places your scene in the modern era, whereas a man in a frock coat and top hat signals a Victorian setting. Modern 3D scanning technology now captures the natural drape of fabric from real people wearing period-correct costumes. This ensures your 1920s figures don't just look like modern people in old clothes; they possess the posture and "heft" of the era. While era-specific figures are sometimes harder to find, selecting the correct attire prevents a jarring chronological mismatch on your platform.
Creating Micro-Scenes
Don't just scatter figures randomly across the board. Use the "Three-Figure Rule" to create narrative interactions. A group of three characters—perhaps a station master, a passenger, and a porter—suggests a conversation or a conflict. This draws the eye toward specific details, such as a well-weathered station door or a unique piece of rolling stock. By positioning figures in mid-action, like a child pointing at a departing train or a worker wiping his brow, you suggest movement and activity that keeps the viewer engaged. This approach turns a simple model into a compelling piece of visual storytelling.
Preparing and Painting 3D-Printed 4mm Figures
While 3D printing provides incredible detail for narrow gauge railway figures 4mm scale, these models require careful preparation before they reach your layout. Unlike traditional plastic or white metal, resin prints often arrive with a network of support structures. These supports ensure the printing process succeeds but leave behind small "pips" that can ruin a figure's silhouette if not handled correctly. Taking the time to properly clean your figures ensures they look like natural inhabitants of your world rather than unfinished plastic parts. It's the difference between a generic accessory and a bespoke character.
Once cleaned, paint adhesion becomes your next priority. Resin is non-porous, meaning standard hobby paints might flake off if you don't use a high-quality primer designed for 3D materials. A thin, matte grey primer is usually best for 4mm scale. It provides enough "tooth" for subsequent layers without clogging fine details like coat buttons or facial features. After priming, you can build depth using a base coat, a dark wash to settle in the creases, and a light dry-brush to highlight the raised edges of the clothing. This layering technique is essential for making tiny figures "pop" under layout lighting.
Cleaning and Support Removal
Use fine-point nippers to clip supports away from the figure, always leaving a small margin to avoid gouging the resin. You can then use high-grit sanding sticks to smooth out the remaining pips until the surface is flush. If you're working on the feet, ensure they are perfectly flat so the figure stands without a wobbling base. Safety is paramount; never sand resin without wearing a protective mask, as fine resin dust is an irritant you don't want to inhale. Once the surface is smooth, a quick rinse in soapy water removes any lingering dust that might interfere with your primer.
Advanced Painting Tips for 4mm
Tiny figures dry out your paint quickly. Using a wet palette keeps your acrylics workable for hours, allowing you to blend subtle skin tones or fabric shades without rushing. Many modellers find the "Face First" method most efficient; by painting the flesh tones and eyes before the clothing, you don't have to worry about accidentally getting skin paint on a finished jacket. For a deeper dive into these techniques, check out our painting 3D printed models guide. This approach ensures a clean finish that stands up to close-up photography.
To ensure your figures stay protected during layout maintenance, explore our range of diorama tools and scenery for the best finishing supplies. Finally, apply a matte varnish to seal your work. This prevents the oils from your hands or the dust from layout cleaning from degrading the paint over time. A well-sealed figure will maintain its character for years of operation, even with frequent handling during shunting sessions.
The Narrow Minded Railworks Approach to Figures
Our philosophy focuses on bridging the gap between high-detail locomotive kits and the characters that operate them. We understand that a static, hand-sculpted figure can sometimes look "plastic" or unnatural next to a precision-engineered model. To solve this, we utilize 3D scanning technology to capture real people in authentic poses. This ensures that our narrow gauge railway figures 4mm scale possess the correct skeletal proportions and natural fabric folds that traditional methods often miss. By starting with a real human subject, we provide a level of realism that grounds your railway in a believable reality.
While many 3D prints are notoriously brittle, we utilize a high-toughness resin specifically chosen for its durability. This material withstands the rigours of layout cleaning and frequent handling during operation. These figures are designed to perfectly complement our OO9 and GN15 kits, ensuring that the crew fits the cab and the passengers fit the coaches without the need for aggressive modification. We also offer flexibility for unique projects by providing custom scaling options, allowing you to match the specific, often idiosyncratic, requirements of your narrow gauge prototype.
From 3D Scan to 4mm Reality
The transition from a full-sized scan to a 4mm miniature requires careful refinement. We don't just shrink a digital file; we optimize the details so they remain crisp at 1:76 scale. Our figures often include specific narrow gauge "props" that define the era, such as vintage oil cans, heavy-duty shovels, or period-correct lunch tins. Every character is designed and produced locally in the UK, supporting the domestic modelling industry while ensuring we maintain strict quality control over every resin batch. This process results in figures that don't just stand on your layout; they inhabit it.
Completing Your Diorama
A realistic figure looks best when paired with equally detailed surroundings. You can enhance your station scenes by pairing our characters with our range of scenery items, including period-accurate petrol pumps and phone boxes. If your project requires a specific historical look or a unique scale that isn't standard, we can often accommodate bespoke requests to suit your railway's specific name or era. This collaborative approach ensures your diorama feels cohesive and unique to your vision.
Browse our full range of 4mm scale figures and accessories here to find the perfect characters for your next project. Whether you're looking for a weary fireman or a waiting passenger, our collection provides the authentic finishing touches your narrow gauge layout deserves.
Bring Authentic Character to Your Layout
Creating a realistic narrow gauge scene requires more than just well-built locomotive kits. It demands characters that fit the specific, often cramped, environments of a rural or industrial line. We've explored how maintaining scale consistency and choosing era-appropriate attire can ground your layout in history. While generic figures often fail to capture the unique "feel" of these lines, selecting high-quality narrow gauge railway figures 4mm scale ensures your scene tells a compelling story. Proper preparation and painting techniques turn these miniatures into the essential storytellers of your miniature world.
Our figures are scanned from real people to provide authentic poses that feel natural rather than stiff. We produce high-definition 3D prints with minimal support marks, specifically designed to fit into the restricted cabs and scenes of your diorama. If you're ready to elevate the realism of your project, explore our collection of lifelike 4mm scale narrow gauge figures today. It's the final touch that makes your railway feel truly alive. Happy modelling!
Frequently Asked Questions
Is 4mm scale the same as OO gauge for figures?
4mm scale (1:76.2) is the standard for OO gauge, meaning figures are sized at four millimetres to the foot. While "OO" technically describes the track gauge, the scale remains the same for the people and buildings. It's vital to distinguish this from 3.5mm HO scale, as mixing the two can make your scene look inconsistent. Using 4mm figures ensures your crew matches the proportions of your narrow gauge kits.
How do I make 3D printed figures stand up on my layout?
You can make figures stand by using a tiny amount of scenic glue or specialized modelling wax. For a more robust fix, drill a small hole into the figure's foot and insert a brass wire pin. This pin can then be pushed into the baseboard or scenery, providing a secure mount that stays upright during transport. This technique is particularly useful for narrow gauge railway figures 4mm scale with slender legs.
What is the best glue for attaching resin figures to a base?
Cyanoacrylate, commonly known as super glue, is the best choice for resin figures. Plastic cement won't work because it doesn't react with resin to create a chemical bond. If you're attaching a figure to a painted surface, scrape away a small amount of paint first to ensure a strong connection. For heavy figures or high-traffic areas, a small dab of two-part epoxy provides the most reliable and long-lasting bond.
Can I use 1:72 scale military figures for a 4mm railway?
Using 1:72 scale figures is possible, but they'll look slightly too large next to 1:76 models. A 1:72 figure represents a person roughly 6% larger than a 4mm scale equivalent. While this might seem minor, it becomes obvious when they're standing in a doorway or sitting in a cab. Unless you're specifically modelling very tall people, sticking to dedicated 4mm scale figures maintains the correct visual balance on your layout.
Do I need to prime 3D printed figures before painting?
Priming is an essential step because resin is non-porous and doesn't hold acrylic paint well on its own. Without a primer, your paint will likely peel or chip during handling. Use a dedicated hobby primer in a neutral grey or white to create a consistent base. This also highlights any tiny imperfections or support marks that you might have missed during the initial cleaning and sanding phase.
How do I remove the "shiny" look from factory-painted figures?
A coat of matte varnish is the quickest solution for removing the plastic sheen from pre-painted figures. Most factory finishes are too reflective for a realistic 4mm scale scene. Brushing or spraying a flat varnish over the figure dulls the surface and makes clothing look like genuine cloth. This also provides an extra layer of protection against fingerprints and dust, which is helpful if you frequently move your figures.
What brushes are best for painting 4mm scale details?
Use high-quality brushes with a sharp point, such as sizes 0, 00, or 000. While it's tempting to use the smallest brush possible, a size 0 with a good tip holds more paint, preventing it from drying before it hits the model. Synthetic brushes are durable and hold their shape well, while sable brushes offer superior paint flow. Maintaining a clean, sharp point is more important than the actual size of the brush.
Are resin figures more detailed than white metal ones?
Resin figures typically offer much sharper detail than white metal because the 3D printing process isn't limited by mold release constraints. You'll notice finer facial features, crisper clothing folds, and more delicate accessories on resin models. While white metal is more rugged and harder to break, resin allows for the high-definition realism that modern modellers expect. Our narrow gauge railway figures 4mm scale utilize this technology to ensure every character looks lifelike.