

A professional finish on a narrow gauge locomotive isn't about hiding the fact that it was 3D printed; it's about respecting the resin medium through surgical preparation and layered weathering. While raw resin prints offer a level of detail that mass-produced models can't match, they often present unique challenges like visible layer lines on curved boilers or scarring from support removal. Mastering the art of finishing 3d printed model trains ensures your OO9 or GN15 rolling stock looks like a bespoke piece of engineering rather than a prototype.
It's frustrating when paint fails to adhere to a kit you've spent hours preparing, or when a primer reveals pitting you thought you'd sanded away. We understand these material constraints and provide the professional techniques needed to overcome them. This guide promises to help you achieve a museum-quality finish that integrates seamlessly into your layout, giving you total confidence when working with high-detail resin materials.
We will examine the essential stages of preparation, including specific sanding grit recommendations for UK modellers and the best priming practices to ensure a durable bond. You'll learn how to treat your 3D printed kits with the same precision you'd apply to a traditional brass or white metal model.
Key Takeaways
- Identify and remove support artifacts using specialized resin sanding techniques that prevent scarring on curved locomotive boilers.
- Distinguish between filler and fine surface primers to hide layer lines while preserving the intricate details of resin-based kits.
- Master the professional techniques for finishing 3d printed model trains to achieve a museum-quality look that hides the manufacturing process.
- Apply weathering through a storytelling lens, focusing on soot and grime placement typical of hardworking narrow gauge industrial engines.
- Ensure a flawless final assembly by checking internal clearances against chassis like the Kato 109 to prevent mechanical fouling.
Surface Preparation: Eliminating Support Marks and Layer Lines
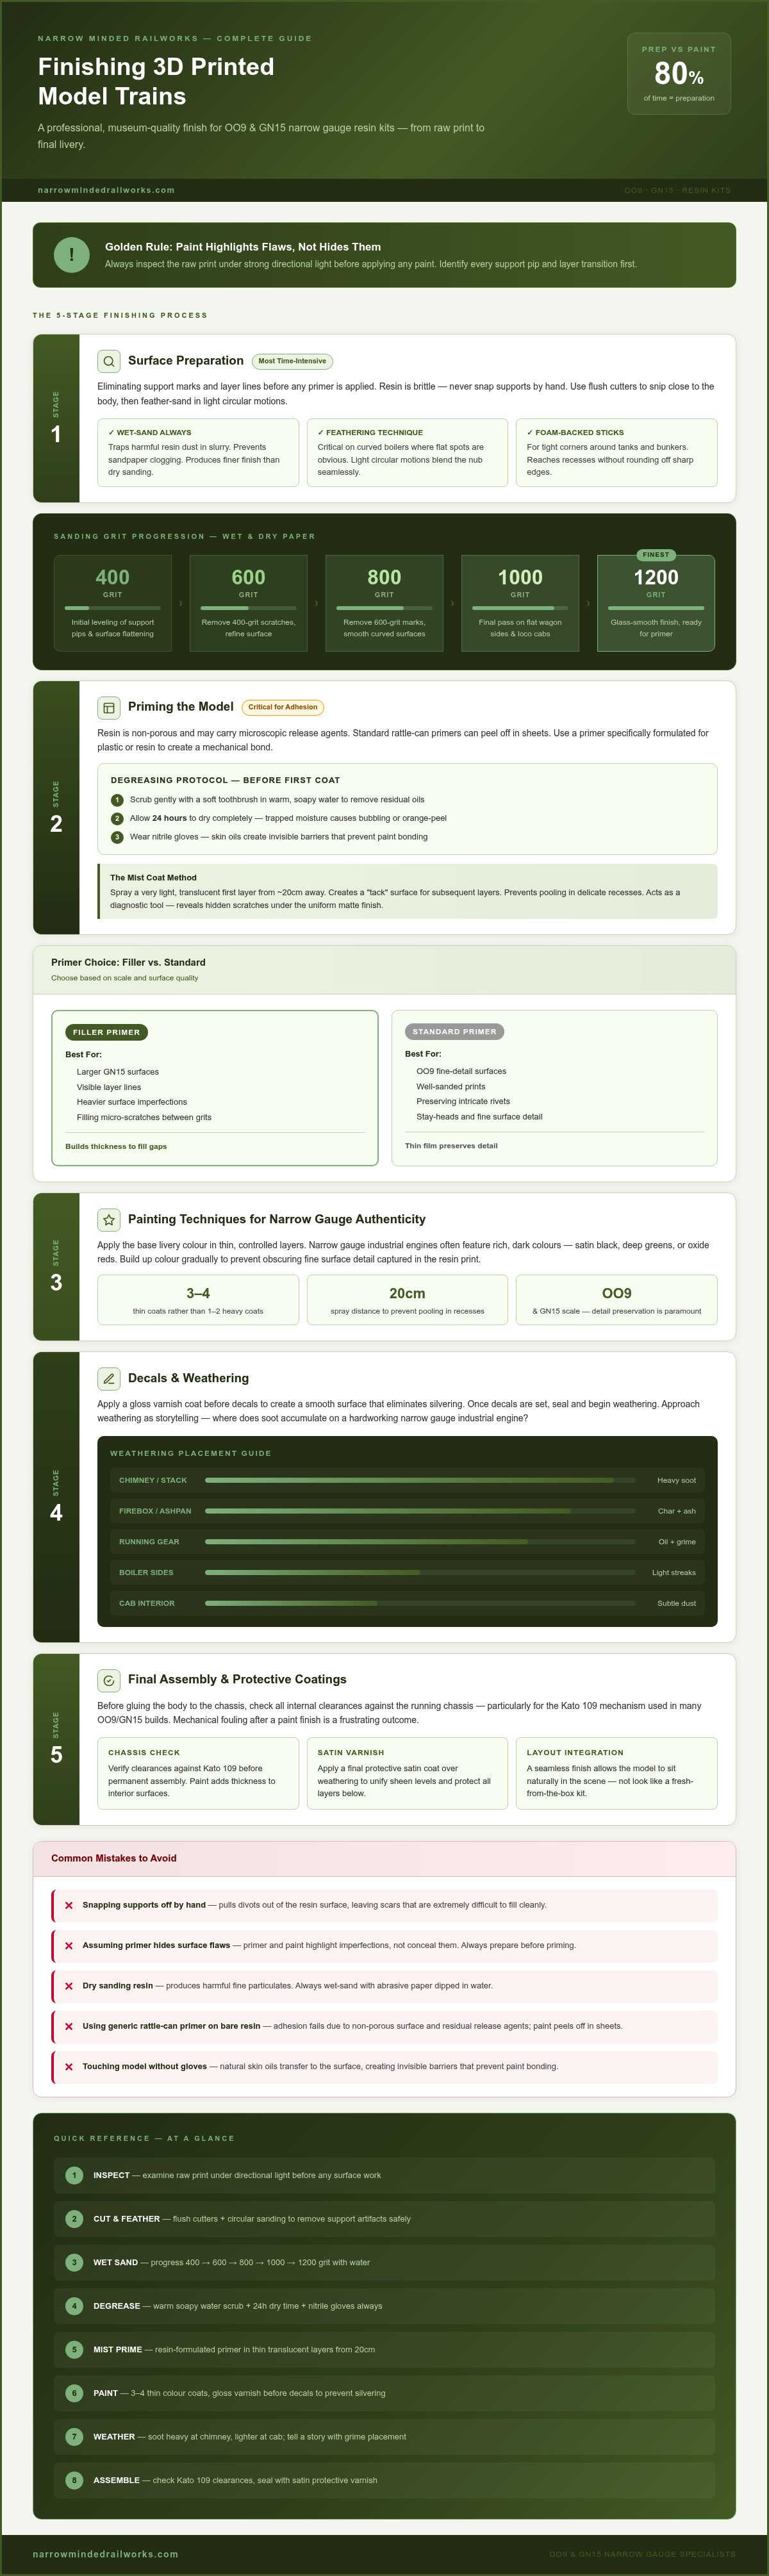
High-detail resin kits for OO9 or GN15 scales provide a level of fidelity that traditional injection-molded plastic cannot match. However, resin carries its own set of manufacturing constraints. While injection-molded parts are often smooth out of the box, 3D printed bodies feature support artifacts and micro-layer lines. Successful finishing 3d printed model trains begins with the "inspect first" rule. You should examine the raw print under a strong, directional light to identify every support pip and layer transition before any paint touches the surface. It's a common mistake to assume primer will hide these flaws; in reality, paint highlights them. Preparation usually accounts for 80% of the total project time, leaving only 20% for the actual application of colour. For modellers looking to create their own digital designs by capturing real-world prototypes, 3D Printing Canada provides a helpful guide on selecting handheld scanners.
You must prioritize dust management when working with resin. Dry-sanding produces fine particulates that are harmful if inhaled. We recommend wet-sanding as a proactive solution. By dipping your abrasive paper in water, you trap the dust in a slurry and simultaneously achieve a finer finish. This method also prevents your sandpaper from clogging, which extends the life of your tools and ensures a more consistent surface texture across the locomotive body.
Removing Support Marks Without Damaging Detail
Resin is brittle, so you shouldn't snap supports off by hand. This often pulls a "divot" out of the model surface, leaving a scar that is difficult to fill. Instead, use sharp flush cutters to snip the support slightly away from the body. You can then use a "feathering" technique, sanding in light, circular motions to blend the remaining nub into the surrounding surface. This is particularly vital on curved boilers where a flat spot would be obvious. For a deeper look at the equipment needed, see our guide on removing support marks from 3d prints.
Sanding Grits and Polishing the Resin
Start with a 400-grit wet-and-dry paper for initial leveling. Once the pips are flush, move to 600 and 800 grit to remove the scratches from the previous stage. For the final pass on flat wagon sides or locomotive cabs, use 1000 or 1200 grit to reach a glass-smooth finish. Narrow gauge models often have tight corners around tanks and bunkers. Use foam-backed sanding sticks to reach into these areas without rounding off sharp edges. This meticulous approach to finishing 3d printed model trains ensures that the high detail of our resin prints remains the star of the show once the final livery is applied.
Priming the Model: Creating a High-Bond Foundation
Resin is an excellent medium for capturing the intricate rivets and stay-heads of a narrow gauge locomotive, but it's chemically different from the injection-molded polystyrene found in standard kits. Many modellers find that standard acrylic paints or generic "rattle can" primers simply peel off in sheets. This happens because the resin surface is non-porous and may still carry microscopic traces of release agents or uncured oils. Achieving a professional result when finishing 3d printed model trains requires a primer specifically formulated for plastic or resin adhesion, which bites into the surface to create a mechanical bond.
We recommend the "mist coat" method for the first application. Rather than trying to achieve full colour coverage immediately, spray a very light, translucent layer from about 20cm away. This creates a "tack" surface for subsequent layers to grip. It also prevents the paint from pooling in the delicate recesses of our OO9 locomotive kits. Once dry, the primer acts as a diagnostic tool; the uniform matte finish will reveal any sanding scratches or support pips that were invisible on the translucent raw resin. It's better to find these flaws now than after the final livery has been applied.
Degreasing and Cleaning Before the First Coat
Resin prints require a thorough cleaning to ensure the primer adheres correctly. Scrub the model gently with a soft toothbrush in warm, soapy water to remove any residual oils. You must allow the model to dry completely, ideally for 24 hours, as trapped moisture will cause the primer to bubble or orange-peel. Wear nitrile gloves during this process. Your skin produces natural oils that can transfer to the model, creating invisible barriers that prevent the paint from bonding to the resin.
Filler Primer vs. Standard Primer
Your choice of primer depends on the scale and surface quality of the print. For larger GN15 surfaces where layer lines might be more prominent, a high-build filler primer can save hours of sanding by leveling out minor imperfections. However, these thick paints can easily bury fine details like handrails or boiler bands on smaller OO9 models. In those cases, a fine surface primer is the superior choice. Choosing the correct product is a vital step in finishing 3d printed model trains effectively. Flash time is the specific duration you must wait between coats to allow solvents to evaporate without the paint becoming fully cured.
Painting Techniques for Narrow Gauge Authenticity
Narrow gauge railways typically operated in harsh, industrial environments. This means your colour choices should reflect utility over vanity. When finishing 3d printed model trains, selecting a palette of industrial blacks, slate greys, and workaday greens creates a more authentic feel than bright, primary colours. For small OO9 locomotive bodies, airbrushing is generally the superior method for achieving an even, thin coat. However, hand-brushing remains a viable option for smaller details if you use high-quality, self-levelling acrylics. The golden rule is to thin your paints. Thick paint fills in the very details you've worked hard to preserve during the sanding stage, leading to a "toy-like" appearance that betrays the model's 3D printed origins.
Masking is another area where precision is required. Because 3D printed resin can have a slight micro-texture, standard masking tapes might allow paint to bleed. We recommend using high-quality, flexible modelling tape and burnishing the edges with a cocktail stick before applying the second colour. This proactive step ensures crisp lines on multi-colour liveries, such as those found on Victorian-era narrow gauge wagons or private owner industrial stock.
Base Coating for Industrial Realism
Applying a base coat isn't a one-and-done process. It's better to apply three or four translucent layers rather than one heavy coat. This gradual build-up maintains the sharpness of boiler bands and cab windows. Consider the "scale colour" effect; pure black often looks too harsh on a small model. Using a very dark grey or a "NATO black" provides a more realistic depth. For a deeper understanding of how colour interacts with resin surfaces, see our guide to painting 3D printed models. This methodical approach ensures your base layer is the perfect canvas for the weathering stages to follow.
Detail Painting and Picking Out Ironwork
Once the base coat is cured, you can focus on the smaller elements that bring the model to life. A "triple zero" brush is essential for picking out chimney caps, brass whistles, or copper pipework. While metallic paints are common, metallic waxes often provide a more convincing oily metal texture for buffer heads and coupling points. To make your model stand out, use a subtle dry-brushing technique on rivet heads. By using a slightly lighter shade of your base colour with a nearly dry brush, you catch the edges of the rivets. This highlights the high-detail nature of resin kits and is a key step in finishing 3d printed model trains to a professional standard.
Decals and Weathering: Bringing the Model to Life
Perfect Decal Application on 3D Surfaces
3D printed surfaces, especially those with high-detail rivets, can be challenging for traditional transfers. Applying decals directly to a matte surface causes silvering, where air is trapped under the film. To prevent this, you should apply a gloss varnish to the specific area first. Once the decal is positioned, using setting solutions helps the film soften and melt into the 3D printed recesses. This makes the lettering look painted on rather than stuck on. For a detailed walkthrough, follow our Micro Sol how-to guide for bubble-free transfers.
Weathering Layers: Washes, Powders, and Oils
Once your decals are set and sealed, you can move on to layered aging. A pin wash is particularly effective on resin kits. It uses capillary action to pull dark pigment into the deep recesses around doors and vents, highlighting the detail without darkening the entire model. For OO9 wagon kits, focus on the interior floors where coal or stone would have scuffed the paint. You can simulate rust and grime using weathering powders, which provide a matte, dusty texture perfect for industrial settings. You can find more specific techniques in our beginner's guide to weathering wagons. To ensure your next project has that authentic, hard-worked appearance, explore our range of OO9 and GN15 kits and start your weathering journey today.
Final Assembly and Protective Coatings
The final stage of finishing 3d printed model trains involves protecting your detailed paintwork and ensuring mechanical reliability. While the visual work is complete, the model remains vulnerable to oils from your skin and environmental dust. Selecting the correct varnish is essential for setting the era of your layout. Satin finishes suit well-maintained Victorian engines, while a flat matt is the standard for hardworking industrial steam locomotives. Before you seal the model, perform a final clearance check. Resin bodies are rigid, so you must ensure that internal detail doesn't foul the movement of the motor or the rotation of the wheels during operation.
Sealing the Work for Layout Longevity
Spray varnishing in the UK presents a specific challenge due to our often humid climate. High moisture levels can cause "frosting," where the varnish dries with an opaque white haze that ruins your finish. You can avoid this by warming the aerosol can in a bowl of lukewarm water and spraying only in a dry, indoor environment. Usually, two light coats provide sufficient protection for regular layout handling. Matt varnish is the standard for narrow gauge steam because it eliminates the unrealistic plastic sheen of raw resin and hides any remaining micro-textures.
Mounting to the Chassis
Our kits are specifically designed for commercial chassis like the Kato 109 or Tenshodo Spud, which simplifies the final assembly. You should avoid using permanent cyanoacrylate (superglue) to join the body to the chassis. This makes future maintenance or motor lubrication nearly impossible. Instead, we recommend a friction-fit or using small amounts of adhesive putty as a proactive solution. This allows you to remove the body for servicing without risking the paintwork you've perfected. If you are still selecting your power unit, check our OO9 locomotive kit guide for full chassis compatibility.
Proper maintenance ensures your finishing 3d printed model trains efforts last for years. We recommend the following care routine:
- Use a soft, clean makeup brush to remove dust rather than a damp cloth.
- Store models in a foam-lined box to prevent brittle resin details from snapping during transport.
- Periodically check the fitment of the body to ensure layout vibration hasn't loosened the mounting points.
- Keep the model away from direct sunlight to prevent any long-term UV degradation of the resin or paint.
Transforming Your Layout with Professional Finishing
Mastering the art of finishing 3d printed model trains allows you to bridge the gap between a raw resin kit and a museum-quality miniature. While 3D printing presents specific material constraints like support marks, proactive surface preparation and high-bond priming provide the solutions needed for a professional result. Weathering then provides the final layer of realism. It turns a static object into a hardworking industrial engine with its own unique history. These steps ensure your OO9 or GN15 models possess the durability and aesthetic quality required for a realistic layout.
We invite you to browse our range of high-detail 3D printed OO9 and GN15 kits to find your next project. Our kits are designed to fit reliable Kato and Tenshodo chassis, featuring dozens of unique narrow gauge prototypes. We provide worldwide shipping from our UK base to support modellers across the globe. With the right techniques and a patient approach, your next resin locomotive will look right at home on any narrow gauge layout. We look forward to seeing your completed models in action.
Frequently Asked Questions
Is 3D printed resin as durable as traditional plastic for model trains?
Resin-based kits offer exceptional detail but are more brittle than injection-molded plastic. While they don't have the same "flex" as standard plastic, they're perfectly durable for normal layout operation once painted. You should avoid dropping resin models on hard surfaces, as they may shatter. However, for stationary or rolling use on a narrow gauge layout, the material provides a sturdy foundation that maintains its shape over time without warping.
What is the best glue to use for 3D printed resin kits?
You should use cyanoacrylate (superglue) or a two-part epoxy for assembling resin kits. Traditional plastic cement relies on a chemical reaction to melt and weld polystyrene surfaces together, but it won't work on 3D printed resin. For a professional result when finishing 3d printed model trains, apply small amounts of superglue with a cocktail stick. This ensures a clean bond without excess adhesive spilling onto high-detail areas like boiler bands or rivets.
Do I need to wash my 3D printed kit before painting?
Yes, you must wash your kit in warm, soapy water before you begin the painting process. Raw resin prints often carry microscopic residues from the manufacturing process or oils from your hands. If you don't remove these contaminants, your primer won't achieve a proper bond. Scrub the model gently with a soft toothbrush, rinse it thoroughly, and allow it to dry for at least 24 hours before applying any coatings.
How do I hide layer lines on a 3D printed locomotive boiler?
Layer lines are best managed through a combination of wet-sanding and high-build primer. Start with 400-grit wet-and-dry paper to level the surface, then move to finer grits like 800 or 1000. If lines persist on curved boilers, a filler primer can bridge the microscopic gaps. This approach ensures a glass-smooth finish that hides the manufacturing process entirely, which is a key goal when finishing 3d printed model trains for a professional layout.
Can I use an airbrush on 3D printed resin kits?
An airbrush is the superior tool for painting resin kits because it applies pigments in thin, controlled layers. This is vital for preserving delicate 3D printed details like rivet heads and window frames that thick brush-applied paint might bury. While hand-brushing works for small details, the airbrush provides the even base coat needed for a realistic industrial finish. Always ensure your paint is thinned to the consistency of milk for the best results.
What happens if I over-sand a 3D printed detail?
If you accidentally sand away a rivet or a boiler band, you'll need to rebuild the detail manually. You can use a tiny drop of UV-cure resin or thick primer applied with a needle to recreate the lost feature. To avoid this constraint, we recommend a proactive approach: sand in light, circular motions and check your progress every few strokes. Using sanding sticks rather than loose paper helps you maintain better control over flat surfaces and sharp corners.
Why is my paint peeling off my 3D printed model?
Paint usually peels because of inadequate surface preparation or the use of a primer that doesn't bond with resin. If the model wasn't degreased properly, invisible oils act as a barrier. Additionally, generic "rattle can" paints often lack the etch-priming properties required to bite into a non-porous resin surface. You can solve this by using a dedicated plastic or resin primer and ensuring the model is completely dry and oil-free before application.
Do Narrow Minded Railworks kits come with the chassis included?
Narrow Minded Railworks kits do not include the chassis or motor. We specialize in high-detail 3D printed bodies for OO9, GN15, and O-16.5 scales. Our kits are specifically designed to fit commercially available power units like the Kato 109 or Tenshodo Spud. This allows you to choose the specific drive system that fits your budget and performance requirements while we provide the bespoke, high-detail locomotive or wagon body for your layout.