

The difference between a hobbyist 3D print and an exhibition-standard narrow gauge model isn't the printer used, but the precision applied during the final stages of the build. While raw resin prints offer incredible detail for OO9 and GN15 scales, they often arrive with unsightly support marks or visible stair-stepping that can ruin the illusion of reality. You might feel that finishing 3D printed kits is a gamble where one wrong move snaps a delicate handrail or a buffer beam. It's a common frustration, especially as 2026 data shows that achieving consistency and managing the time required for finishing are the primary hurdles for most enthusiasts.
We understand that working with brittle resin requires a delicate touch and a structured process. This guide provides a proactive solution to help you turn raw prints into professional, smooth surfaces ready for the paint shop. You'll learn how to remove supports without damaging fine details, which fillers provide the best bond, and how to safely manage the process while adhering to current safety standards for workshop ventilation. By the end of this article, you'll have the confidence to handle delicate 7mm scale parts and produce models that look like high-end injection-moulded kits rather than digital prototypes.
Key Takeaways
- Learn the "snip and sand" technique to remove supports safely without scarring delicate locomotive bodies or wagon frames.
- Discover how wet sanding protects your workshop environment while smoothing surfaces without erasing fine rivet or panel line details.
- Master the use of high-build primers as diagnostic tools when finishing 3d printed kits to identify and eliminate remaining layer lines.
- Ensure long-term paint adhesion and a perfect fit for accessories by following a thorough degreasing and final inspection protocol.
- Apply professional post-processing steps to transform raw resin prints into models that rival the quality of traditional injection-moulded kits.
What is Post-Processing for 3D Printed Kits?
In the context of model railroading, post-processing is the series of manual steps taken to refine a raw print into a paint-ready masterpiece. To understand What is Post-Processing, you should view it as the bridge between digital fabrication and traditional craftsmanship. Unlike mass-produced plastic kits that use high-pressure moulds, 3D-printed resin parts are built in microscopic horizontal layers. This method allows for the incredible detail found in OO9 and GN15 kits, but it introduces specific challenges like layer lines and support "pips" that don't exist on injection-moulded models.
The primary goal of finishing 3d printed kits is to achieve a surface so smooth that the printing process becomes invisible. You must remove every trace of the manufacturing process while preserving delicate features like rivets, hinges, and door handles. Resin is an excellent medium for narrow gauge modelling because of its precision, yet it remains fundamentally different from polystyrene. It's often more brittle; therefore, you cannot simply "snap" parts off a sprue. A proactive, patient approach prevents the heartbreak of a snapped buffer or a cracked boiler shell.
Layer Lines vs. Support Marks
Before you pick up a tool, you need to identify the surface artifacts common to resin prints. "Stair-stepping" or layer lines appear as subtle ridges, most visible on curved surfaces like the top of a boiler or a rounded roof. These are a natural result of the printing process. Support marks, on the other hand, are the small "pips" left behind where the printer built temporary structures to hold the model in place. These often sit on the underside of a chassis or along the edges of a footplate. If you don't address these pips early, they'll prevent the locomotive body from sitting flush on its chassis, causing alignment issues later in the build.
The Essential Tool Kit for Finishing
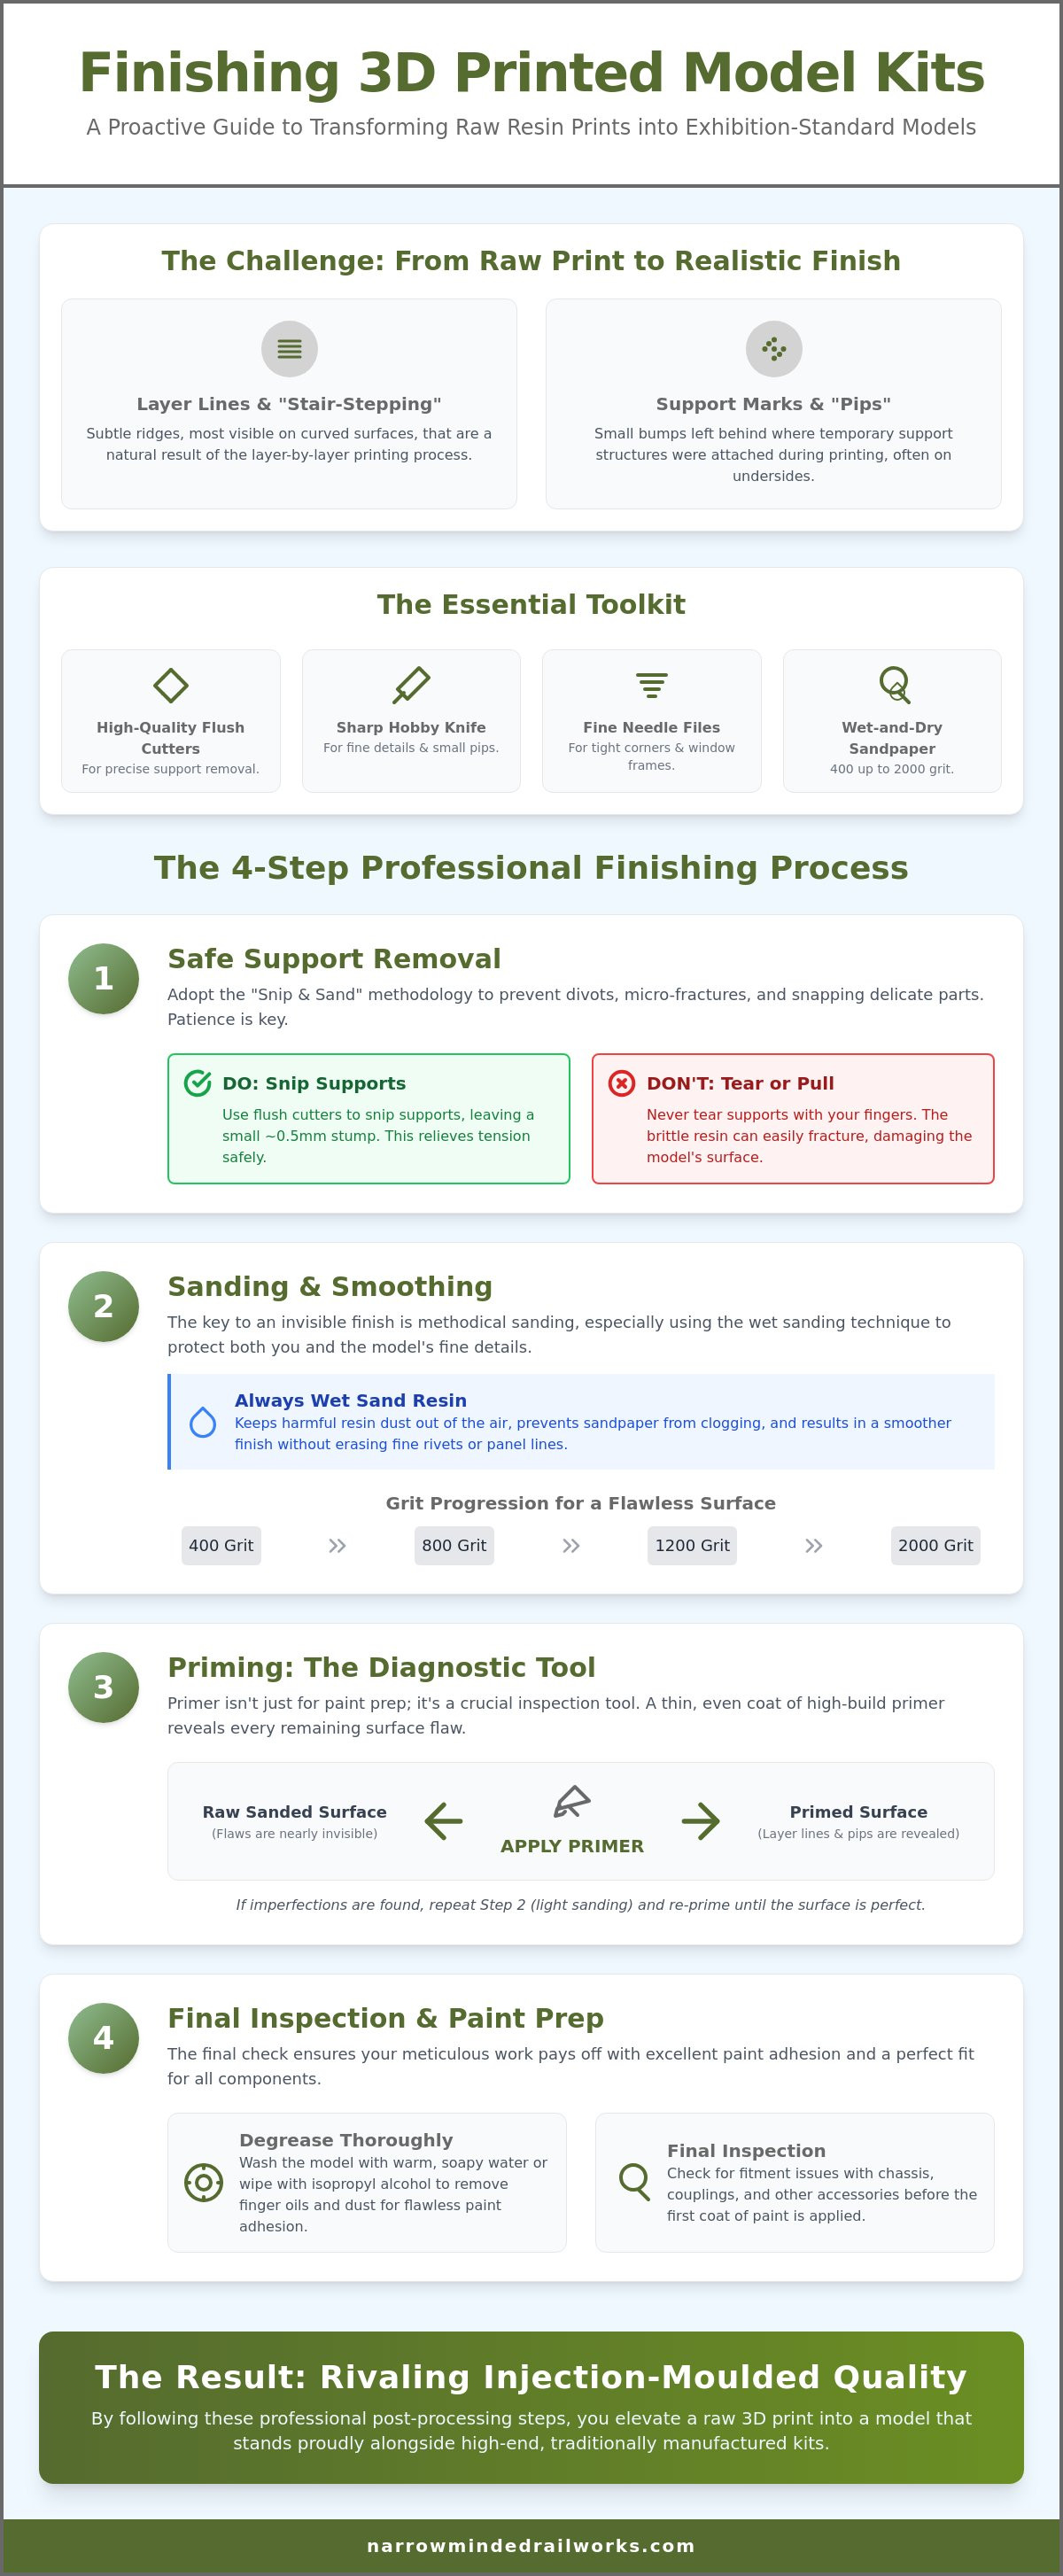
Effective finishing 3d printed kits requires a specific set of tools designed for precision rather than bulk removal. You'll find that standard sandpaper is often too aggressive for resin. Instead, utilize high-grit wet-and-dry paper, starting at 400 grit and moving up to 1000 or 2000. Wet sanding is vital because it keeps the resin dust out of the air and prevents the paper from clogging. For tight corners, such as window frames or internal cab details, a set of fine needle files is indispensable. When it's time to remove supports, use a sharp hobby knife for the smallest attachments and high-quality side cutters for thicker supports. Avoid using your fingers to tear supports away, as the tension can easily cause the brittle resin to fracture in the wrong place.
How to Safely Remove 3D Print Supports
Removing supports is often the most nerve-wracking stage of finishing 3d printed kits. You might be tempted to simply tear the support structures away with your fingers, especially when they look like a loose forest of resin. However, resin is inherently brittle; the tension created by pulling can cause "divots" or pits in the model surface where the support was attached. In the worst cases, it can snap delicate narrow gauge features like chimneys or buffer beams. A proactive solution is to adopt a "snip and sand" methodology that treats every attachment point with individual care.
This careful approach is essential when you're preparing a locomotive body for its power unit. If you don't clear internal supports properly, you'll struggle with the chassis fit, leading to a model that sits lopsided or vibrates during operation. Research into professional finishing techniques suggests that mechanical stress during support removal is a primary cause of micro-fractures in vat-polymerized resins. By following a structured two-step process, you preserve the structural integrity of your model while minimizing the need for heavy sanding later.
Step 1: The Initial Snip
Your first tool should be a pair of high-quality flush-cutters. Instead of cutting right against the model's skin, leave a small "stump" of about 0.5mm. Cutting too close can cause the resin to shatter slightly below the surface, leaving a hole that requires filler. Work from the outside of the support "raft" toward the center. This reduces the overall tension on the model as you go. Pay close attention to areas with integrated handrails or thin cab sides; these are high-risk zones where the support might be stronger than the detail it's holding. If you're ready to start your next build, exploring our range of OO9 locomotive and wagon kits is a great way to find models designed with builder-friendly support placement.
Step 2: Cleaning the 'Stubs'
Once the bulk of the support material is gone, you're left with a series of small pips. You can remove these using a fresh, sharp scalpel blade. Use a gentle "pulling" or scraping motion rather than a forceful push. A pushing motion risks the blade catching and digging into the boiler or tank side. For flat surfaces like wagon floors or footplates, a fine-grit sanding stick is a proactive solution. It allows you to level the stub without creating an uneven surface. By taking the time to shave these stubs down individually, you ensure the surface remains flat and ready for the final smoothing stages of finishing 3d printed kits.
Sanding and Smoothing Narrow Gauge Details
Once you've cleared the support stubs, the surface of your model likely shows subtle "stair-stepping" from the printing process. While these lines are often less than 0.05mm deep, they become painfully obvious once a coat of gloss paint is applied. Finishing 3d printed kits requires a disciplined approach to sanding that balances smoothness with the preservation of fine scale details. Resin is harder than traditional plastic, which means it doesn't "give" under pressure. Instead, it wears away predictably if you use the right materials.
A significant constraint when working with resin is the production of fine, airborne dust, which acts as a respiratory irritant. A proactive solution is to always utilize wet sanding techniques. By keeping the surface and your abrasive paper wet, you trap the dust in a slurry. This prevents particles from entering your lungs and stops the resin from clogging the grit of your sandpaper. This keeps the abrasive sharp for longer, ensuring a more consistent finish across the locomotive boiler or wagon sides. Recent 2026 industry surveys highlight that achieving consistency is the top challenge for 52% of users in post-processing. Taking your time with these sanding steps is the only way to ensure that professional standard across your entire fleet.
Wet Sanding Techniques
Effective smoothing is a process of progression. You should start with a 400-grit wet-and-dry paper to level the largest support marks and layer lines. You'll notice the water turning cloudy as the resin is removed. This is a normal part of the process. Once the surface is level, move to 600, 800, and finally 1200 grit for a polished finish. Always sand in a circular motion or along the length of the boiler to avoid creating flat spots. After each stage, rinse the model in clean, slightly soapy water to remove the abrasive residue. This prevents larger grits from being carried over to the next stage of finishing 3d printed kits.
Handling Micro-Details
The greatest challenge in narrow gauge modelling is sanding around microscopic details like rivets, wash-out plugs, and door hinges. If you sand too aggressively, you risk erasing these features entirely. A proactive solution is the "tape-and-sand" method. Cover the rivets with a small piece of low-tack masking tape while you smooth the surrounding panel. For curved surfaces like boilers, use flexible sanding sponges rather than hard blocks. These sponges conform to the round profile, distributing pressure evenly and preventing the "flat-siding" effect. If you need to reach into tight gaps, such as between a tank and a boiler, trim a small piece of sandpaper and glue it to the end of a toothpick. Micro-Mesh is a specialized abrasive cloth designed to provide ultra-high-gloss finishes on delicate surfaces.
Priming: The Secret to a Professional Finish
Many modellers view priming as the first step of painting, but it is actually the final, most critical stage of finishing 3d printed kits. Raw resin has a translucency that can hide microscopic surface flaws even under bright workshop lights. A proactive solution is to treat your first coat of primer as a diagnostic tool rather than a colour base. Once a uniform matte layer is applied, the shadows cast by remaining "stair-stepping" or support pips become immediately visible. This allows you to catch errors before they are permanently sealed under layers of enamel or acrylic paint.
Applying primer to 3D printed resin requires a different mindset than working with traditional plastic. Some primers formulated for polystyrene don't always bite into the resin surface effectively. While you need a primer that adheres well, you must avoid heavy applications that might obscure the fine rivets and panel lines that define high-quality narrow gauge kits. A proactive solution is to apply two or three light "mist" coats, allowing each to dry for a few minutes. This builds a stable surface without the risk of pooling in delicate window frames or louvres.
Choosing the Right Primer
Grey primer is the industry standard for diagnostic work because its neutral mid-tone reveals surface texture better than white or black. White primer can "blow out" fine details in high light, while black can hide the very shadows you are looking for. You might be tempted to use automotive filler primers to speed up the smoothing process. However, these are often too thick for OO9 or GN15 scales and can easily bury the intricate detail of a locomotive backhead. For a deeper look at the transition from preparation to colour, see our guide on painting 3D printed models. If you are ready to put these techniques to the test, you can browse our latest GN15 and OO9 kits to find your next project.
The 'Prime-Sand-Repeat' Cycle
After your first light coat of primer has dried, inspect the model closely. You will likely find "ghost" support marks that appeared smooth during the wet-sanding stage. This is a common constraint of the medium. A proactive solution is to spot-sand these specific areas with 1000-grit wet-and-dry paper. You don't need to strip the entire model; simply level the flaw until it disappears into the grey base. Apply a second mist coat over the sanded area to check the result. When the primer looks perfectly uniform under a magnifying lamp, the model is officially ready for its final livery. This iterative process ensures your 3D printed locomotive achieves the same professional surface as a high-end brass or injection-moulded model.
Final Inspection and Preparing for Paint
The transition from the assembly stage to the painting booth is a critical juncture in finishing 3d printed kits. After the iterative process of priming and sanding, you might feel the urge to rush into the final colour coat. However, a model that looks perfect under primer can still fail if the technical details aren't verified. You must ensure that every accessory and mounting point is functional before the paint seals the surface. A proactive solution is to perform a dry-fit of all external details to prevent the need for destructive adjustments later.
Checking the fit of accessories like quarry hunslet couplers is a priority during this final inspection. If the mounting holes have slightly closed up due to the thickness of the primer, it's safer to clear them with a pin vice now rather than struggling with a painted chassis. This is also the time to verify that the locomotive body sits perfectly level on its power unit. Any lopsidedness at this stage will be magnified once the final livery is applied, potentially ruining the professional look you've worked hard to achieve.
Degreasing and Cleaning
The Final Check-List
Before you commit to the spray booth, run through a structured check-list to confirm the model's readiness. Inspect the window apertures for any remaining resin "fuzz" or primer build-up that would prevent the glazing from sitting flush. Test the chassis mounting points one last time to ensure the screws or clips engage smoothly without tension. It's helpful to remember that a well-finished 3D printed kit is indistinguishable from a high-end brass or injection-moulded model once painted. By maintaining a disciplined approach to finishing 3d printed kits, you transform a digital print into a museum-quality piece of narrow gauge rolling stock that you can be proud to run on any layout.
Elevating Your Narrow Gauge Fleet
The journey from a raw resin print to a finished model requires patience and a refined methodology. While the inherent brittleness of resin presents a constraint, adopting a surgical approach to support removal and a disciplined wet-sanding routine provides a proactive solution to protect your model. Mastering the art of finishing 3d printed kits allows you to bridge the gap between modern digital manufacturing and traditional scale craftsmanship. By utilizing primer as a diagnostic tool, you can identify and eliminate surface flaws before they reach the final paint stage.
Our kits are designed by modellers, for modellers, and are specifically optimized for popular narrow gauge chassis to ensure a seamless building experience. We provide worldwide shipping to help enthusiasts across the globe achieve exhibition-standard results. If you are ready to elevate your workshop output, you can explore our range of high-detail OO9 and GN15 kits today. With these techniques and a proactive mindset, your next 3D printed locomotive will be a standout addition to your layout.
Frequently Asked Questions
Is 3D printed resin dust dangerous to breathe?
Resin dust is a known respiratory irritant and should not be inhaled during the workshop process. While dry sanding produces fine airborne particles, utilizing wet sanding techniques provides a proactive solution by trapping the dust in a slurry. If you must sand a dry model, always wear a properly fitted P2 or N95 mask and work in a well-ventilated area to ensure your safety.
Can I use standard plastic glue on 3D printed kits?
Standard solvent-based plastic cement will not work on 3D printed resin because it cannot melt the material to create a bond. Since resin is chemically different from polystyrene, using Cyanoacrylate (super glue) or a two-part epoxy provides a proactive solution for a strong mechanical join. For delicate narrow gauge parts, a high-viscosity "thick" super glue allows for better control and gap-filling during assembly.
How do I fix a part that snapped off during support removal?
Re-attaching a snapped part is straightforward if you use a high-quality adhesive and a steady hand. Brittle resin can fracture under the tension of side cutters; however, applying a tiny amount of medium-viscosity super glue to the break provides a proactive solution for a seamless repair. Once the glue is fully cured, you can gently sand the joint to make the fracture invisible before you begin finishing 3d printed kits.
What is the best way to hide layer lines on curved surfaces?
The most effective method for hiding "stair-stepping" on boilers or roofs is a combination of progressive sanding and priming. Curved surfaces reveal printing artifacts more than flat panels; however, sanding with 800-grit wet paper followed by a high-build primer provides a proactive solution to level the surface. Repeating this process twice usually eliminates all traces of the print layers without softening the surrounding details.
Do I need to wash my 3D printed kit before I start finishing it?
Yes, you should always wash your kit to remove any residual processing oils or dust from the manufacturing stage. Residual contaminants will prevent primer and paint from adhering correctly to the resin surface. A quick soak in warm, soapy water followed by a thorough air-dry provides a proactive solution that ensures a stable base for all subsequent finishing steps.
What happens if I sand too much and create a hole?
Creating a hole in a thin cab side or tank is a common mistake when finishing 3d printed kits for the first time. While thin resin walls are easy to over-sand, applying a small amount of automotive-grade filler or UV-cured resin provides a proactive solution to plug the gap. Once the filler is hard, you can re-sand the area level with the rest of the model and proceed with your priming cycle.
Can I use a Dremel or rotary tool for finishing 3D prints?
Rotary tools are generally too aggressive for the delicate scales of OO9 or GN15 modelling. The high RPM of a Dremel can generate enough heat to melt the resin or cause the tool to skip and gouge the surface. Manual sanding with flexible sticks and sponges remains the best proactive solution for maintaining the precision required for high-quality narrow gauge models.
Is it better to remove supports before or after the model is fully cured?
If you are printing your own models, supports are easier to remove before the final UV cure while the resin is still slightly soft. However, most commercial kits arrive fully cured for stability during shipping. While cured resin is harder and more brittle, using the "snip and sand" method with sharp flush-cutters provides a proactive solution that prevents the resin from shattering at the attachment points.