

Does a collection of mass-produced, ready-to-run models truly reflect your creative vision, or is it simply a display of what was available on the shop shelf? Many hobbyists feel limited by the uniformity of standard gauge sets; however, they often hesitate to move into kit building because they fear ruining components through poor assembly. While these concerns are valid, they shouldn't stop you from building a model railway to be proud of. You can transition from a simple collector to a true craftsman by embracing the unique character and compact nature of narrow gauge modelling.
We promise to show you how to move beyond basic sets to create a detailed, characterful layout that showcases genuine skill. This guide explores the benefits of scales like OO9 and GN15, which allow for high realism even when space is at a premium. You'll learn how to master the finishing of 3D printed models and gain the confidence to assemble locomotives and wagons that carry your personal touch. We'll examine the specific techniques needed to turn a box of parts into a centerpiece of your collection, ensuring your layout stands out for its artistry rather than its price tag.
Key Takeaways
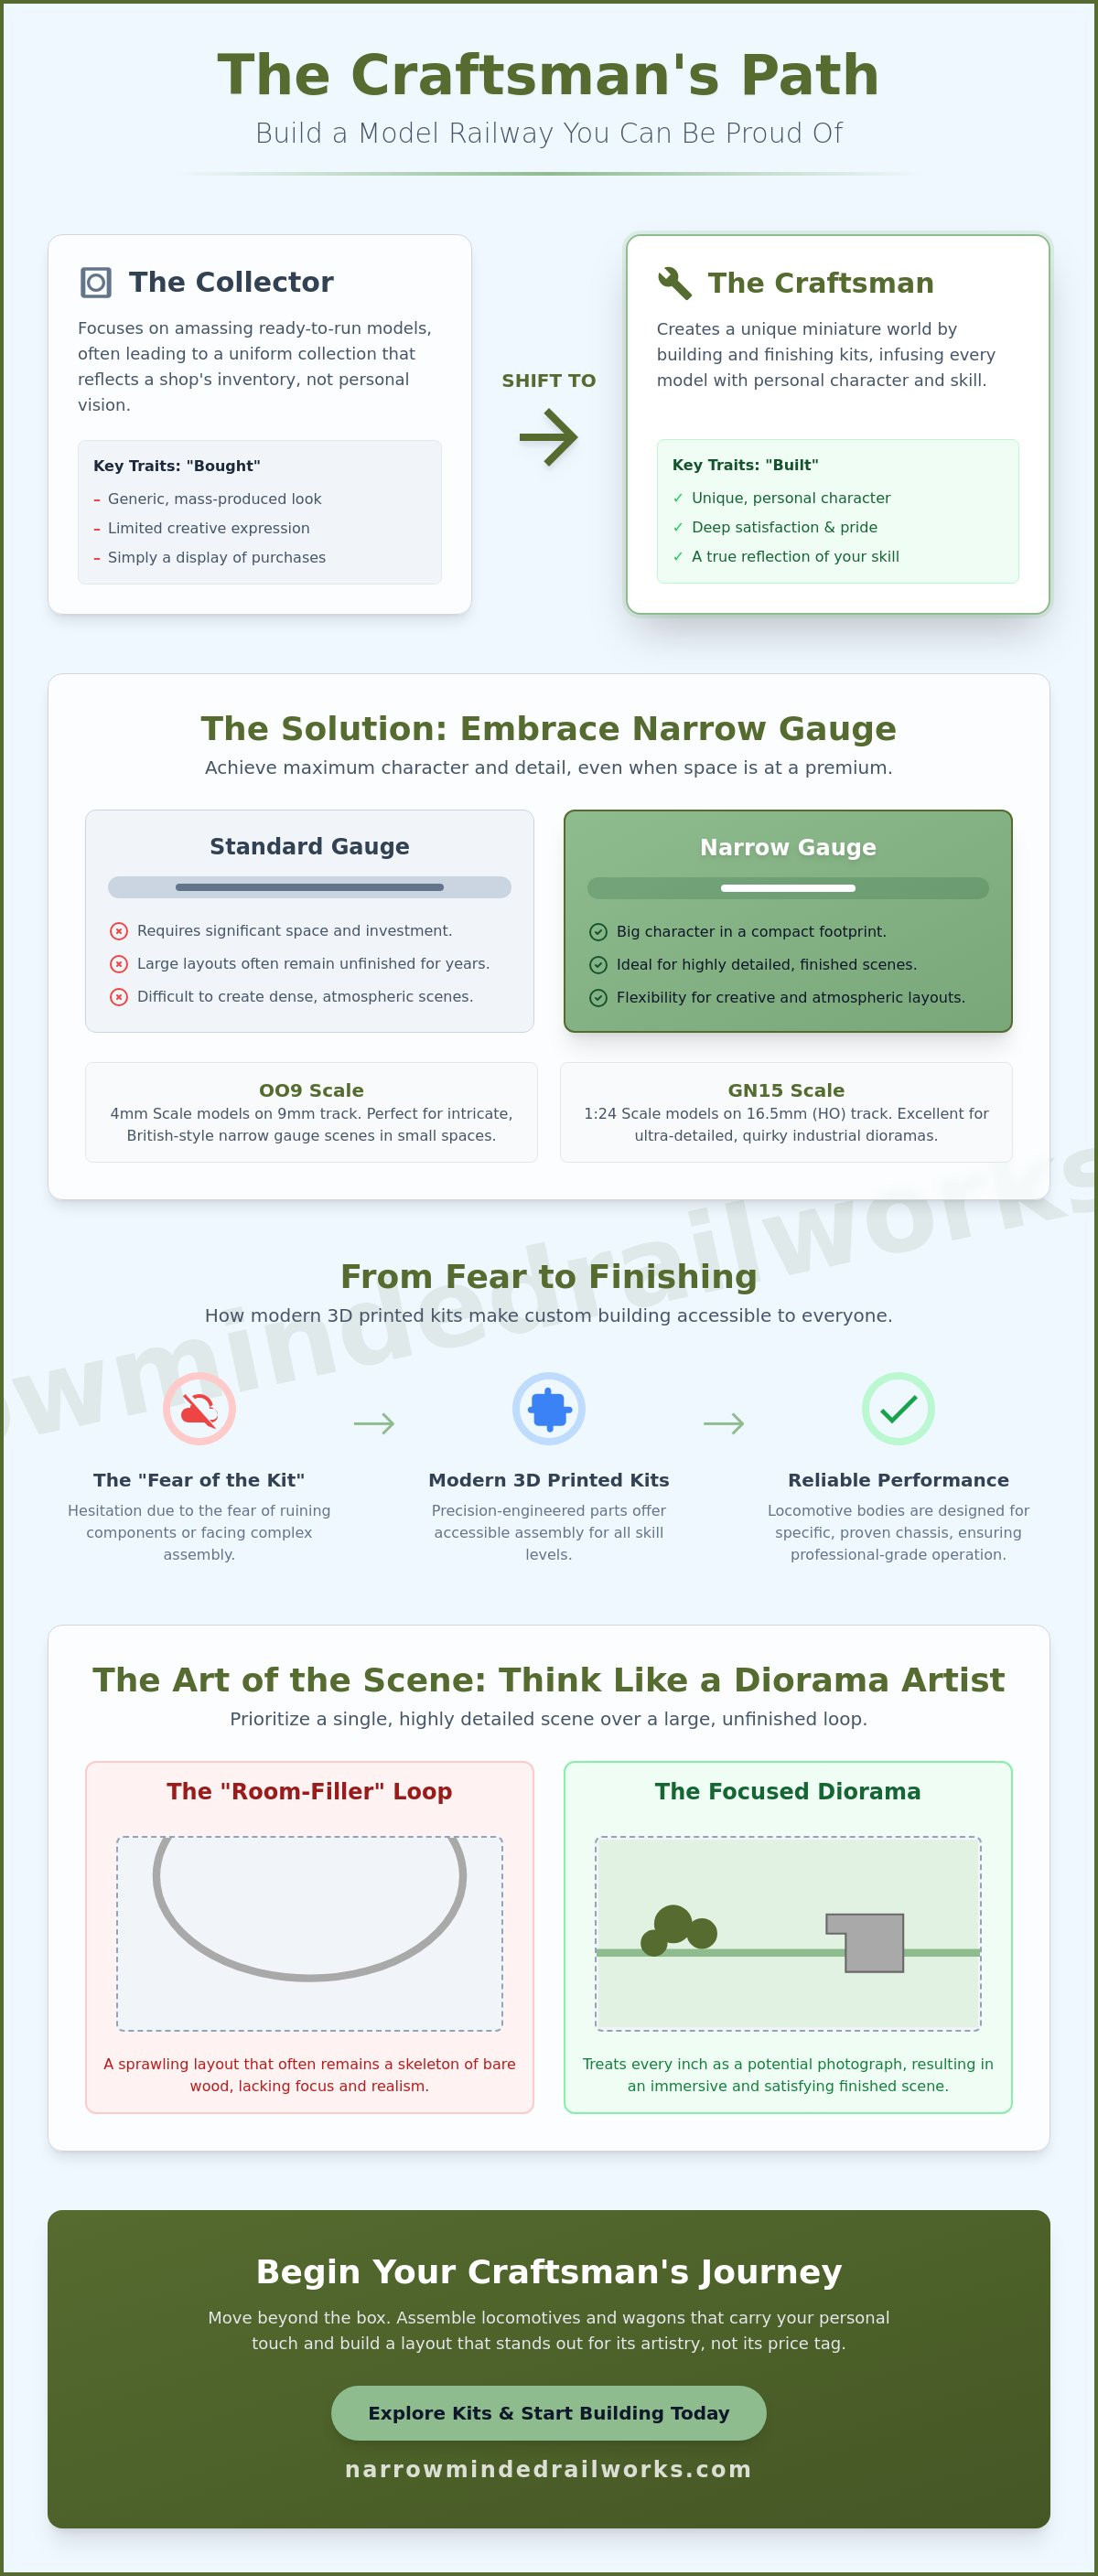
- Understand why shifting your focus from accumulating ready-to-run models to personal craftsmanship is the essential first step toward building a model railway to be proud of.
- Discover how narrow gauge scales like OO9 and GN15 provide an ideal solution for modellers who want to achieve high detail and character within a compact footprint.
- Learn how modern 3D printed locomotive and wagon kits overcome the traditional "fear of the kit" by offering precision assembly that is accessible to all skill levels.
- Explore "diorama thinking" techniques to create immersive scenery that grounds your rolling stock in a realistic, historically inspired environment.
- See how utilizing locomotive bodies designed for specific, proven chassis ensures your custom-built models operate with professional-grade reliability.
Redefining Your Goal: What Makes a Model Railway to be Proud Of?
Many beginners equate success with the size of their layout, but true satisfaction often comes from the level of detail achieved in a smaller space. While a sprawling room-filler might seem impressive, it often remains a skeleton of bare wood and unfinished track for years. Transitioning from a basic collector to a dedicated modeller is the key to building a model railway to be proud of. This shift involves prioritizing character and personal craftsmanship over the sheer volume of ready-to-run stock. By focusing on the "Built-not-Bought" philosophy, you move beyond the generic look of a starter set and begin to create a miniature world with a unique story.
To better understand how a focused approach can accelerate your progress, watch this helpful speed-build demonstration:
The model railway hobby offers a deep sense of accomplishment when you move from consumer to creator. When you assemble your own OO9 or GN15 locomotive kits, you develop a deeper connection to the prototype. You aren't just buying a product; you're crafting a specific piece of history. Standard gauge sets often look like toys because they lack a specific theme or weathering. By focusing on narrow gauge prototypes, you can achieve a level of realism that mass-produced items simply cannot match. This approach ensures your layout is a reflection of your skill rather than your budget.
The Psychology of Craftsmanship in Modelling
Psychologists often refer to the "Endowment Effect," which suggests we place a higher value on things we've had a hand in creating. When you finish a 7mm scale wagon or locomotive kit, the pride you feel is significantly higher than when unboxing a factory-made item. You can avoid the "unfinished layout blues" by setting realistic milestones, such as completing a single scenic diorama. Narrow gauge modelling naturally encourages these one-of-a-kind creations because the original railways were often quirky and improvised. This allows for more creative freedom while building a model railway to be proud of.
Quality Over Quantity: The Small Layout Advantage
Limited space is often viewed as a constraint, yet it frequently leads to better results through forced focus. Micro-layouts allow you to treat every square inch as a potential photograph. Rather than building a repetitive circuit that just goes around in circles, you can focus on a single, highly detailed scene. This diorama-centric approach ensures that every building, figure, and accessory is placed with purpose. You'll find more satisfaction in a finished six-foot layout than a thirty-foot loop that never feels complete. Focus on the scene to achieve maximum realism.
Selecting the Right Scale: Why Narrow Gauge Delivers Maximum Character
While standard gauge layouts offer the grandeur of express trains, they often require significant space and financial investment. If you're struggling with limited room, narrow gauge provides a proactive solution by delivering big character in small footprints. Understanding what is a narrow gauge railway? is the first step toward realizing that you don't need a basement-sized room to create a masterpiece. These lines were originally built for economy and efficiency; consequently, they feature tighter curves and steeper gradients that allow for highly creative landscape integration. This flexibility is a cornerstone of building a model railway to be proud of because it lets you focus on dense, atmospheric scenes rather than long, empty stretches of track.
Choosing between OO9, GN15, and O-16.5 depends on your specific vision. OO9 uses 9mm track to represent narrow gauge in 4mm scale, making it perfect for intricate, compact scenes. GN15, meanwhile, places large-scale locomotive bodies on standard 16.5mm (OO) track, which is ideal for industrial or estate themes. If you prefer a larger, more tactile experience, O-16.5 (7mm scale) offers incredible detail. Many members of The Model Railway Club appreciate these scales for their unique challenges and the way they depart from generic mainline setups. If you're ready to start your journey, exploring specialized locomotive and wagon kits can help you find the scale that speaks to your creative goals.
The Versatility of OO9 and GN15
OO9 is the modeller's choice for creating complex track plans in tiny spaces. By using N gauge track as a foundation, you can build winding mountain passes or cramped slate quarries that fit on a bookshelf. GN15 offers a different advantage; it allows you to model in a much larger scale while utilizing common OO gauge track. This makes it a fantastic entry point for those who want to focus on high-detail locomotive kits and industrial scenery without the need for bespoke trackwork.
Character-Driven Prototypes
Narrow gauge railways have "soul" because they were often built to serve specific local industries. Whether you're inspired by the rugged Welsh slate railways or the charming estate lines of the Victorian era, these prototypes offer a story that mainline railways often lack. By choosing a character-driven theme, you can use unique rolling stock to differentiate your layout. This focus on a specific narrative is essential for building a model railway to be proud of, as it transforms a simple hobby into a work of historical art.
Mastering Kit Building: Moving Beyond Ready-to-Run Models
Buying ready-to-run models is a convenient way to start, but it often results in a layout that looks identical to everyone else's. This transition from being a collector of boxes to a creator of models is the most significant step toward building a model railway to be proud of. While the fear of "ruining" an expensive kit is common, modern technology has simplified the process. If you're unsure where to begin, consult your first OO9 loco kit guide for practical advice on selecting your initial project. By choosing to build rather than just buy, you gain a unique piece of rolling stock that carries your personal signature.
Witnessing the museum-quality exhibits at the San Diego Model Railroad Museum often inspires hobbyists to elevate their own standards through kit building. Traditional etched brass or white metal kits can be intimidating due to their complex soldering requirements; however, modern resin printing provides a proactive solution. These kits arrive with high levels of detail already integrated into the body, which eliminates the need for difficult sub-assemblies. This accessibility is a core component of building a model railway to be proud of that reflects your individual style and technical growth.
Why 3D Printed Kits are a Game Changer
3D printing captures intricate textures like wood grain and rivets with a level of precision that was previously only available in high-end brass models. These kits are designed to fit onto reliable, commercially available chassis, which ensures your finished model runs as smoothly as it looks. You don't need a workshop full of heavy machinery to get started. A basic set of files, some sandpaper, and a steady hand are often the only requirements for a successful assembly. This simplicity allows you to focus on the creative aspects of modelling rather than struggling with basic construction.
The Kit-Building Workflow for Success
A professional finish depends on a structured approach. You should begin by carefully removing any 3D printing supports with a sharp scalpel and degreasing the parts in warm, soapy water to ensure paint adhesion. Dry-fitting is the next essential step; always check that the body aligns perfectly with your chosen chassis before applying any adhesive. Finally, the secret to a professional, non-plastic look lies in the painting process. Utilizing a high-quality primer and applying thin layers of paint will preserve the fine detail of the kit, resulting in a locomotive or wagon that looks like it belongs in a real industrial setting.
Creating Immersive Scenery: Bringing Your Layout to Life
Achieving a professional finish often feels daunting when faced with a vast expanse of bare baseboard. Adopting "diorama thinking" provides a proactive solution by encouraging you to treat every square inch as a potential photograph. This mindset is essential for building a model railway to be proud of, as it shifts the focus from simple track laying to creating a believable world. By grounding your models in a specific time and place, you transform a collection of kits into a cohesive narrative. Whether it's a Victorian estate line or a mid-century industrial site, the environment must justify the presence of the railway.
Blending man-made structures with the natural world requires a layered approach. Realistic track bedding shouldn't look like a uniform ribbon of grey; instead, it should show signs of oil spills, weeds, and varying stone sizes. Vegetation should never be a single shade of green. Using different lengths of static grass and various foam textures helps mimic the chaotic growth found in nature. When these elements are balanced correctly, they ground your OO9 or GN15 rolling stock, making the miniature scene feel permanent and lived-in. To achieve this level of detail, you can browse our range of diorama tools and scenery to find the specific components your layout needs.
Detailing with Diorama Tools and Accessories
Small scenery items tell a story without words. A single petrol pump, a weathered phone box, or a cluster of 3D printed barrels can indicate the era and economic status of your railway's setting. Modern 3D printed scenery kits offer unique architectural features that aren't available in mass-produced plastic ranges. When placing these items, follow the "rule of three" by layering textures: start with a base earth tone, add fine grit or "clutter," and finish with targeted vegetation. This creates a naturalistic look that draws the eye into the scene.
- Figures: Use scanned people in realistic poses to add life to platforms and workshops.
- Industrial Clutter: Scatter crates, pallets, and scrap metal around sidings to suggest active work.
- Signage: Period-accurate signs provide instant context for the location and time period.
Professional Painting and Weathering
Models often look like toys because they retain a factory-fresh "plastic" shine. Moving beyond out-of-the-bottle colours is vital for realism. You should mix your own shades to reflect the muted tones of the real world, where sun, rain, and soot constantly alter surfaces. Simple weathering techniques, such as dry-brushing or applying thin washes of dark paint, can highlight rivets and wood grain on your kits. For a deeper dive into these techniques, read our guide to painting 3D printed models. These steps ensure your hard work results in a masterpiece that looks heavy, metallic, and authentic.
Executing Your Vision: From 3D Printed Kits to a Finished Masterpiece
Completing a layout can feel overwhelming when you attempt to tackle every complex engineering task at once. Narrow Minded Railworks provides a proactive solution by offering precision-engineered kits that simplify the most difficult aspects of building a model railway to be proud of. By utilizing 3D printed locomotive bodies designed to fit specific, proven chassis, we remove the mechanical guesswork that often leads to frustration. This allows you to dedicate your time to the artistic finishing and detailing that defines a high-quality model. When the technical foundation is reliable, you can focus entirely on the craftsmanship that makes your railway unique.
Customizing your kits is the final step in moving beyond the "off-the-shelf" look. You should feel encouraged to add personal touches, such as custom-bent handrails, specific lamp placements, or unique weathering that reflects a particular industrial history. These small additions ensure that your locomotive or wagon is a one-of-a-kind creation. Before you consider a project finished, use this final checklist to ensure it meets a standard you'll be proud to show at exhibitions or to friends:
- Mechanical Reliability: Does the locomotive body sit securely on the chassis and run without wobbling or stalling?
- Visual Consistency: Do your rolling stock and structures share a believable era and weathering style?
- Detail Density: Are there small narrative details, such as tools in a cab or clutter in a wagon, that reward close inspection?
- Clean Execution: Are all 3D print supports fully removed, and are the paint finishes free from visible brush marks or dust?
Choosing Your First Project
Starting with a complex locomotive build can be intimidating if you're new to resin kits. We suggest beginning with a simple wagon kit to build your confidence with preparation and painting techniques. Once you're comfortable with the material, you can select a locomotive body that matches your specific interest, whether that is OO9 or the larger GN15 scale. While every modeller faces a learning curve, our detailed instructions provide a structured path to a professional result. Taking this step-by-step approach prevents burnout and ensures every project contributes to building a model railway to be proud of.
Joining the Modelling Community
Pride in your work often grows when you share your progress with others who understand the craft. Specialized forums and social media groups are excellent places to showcase your builds and receive constructive feedback. You shouldn't view suggestions as criticism; instead, use them as proactive tools to improve your next kit build. Learning from the community helps you master niche techniques more quickly than working in isolation. Ultimately, the most successful layout isn't the largest or most expensive; it's the one that brings you the most personal satisfaction through the power of your own two hands.
Take Your First Step Toward a Masterpiece
We've explored how shifting your focus from sheer volume to personal craftsmanship transforms your hobby into a rewarding pursuit. You now understand that narrow gauge scales like OO9 and GN15 provide the perfect canvas for high realism without requiring a massive footprint. By embracing the "built-not-bought" philosophy, you move past the generic limitations of standard sets and begin creating a world with a distinct story. This approach ensures that your collection isn't just a series of purchases, but a gallery of your own technical achievements.
Building a model railway to be proud of is a journey that rewards patience and creative expression. Every locomotive you finish and every scene you weather adds a layer of personal history to your layout. We provide the tools for this transformation through expertly designed 3D-printed kits for various scales, focusing on the characterful, unique prototypes that make this hobby special. It's time to move beyond the box and start crafting something exceptional that reflects your individual vision.
Start your next pride-worthy project with our OO9 and GN15 kits. We offer worldwide shipping for narrow gauge enthusiasts, ensuring that high-quality craftsmanship is accessible regardless of your location. Don't let space or technical fears hold you back from creating a miniature world that is truly your own. Your finest work is just one kit away.
Frequently Asked Questions
How much space do I really need to build a model railway I can be proud of?
You can build a high-quality layout in as little as three or four square feet. Large layouts often present significant maintenance challenges; however, a micro-layout or diorama allows you to focus on intense detail. This compact approach is a proven method for building a model railway to be proud of without needing a dedicated room. It ensures you finish your project rather than leaving it as a bare wooden frame.
Is narrow gauge modelling harder for beginners than standard gauge?
Narrow gauge is not inherently harder, though it requires a shift in focus from buying to building. Beginners often feel intimidated by complex metal kits; however, modern 3D printed bodies simplify the process by fitting directly onto reliable commercial chassis. This removes the need for difficult soldering or machining. It's an accessible entry point for anyone who wants to move beyond standard, mass-produced train sets.
What are the essential tools I need for building 3D printed locomotive kits?
You only need a small selection of basic tools to achieve professional results. A sharp scalpel for removing supports, fine needle files for smoothing, and high-quality super glue are the primary requirements. While specialized workshops are useful, most narrow gauge enthusiasts successfully assemble their kits on a standard desk. You don't need heavy machinery to create a highly detailed locomotive or wagon that looks authentic.
Can I use standard OO or N gauge track for narrow gauge models?
Yes, specific narrow gauge scales are designed to run on standard track gauges. For example, OO9 models run on 9mm track, while GN15 models utilize 16.5mm track. While standard N or OO track works perfectly well, you can improve realism by using track with wider sleeper spacing. This simple change helps ground your models in a realistic industrial or rural environment without requiring custom engineering.
How do I ensure a professional paint finish on a 3D printed model?
Preparation is the most critical step for achieving a professional finish on resin parts. You must degrease the 3D printed components in warm, soapy water and apply a dedicated primer to ensure paint adhesion. Using thin, multiple layers of paint prevents the loss of fine details like rivets. This structured workflow ensures your model looks like a heavy industrial machine rather than a piece of shiny plastic.
Do I need to be an expert at electronics to build a narrow gauge layout?
What is the benefit of a 3D printed kit over a ready-to-run model?
Kits offer a level of character and uniqueness that mass-produced models cannot match. Ready-to-run items are convenient, but they lack the personal signature of a hand-built project. This personal touch is central to building a model railway to be proud of because it showcases your specific modelling skills. Choosing a kit allows you to create a locomotive that fits your specific era and industrial theme perfectly.
How do I choose the right chassis for a 3D printed locomotive body?
You should select a chassis based on the specific recommendations provided with the locomotive body kit. Our kits are designed around proven, commercially available power units to ensure reliable operation and smooth slow-speed running. Always verify the wheelbase and wheel diameter measurements before purchase. This proactive approach ensures a perfect fit between the 3D printed shell and the mechanical components for a professional result.