

What if the most expensive tool in your workshop is actually the one most likely to ruin your first 3D-printed locomotive kit? Many new modellers ask "what tools do I need for kit building" only to find themselves overwhelmed by high-end gadgets they'll never actually use. We understand the frustration of staring at a delicate resin print and wondering if your old hobby knife will cause a catastrophic snap or if your glue will simply melt the surface. It's a common concern, but achieving a professional finish on narrow gauge models doesn't require a massive investment.
You'll discover exactly which tools you need to successfully build, finish, and detail your first OO9 or GN15 narrow gauge model railway kit. We've simplified the process to ensure you don't waste money on unnecessary equipment while providing the confidence to handle 3D-printed materials safely. This guide provides a clear shopping list of essentials, explains why cyanoacrylate is your best friend for resin, and previews the modern techniques used to prepare 14K resolution prints for the workbench.
Key Takeaways
- Identify the three essential core tools required to protect your workspace and achieve precision cuts on every project.
- Learn why traditional plastic cements fail on resin and which specific adhesives create the strongest bond for 3D-printed kits.
- Discover the correct techniques for removing dense support structures without risking damage to delicate narrow gauge locomotive parts.
- Answer the question "what tools do I need for kit building" with a focused list that avoids wasted spending on unnecessary gadgets.
- See how integrated detailing in Narrow Minded Railworks kits simplifies the assembly process for OO9 and GN15 models.
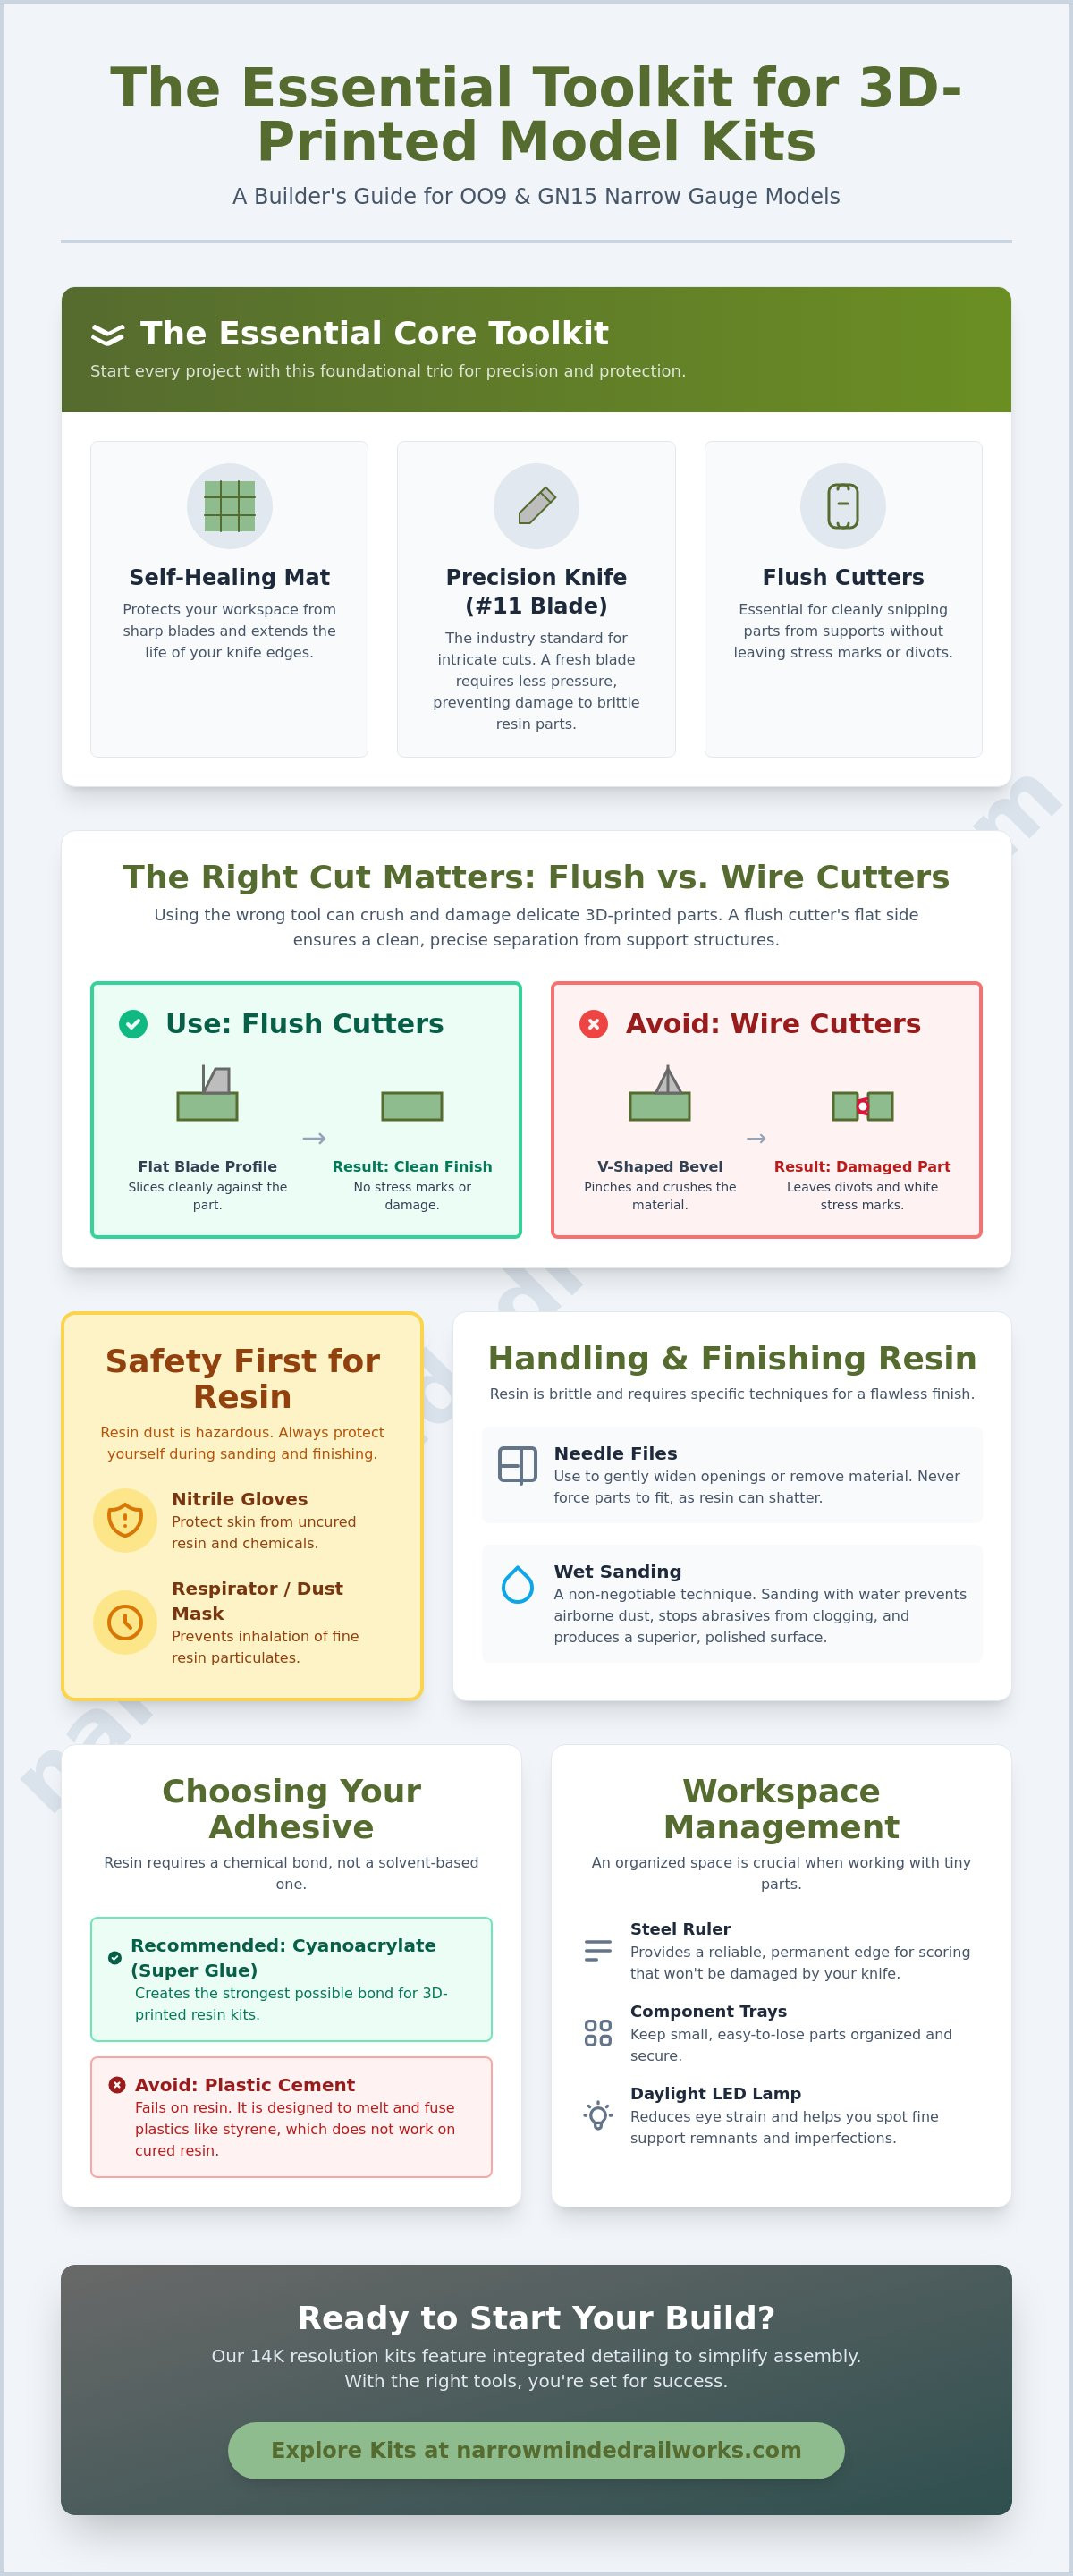
The Essential Core Toolkit for Every Kit Builder
Entering the hobby of narrow gauge modelling can feel daunting when you consider the sheer variety of equipment available. You might ask yourself, what tools do I need for kit building without overspending on gadgets I won't use? While the market offers hundreds of specialty items, successful assembly relies on a core trio: a self-healing mat, a precision knife, and flush cutters. These items provide the foundation for working within the world of plastic model kits and modern 3D-printed resin alternatives.
To better understand these fundamental supplies, watch this helpful video:
A self-healing mat is a vital investment for any workspace. While a standard kitchen table provides a flat surface, it lacks the protection needed for sharp blades. These mats are designed to absorb cuts and "close" behind the blade, which protects your furniture and keeps your knife edges sharper for longer. For the blades themselves, the #11 replaceable steel blade is the industry standard. Its sharp, pointed profile allows for intricate work on OO9 wagon frames where larger blades would fail. While 3D-printed resin is incredibly detailed, it's also more brittle than traditional plastic. Using a fresh #11 blade solves the risk of shattering delicate parts by requiring less pressure to make a clean cut.
Flush cutters are equally important and differ significantly from standard wire cutters. Wire cutters have a "V" shaped bevel on both sides that pinches and crushes material. In contrast, flush cutters are flat on one side. This allows you to snip supports away from a 14K resolution resin print without leaving a stress mark or a "divot" in the model surface. If you're wondering what tools do I need for kit building that will have the biggest impact on finish quality, a high-quality pair of flush cutters is the answer.
Cutting and Shaping Basics
Holding your hobby knife like a pen provides the maximum amount of control for delicate tasks. While plastic rulers are common in many homes, they are easily sliced during scoring; a steel ruler provides a reliable, permanent edge that won't degrade. When removing parts from a sprue or support forest, using a dedicated sprue nipper prevents the "white stress" marks that occur when resin is pulled or twisted away by hand. This proactive approach ensures your GN15 or O-16.5 kits remain crisp and ready for assembly.
Workspace Management for Small Scales
Working in OO9 or GN15 scales means dealing with components that are often smaller than a fingernail. Small parts are easily lost in a cluttered environment. Utilizing plastic component trays keeps these 3D-printed details organized and prevents them from rolling off the bench. Lighting is another critical factor for success. A daylight LED lamp reduces eye strain and helps you spot fine support remnants that might otherwise be missed under standard warm domestic bulbs. By setting up a structured workspace, you set realistic expectations for your build time and final results.
Specialized Tools for Handling 3D Printed Resin Kits
While traditional plastic kits are forgiving, 3D-printed resin requires a more nuanced approach. Resin doesn't melt with solvent; it shatters under pressure. When asking what tools do I need for kit building specifically for resin, safety equipment should be at the top of your list. Nitrile gloves protect your skin from residual chemicals, while a high-quality respirator or dust mask prevents the inhalation of fine particulates during the finishing stage. Because resin is cured with UV light, it lacks the flexibility of styrene. This constraint requires you to be precise with your fitment. If a part doesn't slide into place, use a needle file to gently widen the opening rather than applying pressure. This level of care preserves the crisp edges of your kit.
Wet-sanding is a non-negotiable technique for this material. Using a small dish of water while you work prevents hazardous dust from becoming airborne and keeps your abrasives from clogging. The water acts as a lubricant that produces a polished surface, ensuring your locomotive boilers and wagon sides remain perfectly smooth. This proactive method ensures a higher quality finish than dry-sanding ever could. Before starting, ensure you have these safety essentials ready:
- Nitrile gloves: These protect against skin irritation from any unwashed resin residue.
- Respirator: A mask with a fine particulate filter is vital for blocking microscopic dust during sanding.
- Safety glasses: Brittle resin shards can fly off during support removal, so eye protection is mandatory.
Removing 3D Printing Supports Safely
Removing the "forest" of supports from a 14K resolution print requires patience. Use fine-tipped tweezers to stabilize the model while precision snips cut the support stalks as far from the model body as possible. Support scarring refers to the small pits or raised bumps left on the model surface where the printed support structure was attached. To avoid pitting the model, leave a tiny "nub" of support material and sand it back flush rather than trying to cut it perfectly level in one go. A dental probe or pick is an excellent tool for gently prying supports out of tight corners like locomotive cabs or wagon interiors without scratching the surrounding detail.
Surface Preparation and Cleaning
Before you reach for the glue, give your kit a thorough cleaning. A soft toothbrush and mild dish soap remove any remaining residue from the printing process. This step is critical because any oils or leftover resin will prevent adhesives and primers from bonding correctly. Applying a high-build filler primer is a proactive solution for smoothing out any microscopic layer lines. This preparation stage is vital for a professional result when painting 3D printed models. Once the surface is clean and primed, you'll find that painting 3D printed models becomes a much more rewarding experience. By investing in these specialized items, you'll no longer struggle with the question of what tools do I need for kit building when handling modern materials. If you're looking for high-quality narrow gauge subjects, exploring Narrow Minded Railworks kits provides an excellent starting point for your collection.
Precision Assembly: Choosing Adhesives and Alignment Tools
Assembling a model is the stage where your project truly takes shape. When pondering what tools do I need for kit building for narrow gauge projects, adhesives are often the most misunderstood category. Traditional "poly cement" or plastic solvent is a staple for styrene kits because it melts the surfaces together to create a weld. Resin does not react to these solvents. To bond 3D-printed resin components, you must use a mechanical adhesive like Cyanoacrylate (CA), commonly known as superglue, or a two-part epoxy. Each type serves a specific purpose depending on the joint you're creating.
Before any glue touches your model, you must perform a "dry fit" of all components. Resin prints can occasionally have minor variations, so checking the fitment beforehand is a proactive way to avoid permanent mistakes. If a part is slightly tight, use a needle file to adjust the mating surfaces. This ensures that when you finally apply adhesive, the parts sit flush and "true." For complex assemblies like wagon bodies, using a machinist's mini-square ensures your corners are exactly 90 degrees, preventing a "lozenge" shape that would affect how the model sits on its track.
Mastering Cyanoacrylate (CA) Glue
Superglue comes in three primary viscosities: thin, medium, and gel. Thin CA is ideal for tight-fitting joints as it flows into gaps via capillary action. Medium CA is the best all-rounder for most kit assembly, while gel CA provides a slower set time for positioning larger parts. Applying glue directly from the bottle is often a mistake; instead, place a drop on a scrap of plastic and use a fine pin or a dedicated applicator to transfer tiny amounts to the model. While "kicker" or accelerator spray sets glue instantly, it can make the bond brittle if overused. If you make a mistake, a dedicated CA de-bonder can remove excess glue without harming the cured resin surface.
Holding and Clamping Small Components
Working in OO9 or GN15 scales requires specialized handling tools for parts that are too small for fingers. A set of precision tweezers is mandatory. Reverse-action tweezers are particularly helpful because they stay closed by default, acting as a miniature clamp for small details. For larger assemblies, Blu-Tack or low-tack masking tape acts as an extra pair of hands to hold parts in alignment while the glue cures. This is especially critical when building OO9 locomotive kits, where the 3D-printed body must align perfectly with a commercial chassis from manufacturers like Bachmann or Hornby. Ensuring this alignment early prevents running issues later, providing a solid foundation for a successful build.
Refining the Details: Files, Sanding, and Filling
Once your model is assembled, the refining stage determines the final quality of your locomotive or wagon. While you might still be asking what tools do I need for kit building to achieve a professional look, you don't need a massive set of files. Many beginners fall into the trap of buying cheap 12-piece sets, but these often have coarse teeth that can tear resin rather than smoothing it. A proactive solution is to invest in three high-quality needle files: a flat file for level surfaces, a half-round file for curved interiors, and a round "rat-tail" file for widening holes. These three shapes handle almost every task required for OO9 or GN15 kits without cluttering your bench.
Abrasive sponges are another essential that many generic guides overlook. While traditional sandpaper is effective for flat wagon sides, it struggles with the complex curves of a locomotive boiler. Sponges conform to the shape of the model, which prevents you from accidentally sanding "flat spots" into a rounded surface. This flexibility is vital when working on the delicate details found in modern 14K resin prints. By using a gentle touch and the right abrasive, you preserve the intended dimensions of the kit while removing any remaining support marks.
Selecting the Right Abrasives
Success in sanding relies on following a logical grit scale. Start with 400-grit for initial material removal and progress to 1000-grit or higher for a polished finish. Flexible sanding sticks are the secret weapon for narrow gauge modellers because they allow you to reach into tight spaces, such as between the frames of a 7mm scale locomotive. Wet and dry paper is the best choice for resin because using it with water prevents hazardous dust from becoming airborne while simultaneously preventing the paper from clogging. This simple step keeps your workspace clean and your finish smooth.
Correcting Kit Imperfections
Even the highest quality 3D prints may occasionally show minor layer lines or tiny air bubbles. Filling these gaps with "Green Stuff" epoxy putty or a specialized liquid primer ensures a seamless join. When you need to maintain a crisp, sharp edge on a wagon corner, always use a hard sanding block rather than your fingers. This prevents the edges from becoming "dubbed" or rounded off. Understanding these nuances is a key part of mastering narrow gauge railway basics, where the smaller scale makes every detail stand out.
The "Silver Paint Test" is a professional technique used to verify your work before the final coat. Apply a thin layer of quick-drying silver paint over any sanded areas. Silver is incredibly unforgiving; it highlights every scratch, pit, or uneven surface that is invisible to the naked eye. If the silver looks smooth, you're ready for primer. If it reveals scratches, you know exactly where to focus your final sanding. This extra step ensures you don't waste time on a final paint job only to see imperfections later. Browse our full range of detailed narrow gauge kits and diorama tools to start your next project with the right foundation.
Starting Your Build with Narrow Minded Railworks
While gathering the right equipment is essential, the design of the kit itself determines how many gadgets you actually need to use. When you ask what tools do I need for kit building, you might expect a list of dozens of items. We recognize that complex assemblies can discourage new modellers. To address this, Narrow Minded Railworks utilizes a proactive design philosophy that integrates many fine details directly into the 3D-printed body. This approach reduces the count of separate, fiddly parts that require steady hands and specialized tweezers.
Our kits are produced using 14K resolution resin printing. This technology ensures that surfaces are exceptionally smooth straight from the box, which significantly reduces the time you spend with sanding sticks and files. Just as WoodSnap utilizes specialized printing techniques to transfer vibrant images onto birch wood, our 14K resolution process ensures that every detail of your model is captured with stunning clarity. We understand that sourcing compatible components can be a hurdle. While we don't sell chassis or motors, our locomotive bodies are specifically engineered to fit reliable, off-the-shelf power units from manufacturers like Bachmann or Hornby. This transparency allows you to plan your build with confidence, knowing exactly which external parts you need to source to complete your model.
Why Our Kits are Different
Traditional resin kits often require significant cleanup and heavy-duty tools to remove thick casting blocks. We acknowledge these traditional constraints and offer a modern solution through high-resolution 3D printing. Because our parts are printed to order, they don't sit in storage where they might warp or degrade. This precision means you spend less time correcting imperfections and more time on the creative aspects of the hobby. For those who prefer a larger scale that is easier to handle, our GN15 scale guide offers an excellent entry point into the world of larger-scale narrow gauge modelling.
Your Next Steps in Modelling
If you're new to the hobby, starting with a complex steam locomotive can be a steep learning curve. We recommend beginning with a simple wagon kit from our OO9 or GN15 ranges. These smaller projects allow you to practice the skills of support removal and CA gluing without the pressure of a multi-part locomotive assembly. Once you've mastered the basics on a wagon, you'll have a better understanding of what tools do I need for kit building when you move on to more ambitious projects. Joining a local narrow gauge society or online community can also provide the peer support and inspiration needed to refine your techniques. When you're ready to begin, you can browse our range of beginner-friendly narrow gauge kits to find the perfect project for your workbench.
Ready to Start Your Narrow Gauge Project?
Building your first kit doesn't have to be a source of anxiety or wasted expense. While the initial question of what tools do I need for kit building might lead you toward complex lists, the reality is that a few precision items like a #11 blade and quality flush cutters are all you truly need to begin. We've seen that understanding your material, from resin safety to the nuances of cyanoacrylate, provides a clear path to a successful finish. Success in this hobby relies on preparation and the right mindset rather than an overstuffed toolbox.
Narrow Minded Railworks provides specialist 3D-printed narrow gauge designs that are created by modellers, for modellers. We acknowledge that international logistics can be complex, so we offer reliable worldwide shipping from our UK base to support your hobby wherever you are. Our kits prioritize integrated detail to ensure your building experience is rewarding rather than frustrating. It's time to put your new knowledge into practice and bring your layout to life.
Explore our range of 3D printed narrow gauge kits and start your build today!
Grab your cutting mat and discover the satisfaction of creating something unique for your railway. We look forward to seeing your progress on the workbench.
Frequently Asked Questions
Do I need a soldering iron for model railway kit building?
You do not need a soldering iron for our 3D-printed resin kits. While brass or white metal kits require heat-based assembly, our OO9 and GN15 models are designed for adhesive bonding. This simplifies the entry process for beginners who are not yet comfortable with soldering techniques. If you eventually move into etched brass scratch-building, you may require a soldering station, but it is not a requirement for our current range of models.
What is the best glue for 3D printed resin models?
Cyanoacrylate (CA), commonly known as superglue, is the most effective adhesive for bonding 3D-printed resin. Traditional plastic solvents work by melting styrene to create a weld, but they have no chemical effect on cured resin. We recommend using a medium-viscosity CA for general assembly tasks. This provides a proactive balance between set time and bond strength, ensuring your wagon or locomotive body remains secure during use.
Can I use standard sandpaper on my model kits?
You can use standard sandpaper, but "wet and dry" paper is the superior choice for resin kits. Dry-sanding resin produces fine dust that can be hazardous if inhaled. Using water as a lubricant keeps the dust out of the air and prevents the abrasive from clogging with material. We recommend starting with a 400-grit paper for removing support marks and finishing with 1000-grit for a perfectly smooth surface ready for primer.
How do I remove 3D print supports without breaking the model?
Use precision flush cutters to snip supports away from the model body one at a time. It is often tempting to pull them off by hand, but this can cause "pitting" or surface tears in the brittle resin. By leaving a tiny amount of material and sanding it back flush, you protect the delicate details of the print. This method ensures your OO9 wagon or GN15 locomotive maintains its intended shape without structural damage.
Is it expensive to start building model railway kits?
Starting this hobby is relatively affordable if you avoid unnecessary high-end gadgets. When asking what tools do I need for kit building, focus your initial budget on the "Big Three" essentials: a self-healing mat, a quality hobby knife, and flush cutters. These three items form the foundation of a professional workshop. You can expand your collection with specialized needle files and clamps as your projects become more complex over time.
What are the safety risks of working with resin model kits?
The primary risks involve fine resin dust and skin contact with any uncured residue. We recommend wearing nitrile gloves when handling raw kits and a respirator during any sanding or filing stages to protect your lungs. While cured resin is stable, these precautions prevent irritation and long-term health issues. Maintaining a clean workspace and utilizing a wet-sanding station is a proactive way to manage these risks effectively.
Do I need a specialized workbench for small scales like OO9?
You don't need a specialized workbench, but a stable and flat surface is mandatory. Small-scale parts for OO9 and GN15 models are easily lost, so a clear area with high-intensity LED lighting is essential for visibility. Using a dedicated component tray prevents tiny details from rolling off the bench and disappearing. A standard desk or table is perfectly adequate for kit building as long as you protect it with a self-healing cutting mat.
Which hobby knife is best for a complete beginner?
A standard metal hobby knife handle with replaceable #11 steel blades is the best choice for a complete beginner. These blades are inexpensive and provide the sharp, narrow point required for intricate narrow gauge kit building. We recommend changing the blade frequently during a project. A dull blade requires more pressure to cut, which increases the risk of slipping and damaging your resin kit or causing a personal injury.