

In the world of high-detail scale modeling, epoxy coating isn't a pour to hide mistakes; it's a precision-engineered layer where a fraction of a millimeter determines if your model looks like a museum piece or a melted toy. You've likely felt the frustration of watching a beautifully printed OO9 locomotive kit lose its delicate rivets and door handles under a thick, syrupy layer of resin. It's even worse when that epoxy pools in the corners, ruining the geometry you worked so hard to refine.
We'll help you master the exact epoxy coating thickness to smooth fdm 3d print layer lines without sacrificing the scale-accurate features that define your work. You'll learn how one ounce of Smooth-On XTC-3D, which currently retails for $25.34 for a 6.4 oz unit as of May 2026, can cover over 100 square inches with the right application technique. We'll explore the balance between hiding print lines and maintaining the sharp edges required for professional-grade dioramas and kits while cutting your sanding time in half.
Key Takeaways
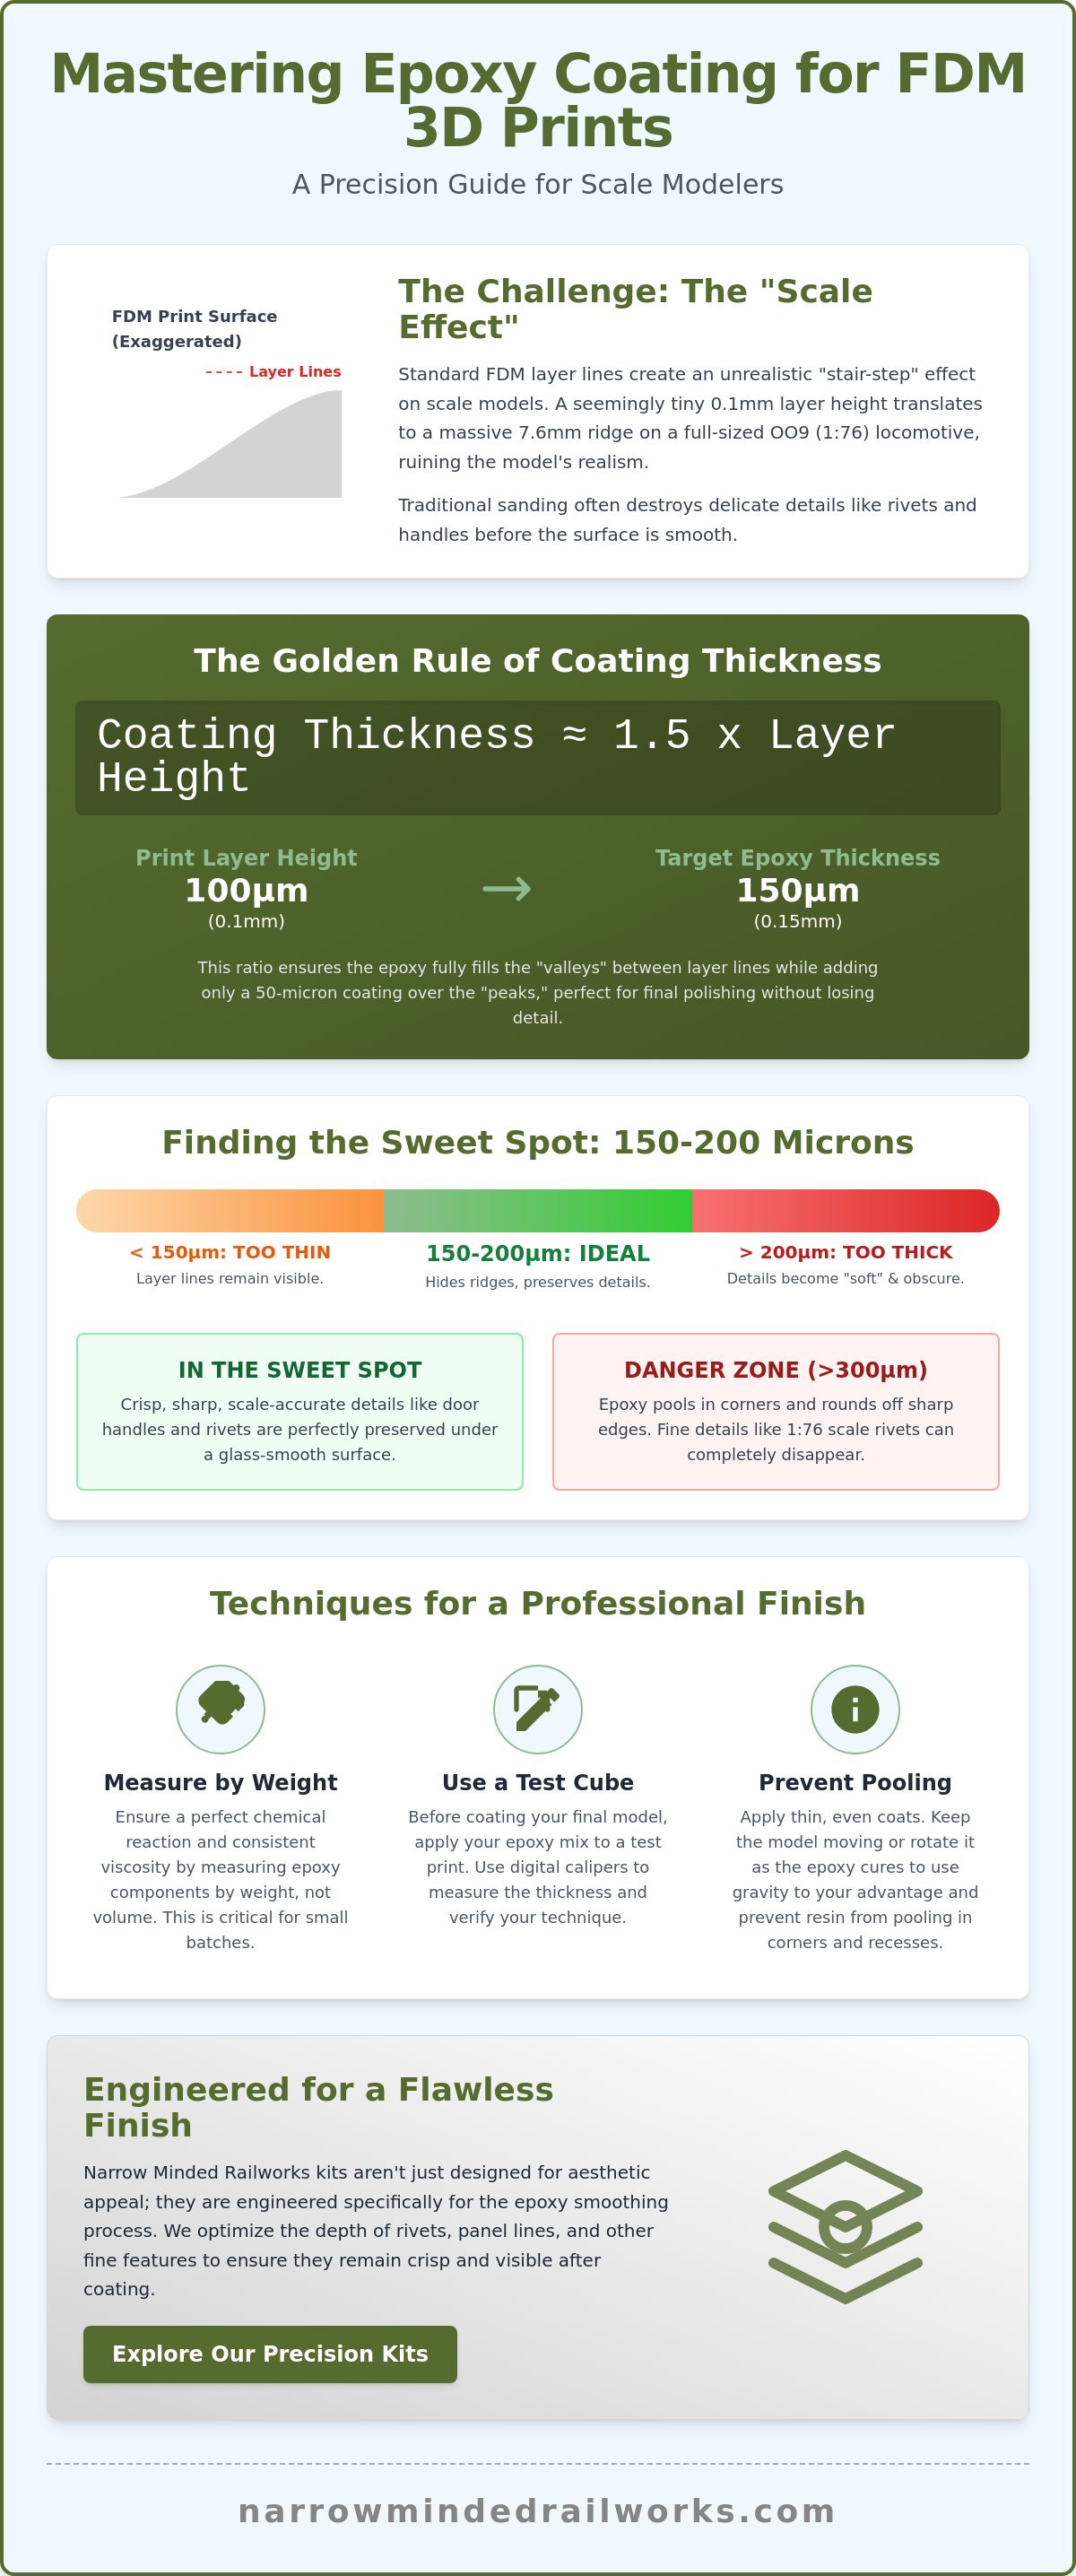
- Discover the "Golden Rule" of maintaining an epoxy coating thickness to smooth fdm 3d print layer lines that is approximately 1.5 times your print's layer height.
- Learn why the 150-200 micron range is the ideal "sweet spot" for hiding ridges on OO9 and GN15 scale locomotive bodies without obscuring fine details.
- Master techniques to control resin viscosity and prevent pooling in corners, ensuring your door handles and rivets remain sharp and scale-accurate.
- Understand the importance of small-batch weight measurement over volume mixing to achieve a consistent, glass-smooth finish every time.
- Find out how Narrow Minded Railworks kits are engineered with optimized detail depths specifically to survive the epoxy smoothing process.
The Challenge of Smoothing FDM Prints in Scale Modeling
Narrow gauge modeling is a pursuit of character and charm. When you're working with OO9 or GN15 scales, every millimeter of your locomotive kit matters. Standard FDM prints often leave visible ridges that look like topographic maps on a boiler. These textures make a high-quality kit look like a prototype rather than a finished piece of rolling stock. Finding the perfect epoxy coating thickness to smooth fdm 3d print layer lines is the difference between a model that catches the light and one that catches the eye for all the wrong reasons.
The "Scale Effect" is particularly brutal in small-scale railroading. A standard 0.1mm layer height might seem fine on a large prop, but in 1:76 scale (OO9), that ridge represents a 7.6mm jump on a full-sized locomotive. Imagine a real steam engine with 7mm steel plates overlapping every few inches; it would look absurd. Traditional sanding often fails because these kits have complex geometries. You can sand a flat wagon side, but you'll likely sand away the rivets, hinges, and door handles before you ever flatten the layer lines.
To better understand this concept, watch this helpful video:
Anatomy of an FDM Surface
Most hobbyists use Fused Deposition Modeling because it's accessible and versatile for creating unique narrow gauge subjects. However, the process creates a "stair-step" effect on any surface that isn't perfectly vertical or horizontal. On a curved boiler or a rounded roof, these steps become glaringly obvious. Even if you push your printer to its 0.08mm limit, the physics of the nozzle still leave a rounded edge on each layer. The orientation of the print can help, but it usually just moves the problem from the sides to the top. This is why a chemical filler is necessary to bridge those microscopic valleys and create a uniform surface for painting.
Why Epoxy is the Modeller's Secret Weapon
Unlike filler primers or spray putties that shrink as they dry, epoxy is a high-solids material. It stays exactly where you put it. It uses surface tension to "bridge" the gaps between layer lines, naturally seeking the lowest points of the print surface. While a spray primer might take five or six coats to hide a 0.12mm layer line, a single application of the right epoxy can do the job instantly. This process also provides structural benefits. Many narrow gauge wagon kits have thin walls to maintain scale accuracy, and a thin epoxy shell adds significant rigidity without adding bulk. It transforms the porous FDM surface into a solid, glass-like substrate ready for professional weathering and paint.
Calculating Epoxy Coating Thickness for Optimal Results
Precision in post-processing is just as vital as the print settings themselves. While many hobbyists suggest applying a thin layer, this subjective advice often leads to ruined kits. To achieve a professional finish, you should follow the Golden Rule: your coating thickness should be approximately 1.5 times your print's layer height. If you're printing a locomotive body at a 0.1mm layer height, your goal is a total epoxy coating thickness to smooth fdm 3d print layer lines of 0.15mm, or 150 microns. This ratio ensures the resin fills the valleys completely while leaving a microscopic 50-micron buffer over the peaks for final polishing.
Measuring these sub-millimeter dimensions might seem daunting, but you can verify your technique using a simple test cube and digital calipers. Print a standard 20mm calibration cube using your preferred settings. Measure the cube's width before and after applying your epoxy. If the post-coating measurement is 20.3mm, you've successfully applied a 150-micron layer to each side. This data-driven approach removes the guesswork and prevents the common mistake of over-application that leads to "soft" looking models.
The Trade-off: Smoothness vs. Detail Retention
High-detail zones, such as cab controls, louvers, and window frames, are the first victims of an aggressive coating. When you exceed the 200-micron mark, the surface tension of the resin begins to pull away from sharp edges and settle into recesses. The critical thickness threshold occurs at 300 microns, where 1:76 scale rivets effectively vanish into the surface. To protect these features, you must use a stiff-bristled brush to "pull" excess resin away from detailed areas before the epoxy begins its curing cycle.
Layer Height Ratios for Common Scales
The scale of your model dictates how much room you have for error. In OO9 scale (1:76), the margin is incredibly slim. These models require ultra-thin, brushed applications to keep the delicate proportions of narrow gauge prototypes intact. For larger subjects like GN15 scale (1:24), you can afford a slightly thicker 200-micron coat because the physical features are larger and can withstand more filler without losing their identity.
When you're working with Narrow Minded Railworks OO9 kits, you'll find that our designs incorporate slightly exaggerated rivet depths to account for this smoothing process. This engineering choice allows you to hit that 150-micron sweet spot while still retaining the crisp, industrial look of the original locomotive. If you're just starting out, we recommend checking out our selection of narrow gauge kits to practice these techniques on surfaces designed for high-quality finishing.
Viscosity and Flow: How Epoxy Behaves on 3D Surfaces
Achieving the perfect epoxy coating thickness to smooth fdm 3d print layer lines requires an understanding of fluid dynamics. Viscosity, or the "thickness" of the liquid, determines how well the resin clings to the peaks of your print versus how quickly it settles into the valleys. In scale modeling, you're fighting a phenomenon called wicking. Because FDM prints consist of microscopic grooves, they act like a series of straws. Through capillary action, low-viscosity resins can actually travel along these lines, pulling material away from the edges where it's needed most and depositing it in unwanted pools elsewhere on the model.
The temperature of your workspace plays a massive role in this behavior. Increasing your room temperature from 20°C to 25°C can reduce epoxy viscosity by as much as 25% to 30%. While this makes the resin easier to spread, it also increases the risk of sagging on vertical surfaces like locomotive boiler sides. If the resin is too fluid, gravity wins the battle, and you'll find a thick, unsightly bead forming along the bottom edge of your wagon kits while the top remains textured. Maintaining a consistent environment is the first step toward a predictable 150-micron finish.
Choosing the Right Resin for Small Models
For the delicate surfaces of OO9 or GN15 kits, you should always opt for a laminating resin rather than a casting resin. Casting resins are designed to be thin so they can release air bubbles in deep pours, but they'll run right off a 3D printed surface. Products like Smooth-On XTC-3D are specifically formulated as high-solids laminating resins. They have a shorter pot life, typically around 10 to 15 minutes, which is actually an advantage. This limited "open time" means the resin begins to thicken quickly, locking the epoxy coating thickness to smooth fdm 3d print layer lines in place before it has a chance to pool in your rivets or door seams.
Controlling the Flow on Vertical Surfaces
To prevent sagging on rounded or vertical geometries, many professional modellers use rotational curing. By mounting a locomotive body on a slow-turning "rotisserie" motor (about 3 to 5 RPM), you force the epoxy to redistribute itself constantly as it cures. This prevents the resin from settling in any one direction. If you don't have a motor, you can use the "flash monitoring" method. Watch the resin as it enters its gel stage; once it reaches a tacky, honey-like consistency, use a clean brush to pull any incipient drips away from the bottom edges. This ensures the coating remains uniform across the entire geometry of the kit.
Step-by-Step: Applying Epoxy for a Professional Finish
Start by removing skin oils from your print. Fingerprints contain contaminants that cause "fish-eyes," which are small craters in the epoxy finish. Wipe the model thoroughly with 99% isopropyl alcohol before you begin. For FDM prints, a light pass with 220-grit sandpaper removes the microscopic "fuzz" common with PLA or PETG without destroying the underlying geometry. This creates a mechanical "tooth" that helps the resin grip the surface more effectively.
Mixing requires a digital scale rather than a measuring cup. Volume-based mixing in small quantities, such as the 5ml or 10ml batches used for a single OO9 locomotive, is notoriously inaccurate because of the resin's surface tension. Use a scale with 0.01g precision to ensure the chemical ratio is exact. This precision prevents "tacky" spots that stay soft and ruin the model. When you're ready to apply, skip the cheap foam brushes. They trap air and release it as bubbles into your finish. High-quality Taklon brushes offer the control needed to achieve the target epoxy coating thickness to smooth fdm 3d print layer lines.
Use the "Detail-First" technique to protect your kit's features. Paint the resin into rivets, louvers, and door handles first. Immediately use a clean, dry brush to wick away the excess from these deep recesses. Once the details are safe, spread the remaining resin over the large, flat boiler or wagon sides. Finish with a final inspection under a bright, raking light to identify any "dry spots" where the resin has pulled away from the plastic.
The Multi-Coat Approach
One thick coat is a gamble, but two ultra-thin coats are a strategy. Aim for approximately 75 to 100 microns per pass. Applying the second coat while the first is still "green," meaning tacky but not liquid, allows for a chemical bond between layers. If the first coat has fully cured, which usually takes 24 hours, you'll need to lightly scuff the surface with 400-grit paper to ensure a mechanical bond. This method prevents the pooling issues discussed earlier and provides a second chance to fill any stubborn print lines.
Post-Coating Refinement
Once your final coat has cured for at least 24 to 48 hours, wet sanding is the secret to a glass-like result. Use 600-grit followed by 1000-grit wet/dry paper with a drop of dish soap in the water. This removes tiny dust nibs or "orange peel" texture. This smooth substrate is essential for painting 3d printed models properly, as thin model paints will highlight every remaining imperfection. If you're ready to put these techniques to the test, explore our range of OO9 and GN15 kits designed for high-resolution finishing.
Maximizing Quality with Narrow Minded Railworks Kits
Achieving the perfect epoxy coating thickness to smooth fdm 3d print layer lines is much easier when the model itself is engineered for the process. At Narrow Minded Railworks, we don't just print a 3D file; we design kits specifically for the post-processing journey. We understand that a 150-micron layer of epoxy will naturally soften sharp edges. To counter this, our digital sculpts feature "over-etched" rivets and panel lines. By increasing rivet depth by approximately 25% compared to a standard digital model, we ensure that after you apply your smoothing layer, the final detail is exactly the scale-accurate height it should be.
Our OO9 and GN15 kits are printed using high-quality PLA that provides a stable substrate for epoxy adhesion. Whether you're building a tiny 1:76 scale industrial shunter or a larger 1:24 scale estate locomotive, our designs account for the surface tension of the resin. We avoid "trap zones" where epoxy might pool uncontrollably, making it simpler for you to maintain a uniform 1.5x layer height ratio across the entire body shell. This engineering focus takes the guesswork out of your build, allowing you to focus on the creative aspects of the hobby.
Design for Smoothing
Every kit we sell is a canvas for your specific finishing style. If you're aiming for an "ex-works" gloss finish, our smooth-wall designs allow the epoxy to self-level with minimal intervention. For those preferring a weathered workhorse look, the added rigidity from a 200-micron epoxy shell provides a durable surface for aggressive salt-chipping or oil-wash techniques. We also provide expert support for modelers tackling their first FDM locomotive body, ensuring your first attempt at resin smoothing is a success.
Joining the Narrow Gauge Community
The journey doesn't end once the epoxy cures. We encourage our customers to share their finished builds and smoothing tips within the wider community. Understanding the history of a narrow gauge railway helps inform how you finish your models. A pristine finish might suit a preserved line locomotive, while a thicker, more textured coat could simulate the heavy grime of a slate quarry engine. Once you've mastered these smoothing techniques, the next step is integrating your rolling stock into a fully realized diorama or layout using our specialized scenery kits.
Master Your Next Narrow Gauge Build
Transforming a raw FDM print into a professional-grade model is a matter of discipline and data. By adhering to the 1.5x layer height rule, you ensure an epoxy coating thickness to smooth fdm 3d print layer lines that fills the valleys without drowning the rivets. Remember that environmental factors like a 5°C temperature shift can drastically alter your resin's behavior; consistency in your workspace is just as important as your mixing ratio. Precision during the application stage saves hours of corrective sanding later.
When you start with a kit engineered for post-processing, you're already halfway to a museum-quality finish. Our specialist narrow gauge designs feature optimized detail depths that thrive under a smoothing layer. We provide global shipping for modelers worldwide, ensuring everyone has access to kits that are truly optimized for 3D print finishing. Browse our range of high-detail OO9 and GN15 kits today and elevate your rolling stock. You have the techniques and the ratios; now it's time to create something remarkable.
Frequently Asked Questions
Will epoxy coating hide all my 3D print layer lines?
Yes, it hides them if you achieve the correct epoxy coating thickness to smooth fdm 3d print layer lines. For a 0.1mm print, a 150-micron layer fills the valleys completely while leaving a smooth buffer over the peaks. If your lines are deeper than 0.2mm, you'll likely need a second thin pass to achieve a perfectly glass-smooth finish that is ready for a professional paint job.
Does epoxy coating add significant weight to my model railway wagon?
It adds very little weight, typically less than 3% of the total model mass. For a standard OO9 wagon weighing 15 grams, the epoxy layer contributes approximately 0.4 grams of material. This negligible increase won't affect the rolling performance of your kits on steep narrow gauge gradients. In fact, the slight increase in structural rigidity can help prevent thin-walled prints from warping over time.
Can I use standard 5-minute epoxy for smoothing 3D prints?
You should avoid standard 5-minute hardware store epoxies for this specific task. These products have a high viscosity that prevents self-leveling and a pot life of only 300 seconds. They often cure with an uneven, "lumpy" texture that requires heavy sanding. Specialized laminating resins like XTC-3D provide a 10-minute working window and flow into layer lines much more effectively for a superior finish.
How do I keep epoxy from filling in small details like door handles?
Use a stiff Taklon brush to pull excess resin away from detailed areas immediately after application. This wicking action ensures the epoxy coating thickness to smooth fdm 3d print layer lines remains thin over rivets and handles. If resin begins to pool in the corners of your GN15 locomotive cab, use a dry brush to clear the recess before the 15-minute gel stage begins.
Is it better to sand the 3D print before or after applying epoxy?
A two-stage sanding process yields the best results for high-detail kits. A quick pass with 220-grit paper before coating removes "fuzz" and improves mechanical bonding between the plastic and the resin. After the epoxy cures for at least 24 hours, wet sanding with 600-grit to 1000-grit paper removes any dust nibs or minor surface tension waves before you apply your final primer.
What happens if the epoxy coating is too thick for my locomotive kit?
A coating that exceeds 300 microns will cause your locomotive body to lose its crisp, industrial look. Sharp corners will become rounded, and fine rivets will effectively disappear under the thick layer of resin. If you accidentally apply too much, you must sand the surface back to the plastic peaks and start again with a thinner batch to preserve the scale-accurate features.
Can I paint directly over the cured epoxy surface?
Yes, but you must scuff the surface first to ensure proper adhesion. Cured epoxy is extremely smooth and non-porous, which can cause hobby paint to peel or bead upon application. A light pass with 800-grit wet/dry paper provides the necessary "tooth" for hobby primers to grab onto. This ensures your final livery remains durable during handling on your narrow gauge layout.
Does epoxy coating help with 'layer shifting' or major print defects?
Epoxy is not a fix for mechanical printing failures like layer shifting or significant z-banding. While it fills the 0.1mm gaps between layers, it cannot realign a model that has shifted by 0.5mm or more during the print process. Major defects require automotive-grade body filler or, more commonly, a reprint of the locomotive body before you begin the smoothing and finishing process.