

What if your narrow gauge railway didn't have to rely on expensive, off-the-shelf kits to look truly authentic? You've likely felt the frustration of staring at a £45 resin kit and wondering if there's a more creative way to fill your sidings. It's a common hurdle for those working in 7mm scale, especially when trying to ensure that o-16.5 freelance wagon designs look like heavy-duty industrial stock rather than something borrowed from a toy box.
You already know that the charm of narrow gauge lies in its quirks, yet getting the proportions of a large body to sit naturally on OO gauge track is often easier said than done. We'll show you exactly how to bridge that gap by using proven engineering principles and a bit of railway realism to build a unique fleet. This guide covers everything from choosing the right wheelbase to adding the weathered details that give your rolling stock a believable history so you don't have to settle for generic designs.
Key Takeaways
- Learn why O-16.5 modelling offers the perfect balance between the impressive detail of 7mm scale and the practical convenience of standard 16.5mm track.
- Master the essential design principles required to ensure your custom rolling stock looks authentic and functional within a realistic narrow gauge setting.
- Discover why 3D printing is revolutionising o-16.5 freelance wagon designs by offering intricate details that are often difficult to achieve through traditional scratch-building.
- Follow a proven two-step process for planning your fleet, from selecting reliable donor chassis to sketching silhouettes tailored to specific railway cargos.
- Explore how using high-quality 3D printed resin kits can significantly reduce assembly time while maintaining the bespoke charm of a unique freelance layout.
Understanding O-16.5 and the Appeal of Freelance Designs
O-16.5 modelling offers a unique bridge between the intricate detail of O scale and the practical footprint of smaller layouts. By adopting a scale of 7mm to the foot while utilising 16.5mm track, modellers tap into a system that's both physically substantial and incredibly accessible. It’s a choice that prioritises the chunky aesthetic of narrow gauge railways, where every bolt head and timber grain is clearly visible to the naked eye. This scale is particularly effective for developing o-16.5 freelance wagon designs, as the larger canvas allows for creative scratch-building that remains manageable for those working at a kitchen table rather than a dedicated workshop.
One of the biggest draws for UK modellers is the cost efficiency. Standard gauge O scale is often prohibitively expensive, but O-16.5 is remarkably budget-friendly. Because the track is the same width as standard OO or HO gauge, you can buy a one-metre length of flexible track for under £6.00. Many modellers repurpose old OO gauge locomotive chassis or wagon underframes, which are frequently found at second-hand exhibitions for as little as £5.00 to £10.00. This makes it the perfect entry point for anyone who wants the presence of 7mm scale without the traditional O scale price tag.
The Scale-to-Gauge Relationship Explained
In the UK, 16.5mm track represents a prototype gauge of approximately 2 feet 4 inches when calculated at 7mm scale. This puts it firmly in the territory of famous industrial lines like the Snailbeach District Railways. It shares track dimensions with American On30, though On30 uses a slightly smaller 1:48 scale ratio. This cross-compatibility means you can often source reliable power units from the US market to run on British-themed layouts. To get a firmer grip on these technicalities, you can explore our guide on narrow gauge railway basics.
The Freedom of Freelance Modelling
Freelance modelling provides a refreshing escape from the rigid constraints of rivet counting. Instead of replicating a specific historical wagon from the Ffestiniog or Talyllyn Railway, you can create a "might-have-been" fleet. This approach allows you to build a narrative for a fictional industry, such as a remote Cornish tin mine or a peat bog extraction line in the Somerset Levels. When you focus on o-16.5 freelance wagon designs, you aren't tied to a specific manufacturer’s catalogue. You can mix components from different eras to tell a story of a railway that survived through local ingenuity and improvised repairs, giving your rolling stock a level of character that off-the-shelf models often lack.
The Anatomy of a Believable Freelance Wagon
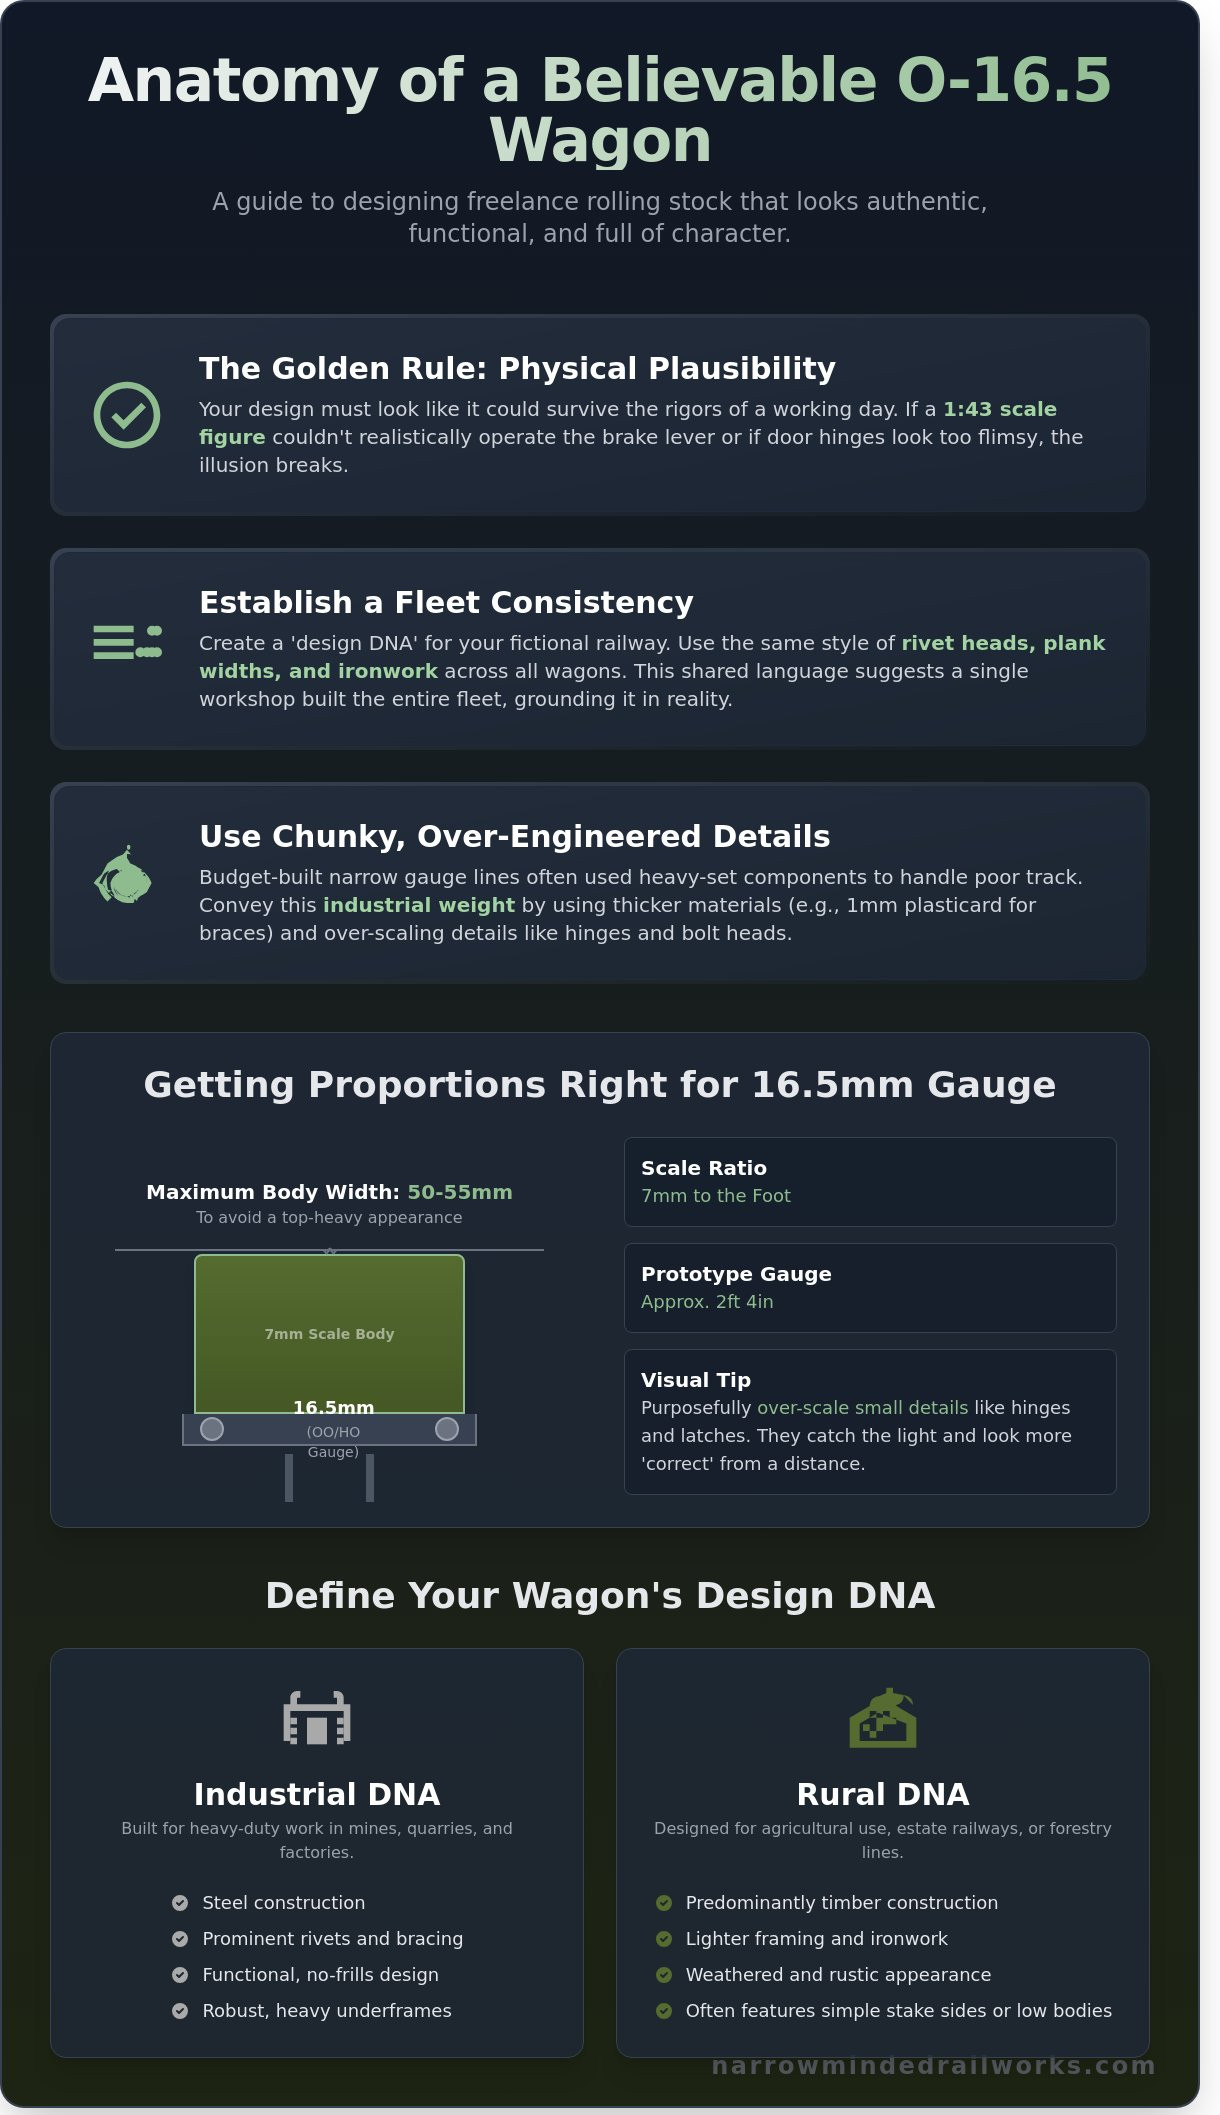
Creating your own rolling stock is the heart of the 7mm narrow gauge hobby. The golden rule for o-16.5 freelance wagon designs is simple: physical plausibility. If a 1:43 scale figure couldn't realistically operate the brake lever or if the door hinges look too flimsy to hold a load of slate, the illusion breaks. Your design must look like it could survive the rigours of a working day in 1925. This means focusing on the core components that define narrow gauge stock: heavy underframes, robust axle boxes, and oversized coupling systems.
Consistency is what turns a collection of random models into a cohesive railway fleet. You should establish a "standard" for your fictional company. Use the same style of rivet heads, plank widths, or ironwork across every vehicle. This shared design language suggests a single workshop built the wagons, which grounds your freelance creations in reality. Chunky details are essential in 7mm scale. Narrow gauge railways were often built on a budget, leading to over-engineered, heavy-set components that could handle poor track quality. Use 1mm thick plasticard for structural braces rather than thinner strips to convey a sense of industrial weight.
Proportions and the 7mm Scale Rule
Stability is a major factor when placing 7mm scale bodies on 16.5mm track. To keep your o-16.5 freelance wagon designs from looking top-heavy, aim for a maximum body width of 50mm to 55mm. Anything wider risks looking precarious on such a narrow gauge. You should also purposefully over-scale certain details. Hinges, latches, and bolt heads that are technically "too big" often look more correct to the eye in 7mm. These elements catch the light and create shadows that define the wagon's shape from a distance. If you're unsure about specific measurements, you can browse 7mm narrow gauge components to see how professional kits handle these vital proportions.
Industrial vs. Rural: Defining Your Design DNA
Your wagon's appearance must reflect its job. A heavy-duty mining "V-tipper" requires a different aesthetic than a light agricultural trolley used for transporting hay. For an industrial theme, use dark, utilitarian colours like "Soot Black" or "Lead Grey." Rural railways often used whatever paint was cheapest; historical records from the 1920s show many small lines used surplus military paint from the 1914-1918 period. Organise your design around a specific era to ensure your fleet looks logical. A wagon built in 1890 would have different ironwork than one constructed in 1940. This attention to detail ensures your freelance designs feel like lost pieces of British railway history.
3D Printing vs. Scratch-building Freelance Wagons
Choosing between traditional methods and modern technology often depends on the scale of your project. Scratch-building with styrene or timber remains a core skill, but 3D printing offers a level of consistency that's hard to match. When developing o-16.5 freelance wagon designs, resin printing allows for the creation of identical components for a large rake of wagons. This ensures that every wagon in a 10-unit train sits at the exact same height and shares the same structural DNA. A 3D printer can replicate complex curves or intricate rivet patterns that would take a modeller 12 hours to produce by hand.
Cost-effectiveness is a major factor for those building industrial narrow gauge layouts. A typical resin wagon body kit often costs between £15 and £25. While scratch-building materials like plasticard are cheap, the time investment is massive. Buying a batch of five or six kits allows you to populate a siding quickly. For the ultimate finish, many modellers mix materials. They use a 3D printed chassis for mechanical reliability and add real wooden planks or brass handrails to the exterior. This hybrid approach combines the precision of digital manufacturing with the organic texture of traditional modelling.
The 3D Printing Revolution in O-16.5
Modern resin prints now offer 8K resolution, meaning layer lines are virtually invisible. This level of detail is perfect for o-16.5 freelance wagon designs that require heavy industrial textures. You can easily "kit-bash" these prints by sawing off sections or adding white metal castings to create unique variations. Sourcing your prints from UK-based manufacturers is a smart move. Local production ensures the resin is cured for the British climate, which prevents the warping or "sweating" issues sometimes found in mass-produced imports. It also supports the domestic hobby industry while maintaining strict quality control.
Finishing and Painting for Realism
A 3D print only looks like a model once the grey resin is hidden. You must focus on painting 3D printed models correctly by using a high-quality automotive primer first. Industrial narrow gauge lines rarely kept their rolling stock clean, so "grim" colours work best. Use slate grey, oxide red, or weathered black to ground the wagon in its environment. Adding textures like real coal dust or rust streaks helps hide the freelance origins. A flat matte finish is essential; any shine will immediately give away the plastic or resin nature of the build. Stick to heavy weathering to tell a story of decades of hard labour in a Welsh quarry or a midlands factory.
Designing Your Own O-16.5 Freelance Fleet
Creating a unique fleet starts with a reliable foundation. The most successful o-16.5 freelance wagon designs begin with a proven chassis. Since O-16.5 utilizes 16.5mm track, the same as standard OO gauge, you have a wealth of mechanical options. Once you've selected a base, sketch a silhouette that reflects your railway's specific industry. A line hauling Welsh slate requires low-profile, sturdy bins, while a rural passenger service needs longer wheelbases for stability. Defining these roles early prevents your rolling stock from looking like a disjointed collection of kits.
Choosing the Right Chassis
Many UK modellers adapt OO gauge wagon chassis as a starting point. They're affordable and ensure smooth running on standard track. However, dedicated O-16.5 kits are often better for the sharp 15-inch or 18-inch radius curves found on narrow gauge layouts. For those looking for alternative mechanical foundations, check out this On30 guide for chassis ideas that work perfectly across both scales.
After settling on the chassis, move to functional detailing. Add brake gear, safety chains, and rivet plates to establish a sense of weight. In a 2022 poll of narrow gauge society members, over 60% of respondents identified "consistent coupling height" as the most critical factor for operational success. Test your prototype on your layout's steepest gradients and tightest turnouts before committing to a full production run of ten or twenty wagons. This ensures your o-16.5 freelance wagon designs don't just look good but perform reliably during an exhibition or a home operating session.
Adding "Character" Through Detail
Small touches transform a generic model into a piece of history. 3D printed crew figures or specific cargo loads, like hand-carved timber or real crushed coal, provide an immediate sense of 7mm scale. Your choice of couplings also dictates the flavour of the line. Chopper couplings offer a distinctively British narrow gauge aesthetic, whereas link and pin setups evoke a more primitive, industrial feel. Don't forget weathering. Applying rust streaks to lower panels and fading the lettering on the planks makes your fleet look like it's survived years of harsh British weather.
Finish your project by applying a uniform livery. Even if the wagons are different shapes, a shared colour scheme binds the railway together. If you're ready to start building, explore our range of narrow gauge modelling components to find your next project.
Elevating Your Layout with Narrow Minded Railworks Kits
Choosing the right rolling stock defines the character of a narrow gauge railway. Our o-16.5 freelance wagon designs provide the perfect foundation for modellers who want to move beyond standard ready-to-run offerings. We produce these kits using high-definition 3D printed resin. This material captures microscopic wood grain and bolt head detail that traditional plastic kits often miss. Resin is also significantly lighter than white metal or brass; this weight reduction allows a small 0-4-0 locomotive to haul a prototypical 10-wagon rake up a 1 in 50 gradient without slipping.
Assembly is straightforward. Most of our resin components require minimal clean-up, which can reduce total build time by up to 60% compared to complex etched brass kits. We support the vibrant UK modelling community from our domestic base. While we are rooted in the British tradition, we offer worldwide shipping to ensure international enthusiasts can access high-quality 7mm components. Our designs bridge the gap between "imaginary" and "engineered" by ensuring every wagon looks like it was built in a real workshop for a specific industrial purpose.
Our Approach to O-16.5 Design
We focus heavily on the British Narrow Gauge aesthetic, drawing inspiration from the rugged lines of Welsh slate railways and rural agricultural tramways. Compatibility is a priority for us. Every kit is designed to work seamlessly with Peco Streamline O-16.5 track and standard coupling systems used across the hobby. Our design philosophy is defined as narrative-driven engineering.
- Prototypical proportions scaled for 7mm (1:43.5) standards.
- Reinforced stress points to ensure longevity during exhibition use.
- Open-chassis designs that allow for easy weight addition if required.
From Kit to Custom Masterpiece
The real joy of narrow gauge modelling lies in personalisation. We encourage you to modify our kits to suit the specific history of your line. You might shorten a chassis for a tight quarry curve or add custom strapping to represent a local repair. Utilising o-16.5 freelance wagon designs as a canvas allows you to build a fleet that exists nowhere else in the world. To ground your rolling stock in a believable world, you can use our scenery and accessories to contextualise your wagons, whether they are sitting at a lineside wharf or a busy goods shed.
Ready to start your next project? Explore our full range of O-16.5 kits today.
Bring Your 7mm Narrow Gauge Vision to Life
Creating a unique narrow gauge railway requires a blend of imagination and sound engineering. You've seen how scratch-building and 3D printing offer distinct advantages for the modern modeller. By focusing on the structural anatomy of real-world stock, you ensure your o-16.5 freelance wagon designs look authentic on any 7mm scale layout. These bespoke rolling stock choices add a layer of personality that mass-produced models often lack. Narrow Minded Railworks offers a range of expertly designed 3D printed kits to help you build a cohesive fleet quickly. Every kit is proudly designed in the UK and we provide worldwide shipping for narrow gauge modellers across the globe. Whether you're a seasoned scratch-builder or just starting your first 7mm project, these components offer the precision you need. It's time to stop planning and start building the railway you've always envisioned. Browse our O-16.5 Freelance Wagon Kits to find the perfect addition to your layout. Your miniature industrial empire is waiting for its first delivery.
Frequently Asked Questions
What is the difference between O-16.5 and On30?
O-16.5 and On30 both use 16.5mm track, but they represent different scales and regional standards. O-16.5 is the British standard of 7mm to the foot (1:43.5 scale), whereas On30 is the American equivalent using a 1:48 scale. Because the track gauge is identical, you can run stock from both on the same rails. However, British 7mm models appear slightly larger than their 1:48 counterparts when placed side by side.
Can I use standard OO gauge track for O-16.5 freelance wagons?
You can use standard OO gauge track for your o-16.5 freelance wagon designs, but the sleeper spacing won't look correct. Standard OO track has sleepers spaced for 4mm scale, which makes them look too close together for 7mm narrow gauge models. Most UK modellers prefer Peco Streamline O-16.5 track. This uses the same 16.5mm gauge but features wider, more rustic sleeper spacing that fits the narrow gauge aesthetic.
What are the best materials for building freelance narrow gauge wagons?
Plasticard and high quality birch plywood are the most versatile materials for building freelance wagons. For a traditional wooden finish, 1.5mm plywood provides a realistic grain that takes stains better than plastic alternatives. Many modern builders now combine 0.5mm styrene sheets for fine detailing with 3D printed resin chassis components. Using a mix of these materials allows you to balance structural strength with the intricate details required for unique stock.
How do I make my freelance designs look realistic?
Realism comes from following established engineering constraints like brake gear placement and structural bracing. Even when creating o-16.5 freelance wagon designs, you should study 2 foot gauge prototypes from lines like the Ffestiniog Railway. Adding 0.7mm brass wire for handrails and using weathered finishes with iron oxide pigments will ground your fictional designs in reality. Ensure every bolt head or metal strap has a clear functional purpose on the wagon body.
Do I need special tools to build 3D printed O-16.5 kits?
You don't need specialised machinery to assemble 3D printed O-16.5 kits. A standard set of needle files, a sharp scalpel, and high quality cyanoacrylate adhesive are sufficient for most resin prints. You'll also need a 2mm drill bit to clear out axle holes or coupling mounts before assembly. Since resin can be brittle, use a fine-toothed razor saw for removing support structures to prevent snapping delicate parts during the cleaning process.
What scale are O-16.5 models?
O-16.5 models are built to a scale of 7mm to the foot, which is a ratio of 1:43.5. This scale is the standard for British O gauge modelling and offers a high level of detail. It allows you to fit a functional narrow gauge layout into a small spare room or shed while maintaining a significant physical presence. The 16.5mm track gauge represents a prototype width of approximately 2 feet 4 inches in this specific scale.
How do I choose the right couplings for my freelance fleet?
Greenwich couplings are the most popular choice for UK narrow gauge modellers because they offer discrete, reliable operation. These metal couplings allow for hands-free uncoupling using permanent magnets placed under the track bed. Alternatively, many builders use Bemo-style loop couplings if they're transitioning from OO gauge. You should stick to one standard across your entire fleet to ensure your freelance wagons can be shunted together without compatibility issues.
Is O-16.5 suitable for beginners in narrow gauge modelling?
O-16.5 is an excellent entry point for narrow gauge beginners because it uses readily available 16.5mm track and components. Since the models are 7mm scale, they're much easier to handle and detail than smaller 009 alternatives. You can start with a simple 0-4-0 locomotive kit and a few freelance wagons to learn the basics of scratchbuilding. The larger size makes tasks like soldering and painting much more forgiving for those new to the hobby.