

Most modellers believe the hardest part of detailing a narrow gauge locomotive is the steady hand required for positioning; however, the real secret to a perfect finish happens before the decal even touches the water. Learning how to use waterslide transfers effectively requires more than just patience. You've likely felt the frustration of a perfectly placed transfer silvering as it dries, or watched a delicate lining decal tear because it wouldn't slide over a 3D-printed rivet. It's disheartening to see a high-quality kit marred by visible carrier film edges that refuse to blend into the paintwork.
While 3D-printed textures and complex rivets present a challenge for adhesion, specific chemical preparations can eliminate the microscopic air pockets that cause these issues. This article teaches you professional techniques to achieve a seamless, painted-on finish that survives handling and highlights every fine detail of your OO9 or O-16.5 kits. We will cover the essential roles of setting solutions, the importance of gloss coats, and the precise steps needed to make carrier film virtually disappear.
Key Takeaways
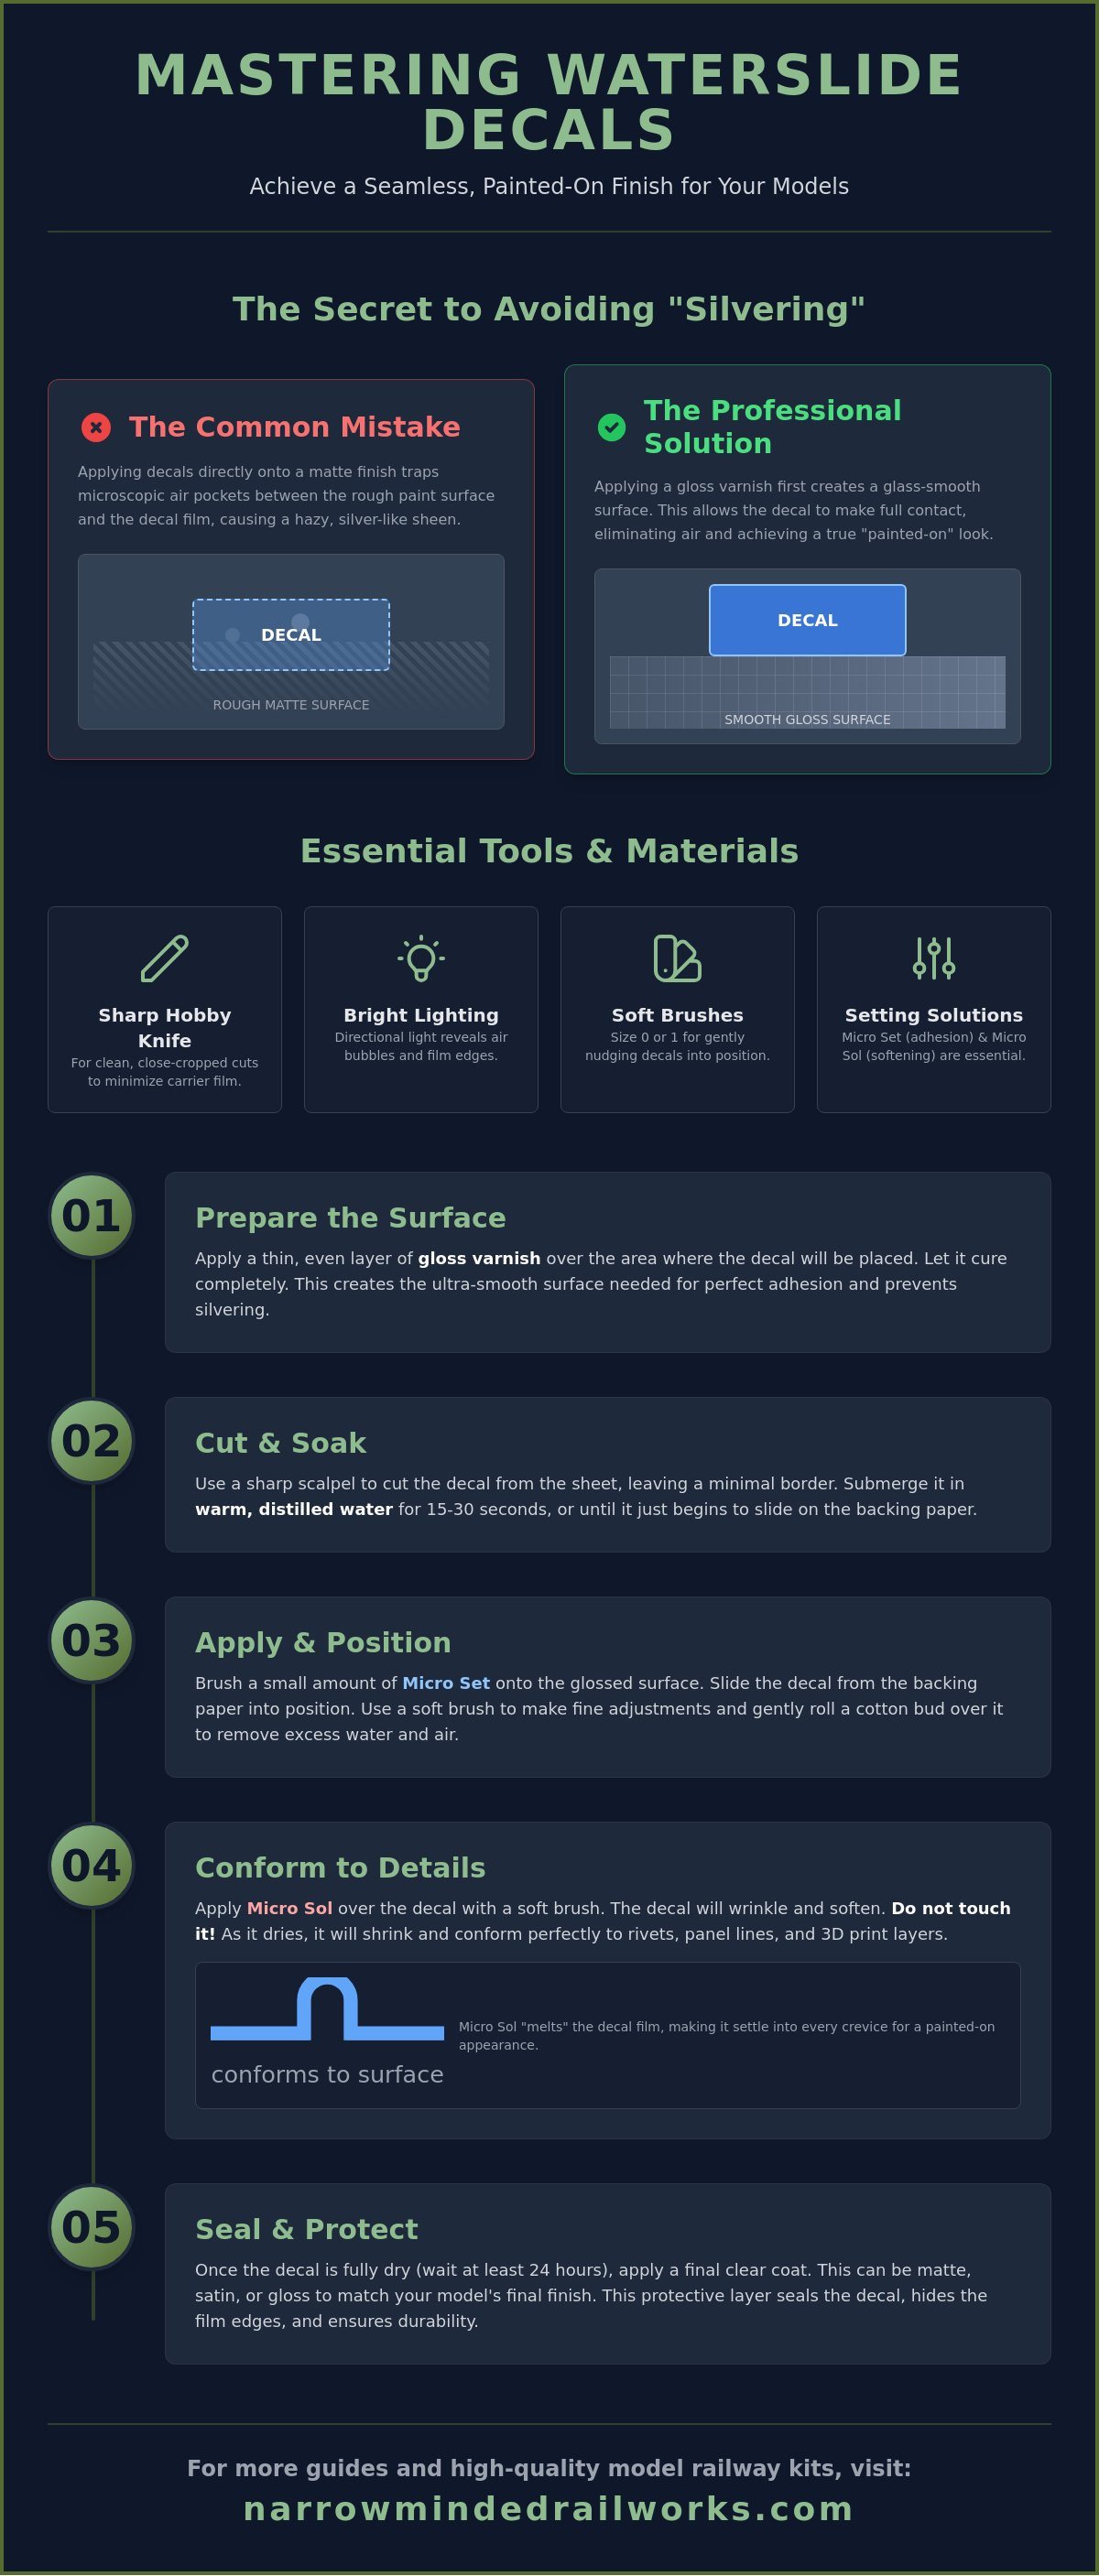
- Achieve precision by utilizing bright, directional lighting and a sharp hobby knife to crop transfers with minimal margins before application.
- While matte finishes are common for narrow gauge locomotives, applying a gloss base is essential to prevent the microscopic air pockets that cause silvering.
- Developing a "soak and wait" approach is the most effective way to learn how to use waterslide transfers while preserving the integrity of the adhesive.
- Rivets and 3D-printed layer lines can prevent decals from sitting flat, but specialized setting solutions allow the film to soften and conform to every detail.
- Lock your work in place with a final protective clear coat to ensure the transfer survives handling and matches the final sheen of your kit.
Essential Tools and Materials for Waterslide Transfers
Learning how to use waterslide transfers effectively begins with your environment. Success starts with a dedicated workstation equipped with bright, directional lighting to help you identify the edges of the carrier film and any trapped air bubbles. While some modellers suggest using tap water and dish soap, this can leave unsightly mineral spots on dark paintwork. You should use warm, distilled water instead to ensure a clean, spot-free finish. To understand the physics of these materials, it's helpful to know what are waterslide transfers: they are incredibly thin layers of ink and lacquer that require delicate handling to avoid damage during the application process.
Precision is vital when working with small-scale models like OO9 or GN15 kits. You'll need soft-bristle paintbrushes, specifically size 0 or 1, to nudge the transfer into place without scratching the surface. Pointed cotton buds are equally important for rolling out excess water. These tools allow you to control the transfer's movement without the risk of tearing the film or damaging the underlying paint.
To better understand how to prepare your surface before applying these details, watch this helpful video:
Cutting and Handling Tools
A fresh scalpel blade is non-negotiable for this task. Even a slightly dull blade will drag against the paper, causing the edges of the transfer to fray or lift prematurely. You should aim for a close-crop cut to minimize the amount of visible carrier film. Standard tweezers require constant pressure, which increases the chance of crushing the delicate film if your grip slips. Using reverse-action tweezers provides a consistent, gentle grip that protects the fragile film while you move it from the water to the model. Finally, work in a lint-free environment. Even a single hair or speck of dust trapped under the decal will create a permanent, visible bump that ruins the painted-on effect.
The Role of Decal Setting Solutions
Mastering how to use waterslide transfers involves understanding the two-stage chemical process of setting solutions. Micro Set is applied first to the model's surface to improve adhesion and help the decal slide into position. Once the transfer is correctly placed, Micro Sol is applied over the top. This solution softens the film, allowing it to "melt" into 3D-printed layer lines or around complex rivets. Relying on water alone often leads to silvering, where air remains trapped in the microscopic pores of the surface. 3D-printed resin can sometimes react poorly to aggressive solvents. You should test your setting solutions on a scrap piece of the kit's support material to ensure the chemicals won't soften the underlying detail before committing to the main model.
Surface Preparation: The Secret to Avoiding Silvering
Many modellers struggle with a white, hazy sheen appearing under their decals after they dry. This phenomenon, known as silvering, occurs when air becomes trapped between the transfer and the model's surface. While you might be tempted to apply transfers directly onto your final matte paint, this is a common mistake. Matte paint is microscopically rough. These tiny peaks and valleys create air pockets that the decal cannot bridge. To master how to apply waterslide transfers, you must first create a "glass-smooth" landing zone where air has no place to hide.
This challenge is amplified when working with 3D-printed narrow gauge kits. The layer lines inherent in the resin or filament printing process act as deep channels for air. If you don't fill these microscopic gaps with a smooth medium, your transfer will never sit truly flat. The proactive solution is to apply a high-quality gloss varnish to the specific area or the entire model before you begin. This provides a level surface that allows the decal film to make 100% contact with the model.
Applying the Gloss Base
You should choose a clear acrylic gloss varnish that is compatible with your base coat. If you are unsure about the initial painting steps, our guide on Painting 3D Printed Models: A Beginner’s Guide to a Perfect Finish provides a solid foundation. Apply the varnish in thin, even layers. Patience is your best tool here. You must allow the gloss coat to cure fully, typically 24 to 48 hours, before proceeding. If the surface is even slightly tacky, the setting solutions might react with the varnish and ruin your paintwork.
Cleaning the Application Area
Even a smooth gloss surface can fail if it's contaminated. Finger oils from handling your OO9 locomotive and wagon kits will prevent the transfer's adhesive from bonding correctly. You should wipe the area gently with a lint-free cloth or a tack rag to remove microscopic dust. I recommend verifying the surface under a magnifying glass. A single speck of grit can cause the film to tear or bulge. By ensuring the landing zone is both glossy and sterile, you set the stage for a professional finish. This preparation makes learning how to use waterslide transfers much more rewarding and predictable.
Step-by-Step: How to Apply Waterslide Transfers Correctly
Once your gloss base is fully cured, you can begin the delicate process of applying the transfers. Trimming the decal correctly is the first hurdle. While it's tempting to leave a wide margin for safety, large areas of carrier film are difficult to hide, even with setting solutions. You should use a fresh scalpel blade to trim within one millimetre of the printed design. This reduces the visual footprint of the film and makes the final blending process much smoother. Learning how to use waterslide transfers effectively requires a balance between speed and precision during this initial preparation phase.
Soaking and Releasing the Film
A common mistake modellers make is soaking the decal until it floats freely in the water. While this seems convenient, over-soaking washes away the vital adhesive backing, which leads to poor long-term bonding and potential lifting. The proactive solution is the "soak and wait" technique. Dip the transfer into warm, distilled water for only five to ten seconds, then place it on a clean, non-porous surface. Let it sit for approximately 45 to 60 seconds. You'll know it is ready when the film slides easily across the backing paper with a gentle nudge from a soft brush. While the decal is releasing, use a damp brush to prime the model's surface with a small drop of water. This creates a thin liquid layer that allows the transfer to float into position rather than sticking instantly.
The Sliding Technique
Positioning a transfer on a small-scale model requires a specific physical approach. You should bring the backing paper directly to the model's surface and gently slide the film onto the liquid pool you prepared. This prevents the transfer from folding over on itself. If you are currently detailing Your First OO9 Loco Kit: A Beginner’s Guide to Choosing and Buying, you will notice that even slight misalignments are obvious. Use a cocktail stick or a fine-pointed brush for micro-adjustments while the film is still floating.
Once you are satisfied with the placement, you must remove the excess moisture without disturbing the alignment. Use the "wicking" method by touching the edge of a dry paper towel or a pointed cotton bud to the perimeter of the water drop. The capillary action will draw the water away, allowing the transfer to settle onto the gloss coat. Perform a final check from multiple angles under your directional lighting. If the transfer has shifted during wicking, add a tiny drop of water to re-float it and try again. Mastering how to use waterslide transfers is ultimately about controlling this fluid balance until the film is perfectly situated.
Conforming to Detail: Using Micro Sol on Rivets and Curves
Narrow gauge prototypes, particularly industrial locomotives like the Quarry Hunslet, are defined by their rugged, riveted construction. When you apply a decal over these raised features, the film naturally "tents" over the bumps, leaving air underneath. Learning how to use waterslide transfers on these complex surfaces requires the use of a strong softening agent like Micro Sol. This solution chemically reacts with the carrier film, causing it to lose its structural integrity so it can drape over every rivet and into every panel line. It effectively turns the decal into a thin skin that follows the contours of the model perfectly.
Once you brush Micro Sol onto the transfer, you must follow the "do not touch" rule. The film will begin to wrinkle and distort almost immediately. This often alarms modellers who think they've ruined their work, but it's actually a sign that the solution is working. If you attempt to move or flatten the decal while it is in this softened state, it will tear or smear. You must allow it to dry naturally. As the moisture evaporates, the film will tighten and pull itself down onto the surface, effectively melting into the paintwork. For the best results on these intricate details, consider browsing our OO9 locomotive and wagon kits, which are designed to accept high-quality detailing.
If you're working on 3D-printed wagon sides, you may encounter stubborn layer lines. These ridges are often more uniform and sharper than traditional rivets. A single application of softener might not be enough to bridge these gaps. If the decal still looks like it's floating after an hour, apply a second coat of solution. This persistent approach ensures the carrier film disappears into the texture of the print rather than sitting on top of it.
The Softening Process
Identifying the point where the decal looks wrinkled is essential for success. This distortion indicates the carrier film has become pliable enough to conform to the model's geometry. For particularly deep recesses or sharp corners, you can gently assist the process once the film has partially set. Use a warm, damp, lint-free cloth to press the decal firmly into the detail. The heat helps the film stretch without breaking. If you're dealing with heavy rivet detail, you might need three or four repeat applications of Micro Sol to achieve a truly seamless, painted-on look. This is a vital part of mastering how to use waterslide transfers on professional-grade kits.
Troubleshooting Common Issues
Even with careful handling, problems can occur. If a transfer tears during the softening phase, don't panic. You can often nudge the pieces back together while they're still wet, though you must be extremely gentle. If air bubbles remain trapped after the decal has dried, use a fine insulin needle to prick the centre of the bubble. Apply a small drop of Micro Sol over the hole, and the air will escape as the film settles. If a decal sets incorrectly or in the wrong position, you can safely remove it by soaking the area with more setting solution and gently lifting the film with a soft brush. These recovery techniques are just as important as the initial application.
Sealing, Protecting, and Weathering Your Transfers
After your transfers have dried and conformed to the rivets, the final step is to secure them against the elements. Leaving a decal exposed makes it vulnerable to physical damage from handling and can cause the edges to lift over time. More importantly, even the best-applied transfer often has a different sheen than the surrounding paint. A final clear coat is the only way to lock the detail in place and ensure the carrier film becomes truly invisible. Mastering how to use waterslide transfers involves this final integration phase where the decal stops looking like a sticker and starts looking like part of the locomotive's history.
The Final Varnish Layer
While solvent-based lacquers provide a very tough finish, they often contain aggressive chemicals that can cause "decal melt" on thin carrier films. You should utilize a high-quality acrylic varnish instead to ensure your work remains protected without the risk of dissolving the ink. Spray application is generally superior to brushing for this stage. Brushing can sometimes snag the edges of a transfer or leave visible streaks, whereas a light mist from an airbrush or aerosol provides a uniform, professional finish. You must allow the varnish to cure for at least 24 hours. Rushing this process can trap moisture under the sealant, which leads to clouding or bubbling later on.
Choosing the right sheen is a matter of prototype accuracy. Most narrow gauge industrial locomotives operated with a dull, hard-working finish. A matte or satin varnish is usually the best choice to hide the remaining edges of the carrier film. If you prefer a more polished look for a passenger loco, a satin finish provides a gentle glow without the toy-like appearance of high gloss.
Integrating with Weathering
A pristine, bright white transfer often looks out of place on a weathered wagon or a soot-stained engine. To achieve a realistic "workhorse" look for your layout, you should use weathering powders and washes to age the new lettering. This process helps blend the decal into the textures of the model. If you are just starting with these techniques, our Beginner’s Guide to Weathering Wagons provides a structured approach to adding grime and rust.
You can use a fine brush to apply a thin wash of "grime" colour over the transfer, which settles into the rivets and recesses you've already highlighted with Micro Sol. This further disguises the edges of the film. Perform a final inspection under bright, directional lighting once the weathering is dry. If you can no longer see where the carrier film ends and the paint begins, you have successfully mastered how to use waterslide transfers to a professional standard. This durable, integrated finish ensures your kits will look excellent on your layout for years to come.
Elevate Your Narrow Gauge Detailing
Mastering the application of decals is a transformative skill for any narrow gauge enthusiast. While the process of detailing small-scale kits can feel intimidating, the solution lies in meticulous surface preparation and the patient use of chemical softening agents. You now understand that a gloss base is non-negotiable for preventing silvering, and that setting solutions are the vital tool for making film conform to complex 3D-printed rivets.
Gaining confidence in how to use waterslide transfers allows you to move beyond basic builds and create exhibition-standard models. Once you have integrated your transfers with protective varnishes and subtle weathering, they become a seamless part of your locomotive's identity. If you're ready to apply these professional techniques to your next project, you can browse our range of 3D-printed narrow gauge kits and accessories. We provide professional OO9 and GN15 kits that are designed by modellers for modellers, ensuring every rivet and panel line is ready for detailing. With worldwide shipping available, your next challenge is only a few clicks away. Happy modelling!
Frequently Asked Questions
How long should I soak a waterslide transfer before applying it?
You should soak the transfer for approximately five to ten seconds in warm, distilled water. While it's tempting to leave it submerged until it floats, this will wash away the vital adhesive backing. Instead, place the damp transfer on a clean, non-porous surface for 45 to 60 seconds to allow the backing paper to release the film. This "soak and wait" method ensures the decal remains sticky enough for a permanent bond.
Why do my waterslide decals look silver or white after they dry?
Silvering occurs when microscopic air pockets are trapped between the decal and a rough, matte paint surface. You can prevent this by applying a gloss clear coat before you begin detailing. The gloss layer provides a perfectly smooth landing zone that eliminates these air gaps. If you see silvering after application, it indicates that the carrier film hasn't fully conformed to the texture of the paint or the 3D-printed surface.
Can I use waterslide transfers on 3D-printed resin models?
You can certainly apply transfers to 3D-printed resin kits, though the layer lines present a unique challenge for adhesion. These ridges act as deep channels for air, which frequently leads to silvering. To solve this, you must use a strong setting solution to soften the film so it can bridge the gaps between layers. Always test your setting solution on a scrap piece of resin to ensure compatibility before starting your main project.
What is the difference between Micro Set and Micro Sol?
Micro Set is a preparation liquid applied to the model first to improve adhesion and help you slide the transfer into position. In contrast, Micro Sol is a softening agent applied over the decal once it is placed. It chemically "melts" the carrier film so it conforms to rivets and curves. Understanding this two-stage process is essential for anyone learning how to use waterslide transfers effectively on complex narrow gauge models.
How do I stop my waterslide transfers from tearing?
Transfers often tear because of rough handling or dull cutting tools. You should always use a fresh scalpel blade to trim your decals and soft-bristle brushes to nudge them into place. If you've applied a softening solution like Micro Sol, the film becomes extremely fragile. You must avoid touching the decal until it has fully dried and tightened, as even the slightest pressure will cause the softened film to rip or smear.
Do I need to varnish my model before applying decals?
You must apply a gloss varnish before placing your decals to ensure a smooth, professional finish. Applying transfers directly to matte paint or raw 3D-printed resin will almost always result in silvering because of surface irregularities. Once the decals are set and dry, you can apply a final satin or matte varnish. This final layer matches the desired sheen of your locomotive and protects the delicate film from future handling damage.
Can I remove a waterslide transfer once it has dried?
You can remove an unvarnished decal by re-wetting the area with a setting solution or warm water. If the transfer remains stubborn, you may need to gently lift the edge with a soft brush or a wooden cocktail stick. However, if you have already applied a protective clear coat, the transfer is permanently locked in. In that case, you don't have a simple removal option and must carefully sand the area before repainting.
How do I apply transfers over rivets and complex detail?
Applying transfers over rivets requires a softening solution to break the film's structural tension. After positioning the decal, brush on a layer of Micro Sol and let it work without interference. The film will wrinkle before pulling tight against the detail as it dries. For deep recesses, you can use a warm, damp cloth to gently press the softened film into the gaps. This is a key skill in learning how to use waterslide transfers on industrial kits.