

The secret to a flawless, airbrush-quality finish on your latest project isn't actually found in your wrist technique, but in the chemistry of your paint. While many hobbyists believe that more practice is the only way to improve, the reality is that physical constraints like high surface tension and rapid evaporation often make a smooth finish impossible with standard methods. Learning how to avoid brush marks when painting models requires a shift in focus from how you move the brush to how you manage the medium itself.
It's frustrating when the fine rivet detail on a narrow gauge locomotive kit vanishes under a layer of streaky, ridged paint. You want a finish that highlights the intricate work of your OO9 or 7mm scale models rather than obscuring it. This guide will teach you exactly how to master the professional techniques and chemistry secrets required to achieve a level surface using only a paintbrush. We'll explore which additives actually work, how to handle 3D printed surfaces, and the specific steps to preserve every detail on your kits.
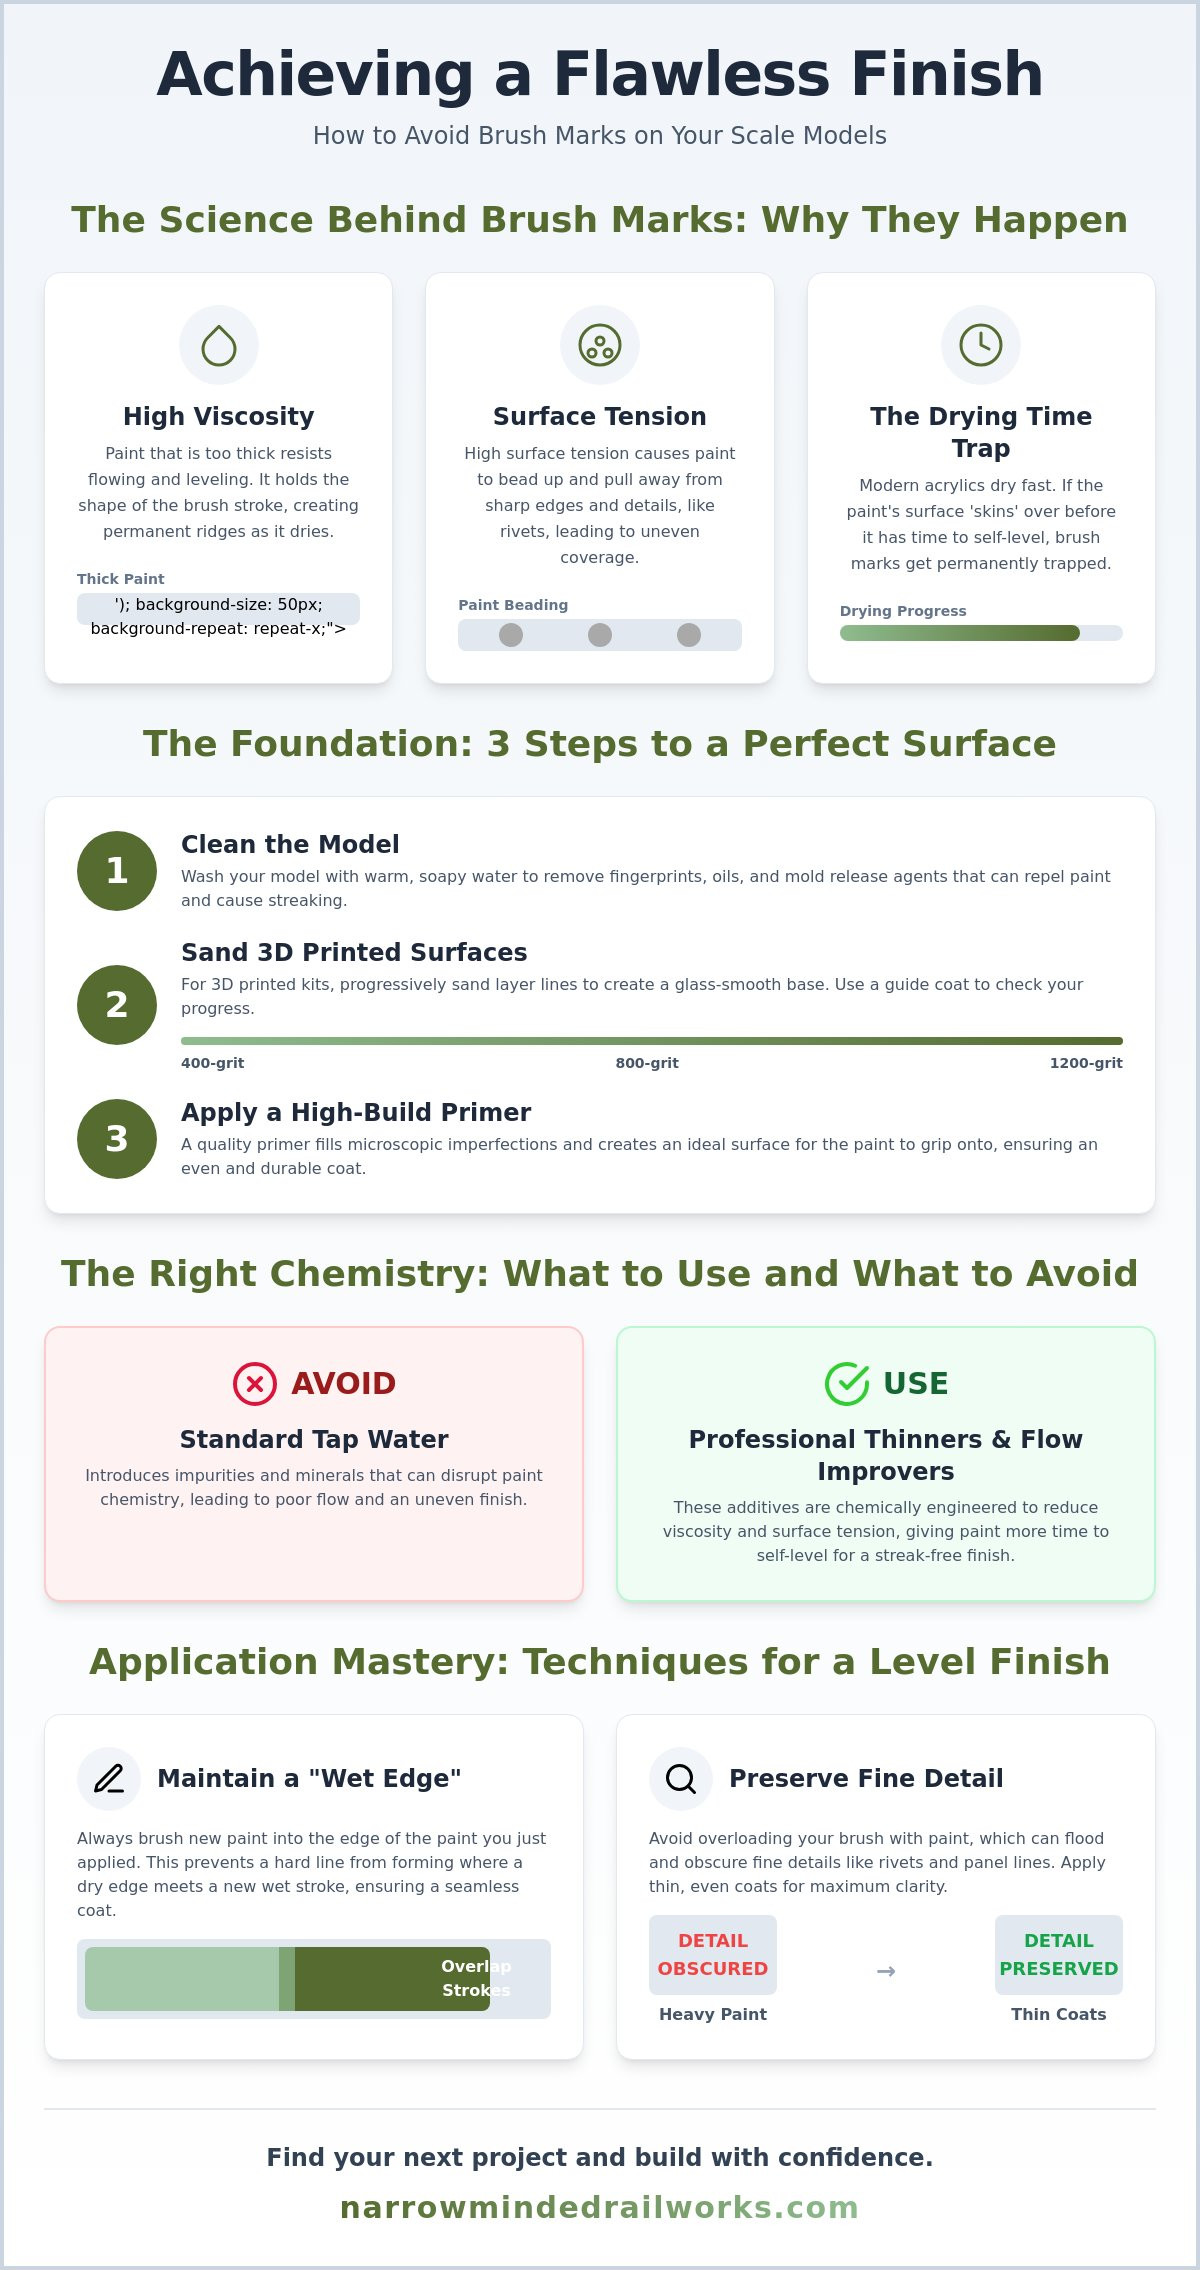
Key Takeaways
- Standard tap water often introduces impurities that disrupt paint flow; however, professional thinners provide the chemical stability needed for a level, streak-free finish.
- 3D printed layer lines can compromise your final surface; therefore, utilizing high-build primers is necessary to fill microscopic imperfections and create a smooth base.
- Rapid drying times often lead to visible ridges; nevertheless, mastering the "wet edge" technique ensures you know how to avoid brush marks when painting models.
- Fine rivet details on OO9 locomotive kits are easily obscured by heavy paint; consequently, precise brush loading is the key to preserving intricate textures on narrow gauge models.
The Science of Smooth: Why Brush Marks Appear on Models
Achieving a factory finish feels like a battle against physics. You apply a smooth stroke, yet moments later, a permanent ridge remains. This happens because paint is a complex mixture of pigments, binders, and solvents that react to the environment the second they leave the bottle. Learning how to avoid brush marks when painting models starts with a look at what happens at the molecular level. Standard acrylics offer fast drying times for efficient assembly; however, this speed often prevents the paint from leveling naturally before it sets.
To better understand how physical forces impact your finish, watch this helpful video:
Viscosity and Self-Leveling Explained
Viscosity is the measure of a fluid's resistance to flow, which determines how much the paint resists the movement of your brush. Most model paints are thixotropic; they become less viscous when agitated by a brush but thicken quickly once they are static. This property is helpful for preventing drips on a vertical locomotive boiler, but it often locks brush strokes in place before they can level out. While gravity helps paint settle on flat surfaces, it often pulls paint away from high points on vertical sides, leaving uneven coverage. High-viscosity paint offers excellent coverage but leaves heavy ridges; therefore, we must reduce its resistance to flow using specific mediums to encourage a flat film.
The Impact of Surface Tension on Detail
Surface tension is the cohesive force that makes liquids minimize their surface area. In modelling, this force causes paint to "bead" on smooth resin or pull away from sharp corners and rivet heads. When you drag a brush across a surface, the bristles create microscopic "trenches" in the paint film. If the surface tension is too high, the paint won't flow back into those trenches before the solvent evaporates. This is particularly noticeable when using various acrylic painting techniques on non-porous 3D printed materials. High surface tension can cause paint to bead on 3D printed resin; therefore, we must introduce surfactants to break that tension and allow the paint to grip the surface evenly.
The "Drying Time Trap" is the most common cause of a ruined finish. Modern acrylics are designed to dry in minutes, which is convenient for assembly but disastrous for leveling. If the "skin" of the paint forms while the bulk of the film is still settling, the brush marks are effectively fossilized. Environmental factors like low humidity or high temperatures accelerate this process. On a hot day, your paint might dry so quickly that it's impossible to avoid brush marks when painting models without chemical intervention. Understanding these environmental constraints allows you to choose the right moment and the right additives for your project.
Surface Preparation: Smoothing the Path for Paint
A flawless finish is impossible if the underlying surface is compromised. Even the most expensive paint cannot hide physical imperfections; instead, it often highlights them. Invisible oils from your fingerprints are a common constraint that repels acrylic binders, causing the paint to bead or streak. You must wash your model in warm water with a drop of mild dish soap before you begin. This proactive step removes mold release agents and oils, ensuring that your base layer achieves a chemical bond with the material.
Tackling 3D Printed Layer Lines
3D printed resin kits, including our narrow gauge locomotive bodies, often feature microscopic layer lines. These artifacts are a byproduct of the printing process, but they create a texture that traps paint and ruins the illusion of scale. To achieve a professional result, you must sand the surface progressively using these steps:
- Initial Leveling: Use 400-grit wet-and-dry sandpaper to remove the visible ridges.
- Refining: Move to 800-grit to eliminate the scratches left by the previous stage.
- Polishing: Finish with 1200-grit for a glass-smooth surface.
Using a guide coat is a proactive way to check your progress. Mist a light layer of contrasting grey primer over the model; any remaining lines will appear as dark streaks. If you want more detail on this process, see our complete guide to painting 3d printed models. This preparation is the most effective way to understand how to avoid brush marks when painting models by removing the physical obstacles that cause paint to pool.
Priming for Maximum Adhesion
High-build primers are essential for filling microscopic pores that sanding might miss. While brush-on primers exist, rattle-can versions generally offer better atomization, creating a more uniform base. Apply a "dust coat" first, which is a light, speckled layer. This provides a "key" for the subsequent wet coat to grip. Understanding The Chemistry of Paint reveals that solvents need time to evaporate fully. Resin kits can outgas during this process; therefore, you should wait at least 24 hours after priming before applying your topcoat. Rushing this stage is a common mistake that leads to cracking or bubbling later.
Choosing the right primer color also impacts your final finish. A white primer is necessary for vibrant liveries like yellow or red, while a black primer adds depth to weathered wagons or metallic surfaces. Once your primer is cured and smooth, you're ready to apply color. Explore our latest locomotive kits to find your next project and put these preparation techniques into practice.
The Right Chemistry: Thinners, Flow Improvers, and Paint Choice
Tap water is the most common constraint in model painting because it contains minerals and chlorine that can disrupt the delicate balance of acrylic binders. These impurities often cause paint to clump or "break" on the palette; consequently, using a professional thinner or distilled water is a proactive solution that ensures a consistent chemical bond. While water simply dilutes the pigment, professional thinners contain a small amount of binder that maintains the paint's structural integrity even when heavily thinned. This stability is vital for achieving a smooth, translucent layer over fine rivet details.
Managing the drying time of your medium is another critical step. Acrylics naturally dry fast, which often locks brush strokes in place before they have a chance to settle. Adding a drying retarder slows down the evaporation process, keeping the "wet edge" alive for several minutes. This allows you to blend new strokes into old ones without creating visible ridges. By incorporating these essential painting techniques into your workflow, you can manipulate the paint with the same precision as a professional artist. Mastering the chemistry of your palette is the most reliable way to understand how to avoid brush marks when painting models.
Thinners vs. Flow Improvers: Knowing the Difference
While thinners reduce pigment density to make paint more fluid, flow improvers reduce surface tension to help the paint spread evenly across the surface. These two additives serve different purposes and are often most effective when used together. If you are painting a large, flat surface like the side of a 7mm scale wagon, a retarder is necessary to prevent the paint from "skinning" too early. You should aim for a "milk-like" consistency in your mix. You can test this by pulling a drop of paint up the side of your palette; it should run back down smoothly, leaving a translucent tint rather than a thick, opaque streak.
The Case for Enamels in Narrow Gauge Modelling
Enamel paints offer a natural advantage for brush painters because they possess a much longer drying time than acrylics. This extended "open time" allows the paint to self-level under its own weight, effectively erasing brush marks as it cures. Many modellers prefer enamels for locomotive boilers because they produce a tough, high-gloss finish that mimics real steel. However, enamels require white spirit for cleanup and have stronger fumes; therefore, you must ensure your workshop is well-ventilated. Managing the 24-hour cure time requires patience, but the resulting factory-smooth finish is often worth the wait for high-end kits.
Application Mastery: Brush Techniques for a Level Finish
Chemistry provides the foundation, but your physical application determines the final result. A common constraint for modellers is the temptation to apply thick paint for instant coverage; however, this approach inevitably leads to visible ridges and obscured details. Understanding how to avoid brush marks when painting models requires a shift toward the "two thin coats" philosophy. Your first coat will often look patchy and translucent. You must resist the urge to add more paint at this stage. Once dry, the second thin coat will build opacity while maintaining the smooth profile you established during preparation.
Directional brushing is another vital skill for achieving a factory finish. You should always follow the natural panel lines or structural features of the prototype. For instance, when painting a 7mm scale wagon side, brush horizontally along the planks. This technique ensures that any microscopic texture remains hidden within the model's geometry. Learning how to avoid brush marks when painting models is as much about strategic planning as it is about steady hands.
Maintaining the Wet Edge
The "wet edge" is the leading boundary of your paint stroke. If this edge dries before you apply the next stroke, a permanent ridge forms where the layers overlap. When painting a complex shape like a Quarry Hunslet boiler, you must plan your attack to move quickly around the circumference. A proactive strategy is to work in small, manageable sections. If you notice a section has started to "skin" over, you've entered the no-go zone. You must never touch this paint again until it's fully cured; otherwise, your brush will tear the surface and create a permanent scar that requires sanding to fix.
Choosing the Right Brush for the Job
Your choice of tool significantly impacts how paint flows onto the resin. While synthetic brushes are durable, they often lack the "belly" required to hold enough fluid for a long, continuous stroke. High-quality sable brushes are a better investment for narrow gauge kits because they release paint at a more consistent rate. You should match the brush shape to the geometry of your model:
- Flat Brushes: These are ideal for large, flat surfaces like locomotive tanks or wagon sides.
- Round Brushes: These offer the precision needed for cab interiors and intricate fittings.
A common constraint is the "hooked" tip caused by improper cleaning. A hooked tip creates micro-streaks in the paint film; therefore, using a dedicated brush soap is a proactive way to maintain your tools. If you're ready to test these techniques on a high-quality surface, browse our range of OO9 and 7mm scale kits today.
Finishing Your Narrow Minded Railworks Kits to Perfection
Our 3D printed resin kits offer exceptional detail, but their non-porous nature presents a unique constraint for the final finish. Unlike wood or plaster, resin provides no "bite" for the paint to soak into; therefore, the quality of your finish depends entirely on the chemical bond of your primer and the flatness of your topcoat. When working on OO9 locomotive kits, the primary challenge is preserving the microscopic rivet heads and cab fittings. If you apply paint too heavily, these details disappear. A proactive solution is to use the thinned, multi-coat approach discussed earlier, ensuring each layer is fully cured before the next is applied.
Even with perfect technique, environmental dust can settle on your model. You don't have to strip the paint to fix these minor flaws. Using ultra-fine polishing pads is an effective way to refine the surface after the paint has dried. This stage is where you truly master how to avoid brush marks when painting models by mechanically leveling any remaining ridges. A smooth, unified surface is the hallmark of a professional build, and it's achievable without an expensive airbrush setup.
Polishing and Buffing the Final Coat
If you find small ridges after your final coat, use micro-mesh pads ranging from 3000 to 8000 grit. "Flatting back" involves using the lower grits to gently sand away the peaks of brush marks. Once the surface is level, move to the 8000-grit pad to polish the paint back to a satin or gloss sheen. This process can be daunting; however, it's the most reliable method for achieving an airbrush-quality finish with a brush. Always finish with a clear varnish. This final layer unifies the sheen across the entire model and protects your hard work from oily fingerprints during handling.
The Role of Weathering in Hiding Sins
Weathering is often seen as an artistic choice, but it's also a practical tool for disguising minor painting imperfections. A common constraint for beginners is a slight texture mismatch on the lower chassis or underframe. A proactive solution is to apply pin washes or weathering powders to these areas. These products settle into recesses and break up flat surfaces, drawing the eye away from any remaining brush strokes. If you're still learning how to avoid brush marks when painting models, start by practicing on spare wagon parts or diorama scenery. Gaining confidence on smaller components makes tackling a full locomotive kit much less intimidating. Perfection comes with patience and the right chemical toolkit.
Achieve Professional Results on Every Model
Achieving a professional, airbrush-quality finish with a paintbrush is a frequent constraint for narrow gauge enthusiasts; however, utilizing the chemistry secrets and techniques outlined here provides a proactive solution. By focusing on meticulous surface preparation, managing paint viscosity with flow improvers, and mastering the wet edge technique, you can produce a factory-smooth surface that highlights every rivet. Mastering how to avoid brush marks when painting models ensures that your technical skill is visible on every locomotive and wagon you build. These methods allow you to preserve the intricate details of narrow gauge kits while enjoying the simplicity of brush painting.
Our expertly designed 3D printed bodies are specifically optimized for fine detail preservation, ensuring your paintwork looks its best. We provide global shipping for all narrow gauge modellers looking to expand their rosters with high-quality kits. Explore our range of high-detail narrow gauge kits and start your next project today. With these professional techniques in your toolkit, you're ready to transform your workbench into a source of pride. Happy modelling.
Frequently Asked Questions
Can I use tap water to thin my acrylic model paints?
Tap water introduces impurities like minerals and chlorine that can break the paint's chemical bond; therefore, you should use distilled water or a dedicated acrylic thinner. This proactive choice prevents the paint from clumping on your palette and ensures a consistent flow. Professional thinners also contain extra binders to maintain paint strength when you're working with high dilution ratios.
How many coats of paint are usually needed for a smooth finish?
You typically need two to three thin coats to achieve a factory-quality finish. A common constraint is the desire for instant coverage; however, applying a single thick layer almost always results in visible ridges and obscured detail. The "two thin coats" rule ensures that you build opacity gradually while keeping the surface level and preserving the fine rivet details on your kits.
What is a 'wet edge' and why is it important for model painting?
The "wet edge" is the active boundary where you're currently applying paint to the model. It's critical because once paint starts to skin over, any new strokes will tear the surface and create permanent ridges. Maintaining this edge is one of the most effective ways to understand how to avoid brush marks when painting models on complex locomotive shapes or large wagon sides.
Why does my paint look 'chalky' or 'gritty' after it dries?
A chalky or gritty appearance usually suggests the paint is drying too quickly before it has a chance to level out. Environmental heat or low humidity often causes this constraint in the workshop. Adding a drying retarder is a proactive solution that slows evaporation, allowing the pigments to settle into a smooth, even film rather than a textured, dry mess.
Does the quality of the paintbrush really affect the amount of brush marks?
High-quality brushes are essential because they hold more fluid and maintain a consistent release rate during the stroke. Synthetic bristles are often too stiff, which physically carves "trenches" into the wet paint film as you move. Investing in natural sable brushes provides the softness required to apply paint without leaving physical tracks behind your brush tip.
How do I fix brush marks that have already dried on my model?
You can fix existing marks by using ultra-fine polishing pads, such as 3000 to 6000 grit micro-mesh. Gently "flatting back" the ridges allows you to level the surface without stripping the paint back to the primer. Once the area is smooth, you can apply a final thinned coat or a unifying varnish to restore the livery's original sheen.
Is it better to use a flat or round brush for painting large flat surfaces?
Flat brushes are the superior choice for large, flat surfaces like 7mm scale wagon sides or locomotive tanks. Their wide profile allows you to cover more area with fewer strokes, which naturally reduces the number of overlap points where ridges can form. Round brushes should be reserved for intricate details and cab interiors where precision is the priority.
Can I avoid brush marks when using metallic or silver paints?
Metallic paints are notoriously difficult to brush because the metallic flakes tend to align with the direction of your bristles. To minimize this effect, you must thin the paint significantly and use a flow improver to reduce surface tension. This allows the flakes to settle horizontally, making it easier to learn how to avoid brush marks when painting models with silver or gold tones.