

What if the most realistic element of your narrow gauge layout isn't the locomotive itself, but the landscape it travels through? While commercial trees offer a quick fix, they often look generic and repetitive, failing to capture the rugged charm of a specialized OO9 or O-16.5 scene. Mastering the art of creating miniature trees for dioramas allows you to break away from uniform wire armatures that look more like toys than timber. Although achieving hyper-realism requires patience, utilizing the right tools and techniques ensures your scenery matches the high detail of your scale kits.
You probably agree that nothing ruins a scene faster than foliage shedding over time or a tree that looks completely out of scale. This guide promises to help you master the art of crafting trees that bring professional-grade depth to your narrow gauge railway. We'll start by looking at species-specific armatures and move through to achieving realistic bark textures. By the end, you'll know exactly how to frame your locomotives with scenery that looks as though it's been growing there for decades.
Key Takeaways
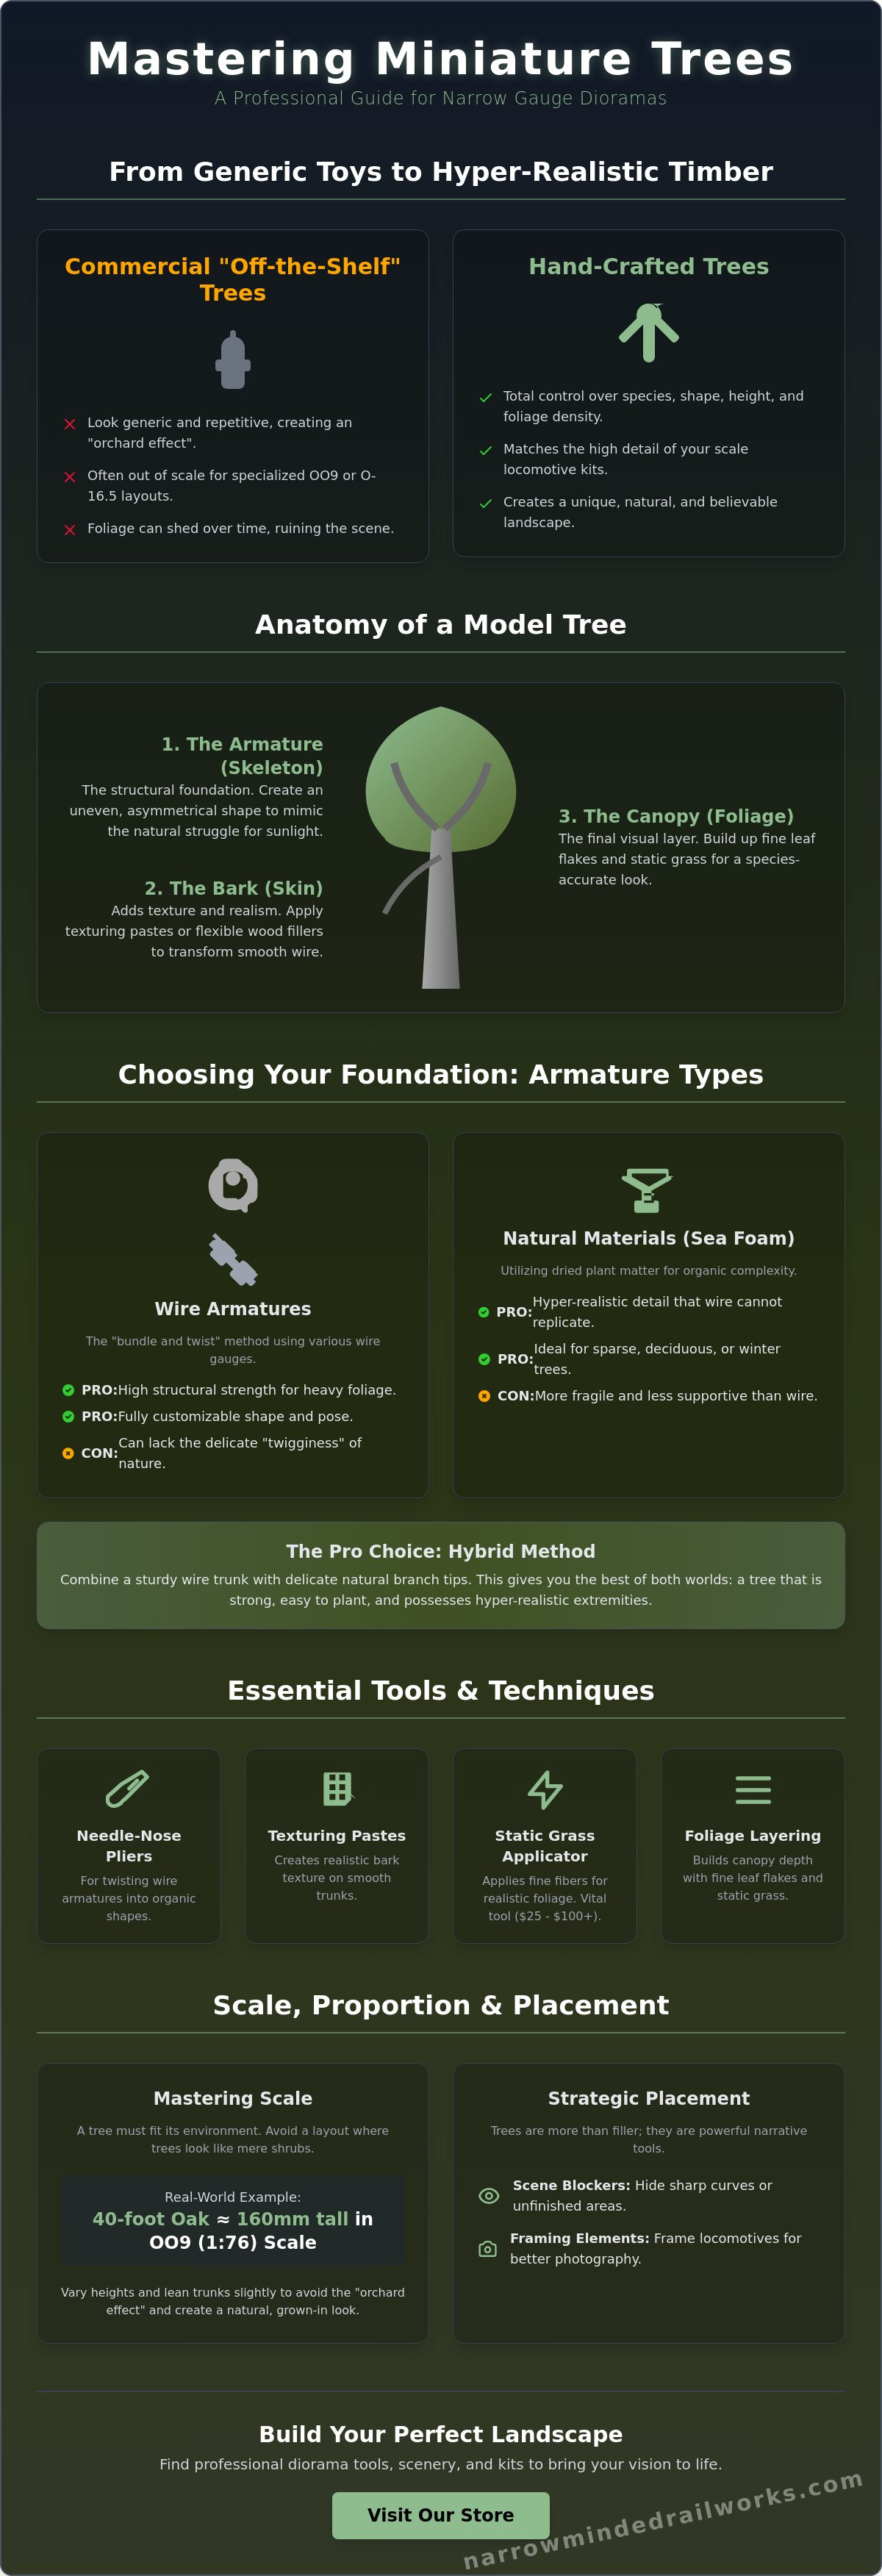
- Evaluate the structural strength of wire armatures against the organic detail of natural materials like sea foam to find the best foundation for your scene.
- Transform smooth wire armatures into realistic trunks by applying professional texturing pastes and flexible wood fillers.
- Master the art of creating miniature trees for dioramas by layering fine leaf flakes and static grass to achieve a species-accurate canopy.
- Utilize strategic tree placement to act as scene blockers, hiding sharp curves and framing your narrow gauge locomotive kits for better photography.
The Fundamentals of Creating Miniature Trees for Dioramas
Trees do more than just fill empty space; they serve as structural anchors that define the vertical limits of a scene. While some modellers view greenery as an afterthought, professional results come from treating vegetation with the same respect as a locomotive kit. To understand the historical context of these displays, one might ask What is a Diorama? and how it uses perspective to tell a story. In the context of model railroading, trees frame the action and provide a sense of place that ground-level details cannot achieve alone.
Commercial "off-the-shelf" trees often struggle to meet the realism standards required for specialized narrow gauge layouts. These mass-produced items frequently feature repetitive branch patterns and generic green tones that look out of place next to high-quality OO9 or GN15 models. Although these products offer convenience, creating miniature trees for dioramas by hand allows you to control every aspect of growth, from trunk taper to leaf density. You'll need a few essential tools to get started: needle-nose pliers for twisting armatures, adhesives for securing foliage, and a static grass applicator to create fine branch detail. While static grass applicators can range in price from $25 to over $100, they are vital for achieving the fine texture found in nature.
To better understand the practical application of these materials, watch this helpful video:
Understanding Scale and Proportion
Scale accuracy is a common hurdle when building a narrow gauge railway. A tree that looks perfect on an OO9 (1:76) layout will appear like a mere shrub on a GN15 (1:24) scene. You should calculate the height of your trees based on real-world equivalents; for instance, a 40-foot oak stands about 160mm tall in OO9 scale. Avoid the "orchard effect" by varying heights and leaning some trunks slightly. This variety suggests a natural environment rather than a planned plantation, helping to set a clear geographical context for your railway.
Anatomy of a Realistic Miniature Tree
A successful model tree consists of three core elements: the armature, the bark, and the canopy. The armature acts as the skeleton, providing the structural foundation for the entire piece. Real trees rarely grow in perfect symmetry, so your armature should reflect the uneven struggle for sunlight. Once the skeleton is set, the bark adds texture, and the canopy provides the final foliage layer. Identifying the character of your tree early, such as a gnarled oak versus a straight pine, ensures that your efforts in creating miniature trees for dioramas result in a cohesive and believable landscape.
Choosing Your Foundation: Wire Armatures vs. Natural Materials
Selecting the right foundation for your project often involves a trade-off between structural integrity and organic complexity. While wire provides a robust skeleton, it can sometimes lack the delicate "twigginess" found in nature. A proactive approach involves evaluating the specific needs of your scene before committing to a material. If you are creating miniature trees for dioramas that feature heavy foliage, a wire armature offers the necessary support. Conversely, for winter scenes or sparse deciduous trees, natural materials like sea foam provide a level of detail that wire struggles to replicate.
For modellers working on complex or repetitive species like palms, 3D printed armatures have become a reliable solution. These provide consistent geometry that is difficult to achieve by hand. However, the most realistic results often come from a hybrid method. By combining a sturdy wire trunk with natural branch tips, you get the best of both worlds: a tree that is easy to plant but possesses hyper-realistic extremities. To help with the assembly of these complex structures, utilizing professional diorama tools and scenery accessories ensures your bonds remain secure over time.
The Wire Armature Technique
The "bundle and twist" method is the standard for creating custom-posed trees. You should start with a variety of wire gauges; using only one thickness results in a trunk that lacks natural taper. Copper wire is excellent for its flexibility, while floral wire offers more rigidity for larger O-16.5 scale models. Begin by bundling several lengths together to form the trunk, then peel off smaller groups to create secondary and tertiary branches. This method allows you to mimic the specific growth patterns of different species with high precision.
Working with Sea Foam and Natural Roots
Natural materials like Teloxys aristata, commonly known as sea foam, offer unbeatable detail for fine branching. A mixed size box of sea foam typically costs between $22 and $63 depending on the quantity, providing a cost-effective way to populate a forest. If you prefer sourcing from your own garden, dried roots are a fantastic alternative. You must clean and preserve these roots in a glycerin solution to prevent rot and brittleness. Grafting these natural elements onto a wire trunk involves drilling small holes into the wire armature or using a high-strength adhesive to blend the textures seamlessly. This technique is particularly effective for creating miniature trees for dioramas where the branch structure remains visible through the canopy.
Creating Realistic Bark Texture and Trunk Details
While a well-twisted wire armature provides the necessary structural foundation, its smooth metallic surface immediately breaks the illusion of a natural landscape. You can solve this by utilizing professional texturing techniques that transform bare wire into a rugged, organic trunk. Many modellers rely on brittle materials like joint compound, but these often crack when the layout is moved or the tree is adjusted. A more proactive solution involves using flexible wood fillers or acrylic caulking, which provide the durability needed for creating miniature trees for dioramas that will last for years.
To add true character to your models, consider sculpting specific features like hollows or broken branch stubs. Use a dental tool to carve out a small cavity in the trunk or press a stiff brush into the wet texture to create deep vertical furrows. If your scene features an older forest, exposing a few gnarled roots at the base helps ground the tree into the diorama floor. This prevents the model from looking like it was simply glued on top of the scenery, a common issue in smaller scales like OO9.
Coating the Armature for Longevity
Creating a custom "bark goop" is an effective way to achieve a high-fidelity finish. Mix PVA glue, fine sawdust, and a dark acrylic paint into a thick paste. While this mixture is dense, you must apply it in thin layers to avoid obscuring the fine branch detail you worked hard to create in the previous steps. Start at the base of the trunk where the texture is coarsest and thin the mixture with a little water as you move toward the secondary branches. This graduated approach ensures the tree maintains a realistic taper from root to tip.
Painting and Weathering the Trunk
Achieving a realistic wood tone requires looking beyond basic brown paint. Nature utilizes a complex palette of slate greys, olive greens, and burnt ochres. Start with a dark base coat and then use dry-brushing to highlight the ridges of the bark texture. This technique is very similar to the process of painting 3D printed models, where the goal is to pick out raised details with a lighter shade. To finish the look, apply a thin wash of green to the north-facing side of the trunk to simulate moss. Adding a few patches of light-colored fine turf can mimic lichen, giving your tree the aged appearance necessary for a convincing narrow gauge scene. This level of detail is what separates professional creating miniature trees for dioramas from basic hobbyist efforts.
Foliage Techniques: From Clump Foliage to Static Grass
Applying foliage is the stage where a model either becomes a masterpiece or ends up looking like a painted vegetable. While many modellers glue clump foliage directly to branches, this often creates a heavy, unrealistic "broccoli" appearance that lacks depth. A proactive solution involves building a hierarchy of materials that mimic the transparency and density of real canopies. When creating miniature trees for dioramas, you should utilize a range of materials from coarse poly-fibre to fine leaf flakes to achieve the necessary layers of detail. This approach ensures your vegetation looks as sophisticated as your OO9 or O-16.5 locomotive kits.
The "light and shadow" rule is essential for achieving a professional finish. Nature is rarely a single shade of green; instead, it's a complex mix of highlights and deep shadows. You should apply darker tones toward the center and bottom of the canopy, while using lighter, brighter shades for the outer edges where sunlight hits. For adhesives, spray glues offer speed, but the "dip and shake" method provides better control for individual branch clusters. You can find professional diorama tools and scenery supplies to help manage these delicate applications without making a mess of your workbench.
Building the Canopy Structure
A realistic canopy starts with a transparent foundation rather than a solid mass. First, tease out small amounts of poly-fibre until it resembles a fine, airy mesh. This creates a "web" that catches the foliage without blocking light. Second, apply a base layer of fine flock or ground foam to establish the core volume. Clump foliage, which currently retails for approximately $9.49 for a 57.7 cubic inch bag, works best when broken into tiny, irregular pieces. Finally, add specialized leaf products or flakes. These larger, shaped pieces provide the species-specific identification that makes a tree look like a birch or an oak rather than a generic green blob.
Advanced Foliage Effects
For those looking to push the boundaries of realism, static grass is an invaluable tool. While usually reserved for fields, a static grass applicator can simulate the fine "twigginess" of a winter tree or the sharp needles of a pine. Prices for these applicators range from $25 to over $100 depending on the model, but the results are unmatched for fine texture. You can also use coloured powders to replicate spring blossoms or the vibrant reds of autumn. Once the foliage is complete, you must seal the tree. A light misting of matte medium or a dedicated scenery cement ensures the leaves stay attached during layout cleaning. This final step protects your investment of time and materials, ensuring your work remains a highlight of your narrow gauge railway for years to come.
Integrating Trees into Your Narrow Gauge Layout
Placement is the final strategic step in creating miniature trees for dioramas, and it requires a thoughtful approach to composition. While many builders view trees as static background elements, they actually serve as powerful "scene blockers." Small layouts often suffer from visible, sharp curves that break the realism of a scene. A proactive solution involves placing dense clusters of vegetation to hide these exits, creating the illusion that the track continues into a vast, unseen forest. This technique keeps the viewer's focus on the modeled area rather than the boundaries of the baseboard.
Trees also act as a natural vignette for your rolling stock. By positioning a large, detailed tree in the foreground, you create a "window" that frames your locomotives as they pass. This is especially effective for photography, where foreground detail adds a sense of immense depth. To maintain this realism over time, you must consider maintenance. Handmade trees are delicate and will eventually collect dust. Although you cannot wash them, a proactive solution is using a very soft-bristled brush and a low-powered vacuum to gently clean the canopy without dislodging the foliage.
Scale Considerations for OO9 and GN15
Scaling your trees correctly is vital for maintaining the unique "narrow gauge" aesthetic. When you are building OO9 locomotive kits, the trees should tower over the engines to emphasize the diminutive nature of the railway. In contrast, working in GN15 scale requires even more attention to detail in the bark and exposed roots because the viewer's perspective is much closer to the model's surface. You can also utilize forced perspective by placing slightly smaller, less detailed trees in the background to make your layout appear deeper than it actually is.
The Final Scene: Ground Cover and Roots
A tree only looks "planted" once it is blended into the surrounding landscape. You should use a mix of leaf litter, fallen branches, and fine turf to hide the join between the trunk and the diorama floor. A classic narrow gauge modeling trope is "root lift," where the roots of an ancient tree have physically moved the track over decades of growth. While this adds incredible character, you must perform a final check to ensure the branches don't interfere with the loading gauge of passing trains. If a branch is too low, it's better to prune it now than to have it snag a delicate wagon later. This careful integration ensures that creating miniature trees for dioramas results in a cohesive, living world rather than a collection of separate models.
Transforming Your Narrow Gauge Landscape
You've explored how to build realistic armatures and apply textured bark to overcome the limitations of generic commercial models. By layering foliage and strategically placing trees to frame your locomotives, you transform a simple layout into a living environment. Mastering the process of creating miniature trees for dioramas ensures your scenery matches the high precision of your narrow gauge kits. This attention to detail bridges the gap between a basic model and a professional display.
Although building these models takes time, having the right equipment makes the task much easier. We provide worldwide shipping on all our kits, ensuring enthusiasts everywhere can access professional-grade supplies. Our products are designed by modellers, for modellers, and we offer specialist narrow gauge expertise to help you achieve the perfect finish. Explore our range of diorama tools and scenery accessories to start your next landscape project today. Your railway deserves a setting that reflects the care you put into your locomotive kits. Happy modelling!
Frequently Asked Questions
How do I make miniature trees look less like plastic?
You can eliminate the plastic appearance by applying a flexible texturing paste to the armature and finishing with matte acrylic paints. While smooth plastic armatures often look generic, a custom layer of wood filler or acrylic caulk provides the rugged surface found in nature. Follow this with a dark wash and light dry-brushing to highlight the ridges. This technique ensures your trees match the high detail of your O-16.5 or GN15 scenery kits.
Can I use real twigs and branches for my diorama trees?
You can use real twigs and branches, but they often become brittle or rot if left untreated. A proactive solution is to soak the wood in a solution of one part glycerin to two parts water for several weeks. This replaces the natural sap and keeps the wood flexible for years. Once dried, these natural armatures provide unbeatable detail for winter scenes or sparse deciduous models on a narrow gauge layout.
What is the best glue for attaching foliage to miniature trees?
High-strength spray adhesives are generally the most efficient choice for large canopies, while matte medium works better for delicate, localized work. Although some glues can leave a shiny residue, using a dedicated scenery cement ensures a professional matte finish. For creating miniature trees for dioramas with heavy foliage, the "dip and shake" method with diluted PVA glue provides a strong, permanent bond that prevents shedding during layout cleaning.
How do I make realistic pine needles for miniature conifers?
Static grass is the most effective material for replicating the fine texture of pine needles on miniature conifers. While traditional flock often looks like moss, applying 2mm or 4mm green static grass with an applicator creates the sharp, directional look of real needles. You should apply a dark green base layer first and then add lighter tips to simulate new growth, providing the depth needed for professional-grade scenery.
How long does it take to create a high-quality miniature tree?
A high-quality tree typically requires between two and four hours of active work, though drying times extend the total process over several days. While you can rush the assembly, allowing layers of bark texture and foliage adhesive to dry completely prevents the model from collapsing or losing detail. Working on a batch of five or six trees simultaneously is a proactive way to manage your time more efficiently during a build.
How do I prevent handmade trees from becoming brittle over time?
You can prevent brittleness by incorporating flexible wood fillers and sealing the finished model with a high-quality matte varnish. Although natural materials like sea foam are prone to drying out, a light misting of artist's fixative can help lock in moisture and stabilize the foliage. For creating miniature trees for dioramas, choosing flexible coatings ensures the branches can withstand minor bumps during periodic layout maintenance and cleaning.
What scale should my trees be for an OO9 layout?
Mature trees on an OO9 layout (1:76 scale) should generally stand between 100mm and 200mm tall to appear realistic. While smaller trees are easier to fit into tight spaces, undersized vegetation makes your narrow gauge locomotive kits look like toys. You should vary the heights within a cluster to avoid a uniform appearance and use larger specimens in the foreground to create a convincing sense of scale.
Can I use 3D printed parts for tree making?
3D printed armatures are an excellent choice for species with complex or repetitive structures, such as palms or ferns. While twisting wire is the traditional method, printing the core skeleton ensures perfect symmetry and consistent branch spacing for difficult species. You can then apply traditional foliage techniques over the printed armature to blend it seamlessly with the rest of your handmade scenery and diorama kits.