

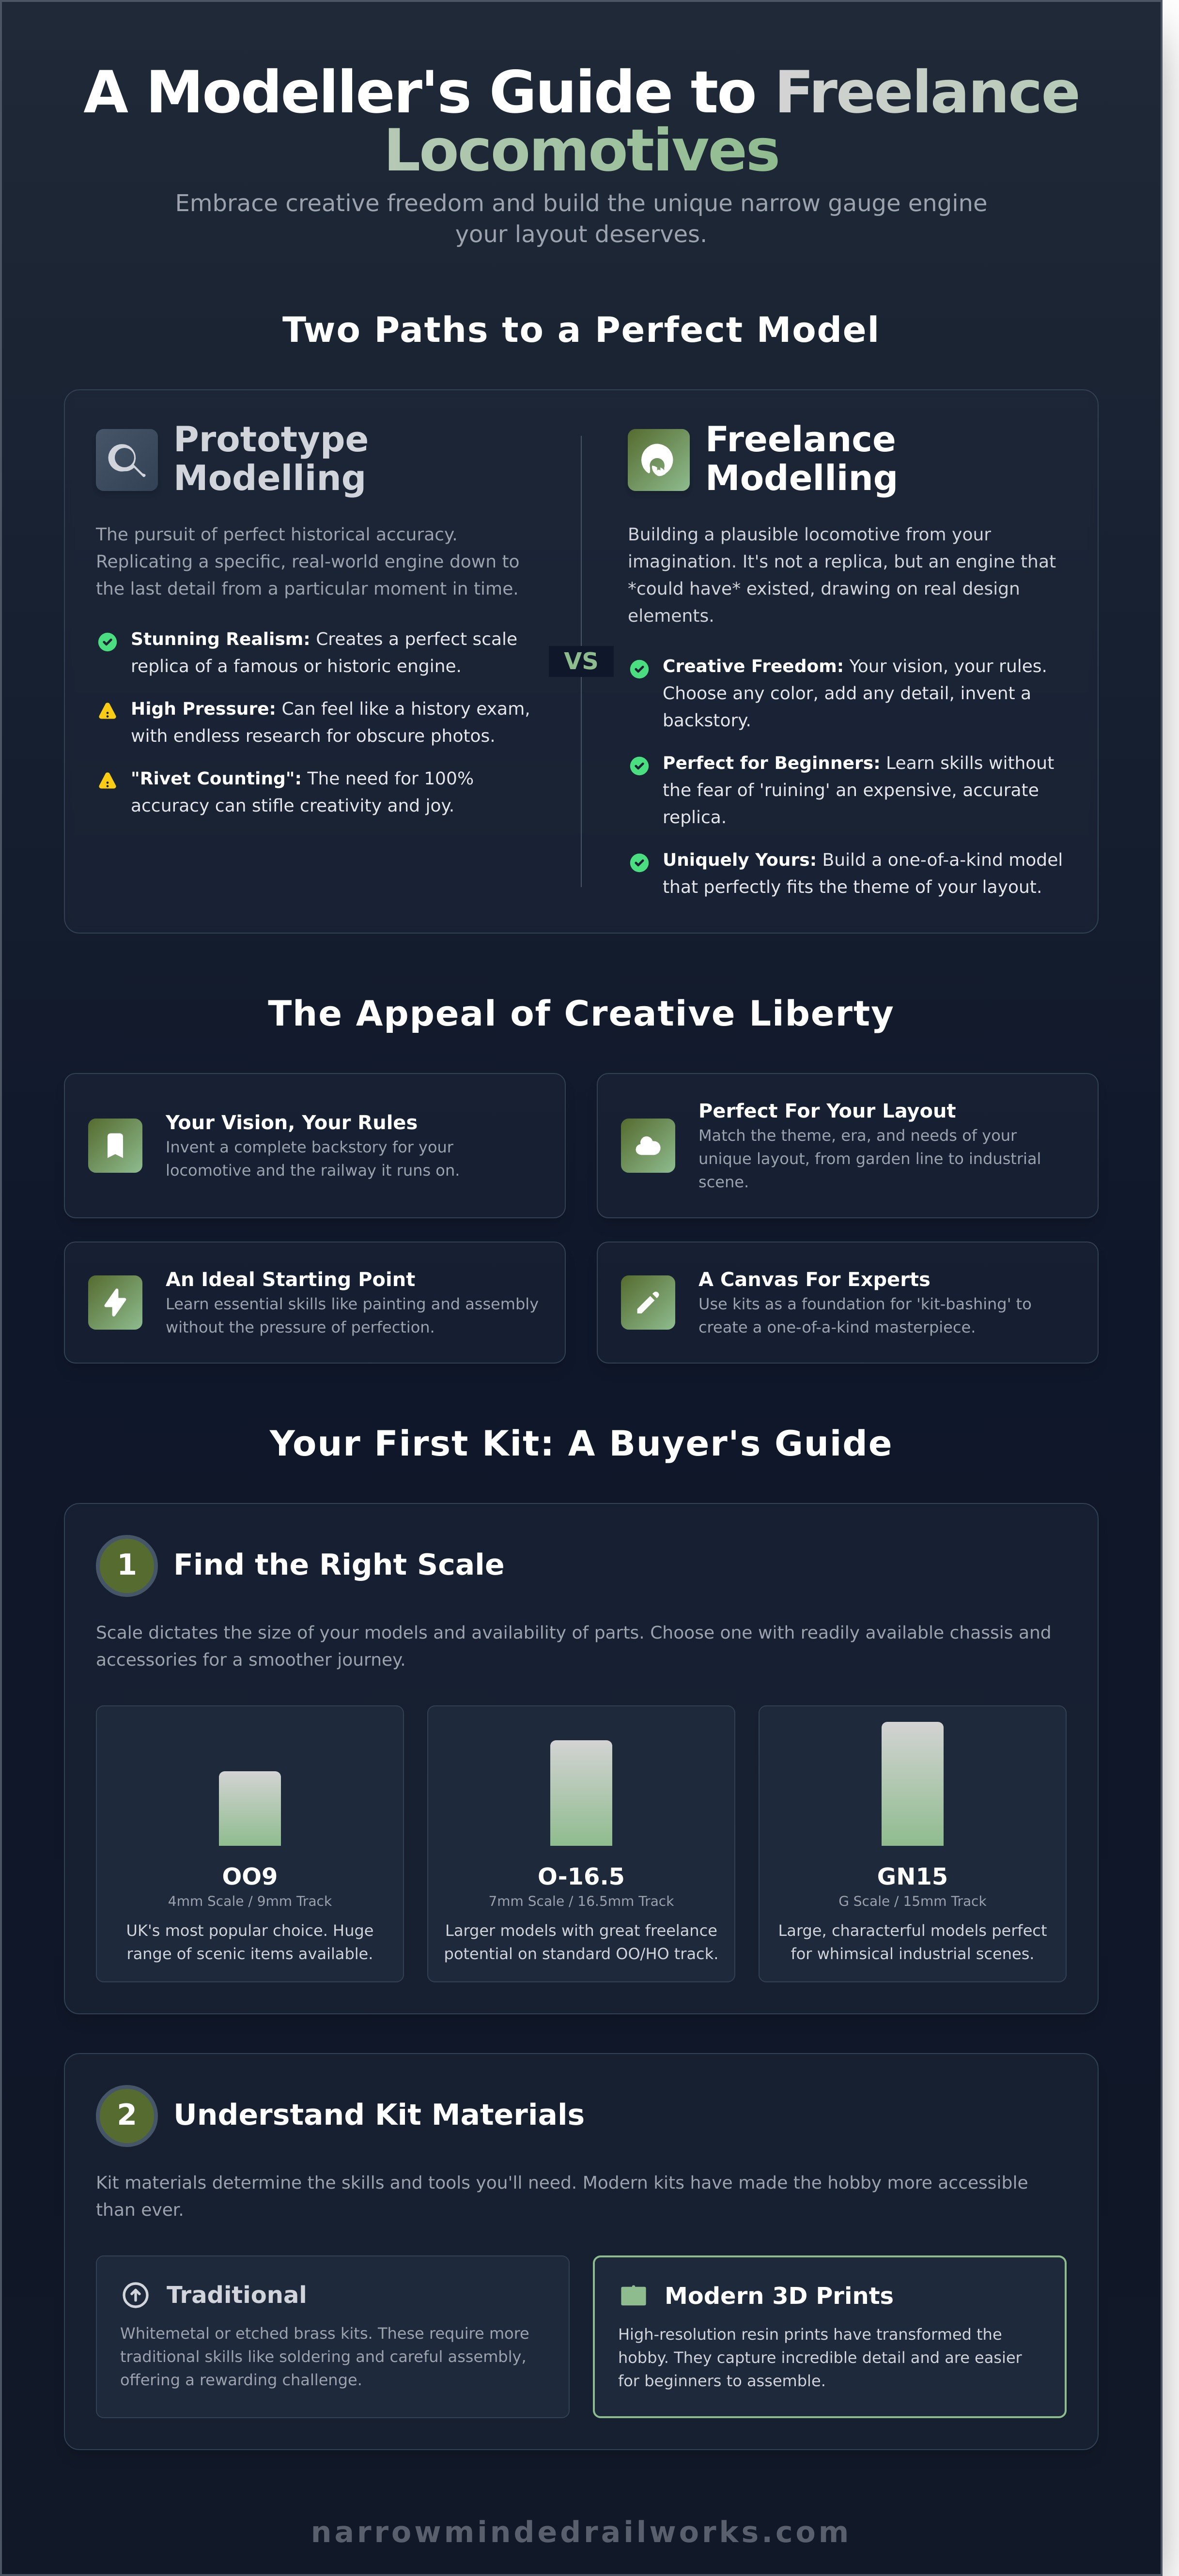
Ever felt the pressure of perfect prototype accuracy? The endless searching for obscure photographs just to get one rivet right? If the world of strict scale modelling can sometimes feel more like a history exam than a creative hobby, you're not alone. The constant worry about getting every detail historically correct can often stifle the very joy we seek from our layouts.
But what if there was a way to capture the spirit and charm of narrow gauge railways without being chained to historical blueprints? Welcome to the wonderfully creative world of freelance narrow gauge loco kits. This is where your imagination takes the driver's seat, allowing you to build a locomotive that simply looks right for your world, without needing to be a perfect replica of a real-world engine.
In this ultimate guide, we'll demystify the entire process. We'll guide you through choosing your first model, selecting the right chassis, and tackling common concerns about finishing modern 3D printed kits. By the end, you'll have the confidence to create a one-of-a-kind locomotive that's bursting with character and is entirely, wonderfully yours.
Key Takeaways
- Learn the key difference between prototype and freelance modelling to unlock your creative potential and build a truly unique locomotive.
- Discover how to select the best freelance narrow gauge loco kits for your skill level and desired scale, ensuring a successful first build.
- Move beyond the basic build with expert tips on painting and finishing, giving your model a unique character and a believable history.
- Get inspired by a showcase of completed models to see what's possible and spark ideas for your own one-of-a-kind project.
What is a 'Freelance' Narrow Gauge Locomotive?
In the world of model railways, a 'freelance' locomotive is one that is not based on a specific, real-world prototype. Instead of being a scale replica of a famous engine like the Flying Scotsman, a freelance design is a product of the kit designer's imagination. It's an engine that could have existed, drawing inspiration from various historical design elements to create something entirely new and unique. This approach is particularly popular in the characterful world of narrow gauge modelling, where industrial, agricultural, and estate railways often featured quirky and individualistic engines. If you're new to the concept, understanding What is a Narrow-Gauge Railway? provides excellent background on the diverse and fascinating railways these models represent.
This video from Sam'sTrains, while focusing on a ready-to-run model, beautifully illustrates the charm and appeal of the narrow gauge scene that freelance kits capture so well:
Prototype vs. Freelance: Embracing Your Imagination
Prototype modelling is the pursuit of perfect historical accuracy. Modellers will spend hours researching a specific engine to replicate its exact livery, weathering, and modifications as they appeared on a particular day. This dedication, sometimes jokingly referred to as 'rivet counting', results in stunningly realistic models. Freelance modelling offers a fun and accessible alternative. It removes the pressure of 100% accuracy, allowing you to build a locomotive that simply looks and feels right for your railway. Importantly, 'freelance' does not mean 'unrealistic'; most designs are based on sound engineering principles and look perfectly plausible chuffing around a quarry or through a country estate.
The Appeal of Creative Freedom
The core appeal of building from freelance narrow gauge loco kits is the ultimate creative liberty it provides. There are no rules to follow, which opens up a world of possibilities for modellers of all skill levels.
- Your Vision, Your Rules: You can choose any colour scheme you desire, add or remove details to your liking, and even invent a complete backstory for your locomotive and the railway it runs on.
- Perfect for Your Layout: A freelance engine can be built to perfectly match the theme, era, and operational needs of your unique layout, whether it's a whimsical garden line or a gritty industrial scene.
- An Ideal Starting Point: For beginners, building a freelance kit is a fantastic way to learn soldering, painting, and assembly skills without the fear of 'ruining' an expensive replica of a real engine.
- A Canvas for Experts: Experienced modellers love using freelance kits as a foundation for 'kit-bashing'-combining parts from different kits to create a truly one-of-a-kind masterpiece.
Choosing Your First Freelance Loco Kit: A Buyer's Guide
Diving into the world of freelance narrow gauge loco kits can be incredibly rewarding, but the sheer variety can feel overwhelming at first. The key is to match a kit to your skill level, budget, and the "feel" you want for your railway. This guide will walk you through the three most important considerations: scale, material, and the all-important chassis.
Finding the Right Scale: OO9, GN15, and More
The scale you choose dictates everything from the size of your models to the availability of parts. In the UK, the most popular choice is OO9, which uses 4mm scale models (the same as OO gauge) running on 9mm track (the same as N gauge). This combination offers a huge range of scenic items and ready-to-run stock. For those seeking larger, more characterful models, GN15 (G scale on 15mm track) is a fantastic option, perfect for whimsical industrial scenes. Other scales like O-16.5 (7mm scale on standard OO/HO track) also offer great freelance potential, drawing inspiration from diverse prototypes like the historic Maine's Two-Foot Gauge Railways. Our advice? Choose a scale with readily available chassis and accessories to make your modelling journey smoother.
Understanding Kit Materials: The Rise of 3D Printing
Traditionally, kits were made from whitemetal castings or etched brass frets, which require skills like soldering. Today, the landscape has been transformed by high-resolution 3D printed resin. Don't mistake these for the brittle prints of the past; modern resins offer a superb balance of properties:
- Incredible Detail: Captures fine details like rivet heads and wood grain with pinpoint accuracy.
- Strength and Durability: Modern resins are tough and resilient, easily handling the rigours of a working layout.
- Ease of Assembly: Often designed as a single-piece body, minimising complex construction and making them ideal for beginners.
The All-Important Chassis: What You Need to Know
This is the most critical point for any newcomer: most freelance narrow gauge loco kits are body shells only. They are designed to fit onto a specific, commercially available motorised chassis which you must purchase separately. It is essential to confirm which chassis a kit requires before you buy it. Common donor chassis include the Kato 11-103 and 11-104, or mechanisms from Bachmann's 'Thomas & Friends' range like Percy or Toby. A mismatch will lead to frustration, so always double-check the product details. Our kit descriptions always specify the needed chassis to ensure you get the right components from the start.
An Overview of the Building Process
Building your first model is often the most rewarding part of working with freelance narrow gauge loco kits. It's a chance to create something truly unique. While every kit is different, the core process follows a logical path from a box of parts to a finished locomotive ready for the rails. The single most important tool you can bring to the project is patience; take your time, enjoy the journey, and you'll be rewarded with a model you can be proud of.
Preparation and Cleanup
Before any assembly begins, proper preparation is crucial. Parts, whether 3D printed resin or cast metal, will need careful removal from their supports or sprues. The key is to work slowly to avoid damaging delicate components. Resin parts, in particular, must be cleaned thoroughly in warm, soapy water with an old toothbrush to remove any residual mould release agent, which will prevent paint and glue from adhering properly. A clean, well-lit workspace and a few essential tools will make this stage much easier.
- A sharp craft knife: For cleanly removing parts and trimming flash.
- Sanding sticks and fine-grit sandpaper: To smooth down any nub marks left from supports.
- A set of small files: Ideal for cleaning up and shaping metal parts.
Assembly and Detailing
Always test-fit every single part before applying glue. This "dry run" ensures everything aligns correctly and allows you to identify any areas that need minor filing or sanding for a perfect fit. For most assembly, a good quality superglue (cyanoacrylate or CA) is sufficient. For major structural joints or load-bearing parts, a stronger two-part epoxy provides superior strength and a longer working time. Once the basic body is assembled, the real fun begins. This is your opportunity to add a personal touch with extra details like brass handrails, a new whistle, or a driver and fireman in the cab, transforming a standard kit into your very own creation.
Bringing Your Creation to Life: Painting and Finishing
Once the glue has set and the chassis runs smoothly, the most creative stage begins. But how do you paint a locomotive that never existed? This freedom is one of the greatest joys of building freelance narrow gauge loco kits. A thoughtful paint job doesn't just add colour; it gives your model a history, a purpose, and a unique personality that is entirely your own.
Before any colour is applied, a high-quality primer is essential. It provides a neutral base, reveals any surface imperfections, and ensures your topcoats adhere properly for a durable, professional finish. A grey or black primer is usually the best choice for railway models.
Creating a Believable Livery
The key to a convincing freelance livery is to create a plausible backstory. Was your locomotive used in a Welsh slate quarry, a rural brickworks, or a Scottish timber yard? This story will guide your choices. For inspiration, look beyond railways:
- Industrial Machinery: Think of the bold JCB yellow, classic Massey Ferguson red, or the deep green of agricultural equipment.
- Commercial Vehicles: Look at liveries from old haulage companies or municipal services for simple, effective colour combinations.
- Colour Theory: Choose a main body colour that stands out, complemented by a robust, darker colour like black or dark grey for the chassis and frames. This creates a visually balanced model.
Finally, bring your fictional company to life with custom decals. You can combine lettering from various sources like HMRS Pressfix sheets or even design your own for a truly unique brand identity.
Weathering for Realism
A pristine, factory-fresh locomotive can look out of place on a working layout. Weathering is the process of adding dirt, wear, and grime to make your fictional model look like it has a real job. It’s the final touch that sells the story. Simple techniques can have a dramatic impact:
- Washes: Applying a thin, dark paint wash (like a mix of black and brown) will see it settle into panel lines and crevices, instantly adding depth and simulating accumulated grime.
- Dry-Brushing: By taking an old brush, dipping it in a lighter colour (like steel or a faded version of the body colour), and wiping most of it off, you can gently flick over raised details like rivets and handrails to simulate paint wear and highlight edges.
- Specific Effects: Add realism with specialised weathering powders for effects like rust streaks, soot stains around the chimney, and coal dust on the bunker. A touch of gloss varnish can create convincing oil and grease spills.
A thoughtful livery and realistic weathering can elevate high-quality freelance narrow gauge loco kits from a simple model into a truly believable miniature machine. For more finishing ideas, explore the customer galleries on sites like Narrow Minded Railworks for inspiration.
Showcase: Inspiring Freelance Kits from Narrow Minded Railworks
To bring the world of freelance modelling to life, we're taking a closer look at some inspiring examples from a specialist in the field. Narrow Minded Railworks creates characterful, high-quality kits that provide the perfect canvas for your imagination. Their range demonstrates the incredible variety possible with freelance narrow gauge loco kits, allowing you to build a truly unique fleet for your layout.
The 'Wasp' Industrial Diesel (OO9)
This pugnacious little diesel shunter is the epitome of industrial might in a tiny package. The 'Wasp' is designed to look perfectly at home in tight industrial settings, shunting wagons around a quarry, factory, or dockside. Its compact nature and powerful appearance make it an ideal motive power solution for micro-layouts where every millimetre counts. The simple resin body is designed for a smooth, reliable mechanism.
- Scale: OO9 (4mm scale, 9mm gauge)
- Chassis Required: Kato 11-109 N gauge chassis.
The 'Critter' Rail Tractor (GN15)
Bursting with rustic charm, the 'Critter' is a rail tractor that looks as though it was cobbled together in a farm workshop. This quirky kit is perfect for representing the light-duty motive power on an agricultural estate railway, a peat bog line, or a small mining concern. Its simple, robust design invites heavy weathering and customisation to tell the unique story of your railway.
- Scale: GN15 (G scale proportions on 16.5mm track)
- Chassis Required: Hornby 0-4-0 or similar small OO gauge chassis.
The 'Boxcab' Electric Locomotive (O-16.5)
Stepping away from steam and diesel, the 'Boxcab' offers a glimpse into an imagined early 20th-century electric railway. With its utilitarian design, this locomotive is ideal for a fictional urban tramway or a bustling interurban line connecting towns and industries. It provides a fantastic opportunity to model overhead catenary and create a distinctive, electrified narrow gauge scene in the popular 7mm scale.
- Scale: O-16.5 (7mm scale, 16.5mm gauge)
- Chassis Required: Bachmann On30 streetcar power bogie.
Your Journey into Creative Modelling Begins Here
We've explored the incredible freedom that freelance modelling offers, allowing you to build a narrow gauge locomotive that is truly one-of-a-kind. From understanding the core concepts to the rewarding process of building, painting, and finishing, you now have the roadmap to create something uniquely yours. The key to a stunning result lies in starting with a great foundation, which is where high-quality freelance narrow gauge loco kits make all the difference.
Are you ready to bring your vision to the rails? At Narrow Minded Railworks, we specialise in unique designs you simply won't find anywhere else. Each kit is meticulously crafted from high-quality 3D printed resin for crisp, beautiful details that will make your model stand out. With worldwide shipping, modellers across the UK and beyond can start their next creative adventure with us.
Don't just build a model-build a legacy. Explore our full range of unique freelance narrow gauge loco kits! Your blank canvas is waiting, and the only limit is your imagination. Happy modelling!
Frequently Asked Questions
What tools do I need to build a freelance resin loco kit?
To build a resin kit, you'll need a basic modeller's toolkit. Essential items include a sharp craft knife or scalpel for removing parts, a set of small files and fine-grit sandpaper for cleaning up edges, and a good quality superglue (cyanoacrylate) for assembly. A pin vice with small drill bits is also highly recommended for drilling holes for handrails and other fittings. Tweezers are invaluable for handling tiny components with precision and care.
Are 3D printed kits difficult for beginners to build?
3D printed freelance narrow gauge loco kits can be an excellent starting point for beginners. While they require patience, the one-piece body shells often simplify major assembly. The main challenge is preparation; removing support marks and thorough cleaning are crucial for a good finish. Compared to complex etched brass kits, they are generally more forgiving. Start with a simple design to build your confidence before tackling more detailed models and you'll find them very rewarding.
Do your freelance kits come with building instructions?
Yes, all our freelance kits are supplied with a comprehensive set of building instructions. These guides typically include a list of all parts, step-by-step assembly diagrams, and detailed notes on any tricky stages. We also provide clear recommendations for the specific chassis the kit was designed to fit, along with any modifications that may be required. The instructions are designed to be clear and easy to follow for modellers of all skill levels.
How do I choose the right chassis if it's not listed?
If a specific chassis isn't listed, you'll need to take some key measurements from the kit's body. The most critical dimensions are the wheelbase (distance between the axles) and the overall length and width. With these figures, you can search for a suitable ready-to-run chassis from UK suppliers like Peco or Dundas Models. Online forums for 009 or narrow gauge modelling are also excellent resources for finding what chassis other modellers have successfully used.
Can I use a freelance locomotive on a layout based on a real location?
Absolutely! Using a freelance locomotive on a layout based on a real location is a common practice, often justified by "modeller's license." Many freelance narrow gauge loco kits are inspired by real-world industrial or light railway designs, so they don't look out of place. A well-built and weathered freelance engine can perfectly capture the character of a specific line, even if that exact prototype never existed in reality. It’s all about creating a believable scene.
What's the best way to clean and prepare a 3D printed model for painting?
For the best paint finish, proper preparation is key. First, wash the 3D printed parts in warm water with a drop of standard washing-up liquid. Gently scrub all surfaces with an old, soft toothbrush to remove any residual release agent or uncured resin, paying close attention to fine details. Rinse the model thoroughly with clean water and allow it to air dry completely for at least 24 hours before applying a quality model primer.