

If you apply standard plastic solvent to a resin locomotive body, you won't get a bond; you'll simply get a mess. Mastering the process of assembling 3d printed model railway kits requires a distinct shift in mindset from traditional plastic modelling. You've likely felt the frustration of a brittle part snapping under light pressure or struggled to hide stubborn support pips without ruining delicate rivet detail. It's a common hurdle for many UK narrow gauge enthusiasts moving beyond ready-to-run models for the first time.
While resin components are more delicate than injection-molded plastic, adopting a structured preparation and bonding workflow ensures a robust and professional result. This guide promises to transform your workshop approach, providing the expert techniques needed to clean, bond, and finish complex kits with complete confidence. We'll examine the specific adhesives required for a permanent hold and the sanding methods that result in a smooth finish ready for the paint shop. By the end, you'll have a sturdy model that fits perfectly onto its commercial chassis.
Key Takeaways
- Replace standard plastic solvent cements with Cyanoacrylate (Super Glue) to ensure a permanent, durable bond on resin components.
- Discover how the warm water removal method prevents breakage and protects fine rivet detail when assembling 3d printed model railway kits.
- While resin prints may require minor structural adjustments, you can achieve a seamless fit onto commercial OO9 or GN15 chassis with strategic sanding.
- Master progressive sanding techniques, moving from 400 to 1000 grit, to eliminate layer lines and create a professional surface for priming.
- Learn invisible repair methods for brittle parts and the best practices for installing cab glazing to complete your locomotive to a high standard.
Essential Tools and Workspace Setup for 3D Printed Kits
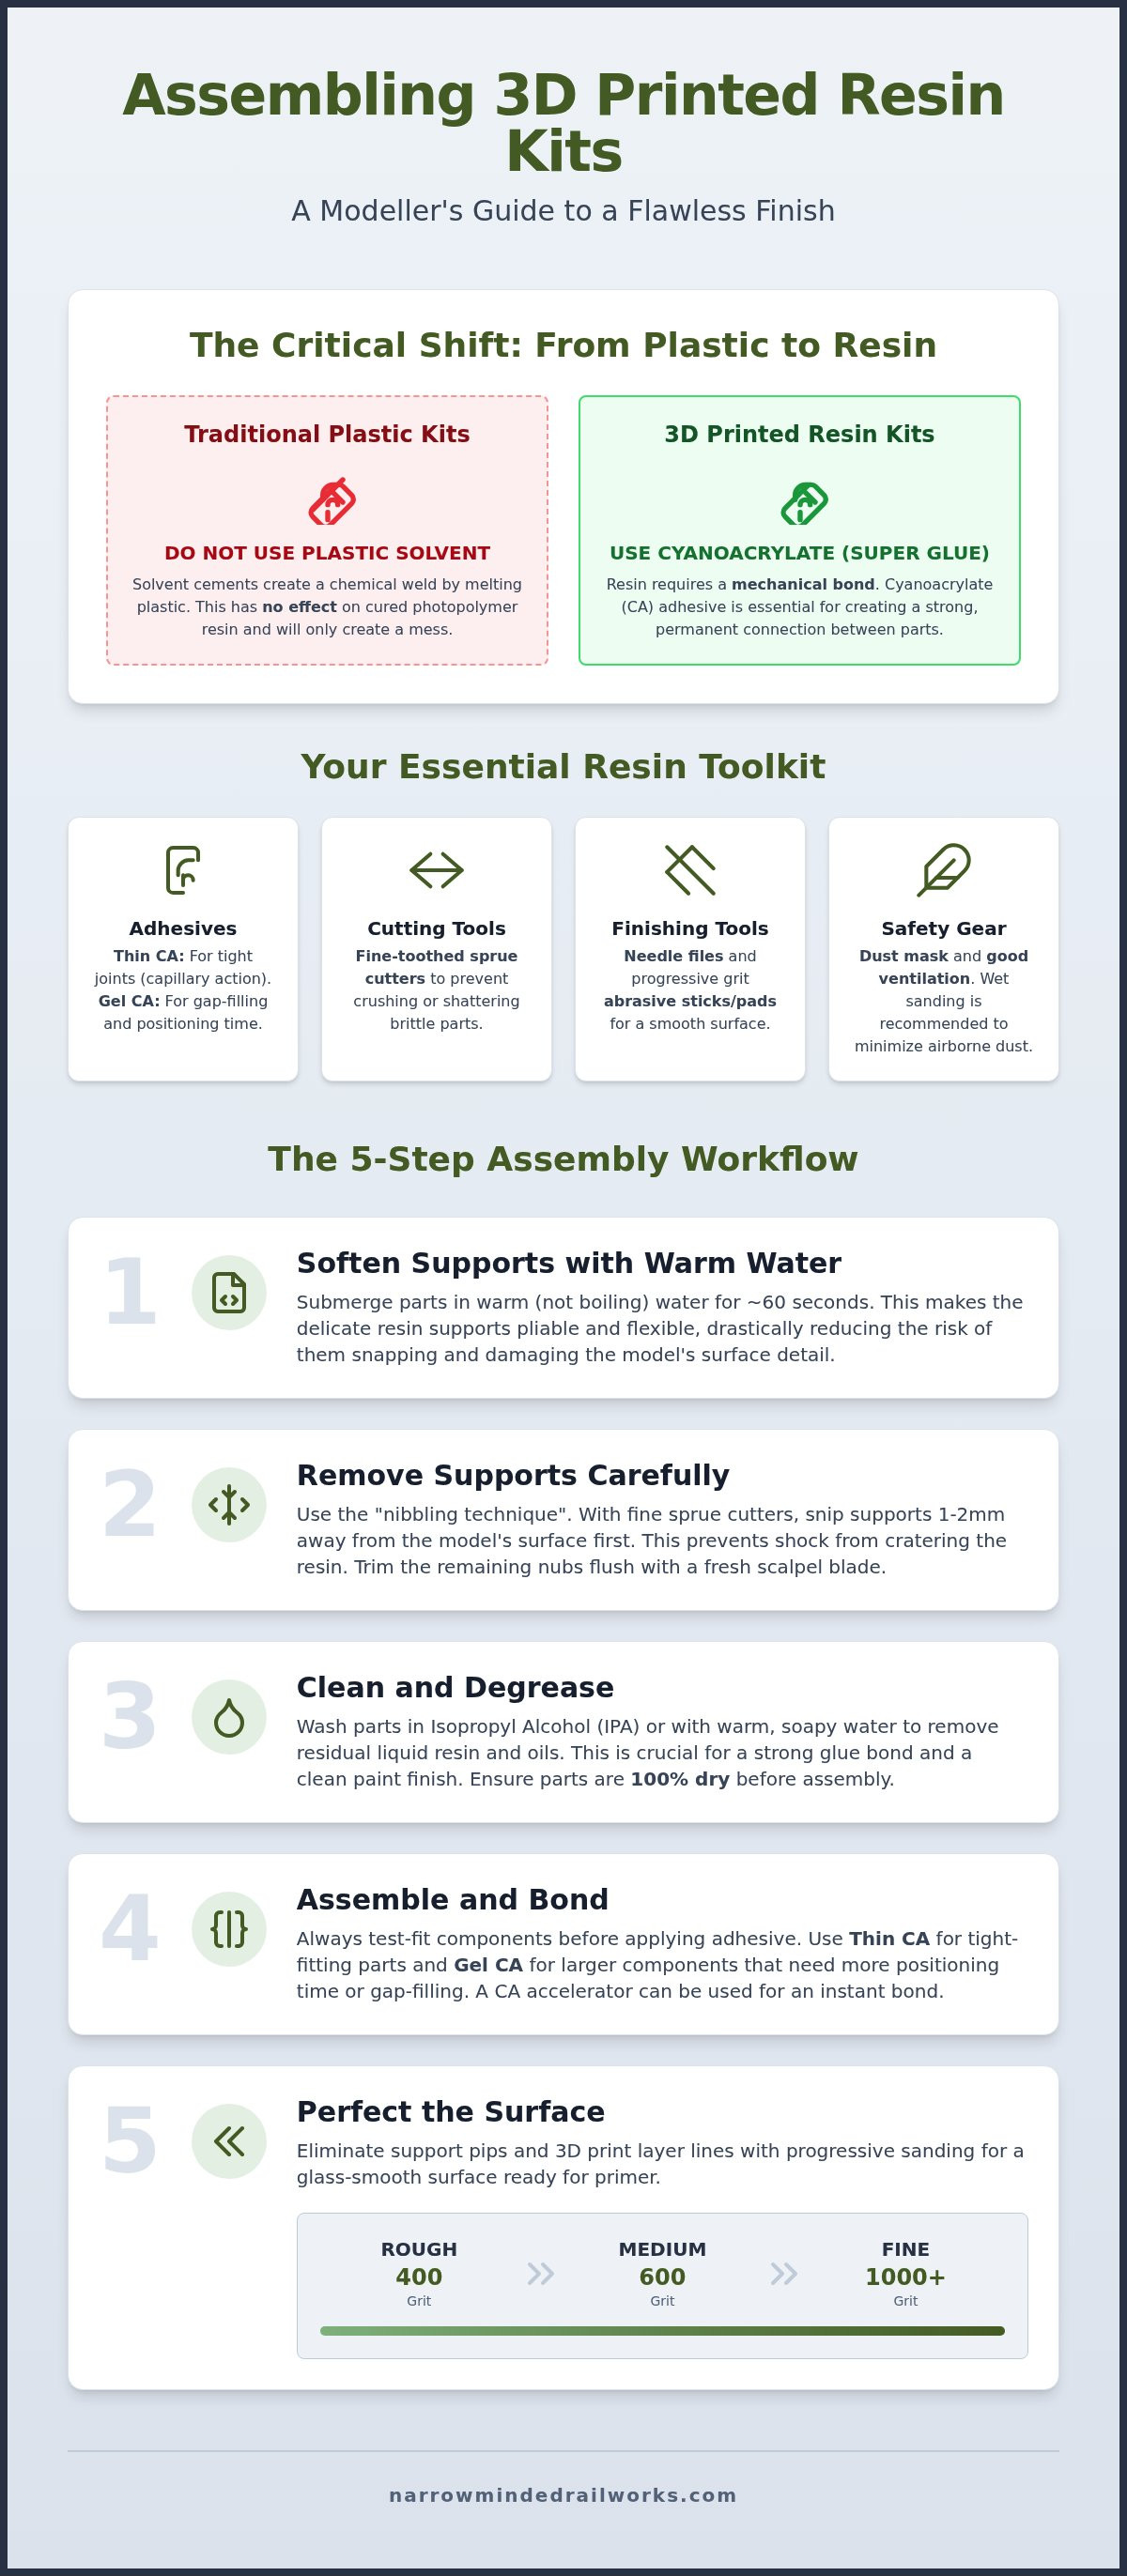
Traditional modellers often rely on liquid poly or solvent cements that melt plastic surfaces together. While effective for polystyrene, these chemicals have no effect on the photopolymer resins used in Stereolithography (SLA) printing. Success in assembling 3d printed model railway kits depends on mechanical bonds rather than chemical welds. This requires a shift in your toolkit and safety protocols before you open your first kit bag.
Choosing the Right Adhesives
Standard solvent cement must stay in the drawer because it cannot penetrate the cured resin surface. Instead, you'll need high-quality Cyanoacrylate (CA), commonly known as super glue. I recommend keeping at least two viscosities on hand. Thin CA is perfect for tight-fitting joints; its low surface tension allows it to be drawn into seams via capillary action. Conversely, Gel CA provides the gap-filling properties and longer positioning times necessary for larger structural components like wagon floors or locomotive cabs. While CA dries quickly, a spray of accelerator provides an instant set. This is particularly helpful when holding awkward parts in alignment for narrow gauge models.
The Modeller’s Toolkit for Narrow Gauge
Resin parts are naturally more brittle than injection-moulded plastic. You should avoid heavy-duty side cutters that might crush or shatter delicate components. Instead, use fine-toothed sprue cutters designed for high-precision work. To ensure a professional finish, you'll also need a selection of needle files and abrasive sticks. Start with a medium grit to remove support pips and finish with fine abrasive pads. Using the right diorama tools and scenery accessories will help you maintain a clean workspace and precise alignment during the build.
Safety is a non-negotiable part of the process. While cured resin is safe to handle, the fine dust produced during sanding can be an irritant. A high-quality dust mask and a well-ventilated area are essential requirements for any workshop. I also suggest using wet-sanding techniques where possible. This keeps the dust out of the air and prevents your abrasives from clogging. Successfully assembling 3d printed model railway kits requires a clean environment to ensure that airborne particles don't compromise the final paint finish.
For modellers who take their workshop infrastructure seriously, particularly when installing air lines for spray booths or pneumatic tools, you can explore Nylon 11 & 12 Flexible Tubing to find reliable industrial-grade solutions from Abbey Extrusions.
Removing Support Structures and Cleaning Resin Parts
When you first unbox a new locomotive or wagon kit, it often arrives encased in a dense network of resin pillars. These supports are a functional necessity of the 3D printing process, ensuring that overhanging details don't sag during production. While this "forest" of supports can look intimidating, it's the first critical step in assembling 3d printed model railway kits. Resin is inherently brittle, so approaching these supports with the wrong technique often leads to snapped parts or surface damage.
To overcome this brittleness, use the "warm water" trick. Submerge the model in a bowl of warm, but not boiling, water for approximately sixty seconds. The heat softens the resin slightly, making the supports pliable rather than rigid. This allows them to peel away with far less force, reducing the risk of the support "plucking" a divot out of the model's skin. You must be careful to distinguish between a support and a fine detail; on narrow gauge models, items like brake pipes or lamp irons can be incredibly thin. Always study the kit's geometry before you start cutting to ensure you aren't accidentally removing a key feature.
Step-by-Step Support Removal
The "nibbling" technique involves cutting the support a millimetre or two away from the model's surface to prevent the shock of the cut from cratering the resin. Always start from the outside of the print and work your way toward the most delicate central details. This strategy reduces the overall tension on the model as the support structure becomes less rigid. Once the bulk of the material is gone, use a fresh scalpel blade to make a final flush cut against the body. This precision reduces the amount of work required during later sanding and priming techniques to achieve a smooth finish.
The Final Wash: Removing Residual Resins
Even after support removal, resin parts may feel slightly tacky or "greasy" to the touch. This is often caused by residual liquid resin or oils from the manufacturing process. A quick bath in Isopropyl Alcohol (IPA) or a gentle scrub with warm soapy water will remove these contaminants. You must ensure the model is 100% dry before you move on to bonding. Any moisture left in the recesses can prevent your Cyanoacrylate from curing properly or cause it to "bloom" with a white crust. For a more detailed look at perfecting the surface after this stage, read our specialist advice on removing support marks from 3d prints.
Taking the time to clean your parts thoroughly ensures that your paint and glue will adhere perfectly. If you are looking for your next challenge, why not browse our latest OO9 locomotive kits designed specifically for the UK modeller.
Structural Assembly: Fitting Chassis and Heavy Components
While injection-moulded plastic kits often promise a "snap-fit" experience, the reality of assembling 3d printed model railway kits is more nuanced. Resin prints may require minor manual adjustments, or "fettling," to accommodate commercial chassis from brands like Kato or Bachmann. While this extra step might seem like a constraint, it allows for a much tighter, more professional fit than generic plastic parts. You can achieve this by incrementally sanding the internal mounting blocks until the chassis slides into place without force. Organizations like the University of Huddersfield 3D Printing Society highlight how these technical refinements are a core part of the modern 3D printing workflow.
Weighting is another critical consideration for any narrow gauge build. Resin is significantly lighter than die-cast metal, which can lead to poor traction on steep gradients or uneven track. You'll need to identify hollow spaces within the boiler, side tanks, or even the coal bunker to hide lead shot or tungsten putty. Securing this weight as low as possible ensures a better centre of gravity and improved running qualities. Always test the clearances for wheels and coupling rods after adding weight to ensure nothing interferes with the mechanical movement of the chassis.
Aligning the Locomotive Body
Dry-fitting every component before you apply a single drop of glue is the most important rule of structural assembly. You should place the body on a flat piece of glass or a dedicated track jig to ensure it sits level. If you notice a slight wobble, it's usually due to a support mark on the underside rather than a warped print. However, if minor warping is present, you can carefully submerge the part in warm water to gently reshape it. Once perfectly aligned, use small clamps to hold the body in position while your adhesive sets.
Couplings and Buffers
Narrow gauge modelling requires precise coupling heights to ensure reliable operation on tight curves. When fitting couplings to your kit, refer to our quarry hunslet coupler guide for specific mounting instructions. High-stress areas, such as buffer beams and coupling mounts, often benefit from a small dab of two-part epoxy resin. While CA is excellent for general assembly, epoxy provides the shear strength needed to withstand the constant pulling and pushing of a heavy mineral train during an exhibition.
Surface Preparation: Sanding and Priming Techniques
A raw resin print often looks deceptively smooth until the first coat of paint reveals a "hidden layer" of topographical print lines. While modern SLA technology produces incredibly fine detail, the nature of the layering process means that some micro-texture is inevitable. When assembling 3d printed model railway kits, successful surface preparation is the difference between a model that looks like a toy and one that looks like a professional scale replica. You can overcome these surface imperfections by using a high-build primer, which acts as a micro-filler for the tiny valleys between layer lines.
The secret to a glass-smooth finish lies in progressive sanding. You should start with a 400-grit abrasive to remove the remnants of support pips, then move to 600-grit for general smoothing. Finally, a 1000-grit polish will prepare the surface for its base coat. While it's tempting to sand aggressively, you must be careful not to erode the delicate rivet detail or door hinges designed into the locomotive body. If you find deep print lines in a conspicuous area, apply a tiny amount of automotive filler or thick primer with a brush before sanding it back flush.
The Art of Wet Sanding
Resin is sensitive to friction, and dry sanding can quickly lead to heat buildup that softens the material or clogs your sandpaper. Wet sanding is a proactive solution that keeps the surface cool and prevents micro-dust from entering the air. To identify low spots that require more attention, apply a "guide coat" of a contrasting paint colour. When you sand the surface, the paint will remain in the low spots, clearly showing you where the layer lines are still present. Once you're satisfied, clean the model thoroughly in warm water to ensure no abrasive grit remains in the corners.
Priming for Success
Choosing the right primer colour is essential for your final livery. A grey primer is the most versatile for narrow gauge models, while white is better for vibrant liveries and black works well for steam locomotives to provide natural shadows in the recesses. You should apply several light "mist" coats rather than one heavy layer. This prevents the paint from pooling and obscuring the fine details you worked so hard to preserve. For a deeper look at the next stage of your build, refer to our specialist guide on painting 3d printed models.
Mastering these techniques ensures that your finished locomotive looks right at home on a high-fidelity layout. If you're ready to start your next project, browse our range of GN15 locomotive kits designed for a professional finish.
Troubleshooting and Final Assembly Details
Accidents are a reality of the hobby, especially when handling the fine-scale details found on UK narrow gauge models. If a component snaps during the final stages of assembling 3d printed model railway kits, you can achieve an invisible repair by using a needle-point applicator with thin CA. Simply hold the parts in alignment and allow the glue to wick into the fracture via capillary action. Once set, a gentle polish with a fine abrasive stick ensures the joint disappears entirely under the final coat of varnish. This proactive approach saves a build that might otherwise be destined for the scrap heap.
For cab glazing, standard super glue is unsuitable because the fumes will permanently fog the clear material, a process known as blooming. A better solution is to use a dedicated canopy glue or a small amount of clear gloss varnish to secure your acetate sheets. These adhesives dry completely clear and provide enough working time to position the windows perfectly. Once the glazing is set, perform a final inspection for any "silvering" around decals or stray glue marks that might detract from the professional finish of your locomotive.
Advanced Finishing Touches
Applying decals to 3D printed surfaces requires more than just water and patience. Because resin can have a micro-texture, decals often struggle to sit flat, leading to trapped air. You should use micro sol to soften the carrier film, allowing it to conform to every rivet and panel line on the body. This creates the appearance of painted-on lettering. You might also consider replacing certain resin details, like long handrails, with fine brass wire to improve the model's durability during operation.
Maintenance and Longevity
Resin models are professional-grade replicas rather than toys, and they require specific care to ensure they last for years on your layout. While modern photopolymers are stable, prolonged exposure to direct sunlight can cause UV degradation, leading to increased brittleness or even warping over time. Storing your models in a dust-free, dark environment when they aren't on the tracks is the most effective way to maintain their structural integrity. When handling your locomotives, always lift them by the chassis or the strongest part of the body to avoid putting pressure on delicate cab roofs, chimneys, or whistles.
Ready to put these skills into practice? Explore our range of OO9 locomotive and wagon kits to start your next project.
Master Your Next Narrow Gauge Build
Transitioning from ready-to-run models to bespoke kits represents a significant step in your modelling journey. While the unique properties of resin require a shift in your workshop habits, the results speak for themselves. By replacing solvent cements with high-quality Cyanoacrylate and adopting the warm water removal technique, you protect the fine rivet details that make narrow gauge locomotives so distinctive. The process of assembling 3d printed model railway kits is ultimately about patience and precision; specifically, using progressive sanding to achieve a professional surface ready for the paint shop, a level of technical excellence also championed by innovators like Neil Banerjee.
At Narrow Minded Railworks, we understand these challenges because we are modellers ourselves. Our professional-grade resin prints are specifically designed for easy integration with commercial chassis, ensuring your project runs as well as it looks. Whether you are building for a diorama or a working layout, we offer worldwide shipping for all our locomotive and wagon kits to support enthusiasts everywhere.
Ready to apply your new skills? Browse our latest 3D printed narrow gauge kits and start creating your next masterpiece today. We look forward to seeing your finished models on the track.
Frequently Asked Questions
What is the best glue for 3D printed model railway kits?
Cyanoacrylate (CA), commonly known as super glue, is the only effective adhesive for resin components because standard solvent cements cannot melt the material to form a bond. Using a variety of viscosities allows for better control during assembly. Thin CA is ideal for tight seams via capillary action, while gel versions offer the positioning time needed for larger structural parts. Always ensure the surfaces are clean to achieve the strongest possible mechanical connection.
Can I use standard model railway paint on 3D printed resin?
You can use standard acrylic or enamel hobby paints once the resin has been properly primed. While resin is a versatile material, paint often fails to adhere to the smooth surface without a high-quality primer to act as a "key." Applying a dedicated plastic or automotive primer creates a stable base for your chosen livery. This ensures a professional finish that withstands regular handling on your layout without flaking or peeling.
How do I remove the visible "steps" or layer lines on my 3D print?
Removing visible layer lines requires a combination of high-build primer and progressive wet sanding. While the layering process is a natural constraint of 3D printing, you can smooth these "steps" by starting with 600-grit and moving up to 1000-grit abrasives. This systematic approach eliminates texture without eroding fine rivet detail. A final coat of primer will reveal if any further sanding is necessary before you apply the final base coat.
Are 3D printed kits more fragile than traditional plastic kits?
Resin parts are generally more brittle than traditional injection-moulded plastic, making them susceptible to snapping if dropped or forced. Although this is a material constraint, it allows for a much higher level of detail than standard plastic kits. You should handle these models by the chassis or the thickest part of the body. Storing them in a secure, UV-protected environment prevents the resin from becoming excessively brittle over several years.
Do I need to wash my 3D printed kit before I start building?
Washing your kit is a vital step because residual liquid resin or manufacturing oils can prevent adhesives and paint from bonding properly. You should gently scrub the parts in warm, soapy water using a soft toothbrush to reach into the corners. After rinsing, allow the components to air dry completely. This simple preparation ensures that your work when assembling 3d printed model railway kits isn't compromised by invisible surface contaminants.
What chassis do I need for Narrow Minded Railworks OO9 kits?
Our OO9 kits are specifically designed to fit commercially available chassis from brands like Kato, Bachmann, and Tsugawa. While we don't sell the motors ourselves, each kit description specifies which chassis is required for a perfect fit. Most designs utilize the Kato 11-103 or 11-109 power units. You may need to perform minor sanding on the internal mounting blocks to achieve the exact clearance needed for your specific unit.
How do I fix a part that has snapped off a 3D printed locomotive?
You can repair snapped resin parts by using thin Cyanoacrylate to wick into the fracture. If a small detail like a lamp iron breaks off, hold it in place with tweezers and apply a tiny drop of glue to the joint. Once cured, you can gently sand the area to remove any excess adhesive. This technique results in a repair that is virtually invisible once the model has been repainted and finished with a matt varnish.
Is it possible to drill into 3D printed resin for adding handrails?
It is entirely possible to drill into 3D printed resin for adding handrails or vacuum pipes. Since resin is harder than polystyrene, you should use a sharp HSS drill bit in a manual pin vice rather than a high-speed power tool. Applying too much pressure can cause the material to crack, so proceed slowly with light, steady rotations. This allows you to add fine wire-work that significantly increases the durability and realism of your model.