

What if you could build a fully operational narrow gauge locomotive for less than the cost of a single ready-to-run coach? While a standard RTR steam engine currently retails for an average of £165, many modellers feel priced out before they even buy their first piece of flexitrack. It's a common frustration; you want the charm of the Lynton and Barnstaple Railway without the eye-watering investment. Finding affordable oo9 kits shouldn't feel like a gamble, yet the fear of choosing the wrong chassis or ruining a delicate 3D print stops many from trying. You deserve a unique layout that doesn't require a massive financial commitment.
We agree that the high cost of entry is the biggest hurdle for new narrow gauge enthusiasts. This article will show you how to source and build a high-quality locomotive for under £60, ensuring you get a bespoke engine for a fraction of the retail price. We'll break down the best 3D printed bodies available today, identify exactly which £25 motorized chassis you need for a perfect fit, and provide a clear finishing guide to guarantee a professional result on your very first attempt.
Key Takeaways
- Understand the significant cost savings of kit-building versus ready-to-run models, especially as retail prices for new locomotives often exceed £120.
- Learn how to select the perfect N-gauge donor chassis to power your affordable oo9 kits without compromising on running quality.
- Follow a transparent budget breakdown to see how you can complete a bespoke, high-quality OO9 locomotive for under £60.
- Master practical assembly skills, including the best methods for cleaning 3D printed resin and removing support marks for a professional finish.
- Explore a range of unique locomotive and wagon designs specifically engineered to help you build a distinctive narrow gauge layout on a realistic budget.
What Makes OO9 Kits the Most Affordable Entry to Narrow Gauge?
Narrow gauge modelling has shifted from a niche, expensive pursuit into one of the most accessible areas of the hobby. At its core, OO9 scale involves modelling 2-foot and 2-foot-3-inch prototype railways using a 4mm scale (1:76) body that runs on 9mm N-gauge track. This OO9 scale and gauge combination allows modellers to recreate the charm of the Ffestiniog or Welshpool and Llanfair Light Railway without needing a massive spare room. By 2026, the market has seen a surge in interest as enthusiasts look for ways to maintain their hobby during rising living costs.
The price gap between different purchasing methods has never been wider. In early 2026, a standard ready-to-run (RTR) small steam locomotive from major manufacturers frequently exceeds £120, with some highly detailed models reaching closer to £180. These prices reflect the complex assembly and global logistics costs that large brands face. For many, these figures are a barrier to entry, but affordable oo9 kits provide a viable alternative that doesn't sacrifice detail for price.
To better understand how these budget-friendly options are changing the hobby, watch this helpful video:
The democratization of narrow gauge modelling is largely thanks to 3D printing technology. Since 2024, the number of independent designers selling high-quality resin bodies through online hobby marketplaces and specialized designer websites has grown by approximately 25 percent. These designers don't have the overheads of large factories, allowing them to sell locomotive bodies for as little as £20 to £35. This shift means you're no longer restricted to what the "big three" decide to produce; you can model obscure industrial shunters or unique rural prototypes for a fraction of the cost.
The real secret to professional results on a budget is the "Body-on-Chassis" concept. Instead of building a complex metal chassis from scratch, you buy a reliable, mass-produced N-gauge chassis, often from brands like Kato or Graham Farish. You then fit a specialized OO9 kit body over the top. It's a plug-and-play approach that ensures your locomotive runs smoothly from day one. Using affordable oo9 kits in this way removes the frustration of traditional kit-building while keeping the total project cost manageable.
Why Narrow Gauge Modelling is Growing in 2026
Space is at a premium in UK homes, and the 9mm track used in OO9 allows for incredibly tight 9-inch radius curves. You can fit a complete, characterful layout on a 4-foot shelf or even a small coffee table. The charm of industrial themes, such as slate quarries or timber lines, offers a creative freedom that standard mainline modelling often lacks. Community support has also hit an all-time high, with forums and social media groups providing instant troubleshooting for new builders.
Kits vs. Ready-to-Run: The Real Cost Difference
When you buy RTR models from Peco, Bachmann, or Heljan, you're paying for convenience and a warranty. Typical costs for these models sit between £130 and £190. In contrast, a kit-built alternative involves three main costs: the 3D-printed or plastic body (£25), a donor chassis (£25), and a few pounds for paint and couplings. While a standard RTR locomotive averages £150 in the current market, a resourceful modeller can complete a high-quality kit build for just £55. This represents a 63 percent saving, allowing you to triple the size of your locomotive fleet for the same investment.
Choosing the Best Affordable Chassis for Your OO9 Kit
The secret to building affordable oo9 kits lies in the hidden mechanics beneath the resin or plastic body shell. Since OO9 models represent narrow gauge prototypes running on 9mm track, the N-gauge market provides a ready-made supply of reliable power units. This cross-compatibility means you don't need expensive, bespoke narrow gauge motors to get a train moving. Most modellers start by looking at N-gauge donors because they offer mass-produced reliability at a fraction of the cost of hand-built brass alternatives.
For those new to the hobby, The 009 Society offers extensive archives and community wisdom on which N-gauge engines fit specific narrow gauge prototypes. This collective knowledge is vital when you're trying to match a specific 3D-printed shell to a working motor. By using a standard N-gauge chassis, you ensure your locomotive can handle standard 9mm points and trackwork without specialized adjustments.
Kato Chassis: The Budget Modeller’s Secret Weapon
The Japanese manufacturer Kato produces what many consider the "Gold Standard" for entry-level modelling. The Kato 11-103 (four-wheel) and the 11-109 or 11-110 (bogie) units are legendary for their smooth slow-speed running. As of early 2026, these units typically retail between £18 and £25 at UK specialist shops. Their compact size makes them the default choice for 80% of 3D-printed bodies available on the market today. You'll find that most designers explicitly state their kits are "designed for the Kato 11-103," making the assembly process a simple click-fit task that requires no complex tools.
Beyond Kato, UK modellers often turn to Bachmann and Graham Farish. The Graham Farish Class 03 or 04 diesel chassis is a popular donor for larger industrial narrow gauge locomotives. While these are often more expensive than Kato units, they provide a heavier, more robust feel that suits "mainline" narrow gauge operations. You can often find these for £45 to £60 on the second-hand market, offering a significant saving over buying a brand-new locomotive just to strip it for parts.
Alternative Donors and Second-Hand Savings
If you're willing to do a bit of "bash-modelling," older N-gauge steam locomotive chassis can be repurposed for your affordable oo9 kits. Look for older Minitrix or Lima models on eBay. When buying used chassis to ensure reliability, look for these specific indicators:
- Minimal carbon buildup on the motor commutator.
- Clean wheel treads with no deep pitting or "arcing" marks.
- Original packaging, which often suggests the previous owner maintained the model.
Sourcing these parts requires a mix of patience and strategy. While new Kato units are available from major UK retailers, eBay remains the primary source for discontinued Graham Farish donors. If you find yourself graduating to larger scales after mastering narrow gauge projects, you might want to explore the GN15 chassis guide for advice on using 16.5mm power units in larger scales.
Reliability is the most important factor when choosing a donor. A cheap chassis that stalls on every point will quickly ruin the fun of your layout. Focus on units with all-wheel pickup and a proven track record in the community. If you're ready to start your first build, you can browse our latest locomotive shells to see which chassis they require for a perfect fit.
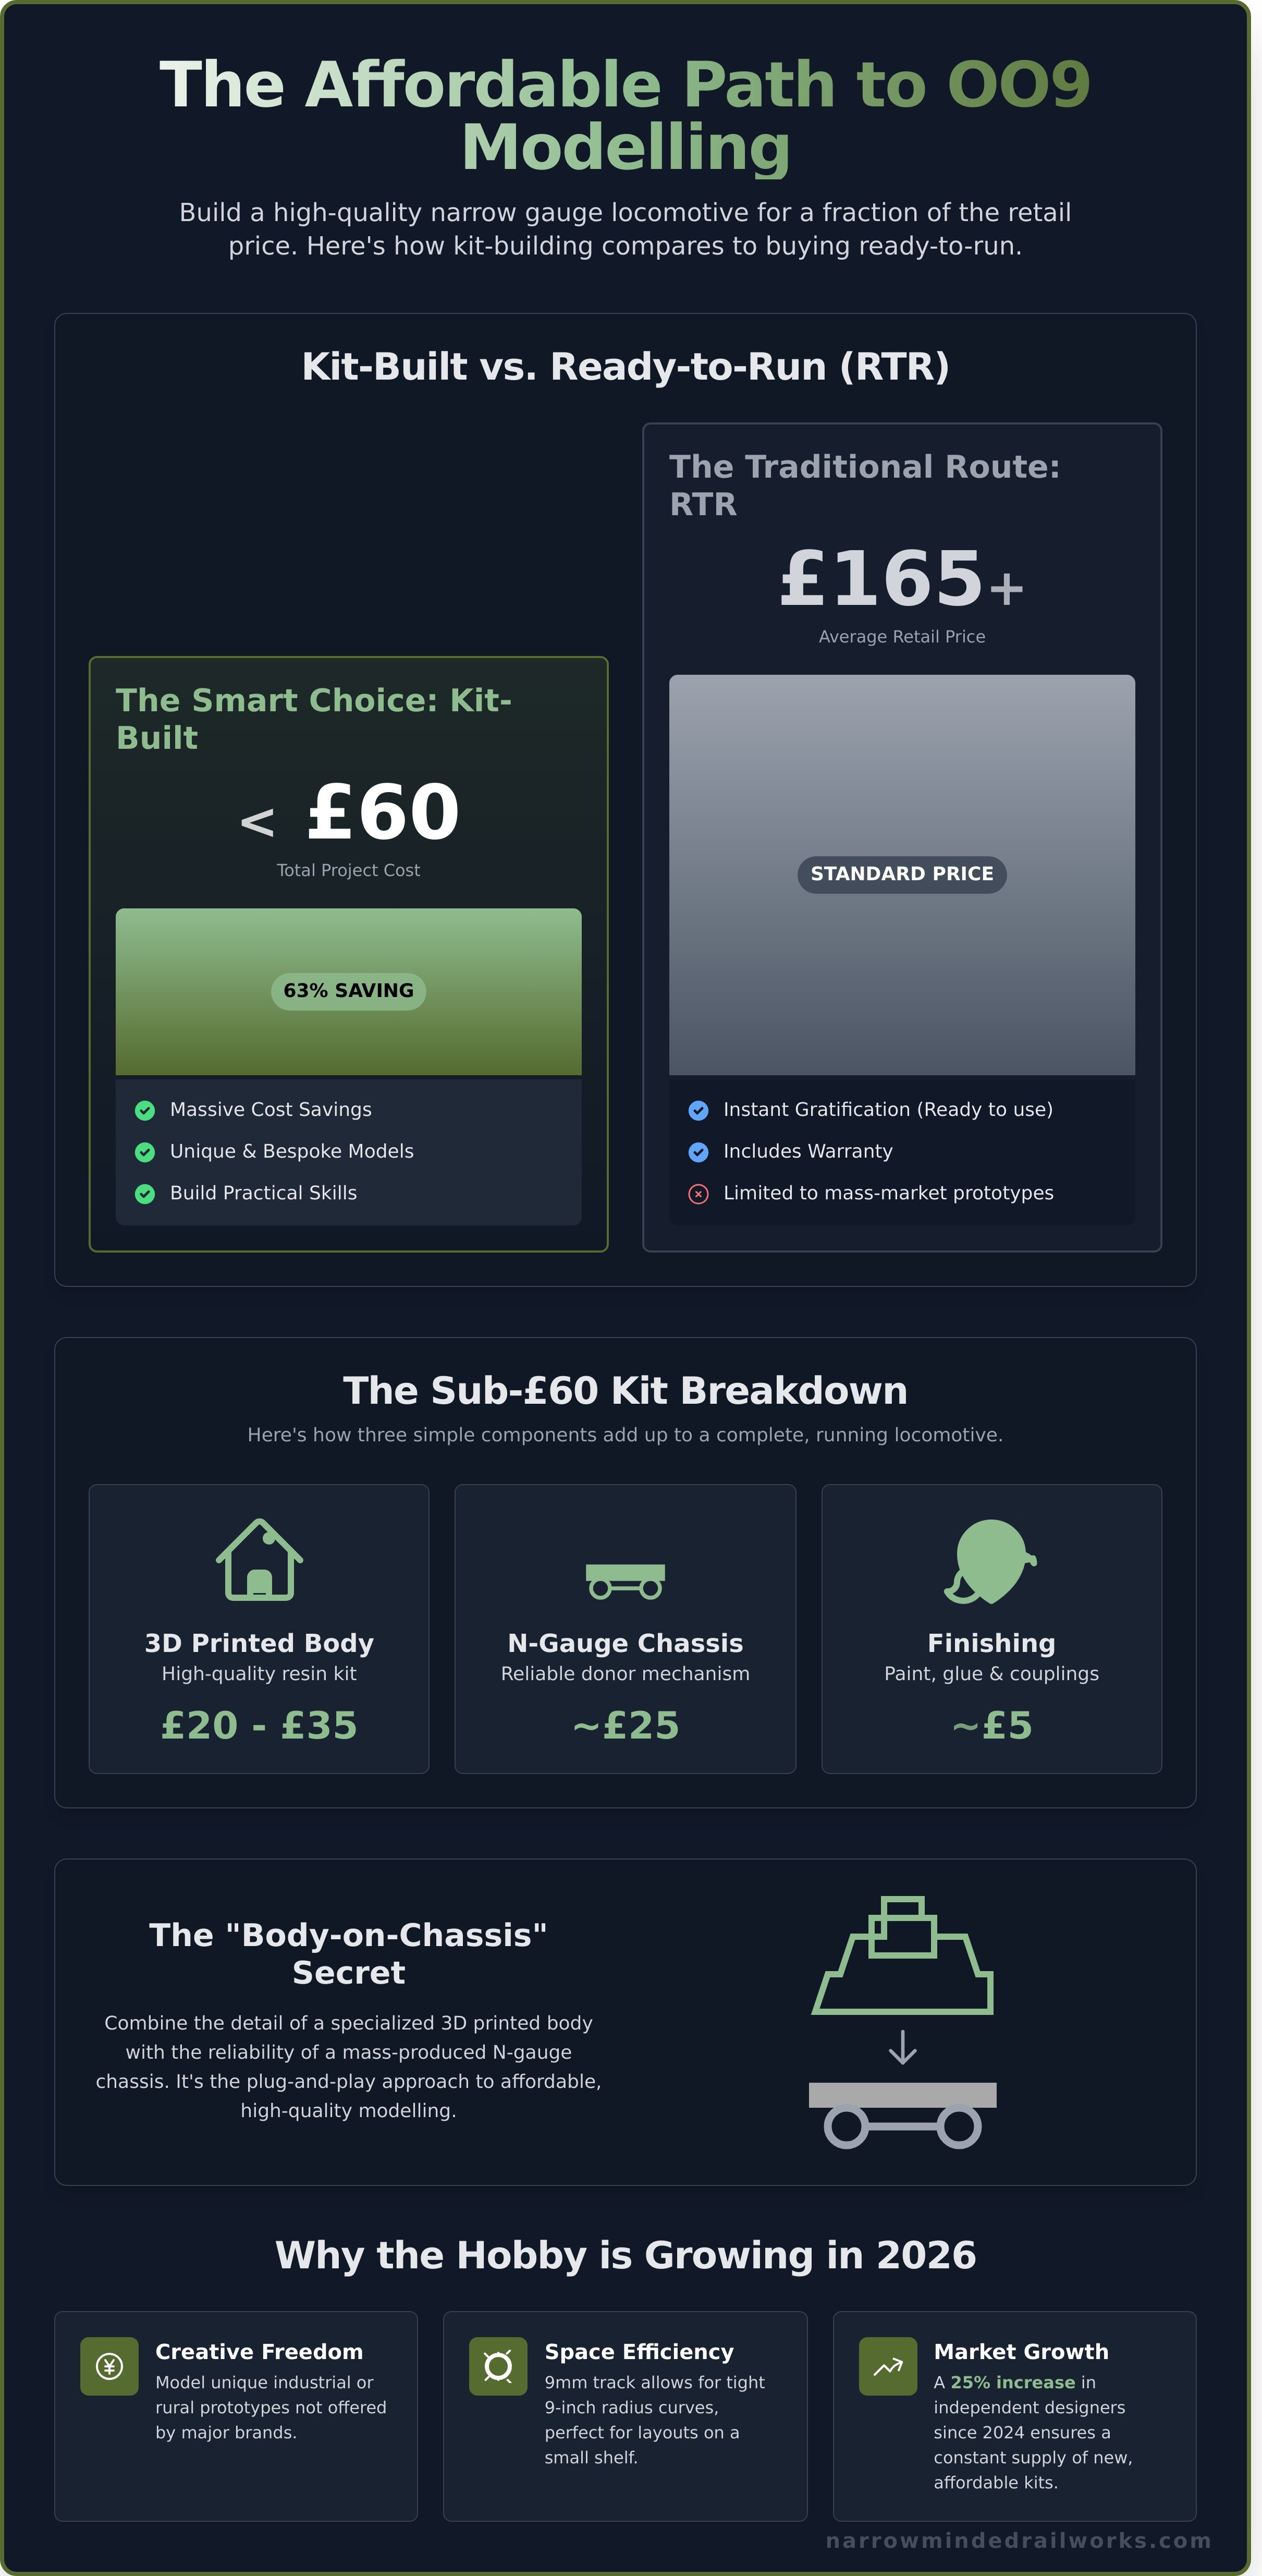
Cost Analysis: Building an OO9 Locomotive for Under £60
Many hobbyists assume narrow gauge modeling requires a massive investment, but you can build a high-quality locomotive for less than the cost of a standard dinner out. By sourcing affordable oo9 kits and pairing them with reliable Japanese chassis, you'll bypass the high entry price of ready-to-run (RTR) models. A typical RTR locomotive now retails between £120 and £180. You can achieve similar or better results for a 55% saving if you're willing to handle the assembly yourself. This financial flexibility lets you expand your roster without draining your bank account.
Connecting your model to history is easier when you study the collections at the Narrow Gauge Railway Museum, where real-world dimensions help you refine your kit’s proportions. These historical prototypes often featured rugged, utilitarian designs that are surprisingly simple to replicate in miniature. Kit-built models also offer a distinct advantage in longevity. While mass-produced plastics can become brittle or suffer from gear fatigue over 10 years, a kit built with a reputable donor chassis and a resin or white metal body is often easier to repair and maintain.
The Budget Build Shopping List
Creating a functional engine requires three main components. First, you need a locomotive body kit. These typically cost between £20 and £30 from independent 3D printing designers. Second, you'll need a donor chassis. The Kato 11-103 or 11-109 N-gauge power units are industry standards, usually priced between £15 and £25 depending on the retailer. Finally, factor in £5 to £10 for paint and finishing supplies. While a tin of Humbrol enamel costs around £3.00, you only use a fraction of it per model, meaning the amortized cost is very low.
You likely already own the primary tools needed for these affordable oo9 kits. A standard craft knife, a set of tweezers, and a small file are sufficient for most builds. You'll only need to invest in specialist supplies like cyanoacrylate (super glue) or a specific primer if they aren't already in your workshop. This approach ensures your initial £60 budget stays focused on the model itself rather than expensive equipment.
- Body Kit: £24.00 (Average 3D printed resin)
- Power Chassis: £19.50 (Kato 11-103)
- Adhesives and Paint: £7.50 (Pro-rated)
- Total: £51.00
Scaling Up: Building a Full Train on a Budget
Once your locomotive is complete, you'll need rolling stock. Choosing 3D printed bodies over ready-to-run wagons can save you £15 per vehicle. A 3-wagon train can be built for under £40 by combining 3D-printed bodies with Peco bogies. Using Peco GR-102 style bogies is the most cost-effective method for scratch-building or kit-bashing your fleet. These units provide smooth running for roughly £6 per pair, allowing you to focus your remaining funds on detailing and weathering. This strategy lets you build a complete, realistic narrow gauge consist for less than the price of a single premium locomotive from a major manufacturer.
Practical Guide: Assembling and Finishing Your First OO9 Kit
Building your first model from a selection of affordable oo9 kits is a rewarding milestone for any narrow gauge modeller. The transition from a box of grey resin parts to a weathered, characterful locomotive requires patience and a specific sequence of tasks. Prep work accounts for about 70% of the final quality, so don't rush the initial stages.
Begin by inspecting your parts under a bright lamp. 3D printed resin can sometimes have a slight oily residue from the manufacturing or cleaning process. Wash every component in warm, soapy water and let them air dry completely. This simple 10 minute step ensures your paint won't peel away later. Look for support "nibs," which are the small bumps where the print was attached to its printing frame. These are inevitable in the 3D printing process but easy to manage.
Removing these marks is a delicate process that requires a light touch. Use a fresh scalpel blade to flick off the larger bits, then follow up with 600-grit and 1000-grit sanding sticks. Work in a circular motion to avoid creating flat spots on curved boilers or cab roofs. If you find a stubborn print line, a tiny smear of Humbrol Model Filler will smooth it out before you reach for the primer. Resin is more brittle than injection-moulded plastic, so support the part from behind while sanding to prevent snaps.
Finishing 3D Prints Like a Pro
Achieving a realistic finish starts with a high-quality primer. Tamiya Surface Primer is the industry standard because it's thin enough to preserve rivet detail but thick enough to hide 0.05mm layer lines. Once the primer is dry, use dry-brushing techniques with acrylics to highlight edges and hide minor imperfections. For a comprehensive guide on advanced textures, see our tips for Finishing 3D Printed Kits to perfect your technique.
Troubleshooting Common Kit Issues
When working with affordable oo9 kits, a common hurdle is ensuring the locomotive sits level on its chassis. A 1mm tilt can cause frequent derailments on tight 9-inch radius curves. If the fit is tight, use a needle file to gently open the aperture rather than forcing the parts together. Weight is your best friend here. Adding 15 grams of lead shot or tungsten putty inside the tanks can increase your locomotive's traction by up to 35% on steep gradients. Use a tiny drop of 5-minute epoxy for structural bonds. It remains slightly flexible, unlike brittle superglue which might snap if the loco is bumped during a session.
When it's time to marry the body to the chassis, consider a friction fit or using small blobs of adhesive putty first. This allows you to remove the motor and gears for maintenance or oiling without breaking a permanent glue bond. If the kit requires a permanent fix, apply your adhesive sparingly to the hidden underside of the footplate to keep the exterior clean.
Narrow Minded Railworks: Your Partner in Affordable Modelling
Narrow gauge modelling shouldn't be a luxury hobby reserved for those with massive budgets. At Narrow Minded Railworks, we built our business on the belief that characterful, unique designs can be accessible to everyone. Our range focuses on providing affordable oo9 kits that allow you to build a prototypical or freelance fleet without spending hundreds of pounds on brass or white metal alternatives. Since our founding in 2021, we've focused on 3D printing technology to bypass the high costs of traditional injection moulding. This lets us experiment with quirky industrial designs and obscure prototypes that larger manufacturers simply won't touch.
Our current catalogue features over 48 distinct locomotive bodies and a growing collection of rolling stock. You'll find everything from tiny quarry hunslets to robust diesel shunters. Most of our wagon kits start at just £12.00, while locomotive body shells typically range between £24 and £38. Because we use high-resolution 8K and 12K resin printers, the level of detail is incredibly sharp. You get crisp rivets, clear planking lines, and realistic textures straight out of the box. This technology allows us to release a new design every 30 days, ensuring there's always something fresh for your layout.
We operate from our workshop in the UK, but we ship our kits to enthusiasts across the globe. For domestic modellers, standard shipping via Royal Mail starts at £3.95. International customers in Australia, the US, or Europe can expect tracked delivery to reach them within 10 to 15 days. We pack every order with recycled materials to keep costs down and reduce our environmental footprint. This direct-to-consumer model means you aren't paying for middleman markups or expensive retail storefronts. It's a straightforward way to grow your collection without the financial sting usually associated with niche scales.
Why Our Kits Stand Out
We design our locomotive bodies to fit specific, readily available chassis like the Kato 11-103, 11-109, or the Bachmann 0-6-0. This eliminates the need for complex gearbox assembly or expensive custom power units that can cost over £100. Our 3D prints require minimal cleanup. You can often move from opening the box to applying primer in under 25 minutes. If you get stuck, you can message the designer directly for technical advice on your specific build.
Start Your Narrow Gauge Journey Today
If you're new to the scale, our starter kits provide the perfect entry point. These bundles include the body shell and all necessary detail parts to get you running quickly. Our affordable oo9 kits are designed to be forgiving for beginners while offering enough detail for seasoned modellers to enhance. Join our active social media community to see how over 1,500 other builders have painted and modified their NMR kits. Ready to expand your roster? You can Explore our latest affordable OO9 kits today and start building something unique.
Start Building Your Narrow Gauge Empire Today
Building a high-quality narrow gauge layout doesn't require a massive budget or years of engineering experience. By pairing a reliable Kato chassis with affordable oo9 kits, you can have a fully functional locomotive running on your tracks for under £60. This approach simplifies the assembly process, making it accessible for modellers who want professional results without the premium price tag often found in ready-to-run models. It's the most practical way to expand your roster while keeping costs under control.
Narrow Minded Railworks offers over 100 unique narrow gauge designs specifically engineered for easy assembly on Kato power units. Whether you're a beginner or a veteran, our kits provide the perfect balance of detail and durability. We ship worldwide from our UK base, ensuring you get the parts you need no matter where your workshop is located. It's time to stop dreaming about your layout and start creating it with tools designed for your success.
Browse our range of affordable OO9 locomotive kits
You've got the skills and the plan; now get the kit that brings your vision to life.
Frequently Asked Questions
What is the cheapest way to get started in OO9?
Buying a 3D printed body shell for £15 to £25 and fitting it onto a second-hand N-gauge chassis is the most cost-effective entry point. You can often find used Graham Farish or Kato chassis for under £40 on eBay. This method allows you to build a unique locomotive for less than £70. It's significantly cheaper than buying ready-to-run models that often retail for £150 or more in 2024.
Do OO9 kits come with a motor and wheels?
Most affordable oo9 kits are "body only" and require a separate donor chassis to provide the motor and wheels. While some premium brass or white metal kits include every component, budget-friendly resin options typically rely on N-gauge power units. Always check the product description. 90% of 3D printed shells are designed specifically to clip onto Kato 11-103 or 11-109 chassis which you must buy separately.
Is OO9 the same as HOe or HOn30?
OO9 uses the same 9mm track gauge as HOe and HOn30, but the scales differ. OO9 represents 2ft narrow gauge at 4mm per foot (1:76 scale), while HOe is 3.5mm per foot (1:87 scale). Because all three use 9mm rails, you can run them on the same layout. However, an OO9 locomotive looks roughly 15% larger than its HOe counterpart when placed side-by-side on the track.
Which N-gauge chassis is best for OO9 kits?
The Kato 11-103 and 11-109 four-wheel chassis are the industry standards for small OO9 locomotives because of their £25 price point and reliability. For larger 0-6-0 engines, the Graham Farish 08 shunter chassis is a popular choice among UK modellers. These units provide smooth slow-speed running. This is essential for narrow gauge shunting operations on 9mm tracks where stalls are common.
Are 3D printed railway kits durable enough for regular use?
Modern UV-cured resins used in 2024 are highly durable and can withstand decades of regular use if handled correctly. While older resins from 2015 were prone to brittleness, current materials like "ABS-like" resin offer a 20% increase in impact resistance. These bodies won't warp under normal indoor temperatures. You should avoid leaving them in direct sunlight for more than 4 hours to prevent UV degradation.
What tools do I need to build a 3D printed OO9 loco kit?
You need a basic toolkit consisting of a fine-toothed sprue cutter, a set of needle files, and 1000-grit sandpaper. Since 3D prints don't have traditional mould lines, you'll spend about 15 minutes removing support marks. Use cyanoacrylate (super glue) for assembly, as standard plastic cement won't bond with resin. A pin vice with a 0.5mm drill bit is also useful for clearing out handrail holes accurately.
Can I run OO9 trains on standard N-gauge track?
Yes, OO9 trains run perfectly on standard N-gauge track because both systems use a 9mm rail spacing. However, N-gauge sleepers are spaced too closely for a realistic narrow gauge appearance. Most UK enthusiasts use Peco Streamline OO9 Crazy Track, which features wider sleeper spacing. This dedicated track costs approximately £5 per yard. It significantly improves the visual authenticity of your narrow gauge railway layout.
How do I paint a 3D printed locomotive body?
Start by washing the resin body in warm soapy water to remove any residual oils from the printing process. Apply a high-quality plastic primer, such as Halfords Grey Primer, in two thin coats. Once dry, you can use acrylic hobby paints like Tamiya or Vallejo. These affordable oo9 kits look best when finished with a matte varnish after your decals are set. This protects the finish from fingerprints.