

Have you ever been tempted by the huge variety of unique models available online, only to hesitate when you see they are 3D printed? If concerns about visible layer lines, questions over detail quality, or confusion about which chassis will fit are holding you back, you're not alone. The good news is that the technology has evolved at an incredible pace, and the world of high-quality 3d printed wagon bodies now offers an amazing opportunity to add rolling stock to your layout that you simply can't buy off the shelf.
This comprehensive guide will demystify the entire process. We'll help you understand the pros and cons, show you what to look for in a quality kit, and guide you on choosing a body that is compatible with your existing chassis. Most importantly, you will learn the essential skills for preparing, painting, and finishing your model to a standard that will make it a standout piece in your collection. It's time to confidently add that unique wagon you've always wanted.
Key Takeaways
- Understand the key advantages of using 3d printed wagon bodies to create a truly distinctive and personalised fleet for your model railway.
- Move beyond mass-produced models by exploring the world of unique prototypes and obscure wagons now accessible through 3D printing.
- Learn the most critical factor when selecting a kit: ensuring its compatibility with a readily available donor chassis to guarantee a successful build.
- Master the essential finishing techniques that transform a raw print into a realistic, weathered model ready for your layout.
What Are 3D Printed Wagon Bodies? A Revolution in Your Workshop
At its heart, a 3D printed wagon body is a physical object created directly from a digital design file. This technology transforms the hobby of railway modelling by allowing enthusiasts and small businesses to produce rolling stock that was previously unimaginable. Instead of being limited to mass-produced kits, you can now build that obscure, one-off prototype that ran on your favourite branch line, or even design a freelance wagon from scratch.
To see how accessible this technology has become, watch this excellent video on creating a first model:
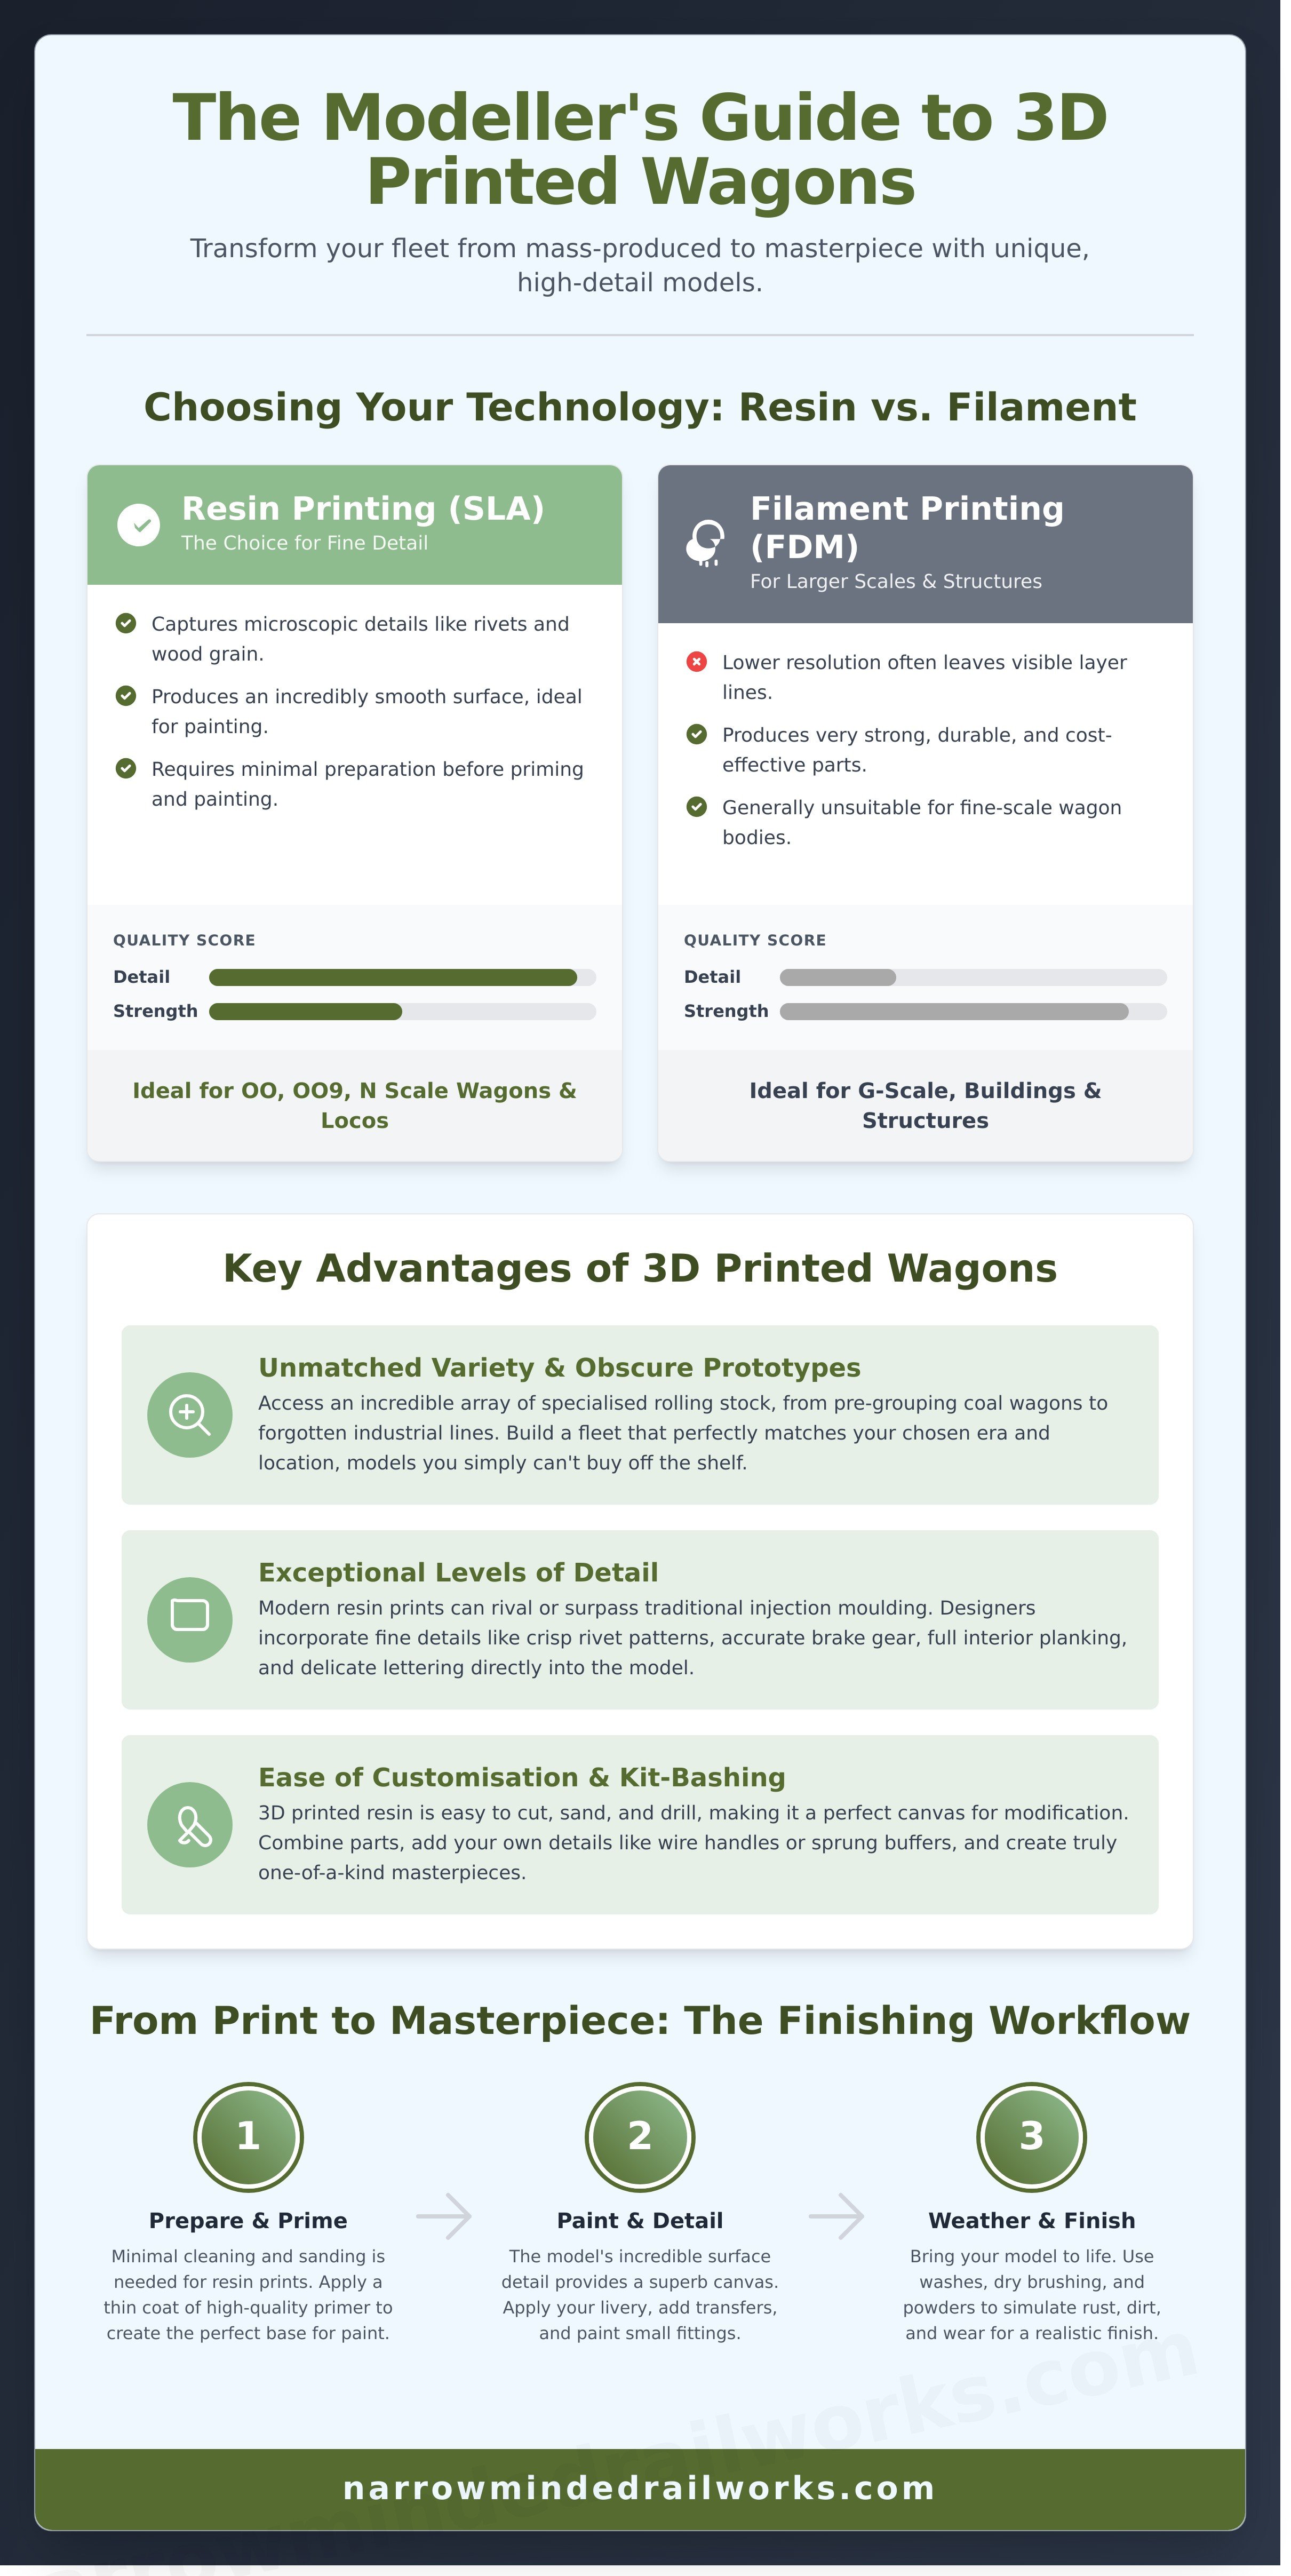
This approach stands in stark contrast to traditional injection moulding used by major manufacturers. Injection moulding requires expensive steel tooling, often costing thousands of pounds, making it viable only for large production runs of popular models. 3D printing has no such barrier, making it perfect for the niche and bespoke world of 3d printed wagon bodies. Two main technologies dominate this space, each with distinct advantages for the modeller.
Resin Printing (SLA/MSLA): The Choice for Fine Detail
This method uses a vat of liquid photopolymer resin, which is cured layer by tiny layer with a UV light source. It’s the gold standard for model railway applications because it captures incredible detail. Everything from microscopic rivets and wood grain textures to delicate lettering is rendered with crisp precision. The resulting smooth surface finish requires minimal preparation before painting, which is why most high-quality wagon kits you'll find from specialist suppliers use this technology.
Filament Printing (FDM): For Larger Scales and Structures
Fused Deposition Modeling (FDM) works by melting a spool of plastic filament and extruding it through a nozzle to build the model. While it’s often cheaper and produces very strong parts, its main drawback is the lower resolution, which can leave visible layer lines. For the fine detail required on OO or OO9 scale wagons, FDM is generally unsuitable. However, it excels in larger scales like G-scale or for producing robust scenic items like buildings, bridges, and line-side structures.
Key Advantages: Why Choose a 3D Printed Wagon?
While the shelves of model shops are filled with excellent ready-to-run stock, the world of 3D printing offers a gateway to a truly distinctive and personalised model railway. By choosing a 3D printed wagon, you move beyond the mainstream catalogue, gaining access to unique models while supporting the small, specialist suppliers who are the lifeblood of the hobby's niche interests.
Many of these specialist suppliers have become successful small businesses by selling their kits online, reaching a global community of modellers. For creators in the hobby looking to do the same, setting up a professional digital storefront with an expert partner like NB eCommerce & Design is a crucial step in turning a passion into a viable business.
Unmatched Variety and Obscure Prototypes
Have you ever wanted to model a specific pre-grouping Welsh railway or a forgotten industrial narrow-gauge line? Mainstream manufacturers often focus on the most popular prototypes, but 3D printing opens the door to an incredible array of obscure and specialised rolling stock. You can finally build a fleet of wagons that perfectly matches your chosen location and era, from early private owner coal wagons to specialised agricultural or military stock that would never justify a mass-market production run.
Exceptional Levels of Detail
Forget the coarse, layered prints of the past. Modern resin 3d printed wagon bodies can achieve a level of fidelity that rivals or even surpasses traditional injection moulding. Designers can incorporate incredibly fine details directly into the model, including:
- Crisp rivet patterns and panel lines.
- Accurate underframe components and brake gear.
- Delicate lettering and maker's plates.
- Full interior planking or load details.
This inherent detail provides a superb foundation for painting and weathering, resulting in models that look exceptionally realistic on your layout.
Ease of Customisation and Kit-Bashing
3D printed resin is an ideal medium for the hands-on modeller. It's generally easy to cut, sand, and drill, making it perfect for customisation. You can easily combine parts from different kits to create a unique 'freelance' wagon or modify a prototype to represent a specific variation. This adaptability makes them a fantastic canvas for advanced projects, and you can learn how to enhance your model railway with some great techniques and 3D prints from experts in the field. Adding your own wire grab handles, sprung buffers, or preferred coupling systems is a straightforward process that elevates a great kit into a masterpiece.
How to Select the Right 3D Printed Wagon Body Kit
Choosing your first 3D printed wagon body is an exciting step towards creating truly unique rolling stock for your layout. However, to ensure your project is a success from the start, a little bit of planning goes a long way. This guide will walk you through the key considerations, from the chassis it sits on to the format you buy it in, ensuring you get a fantastic result.
The Golden Rule: Check Chassis Compatibility First
This is the single most important step. The vast majority of 3d printed wagon bodies are sold as a 'body only' kit. This means you will need to source a separate, commercially available chassis for it to sit on. Designers create their models to be a perfect fit for specific, easy-to-find chassis from manufacturers like Peco, Kato, or Bachmann. Always check the product description for the recommended 'donor' chassis. This simple check guarantees:
- Correct ride height and coupling alignment.
- A perfect match for the wheelbase.
- An easy and secure fitting process, often with minimal modification.
Ignoring this step can lead to a model that looks out of proportion or simply won't run properly on your layout.
Choosing Your Scale: From OO9 to On30 and Beyond
It might seem obvious, but it's crucial to select a wagon body that matches the scale and gauge of your model railway. Consistency is key to a believable scene. For narrow gauge modellers, some of the most popular scales in the UK include:
- OO9: The most popular UK narrow gauge scale. It uses 4mm:1ft scale models (like OO) running on 9mm gauge track (the same as N gauge).
- On30: An American-originated scale popular here, featuring larger 7mm:1ft scale models running on 16.5mm track (the same as OO gauge).
- GN15: A more niche but characterful scale using large G-scale models on 16.5mm track to represent a 15-inch gauge railway.
Physical Kit vs. Digital STL File
When browsing for kits, you'll encounter two main options. A physical kit is a professionally manufactured resin print that is posted to you, ready for painting and assembly. This is the best route for most modellers, especially beginners, as it guarantees a high-quality, detailed part without any of the hassle of printing.
A digital STL file, on the other hand, is a file you purchase to print yourself. While this offers flexibility, it requires you to own, maintain, and successfully operate your own resin 3D printer. Factoring in the cost of the printer, resin, and the learning curve, starting with a pre-printed kit is a more reliable path to a finished model. To get started without the fuss, why not browse our range of professionally printed wagon kits?
A Beginner's Guide to Finishing Your 3D Printed Wagon
Assembling a kit is one of the most rewarding parts of the model railway hobby. The finishing process is what transforms high-quality 3d printed wagon bodies from a simple component into a realistic, layout-ready piece of rolling stock. Follow these key steps for a professional-looking result. These techniques are universal and apply to most resin model kits you'll encounter.
Step 1: Cleaning and Curing
Resin prints are created in a bath of liquid photopolymer. The first step is always to wash the print in Isopropyl Alcohol (IPA) to remove any sticky, uncured resin from the surface. Following the wash, the model is exposed to UV light to post-cure the resin, maximising its strength and durability. Fortunately, reputable suppliers like Narrow Minded Railworks perform these crucial steps before dispatch, meaning your model arrives clean, cured, and ready to work on.
Step 2: Support Removal and Sanding
Your print will have small, scaffold-like structures called supports, which are a necessary part of the printing process. Carefully snip them away from the body using a pair of sharp hobby clippers or a craft knife. Any small marks or pips left behind can be gently smoothed with fine-grit sanding sticks or paper. The goal is a perfectly smooth surface, creating an ideal canvas for primer and paint.
Step 3: Priming and Painting
A thin coat of primer is essential for resin models; it ensures your paint adheres properly and provides a uniform base colour. A light grey or white spray primer is ideal as it helps all the fine details stand out. Once primed, you can apply your chosen livery colours. An airbrush will give a smooth, even finish, while fine paint brushes are perfect for picking out small details. We recommend using acrylic model paints for their ease of use and quick drying times.
Step 4: Decals and Weathering
This final stage is where you add true character and realism to your wagon. Apply waterslide decals for authentic lettering, numbering, and branding according to your chosen prototype. To take your model from a factory-fresh look to an in-service appearance, use weathering powders and washes to simulate dirt, rust, and daily wear. A final spray of matt varnish will seal and protect all your hard work, completing your 3d printed wagon and making it ready for the layout.
Embrace the Future of Your Model Railway
The world of model railways has been transformed by 3D printing, offering an unprecedented level of detail and access to unique prototypes that were once out of reach. As we've explored, from selecting the perfect kit for your era to applying those crucial finishing touches, you now have the knowledge to create rolling stock that is truly your own and stands out on the tracks.
The journey from a digital file to a masterpiece on your layout is incredibly rewarding. With high-quality 3d printed wagon bodies, you can add authentic character and variety that brings your entire scene to life. Whether you're modelling a bustling industrial line or a forgotten rural branch in the British countryside, the perfect wagon is waiting to be built.
Ready to start your next project? Explore our huge range of 3D printed wagon bodies for your layout. At Narrow Minded Railworks, we specialise in unique narrow gauge prototypes, all designed and printed in-house for maximum quality control. Our kits are expertly crafted for easy fitting to popular commercial chassis, making your build as smooth as possible.
Don't just build a layout-build a legacy. Happy modelling!
Frequently Asked Questions
What is the best glue for 3D printed resin wagon bodies?
For joining resin parts, we recommend using a cyanoacrylate adhesive, commonly known as super glue. A medium viscosity super glue provides a strong, quick bond that is ideal for most assembly tasks. For maximum strength, especially on load-bearing joints, a two-part epoxy adhesive is an excellent choice as it offers a superior bond but requires more time to cure. Avoid using polystyrene cement, as it is designed for plastic kits and will not work on resin.
Are 3D printed wagons strong enough for a working model railway layout?
Absolutely. Modern photopolymer resins are remarkably strong and durable, making them perfectly suitable for a working layout. Our 3d printed wagon bodies are designed to withstand the rigours of regular handling, coupling, and running sessions. While they are detailed models and should be handled with appropriate care, their structural integrity is more than sufficient for the demands of an active model railway, ensuring they will be a long-lasting part of your rolling stock.
Why do I need to use a primer before painting a resin model?
A primer is essential because resin has a very smooth, non-porous surface that paint struggles to adhere to directly. Applying a thin coat of primer first creates a micro-textured, uniform base layer that the paint can grip onto effectively. This prevents the final paint coats from chipping or peeling during handling. For best results, use a quality acrylic model primer from a spray can or airbrush for a consistent, even finish before you apply your livery.
What chassis will my wagon body kit fit?
Compatibility varies between kits, so it is crucial to check the specific product description before purchasing. Most of our wagon bodies are designed to fit popular and readily available ready-to-run (RTR) chassis from UK brands like Bachmann, Hornby, or Dapol. The product page will clearly state the recommended donor chassis, including the exact model or product code required, to ensure a perfect fit for your project and get your wagon on the tracks quickly.
Can I get a wagon body printed in a custom scale?
In many cases, yes. While we primarily offer standard UK scales like OO gauge (1:76.2) and N gauge (1:148), custom scaling is often possible. If you require a different scale, such as O gauge or a more obscure one, please contact us directly with your requirements. There may be a small additional design fee, perhaps around £5-£10, to cover the time needed to rescale the digital file correctly, but we are always happy to discuss bespoke projects.
How do I remove the fine support marks without damaging the model's detail?
Patience is key to a clean finish. First, use a very sharp pair of hobby snips or a craft knife to carefully clip the support structures as close to the model's surface as possible. Afterwards, gently sand the remaining small nubs using fine-grit sandpaper (1000-grit or higher) or a set of modeller's files. Work slowly and use a light touch, sanding in small circular motions to blend the area without removing any of the surrounding fine detail.