

Have you ever admired those charming, characterful narrow gauge layouts, only to be stopped by a confusing wall of jargon? O-16.5, O-14, 'body kit only' - it can feel like you need a dictionary just to get started. The world of 7mm narrow gauge kits is incredibly rewarding, but it's easy to feel intimidated by the perceived complexity and the fear of buying the wrong parts. You might wonder what actually comes in the box for your money, or feel daunted by the prospect of soldering and painting for the first time.
This guide is your friendly map into this fantastic scale. We are here to cut through the confusion and get you on track. We'll demystify the different scales, show you how to choose a beginner-friendly kit, and explain exactly what you'll need - from the right chassis to the correct wheels - to turn that box of parts into a running locomotive. By the end of this article, you'll feel confident and inspired to start your very first 7mm scale project and discover just how rewarding this corner of the model railway hobby can be.
Key Takeaways
- Grasp the key differences between 'scale' and 'gauge' to understand the unique appeal and high detail of 7mm narrow gauge modelling.
- Learn how to confidently choose your first project by understanding what different types of 7mm narrow gauge kits contain and which are best for beginners.
- Discover the essential tools and a step-by-step overview that demystifies the kit building process, making it achievable and enjoyable.
- Move from a curious beginner to a capable builder with a clear path to completing your very first model with satisfying results.
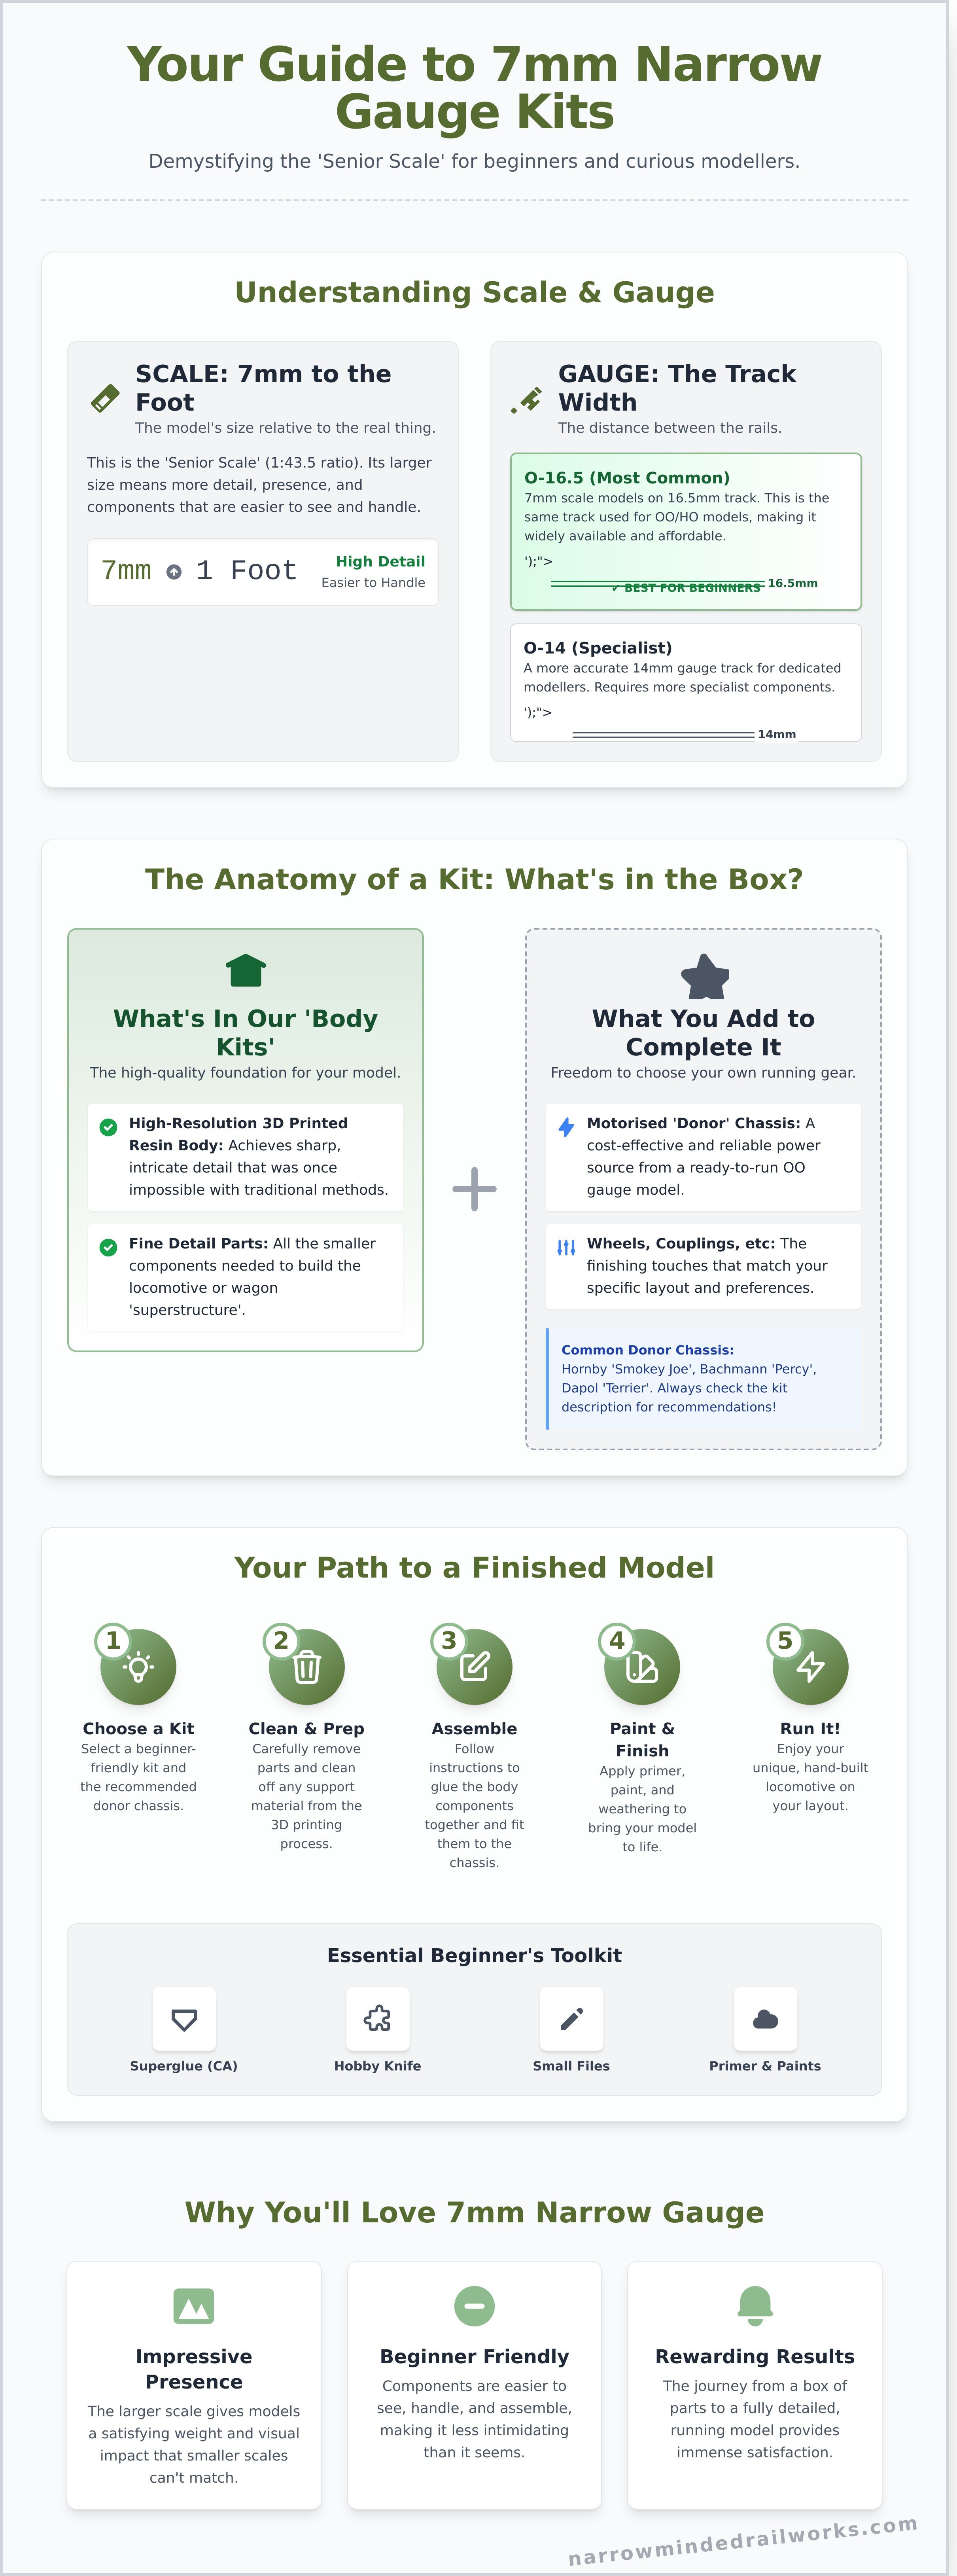
What is 7mm Narrow Gauge? The 'Senior Scale' Explained
Welcome to the captivating world of 7mm narrow gauge modelling. Often called 'the Senior Scale', this is one of the larger and more detailed scales, offering an incredibly rewarding experience for modellers of all skill levels. The term 'narrow gauge' simply refers to models of characterful, smaller trains that, in real life, ran on tracks narrower than the UK's standard 4ft 8½in gauge. This contrasts with standard gauge O scale, which uses the same 7mm scale but models the larger mainline trains.
The primary appeal of building 7mm narrow gauge kits lies in their impressive size and the satisfying level of detail you can achieve. The larger components are generally easier to see, handle, and assemble, making the construction process a genuine pleasure rather than a test of eyesight. To see the level of detail involved in these fantastic models, take a look at this video:
Understanding the Scale: 7mm to the Foot
At its core, the scale is wonderfully straightforward: every 7mm on the model represents one foot on the full-size prototype. This works out to a ratio of 1:43.5, a popular choice for capturing the unique charm of Britain's industrial and rural railways, from Welsh slate quarries to quaint countryside light railways. For a more technical deep-dive, the 7mm scale explained page on Wikipedia is an excellent resource. This larger scale allows for robust models with real presence and weight.
Decoding the Gauges: O-16.5 vs. O-14
While the 'scale' is 7mm to the foot, the 'gauge' refers to the distance between the rails. The most popular and accessible format is O-16.5. This means you run your 7mm scale models on 16.5mm wide track, which is exactly the same track used for the much smaller OO and HO gauge models. This is a huge advantage, as track, points, and many locomotive chassis are readily available and affordable.
A more specialist option is O-14, which uses a finer, more accurate 14mm gauge track. While it offers superior fidelity for the dedicated modeller, it requires more specialist components. To ensure you can get started easily, the vast majority of our 7mm narrow gauge kits are designed for the popular and convenient O-16.5 gauge.
The Anatomy of a Model Kit: What's Actually in the Box?
One of the most common questions we hear from newcomers is, "What am I actually buying when I order a kit?" It's a great question, because the term 'kit' can mean very different things depending on the manufacturer. Unboxing your first project should be exciting, not confusing. This section will clarify what you can expect and highlight the immense creative satisfaction that comes from building a unique model from a collection of carefully designed parts.
At Narrow Minded Railworks, we believe the joy is in the build. You're not just assembling a product; you're creating a piece of railway history in miniature, and our kits are designed to give you the best possible starting point for that journey.
Body Kits vs. Complete Kits
The vast majority of our 7mm narrow gauge kits are body kits. This means the box contains all the high-detail parts needed to build the body, or 'superstructure', of a locomotive or wagon. We specialise in this approach because it offers you, the modeller, maximum freedom to choose the running gear, couplings, and fine details that match your specific needs. In contrast, 'complete kits', which would include wheels, motor, and gears, are very rare in this scale and often limit your customisation options.
The All-Important Chassis: Finding a Power Source
A body kit needs a motorised chassis to run on your layout. The most common and cost-effective method is to use a 'donor chassis' from a reliable, mass-produced ready-to-run OO gauge model. By fitting our detailed body to one of these, you get a superb-looking narrow gauge loco with a smooth, reliable mechanism. Always check the individual kit description for the recommended donor, but common choices include:
- Hornby 0-4-0 'Smokey Joe' or 'Pug' chassis
- Bachmann 0-4-0 chassis (found under models like Percy)
- Dapol or Hornby 'Terrier' 0-6-0 chassis
Materials Matter: Resin, Whitemetal, and 3D Prints
While traditional kits often use materials like cast whitemetal, we primarily use modern, high-resolution 3D printed resin. This cutting-edge technology allows us to achieve a level of sharp, intricate detail that was once impossible. It enables us to faithfully recreate unique and often obscure prototypes that worked Britain's industrial lines, many of which are now lovingly preserved and can be seen at the Narrow Gauge Railway Museum. The result is a lightweight, strong, and incredibly detailed foundation for your model, ready for your personal touch in painting and finishing.
How to Choose Your First 7mm Narrow Gauge Kit
Diving into the world of 7mm narrow gauge kits can be incredibly rewarding, but choosing that first project is crucial. The goal isn't to build a museum-quality masterpiece straight away, but to have a successful and enjoyable experience that builds your confidence. By starting with a manageable project, you'll learn the fundamental skills needed for more complex models later on. Remember, this hobby is about the satisfaction of the building process, not just the finished product.
Start Simple: The Humble Wagon Kit
We always recommend a simple wagon kit as the perfect starting point. A basic open wagon or van is an ideal first project because it teaches you the core skills without being overwhelming. You will learn how to:
- Clean up and prepare resin or whitemetal parts.
- Accurately assemble a simple structure.
- Apply paint, transfers, and basic weathering.
Wagons are also a low-cost entry point, with many fantastic kits available for under £30. They can often be completed in a few evenings, giving you a quick and satisfying result that will motivate you to build more. Browse our range of O-16.5 wagon kits here.
Moving Up: Your First Locomotive Body Kit
Once you have a couple of wagons under your belt, you'll be ready to tackle your first locomotive. Look for a simple loco body kit, such as a small industrial shunter or a basic four-wheeled diesel. These models often have simpler shapes and fewer intricate parts than a large steam engine. Critically, ensure you choose a kit designed to fit a readily available and affordable donor chassis. Always read the product description carefully to understand what is included and what else you'll need to purchase.
Beyond the Rails: Scenery and Building Kits
Building a railway is about more than just the trains. To bring your layout to life, consider a lineside building or scenery kit. Projects like a platelayer's hut, a small signal box, or even just some detailed fencing can add immense character to a scene. These kits are fantastic for developing different skills, particularly in painting, scenic work, and creating realistic textures. They offer a refreshing change of pace from rolling stock and help you think about your models as part of a complete, living world.
Essential Steps and Tools for a Successful Build
Embarking on your first model build can feel intimidating, but the truth is that constructing beautiful 7mm narrow gauge kits is more about patience and process than specialist skills. By breaking the project down into manageable stages, you can achieve a professional-looking finish you’ll be proud of. This guide provides a high-level overview of the journey from a box of parts to a completed model, demystifying each step along the way.
Preparation and Cleanup
A great finish starts with good preparation. Before any assembly, it's crucial to wash all parts in warm, soapy water and allow them to dry completely. This removes any release agents or residue from the manufacturing process that could interfere with glue or paint. For 3D printed parts, carefully snip away support structures with sharp side-cutters and clean up any remaining marks with a sharp craft knife and fine-grit sanding sticks. A clean, smooth surface is the foundation of your entire build.
Assembly: Glues and Test Fitting
The golden rule of model making is to always test-fit parts before applying glue. This ensures everything aligns correctly and allows you to identify any areas that may need minor adjustment. For most resin or plastic kits, a good quality superglue (cyanoacrylate or CA) is ideal for a quick, strong bond. For load-bearing joints or when you need more positioning time, a two-part epoxy is a better choice. A good pair of tweezers is invaluable for handling small, delicate components without causing damage.
Painting, Decals, and Weathering
This is where your model truly comes to life. Always begin with a light coat of primer; it helps the main colour coats adhere properly and reveals any surface imperfections. You can choose between acrylic and enamel paints, applied either by hand-brushing or with an airbrush for a smoother finish. Once painted, applying decals adds the fine details, followed by weathering powders or washes to simulate the authentic grime and wear of a hard-working locomotive. For a deeper dive, see our beginner's guide to weathering.
With these steps in mind, you have a clear roadmap for successfully building your 7mm narrow gauge kits. For a curated selection of essential tools and beginner-friendly kits, explore the range at narrowmindedrailworks.com.
Explore Our Range of 7mm (O-16.5) Narrow Gauge Kits
Now that you're equipped with the knowledge to start your journey, it's time for the exciting part: choosing your first model. We've curated a selection of our most popular and rewarding 7mm narrow gauge kits to inspire your next project. Each kit is designed with care, capturing the unique character of Britain's industrial and rural light railways.
Popular Locomotive Kits for Beginners
Starting with a locomotive is a rite of passage. These kits are chosen for their straightforward construction and charming prototypes, making them ideal for new builders.
'Penrhyn' Class 0-4-0ST Quarry Tank: A true icon of the Welsh slate industry. This powerful-looking tank engine is a perfect introduction to etched brass construction. Its simple, robust design makes assembly a joy.
- Prototype: Hunslet Engine Company 'Port' Class
- Recommended Chassis: Bachmann 'Percy' 0-4-0 chassis (with modifications)
'Lister' Railmotor Petrol Loco: Representing the smaller, workaday locomotives found on countless industrial lines. This kit features a high-detail resin body and is an excellent project for developing your weathering skills to replicate a hard-working engine.
- Prototype: Lister Autotruck-based locomotive
- Recommended Chassis: A simple 16.5mm gauge motor bogie or chassis kit.
Characterful Wagons to Build Your Fleet
A locomotive is nothing without a train to pull. Building a varied rake of wagons is one of the most satisfying aspects of the hobby, creating a slice of moving history. Our wagon kits are designed for quick assembly, allowing you to build up a diverse fleet in no time.
- Slate Wagons: The quintessential narrow gauge wagon. We offer kits for both loaded and unloaded versions to add variety to your slate trains.
- End-Tipping Wagons: Perfect for modelling quarry or construction scenes, these simple wagons add operational interest and industrial grit to any layout.
- Small Box Vans: Ideal for representing general goods traffic, from farm supplies to blasting powder. A closed van breaks up the visual monotony of an open-wagon train.
Unique Scenery to Bring Your Layout to Life
To truly capture the atmosphere of a narrow gauge line, your models need a world to inhabit. Our range of lineside building and scenery kits provides the perfect backdrop, creating a sense of place and purpose for your railway.
From a rustic slate cutting shed to a detailed weighbridge hut, these structures help tell the story of your layout. They are designed to complement our rolling stock and provide a focal point for your scenes.
Ready to start building? Explore our complete catalogue of models and find the perfect project to bring your narrow gauge vision to life. View our full collection of 7mm scale kits and accessories.
Your Journey into 7mm Narrow Gauge Begins Now
You've now uncovered the rewarding world of 7mm narrow gauge, from understanding the 'senior scale' to knowing what to expect inside the box. We've shown that with the right first kit and a few essential tools, building a beautifully detailed model is well within your reach. The journey from a collection of parts to a finished locomotive or wagon is one of the most satisfying experiences in model railways.
If you're ready to take the next step, our range of 7mm narrow gauge kits is the perfect place to start. Every model is a unique prototype, designed and produced in-house and brought to life with high-resolution 3D printing for the crispest detail. We offer worldwide shipping, so modelers everywhere can enjoy our creations.
Why wait to start your next project? Explore our complete collection of 7mm scale model kits today and discover the perfect model to bring your layout to life. Happy building!
Frequently Asked Questions
What does O-16.5 actually mean?
O-16.5 is a combination of scale and track gauge. The "O" refers to the scale, which in the UK is 7mm to the foot (a ratio of 1:43.5). This determines the model's physical size. The "16.5" is the distance between the rails in millimetres. This means an O-16.5 model is built to 7mm scale but runs on 16.5mm gauge track, the very same track used for OO gauge models, perfectly representing a narrow gauge railway.
Do your 7mm narrow gauge kits come with motors and wheels?
Our kits are typically for the body shell and detailing parts only. This approach gives you the flexibility to choose a chassis, motor, and wheelsets that meet your specific performance standards and budget. We believe in providing a superb quality body as the foundation for your unique model. Please always check the individual product description, which will clearly list exactly what is included and what you need to purchase separately to complete the model.
Is it difficult to build a 3D printed model railway kit?
Building a modern 3D printed resin kit is generally more straightforward than traditional etched metal kits. The parts count is often lower as much of the detail is integrated into the main body print. The main tasks usually involve some light sanding to remove support marks and then assembly with superglue. With a little care and patience, they provide a highly rewarding experience and are an excellent entry point for anyone new to railway kit building.
What basic tools do I need to start building my first 7mm kit?
You can get started building our 7mm narrow gauge kits with just a few essential tools. We recommend a good quality craft knife (such as a Swann-Morton), a set of small needle files, fine-grit sanding sticks or paper, tweezers for handling small parts, and a reliable superglue (cyanoacrylate). A self-healing cutting mat is also a fantastic investment to protect your work surface. These basics are all you need for the assembly of most resin kits.
Can I use standard OO gauge track for O-16.5 models?
Yes, you absolutely can. This is one of the greatest advantages of modelling in O-16.5. The 16.5mm track gauge is identical to that of standard OO gauge (and European HO gauge). This means you have access to the huge and cost-effective range of track and points from UK manufacturers like Peco and Hornby. It makes building a layout significantly easier and often more affordable than using specialist narrow gauge track systems.
How do I find the right chassis for my locomotive body kit?
The first place to check is always the kit's product description on our website. We will either recommend a specific, commercially available ready-to-run (RTR) chassis that the body is designed to fit, or we will provide the critical dimensions required, such as the wheelbase and wheel diameter. For example, a kit may be designed for a Dapol 'Pug' chassis. This information ensures you can source a smooth-running mechanism for your finished locomotive.