

A pristine model is often a missed opportunity to tell a compelling story of industrial toil. You’ve likely felt the frustration of finishing a detailed kit only to find it looks more like a plastic toy than a functional part of a working railway. It’s understandable to fear that a heavy-handed application of paint might obscure fine details or that certain solvents could compromise the 3D printed resin.
Mastering the art of weathering model railway buildings allows you to transform these clean surfaces into realistic, hard-working structures that belong in a muddy quarry or a soot-stained yard. While working with resin presents unique challenges regarding chemical compatibility, we provide clear solutions to ensure your finish is both safe and professional. This article covers the essential techniques for using powders and washes to highlight 3D printed textures. You'll learn how to build up layers of grime with confidence, ensuring your next project looks like it has survived years of British weather.
Key Takeaways
- Identify the visual shortcomings of uniform factory finishes and learn how to replace them with authentic industrial grime.
- Gain confidence in weathering model railway buildings by using resin-safe powders and pigments to highlight high-detail 3D printed textures.
- Implement a reliable step-by-step workflow that starts with a protective base layer to prevent damage to your underlying paintwork.
- Adapt your techniques for specific narrow gauge themes, such as the dusty accumulation of a slate quarry or the heavy mud of a peat bog.
- Select the appropriate final varnish to preserve your professional finish while ensuring moving parts like doors remain functional.
Why Weathering Model Railway Buildings is Essential for Realism
A pristine model often stands out for the wrong reasons. Under typical layout lighting, uniform factory colours can appear flat and artificial, creating a "toy-like" effect that breaks immersion. While it's tempting to leave a freshly painted structure as it is, weathering model railway buildings is the essential final step in grounding your scene. In the narrow gauge world, structures rarely stayed clean. Whether it's a remote peat bog or a bustling Welsh slate quarry, the environment leaves a permanent mark on every surface. By embracing "Rule #1", your railway, your rules, you can use weathering to suggest age, neglect, or heavy industrial use. This ensures your buildings reflect the specific history of your line rather than looking like they just arrived from a shop shelf.
The Narrative of Industrial Grime
Every stain on a building tells a story of its daily life. On an engine shed, soot accumulates heavily above the doors where locomotives vent steam and smoke. Workshops might show dark, greasy patches near the ground from spilled lubricants and heavy foot traffic. It's helpful to distinguish between environmental wear and operational wear. Rain streaks on wooden planks represent the former, while coal dust or metal filings represent the latter. Beyond aesthetics, weathering serves a practical purpose; it effectively hides small assembly gaps or minor paint slips. You don't need to fear a less-than-perfect build, as these areas often become the perfect anchors for a bit of convincing character and grime.
3D Printed Kits vs. Traditional Materials
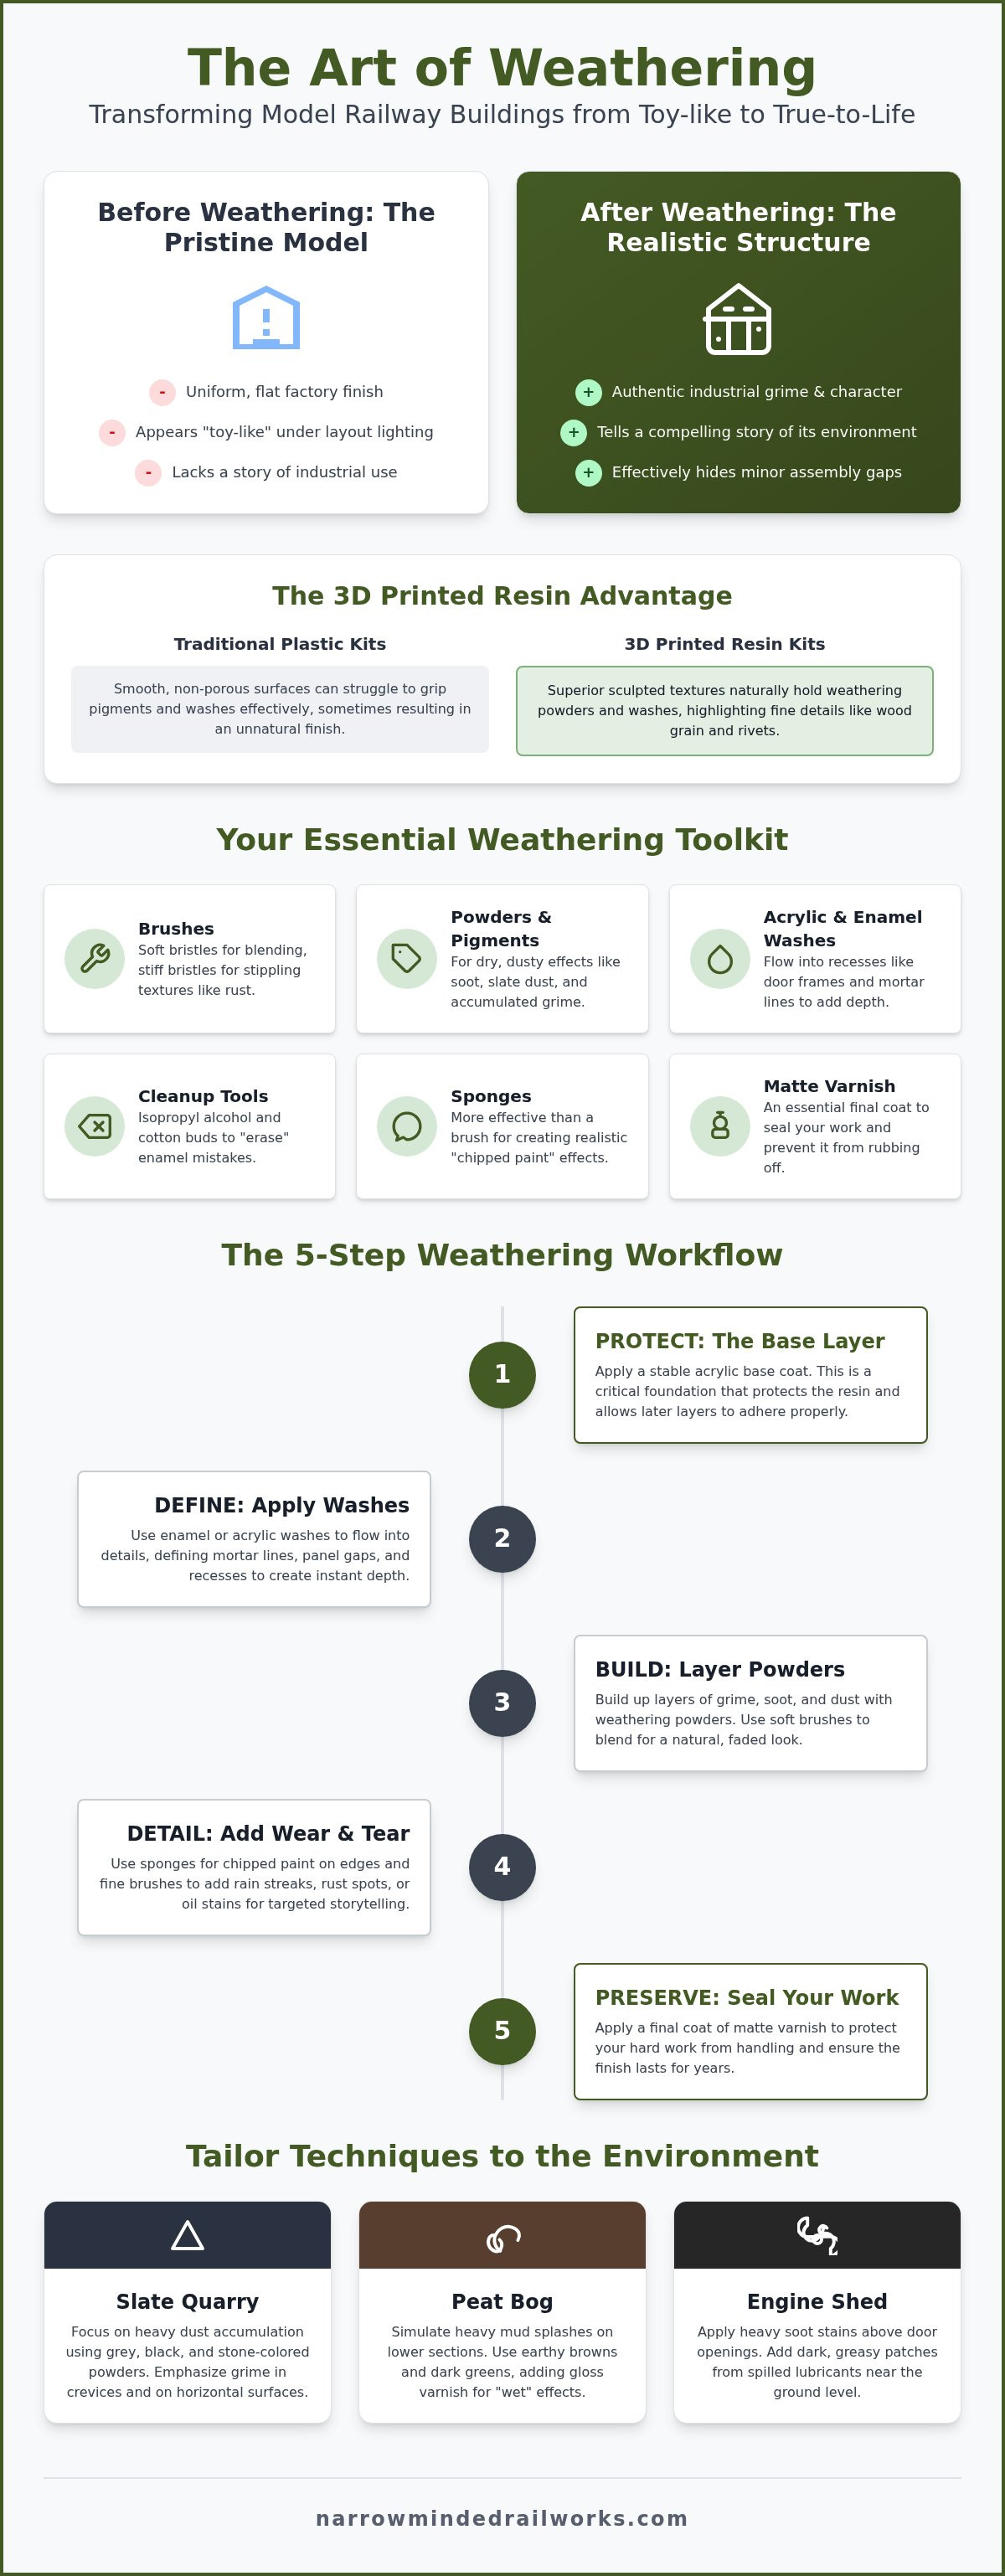
Traditional plastic kits often have smooth, non-porous surfaces that can struggle to grip pigments effectively. Conversely, 3D printed resin kits provide a superior surface texture that is ideal for holding weathering powders and washes. The high-detail sculpted textures found in OO9 locomotive kits and scenery allow pigments to settle naturally into recesses. This highlights fine wood grain, brick mortar, and rivet details that might otherwise be lost under a single coat of paint. By choosing a kit rather than a ready-to-run model, you gain the freedom to customise the level of neglect or care your structure receives. This ensures your buildings don't just sit on the layout; they look like they've been part of the landscape for decades.
Essential Tools and Materials for Weathering Resin Kits
Achieving a professional finish doesn't require an expensive airbrush setup. While high-end equipment is useful, most weathering model railway buildings can be completed using a selection of specialised brushes and pigments. Soft-bristled brushes are necessary for blending powders into smooth gradients, whereas stiff-bristled brushes allow you to stipple textures like moss or heavy rust onto vertical surfaces. We recommend working in a well-ventilated space, as fine pigments and varnishes can be irritants. A final coat of matte varnish is essential to seal your work, ensuring the textures don't rub off during layout maintenance.
Weathering powders and pigments provide the dry, dusty effects common in industrial narrow gauge settings. For deeper details, acrylic and enamel-based washes are used for "pin-washing" recesses like door frames and brick mortar. If you are new to these mediums, the National Model Railroad Association offers a helpful Beginners Guide to Weathering that explains the chemistry of different washes. While some modellers worry about chemicals damaging resin, cured 3D prints are remarkably resilient to most hobby-grade enamels when applied correctly over a primer.
The Beginner’s Weathering Toolkit
Mistakes are a natural part of the learning process, but they don't have to be permanent. Keeping isopropyl alcohol and cotton buds on hand allows you to "erase" enamel-based errors from resin surfaces without stripping the base paint. When choosing pigments, PanPastels offer a creamy consistency that adheres well to 3D printed textures, while traditional loose powders are better for creating heavy piles of slate or coal dust. For adding realistic wear to edges, a simple household sponge is often more effective than a brush for stippling "chipped" paint effects onto window sills and doors.
Choosing the Right Paints and Mediums
A successful weathered finish depends entirely on the quality of the layers beneath it. Acrylics are the preferred choice for base layers on 3D prints because they dry quickly and provide a stable foundation. You can find detailed advice on painting 3D printed models to ensure your base coat is ready for heavy weathering. Enamel washes offer superior flow into fine details, but they should only be used once the base acrylics are fully cured. If you're looking to expand your collection, our range of diorama tools and scenery provides the essential materials needed to bring your kits to life.
Core Weathering Techniques: A Step-by-Step Workflow
Developing a consistent workflow is the most effective way to avoid over-weathering your structures. While many modellers feel eager to apply grime immediately, starting with a systematic approach ensures a professional result. Weathering model railway buildings effectively requires building up effects in thin, controlled layers rather than applying a single heavy coat. Follow this five-step process to achieve a realistic finish on your resin kits.
- Step 1: Protective Coating. Apply a thin layer of gloss or satin clear coat. This safeguards your base colours and provides a smooth surface that helps washes flow into recesses.
- Step 2: Recess Washing. Use a dark enamel or acrylic wash around door frames, window lintels, and brickwork. This adds immediate depth and simulates natural shadow.
- Step 3: Environmental Texturing. Apply dry pigments to represent soot, dust, or moss. These are particularly effective on the high-detail textures found in narrow gauge kits.
- Step 4: Edge Highlighting. Use dry brushing to catch the raised edges of wood planks or corrugated iron, simulating the look of worn paint or bare metal.
- Step 5: Final Sealing. Apply a matte varnish once you're satisfied. This prevents fingerprints and ensures your pigments don't rub off during layout operation.
Mastering the Wash and Wicking
A common pitfall is allowing washes to pool in large, flat areas, which creates unrealistic "tide marks." While you might want a heavy look, a "sludge wash" should be applied selectively to shed walls or engine house doors. If a wash spreads too far, use a clean, damp brush to wick away the excess fluid. This technique of "wicking" allows you to control exactly where the grime settles. You can also use green-tinted washes at the base of buildings to simulate rising damp or algae, which is a frequent sight in the humid environments of a peat bog or riverside quay.
The Art of Dry Brushing and Chipping
Dry brushing is a subtractive technique that requires patience. While it's tempting to use a loaded brush, you must follow the "almost dry" rule: wipe your brush on a paper towel until it leaves almost no visible trace before touching the model. This ensures you only catch the highest points of the 3D printed texture. Focus your efforts on high-traffic areas like door handles, window sills, and footplates. For metallic elements, a dark iron or gunmetal shade works better than bright silver, providing a subtle hint of worn machinery that fits the industrial narrow gauge theme perfectly.
Weathering for Specific Narrow Gauge Environments
Narrow gauge lines often operate in the most demanding landscapes across the UK. Whether your layout depicts a mountain slate quarry or a marshy peat bog, the environment dictates how you approach weathering model railway buildings. A generic layer of brown paint rarely suffices; instead, you must consider the specific industrial outputs of your line. For instance, a slate quarry environment requires an accumulation of grey and white powders to simulate fine stone dust. Conversely, a peat bog setting demands heavy applications of dark mud and deep rust to represent constant dampness and organic decay.
Consistency across your layout is vital for immersion. Your structures should visually match the rolling stock they serve to create a believable scene. If you are building OO9 wagon kits designed for timber haulage, your sawmill buildings should show sawdust accumulation and wood-sap staining. This integrated approach ensures that every element of your narrow gauge railway feels like it belongs to the same cohesive world. Coastal lines present another unique challenge, where salt spray leads to heavy corrosion and bleached woodwork that requires a much lighter, desaturated palette.
Simulating Realistic Rust and Corrosion
Resin kits featuring corrugated iron or metal tanks provide an excellent surface for corrosion effects. We recommend the three-colour rule to achieve realistic depth: start with dark brown for old, pitted areas, add burnt sienna for established rust, and finish with small dots of bright orange for fresh oxidation. You can create physical texture by applying specialised weathering mediums or even fine salt over a damp base coat before painting. Focus these efforts on areas where water naturally collects, such as the bottom of water tanks or the overlapping joints of corrugated roof sheets.
Soot, Smoke, and Vertical Streaking
Industrial buildings are rarely clean from above, especially on a working steam line. Chimney stacks and roof vents on engine sheds should receive a heavy application of matte black pigments to simulate years of accumulated coal smoke. To represent rain-washed grime, apply a thin wash and use a vertical motion to pull the pigment down the walls. This simulates how rainwater moves dirt across a surface over time. If you're ready to start your next project, our GN15 and O-16.5 scenery kits offer the perfect high-detail surfaces to test these environmental techniques.
Final Assembly and Protection for 3D Printed Models
Once you've completed the artistic stages, the final assembly requires a practical eye. 3D printed kits often feature precise tolerances, meaning thick applications of paint or pigment can interfere with moving parts. When weathering model railway buildings, you should always check the clearance of opening doors and window frames before the final seal. If a wash has pooled in a hinge, clear it with a dry brush immediately to prevent the part from seizing. Handling your model at this stage also requires care; oils from your skin can smudge loose powders. It's best to move the structure by its base or use a dedicated mounting block to avoid damaging the finish.
The Role of Varnish on Resin
Varnish is the invisible layer that defines the final texture of your model. For the vast majority of industrial narrow gauge structures, a high-quality matte varnish is the standard choice. It removes any remaining "plastic" sheen from the resin and provides a flat surface that looks like aged timber or stone. However, you can use gloss or satin varnishes selectively to suggest active industrial use. A small dab of gloss on a workshop floor or near an engine shed door effectively simulates fresh oil spills or wet grease. While spray varnishes provide the most even coverage, a brush-on varnish offers better control for these specific "wet" highlights without affecting the surrounding dusty textures.
Completing the Scene
A weathered building only looks realistic if it matches its surroundings. If you are getting started in GN15 scale, ensure your scenery kits share the same colour palette as your structures. For example, the dark mud at the base of a peat shed should bleed naturally into the surrounding ballast and trackbed. This visual consistency prevents the building from looking like an isolated object dropped onto a layout. Conduct a final inspection under your actual layout lighting, as the cool temperature of certain LEDs can change how your rust and soot effects appear. Balancing these elements ensures your 3D printed model transitions from a kit into a convincing piece of industrial history.
Bring Your Industrial Scenes to Life
Transforming a static kit into a functional part of your railway is a rewarding process that requires patience rather than perfection. By understanding the narrative of your industrial environment and applying pigments in controlled layers, you ensure your weathering model railway buildings project enhances the layout rather than cluttering it. We've explored how protective clear coats and scale-specific textures allow for safe, professional results on 3D printed resin. These techniques bridge the gap between a "toy-like" finish and an authentic representation of industrial toil.
Whether you're recreating the dusty atmosphere of a North Wales quarry or the damp decay of a peat bog line, the right kit provides the perfect canvas. Explore our range of 3D printed narrow gauge kits and start your next project today. Our unique designs for OO9, GN15, and O-16.5 scales are designed by modellers, for modellers, to ensure high-detail results right out of the box. With worldwide shipping available, you can begin customising your industrial landscape regardless of your location. Don't let the fear of over-weathering hold you back from telling your railway's story; every streak of grime adds character to your unique world.
Frequently Asked Questions
Is weathering reversible if I make a mistake on a resin kit?
Weathering is often reversible if you act quickly and use the right mediums. While harsh chemicals can damage 3D printed resin, using enamel washes over a cured acrylic base allows you to "erase" mistakes with a small amount of white spirit or isopropyl alcohol. This proactive approach ensures you can experiment with weathering model railway buildings without the fear of ruining a kit. Always test a small, hidden area first to confirm the chemical compatibility of your chosen solvent.
Can I weather my model railway buildings without an airbrush?
You don't need an airbrush to achieve professional results on narrow gauge structures. While airbrushes are useful for broad gradients, most industrial grime is best replicated using hand-applied washes, dry brushing, and pigments. These manual techniques allow for greater precision when highlighting the fine textures found in our 3D printed kits. Using soft-bristled brushes for blending and sponges for chipping provides a level of control that often surpasses what a spray can achieve.
What is the best varnish to use on 3D printed resin models?
A high-quality matte varnish is typically the best choice for industrial narrow gauge structures. While gloss finishes can look unrealistic on stone or timber, a matte coat removes any artificial resin sheen and provides a realistic, flat appearance. If you need to simulate "wet" areas like moss or oil spills, you can apply a gloss varnish selectively over the matte layer. This two-step process ensures your building looks appropriately aged while maintaining specific environmental details.
Will weathering my model buildings affect their resale value?
Weathering can actually increase the appeal of a model within the narrow gauge community. While standard gauge collectors often prefer pristine models, narrow gauge enthusiasts value the "lived-in" industrial look that weathering provides. A well-executed finish demonstrates skill and saves the next owner the task of customisation. When weathering model railway buildings, focus on subtle, realistic effects that follow the narrative of a working line rather than applying heavy, non-specific layers of grime.
How do I prevent weathering powders from rubbing off over time?
Sealing your work with a dedicated fixative or matte varnish is the only way to ensure powders stay in place. While loose pigments offer a fantastic dusty look, they will eventually smudge or rub off during layout cleaning. Applying a light, misty coat of varnish from a distance prevents the air pressure from blowing the powder away. This protective layer also makes the model more durable, allowing you to move structures without leaving fingerprints on the finish.
Are enamel washes safe to use on 3D printed resin kits?
Enamel washes are safe for cured 3D printed resin, provided you apply them over a stable primer. While raw resin can occasionally react to aggressive solvents, a protective layer of acrylic paint acts as a barrier. This setup allows you to use the superior flowing properties of enamels to highlight mortar lines and wood grain. We recommend allowing your base coat to cure for at least 24 hours before introducing enamel-based products to ensure a successful finish.
How much weathering is considered "too much" for a beginner?
"Too much" is subjective, but a good rule is to stop just before you think you've finished. While it's tempting to cover every surface in grime, leaving some of the original colour visible creates a more realistic sense of depth. If you find you've gone too far, you can often knock back the effect with a lighter dry brush of the original base colour. This layering technique helps beginners find the right balance for their specific layout theme.
Do I need to weather the interior of my model buildings?
You only need to weather the interior if it will be visible to viewers. While many modellers enjoy the challenge of detailing every corner, focusing your efforts on areas seen through windows or open doors is a more efficient use of time. If you do choose to detail the inside, remember that interiors often accumulate different types of grime, such as cobwebs or localised soot, which differs from the rain-washed streaking found on the exterior walls.