

The biggest mistake a modeller can make is equating a small footprint with a small ambition. While you might feel that a lack of spare room prevents you from starting a serious project, portable narrow gauge layouts actually serve as a catalyst for museum-quality super-detailing. It's common to feel overwhelmed by the prospect of a massive permanent build or confused by the technical differences between OO9 and GN15 scales. You deserve a project that's manageable enough to finish but detailed enough to stand out on the exhibition circuit.
This guide provides a clear path to mastering the art of the compact railway. You'll discover how to design, build, and transport a highly detailed narrow gauge system that fits into any living space without sacrificing realism. We'll explore the cost-effective benefits of kit-building, which can be 40% cheaper than relying on ready-to-run models, and review the essential electrical safety standards for the 2026 season. From selecting the right scale kits to implementing professional diorama tools, this article ensures your next layout is ready for the National Garden Railway Show on April 25, 2026.
Key Takeaways
- Identify why OO9, GN15, and O-16.5 scales provide the ideal balance of detail and weight for portable narrow gauge layouts that one person can easily carry.
- Master lightweight engineering by comparing birch plywood to extruded polystyrene foam and utilizing space-saving sector plates instead of bulky fiddle yards.
- Ensure your trackwork remains secure during transit by adopting the brass screw soldering technique and utilizing multi-pin connectors for reliable electrical setup.
- Elevate your diorama with 3D printed kits and specialized tools that allow for high-impact industrial or rural themes without adding unnecessary weight.
- Prepare for the exhibition circuit by constructing bespoke transport crates and integrated LED lighting systems that guarantee consistent presentation in any venue.
What Defines a Portable Narrow Gauge Layout?
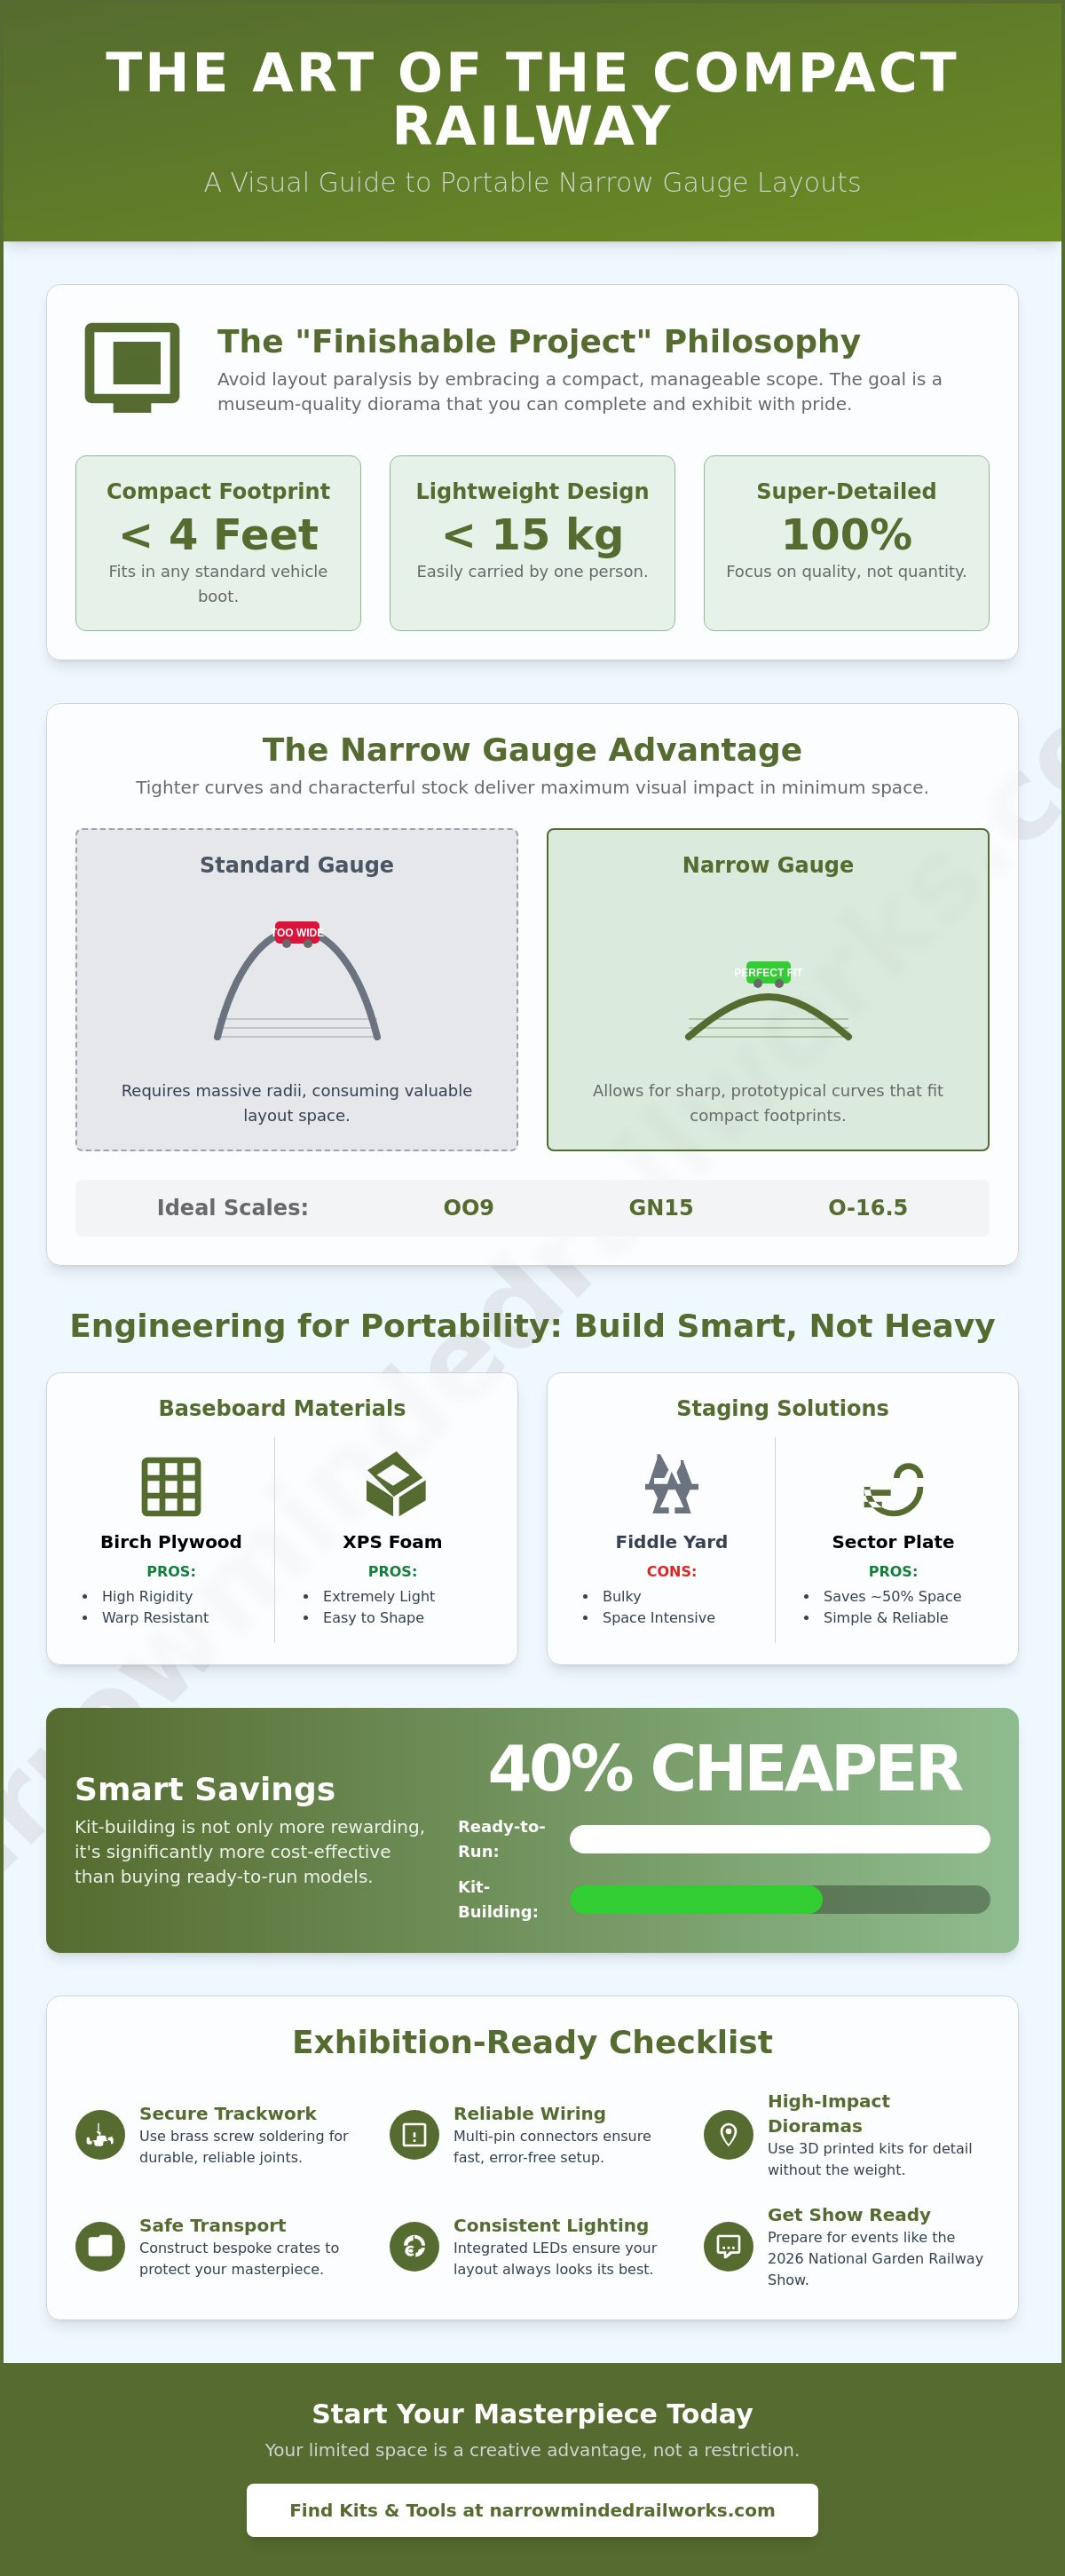
Modellers often face the reality of limited domestic space, which can lead to the abandonment of large scale ambitions. Portable narrow gauge layouts offer a proactive solution by prioritising artistic efficiency over sheer track mileage. A truly portable layout is defined by its physical accessibility; it's light enough for one person to carry and compact enough to fit into a standard vehicle boot. This usually involves a footprint of four feet or less and a total weight under 15 kilograms. By setting these physical boundaries, you shift your focus from laying endless track to perfecting the atmosphere of a single, highly detailed scene.
Adopting the "Finishable Project" philosophy ensures you don't become another victim of layout paralysis. Large permanent builds often stall because the workload exceeds the available hobby time, whereas a portable diorama provides a clear finish line. Whether you're building a shelf layout for a home office, a boxfile layout that fits in a cupboard, or an exhibition diorama designed for public display, the goal is a completed model that showcases professional craftsmanship. These small footprints allow you to master super-detailing without the pressure of a massive room-filling project.
To better understand how a compact footprint can still tell a massive story, watch this helpful video:
The Advantages of Narrow Gauge for Portability
Narrow gauge is the superior choice for portability because it allows for tighter curves without sacrificing visual weight. While standard gauge layouts require massive radii to look realistic, narrow gauge prototypes often featured sharp bends in industrial or rural settings. This allows you to fit complex track plans into tiny footprints. Using OO9, GN15, or O-16.5 scale kits gives you characterful, oversized rolling stock that provides significant visual impact on small boards. This approach aligns perfectly with the core concepts of what is a narrow gauge railway, where utility and environment dictate the design rather than standardisation.
Common Portable Formats: From Pizza to Pasting Tables
Different formats cater to different modelling goals. The "Pizza" layout is a popular choice, featuring circular tracks that usually fit within a 2x2 foot square. These are perfect for continuous running and allow you to focus entirely on 360-degree scenery. Alternatively, pasting table layouts utilize a folding table as a ready-made baseboard, providing a long, thin stage for end-to-end operations. For those aiming for the exhibition circuit, the Shadow Box format is ideal. It uses a proscenium arch to frame the scene, hiding the staging areas and focusing the viewer's eye on the super-detailed core of the layout, much like a museum display.
Engineering for Movement: Baseboards and Modular Design
Traditional heavy timber framing poses a significant hurdle for modellers who need to move their work between home and exhibitions. While solid wood is sturdy, it's prone to warping and excessive weight. A proactive solution involves using 6mm or 9mm birch plywood in a laser-cut or hand-cut box-grid pattern. This provides the necessary rigidity for portable narrow gauge layouts while keeping the total weight manageable for a single person. For those prioritising extreme lightness, extruded polystyrene (XPS) foam can serve as a scenic base, provided it's protected by a wooden perimeter frame to prevent compression damage.
Space management at the board ends is another constraint that requires a thoughtful approach. A traditional fiddle yard often consumes as much space as the scenic section itself. You can solve this by implementing a sector plate. This pivoting track section allows you to align a single entry line with multiple storage sidings in roughly half the length of a conventional point-based yard. To ensure these sections align perfectly every time, use steel pattern-maker dowels. These provide sub-millimetre track registration, which is vital when moving small-scale rolling stock across board joins. If you're currently planning your track bed, using professional diorama tools and scenery components will help you achieve a level surface that resists the vibrations of travel.
Step-by-Step Baseboard Construction for Portability
Building for the road requires more than just glue and screws. You must design the frame with a high strength-to-weight ratio, typically using a 100mm deep sub-frame for maximum stiffness. To protect your hard work, install 12mm plywood end plates that extend slightly above the track level. These act as "dead stops" and physical shields for the rails during transit. Finally, integrate a flush-mounted handle system into the frame. This allows for a firm grip without protruding into the scenic space or snagging on vehicle interiors during loading.
Modular vs. One-Piece Layouts
Choosing between a single-piece diorama and a modular system depends on your transport capacity. One-piece layouts are simpler to wire but harder to store. In contrast, modular sections allow for easier handling and the ability to expand the project over time. Many modellers now follow standardised interfaces like the Freemo standard, which ensures their modules can connect with others at club meets. When building modules, you can hide the physical join line by placing it along a natural break in the landscape, such as a small stream, a road, or a change in ground texture. This creates a seamless appearance while maintaining the benefits of a multi-part system.
Trackwork and Wiring for the Mobile Modeller
Reliable trackwork is the foundation of any successful railway, yet the physical stress of transport often leads to misaligned rails and electrical failures. Portable narrow gauge layouts require a more robust approach than permanent home installations. A proactive solution for securing track at board joins is the "soldered to brass screws" technique. By driving small brass screws into the baseboard at the very edge of the module and soldering the rails directly to the screw heads, you create a permanent, immovable anchor. This prevents the rails from snagging or bending when sections are separated or moved during transit.
Electrical reliability is equally critical, especially if you plan to exhibit your work. For the 2026 exhibition season in the UK, all mains connections must use a Residual Current Detector (RCD) that trips at a maximum of 30 milliamps in under 40 milliseconds. To make setup efficient, avoid individual wire joins in favour of multi-pin connectors like D-sub or XLR plugs. These allow for a single "click" connection between boards, reducing the risk of wiring errors in a busy environment. While the choice between DCC and traditional DC control depends on your specific rolling stock, you should ensure your chosen system is tested for reliability in high-traffic environments before committing to a final build.
Track Alignment Across Joins
Humidity and temperature changes during transit can cause "rail creep," where the metal expands or contracts at a different rate than the wooden baseboard. You can mitigate this by using sliding fishplates or small "bridge rails" that are dropped into place once the boards are bolted together. If a visible gap remains, you can hide the board join using clever scenic placement. Level crossings, muddy tracks, or strategically placed weeds can mask the physical break in the rails, maintaining the illusion of a continuous landscape without compromising the modular nature of the build.
Powering Your Portable Empire
Managing the clutter of wires under a layout is a common pain point for mobile modellers. A proactive solution is to use a structured bus wire system, where heavy-gauge wires carry the main power and smaller droppers feed individual track sections. Secure these with cable ties or P-clips to prevent them from snagging during loading and unloading. For true "plug-and-play" operation, some modellers now utilise high-capacity battery packs to power their layouts, removing the need for mains access at smaller events. Before any show, perform a "transport vibrate" test by gently shaking the board and checking for electrical continuity to catch loose connections before they fail in public.
Maintaining clean track is a final, vital step for layouts that spend time in storage. Dust and oxidation can quickly lead to stuttering performance on small-scale systems. Using a dedicated track cleaning block or a lint-free cloth with isopropyl alcohol before every session ensures your locomotives maintain consistent contact. While a Peco OO9 Gauge ST-400 Starter Track Set costs approximately £96.95, the longevity of your investment depends entirely on these preventative maintenance habits.
Selecting Locos and Kits for High-Impact Dioramas
Weight management is a constant challenge for the mobile modeller. While traditional white metal kits provide excellent traction, they can make multi-board portable narrow gauge layouts difficult to carry. A proactive solution involves using 3D printed resin kits, which deliver exceptional fine-scale detail without the weight penalty of lead-based alloys. These lightweight models allow you to feature multiple locomotives on a single board without exceeding your weight limit. By choosing kits, you also bypass the "Narrow Gauge Tax" often found with ready-to-run models; building from kits is approximately 40% cheaper, allowing you to invest more in high-quality scenery and tools.
Success on a small footprint depends on a cohesive theme. Whether you choose industrial quarrying, rural tramways, or estate railways, the goal is to create a self-contained world. You can solve the problem of limited space by integrating verticality. Instead of a flat board, add height with embankments or depth with a small stream. Use "scenic breaks," such as a large warehouse or a stone bridge, to hide the entrances and exits of your track. This prevents the viewer from seeing the fiddle yard and maintains the immersion of the diorama.
OO9 and GN15: The Kings of the Micro-Layout
Small-wheelbase locomotives are essential for navigating the tight radius curves common in portable designs. A Quarry Hunslet in OO9 or a small industrial tractor in GN15 can handle bends that would stall standard equipment. To achieve a professional result, master the art of painting 3D printed models to create weathered, realistic textures that hide the printed layers. For example, a 3-foot shelf layout featuring a single "Quarry Hunslet" and a few slate wagons provides more character and operational interest than a generic oval of track.
Scenery for the Portable World
Vibration during transport is the enemy of fine scenery. You can protect your work by using professional-grade scenic cement to secure every piece of ballast and flock. For larger structures, consider making them removable. By embedding small earth magnets into the baseboard and the bottom of your buildings, you ensure they stay in place during a show but can be packed separately for travel. Finally, utilise "Forced Perspective" by placing smaller scale trees or buildings at the rear of the board. This technique makes a 12-inch deep board look like it spans a mile, creating a sense of vastness on a tiny footprint.
If you're ready to start your next project, explore our range of OO9 and GN15 locomotive kits to find the perfect centerpiece for your layout.
The Exhibition Circuit: Transport and Presentation
Transitioning from the workbench to the exhibition hall requires a shift in mindset. While your layout is now a finished work of art, it's also a piece of cargo that must survive the vibrations of the road. A proactive solution to the hazards of travel is the "layout crate" approach. By constructing a bespoke plywood case that fits your baseboards exactly, you provide a rigid shell that shields delicate scenery from external impacts. This level of protection is vital for portable narrow gauge layouts that may travel hundreds of miles to premier events like the National Garden Railway Show at NAEC Stoneleigh on April 25, 2026.
Venue lighting is notoriously unpredictable and can wash out the fine details you've worked hard to create. You can solve this constraint by integrating high-density LED strips into a shadow box header. This ensures your scene is viewed with consistent shadows and highlights, regardless of the hall's overhead lights. To complete the professional presentation, add a clean fascia with a fabric skirt to hide the legs and storage area. Always pack an "Emergency Kit" containing essential diorama tools and adhesive to handle the minor repairs that inevitably occur during the setup process.
Protecting Your Work in Transit
Movement inside the transport crate can be just as damaging as an external bump. Use custom-cut foam inserts to cradle your rolling stock, preventing locomotives from rolling into each other. Humidity control is another factor that modellers often overlook; placing silica gel packs inside your layout crate helps prevent the wood from swelling and track from buckling during storage. Ensure your "skyline" and any delicate trees are double-pinned or bonded with high-strength scenic cement to withstand the constant vibration of a vehicle engine.
Engaging with the Public
An exhibition layout is a storytelling medium. You can enhance the visitor experience by developing a short "script" or background story about your railway's history to share with curious onlookers. Providing visual aids, such as a printed information board or a QR code linking to your build log, allows interested modellers to follow your journey. If you're ready to start your own exhibition-standard project, you can browse our OO9 and GN15 kits to find the perfect industrial or rural prototype for your next build.
Building Your Mobile Masterpiece
Mastering the technical challenges of lightweight engineering and robust trackwork ensures your project survives the rigours of the exhibition circuit. While a lack of space often feels like a constraint, portable narrow gauge layouts prove that limited footprints actually encourage higher standards of super-detailing. By focusing on a single, well-executed scene, you can achieve museum-quality results that larger projects often struggle to maintain. You've learned how to secure your track, manage your power, and protect your work during transit; now it's time to bring that vision to life.
A proactive approach to construction starts with selecting the right components. Explore our range of 3D printed narrow gauge kits for your next portable project to find specialist OO9 and GN15 designs that prioritise detail without adding unnecessary weight. We offer worldwide shipping for modellers and provide highly detailed kits designed for easy assembly. Every great railway begins with a single kit and a clear plan. With the right foundations in place, your compact layout will stand as a testament to your craftsmanship for years to come.
Frequently Asked Questions
What is the best scale for a portable narrow gauge layout?
OO9 is the most popular narrow gauge scale in the UK due to the extensive range of kits and accessories available. GN15 is another excellent choice for those who prefer larger scale detailing on 9mm track. Both scales allow for the tight curves required for portable narrow gauge layouts without sacrificing the visual weight of the rolling stock. Selecting a scale that matches your space constraints ensures a more rewarding build.
How do I keep my track aligned when moving a modular layout?
Use steel pattern-maker dowels to ensure perfect registration between modular sections every time you set up. These provide sub-millimetre accuracy that traditional bolts simply cannot match. Soldering your rail ends to brass screws driven into the board edge also prevents the track from shifting or snagging during transit. This combination of mechanical and physical anchoring keeps your trains running smoothly across every join, even after repeated assembly and disassembly.
Can I build a portable layout on a budget?
You can build a high-quality layout on a budget by prioritising kit-building over ready-to-run models. Building from kits is approximately 40% cheaper, which allows you to allocate more funds toward professional diorama tools and scenery. A realistic starting budget for a small OO9 project is around £150. This amount typically covers a basic track setup, a second-hand locomotive, and several wagon kits to get you started on your modelling journey.
What materials are best for a lightweight baseboard?
A combination of 6mm birch plywood and extruded polystyrene (XPS) foam offers the best strength-to-weight ratio for modern modellers. The plywood provides a rigid, warp-resistant frame for mounting track and electronics, while the foam keeps the scenic base incredibly lightweight. This structure ensures the layout remains easy for one person to carry. It also provides a stable surface that resists the temperature changes often encountered during transport to different venues.
How do I transport my locomotives without damaging them?
Construct a dedicated transport case with bespoke foam inserts that cradle each locomotive and wagon individually. This prevents models from rolling or colliding when you're moving the layout between venues. Adding silica gel packs to the case is a proactive way to manage humidity and protect your metal components from oxidation during storage. These simple steps ensure your rolling stock arrives at the exhibition in the same condition it left your workshop.
Is DCC or DC better for a portable exhibition layout?
The choice between DCC and DC depends on your operational preferences, as both systems are capable of exhibition-standard performance. DC is often simpler for small end-to-end layouts, while DCC offers more flexibility for complex movements and sound. You should check with exhibition organisers regarding their specific power requirements and safety standards before finalising your control setup. Reliability is the priority, so choose the system you feel most comfortable troubleshooting under pressure.
How small can a narrow gauge layout actually be?
Narrow gauge layouts can be incredibly compact, with "pizza" designs fitting into a 2x2 foot space for continuous running. Boxfile layouts are even smaller, often fitting entirely within a standard A4 or A3 storage box. These tiny footprints are ideal for portable narrow gauge layouts where the goal is to master super-detailing without committing to a large room. Small size doesn't mean small ambition; it simply means a more focused and manageable project.
Do I need a special license to exhibit my layout at a show?
You don't need a specific license to exhibit, but you must comply with strict electrical safety regulations for the 2026 season. All mains-powered equipment must be protected by a Residual Current Detector (RCD) that trips at 30 milliamps. Most shows also require a valid Portable Appliance Testing (PAT) certificate for any equipment you bring. Confirming these requirements with the show manager well in advance ensures a stress-free setup on the morning of the event.