

The most impressive locomotive on your narrow gauge layout might be the one you didn't buy off a retail shelf. While ready-to-run models offer convenience, they often lack the unique character that defines a truly personal railway. Many hobbyists feel stuck between these generic options and the intimidating world of complex brass scratch-building. You've likely felt the frustration of searching for a specific prototype only to find it doesn't exist in a box, or perhaps you've hesitated to start because you aren't sure which commercial chassis will actually fit. High-quality o-16.5 locomotive kits provide the perfect middle ground, offering a path to a bespoke fleet without requiring master-level engineering skills.
We understand that the transition from collector to builder can feel daunting. This guide is designed to remove that uncertainty by showing you exactly how to choose, build, and finish professional-grade models. You'll learn how to identify the best 3D-printed bodies for your needs, match them with reliable power units, and apply painting techniques that ensure your finished work looks factory-fresh. We'll provide a clear roadmap for creating a unique, reliable fleet that sets your layout apart from the rest.
Key Takeaways
- Understand the spatial advantages of O-16.5 modeling, which pairs high-detail 7mm scale bodies with the space-saving benefits of 16.5mm track.
- While sourcing a motor can be challenging, you'll learn how to successfully pair o-16.5 locomotive kits with reliable commercial donor chassis.
- Explore the benefits of 3D-printed resin components, which provide an accessible alternative to the complexity of traditional brass or white metal assembly.
- Although resin requires careful preparation, mastering the cleaning and priming process allows you to achieve a smooth, professional-grade finish on every model.
- Learn how to transition from generic ready-to-run layouts to a bespoke narrow gauge railway featuring unique prototypes not found in retail boxes.
What are O-16.5 Locomotive Kits and Why Choose This Scale?
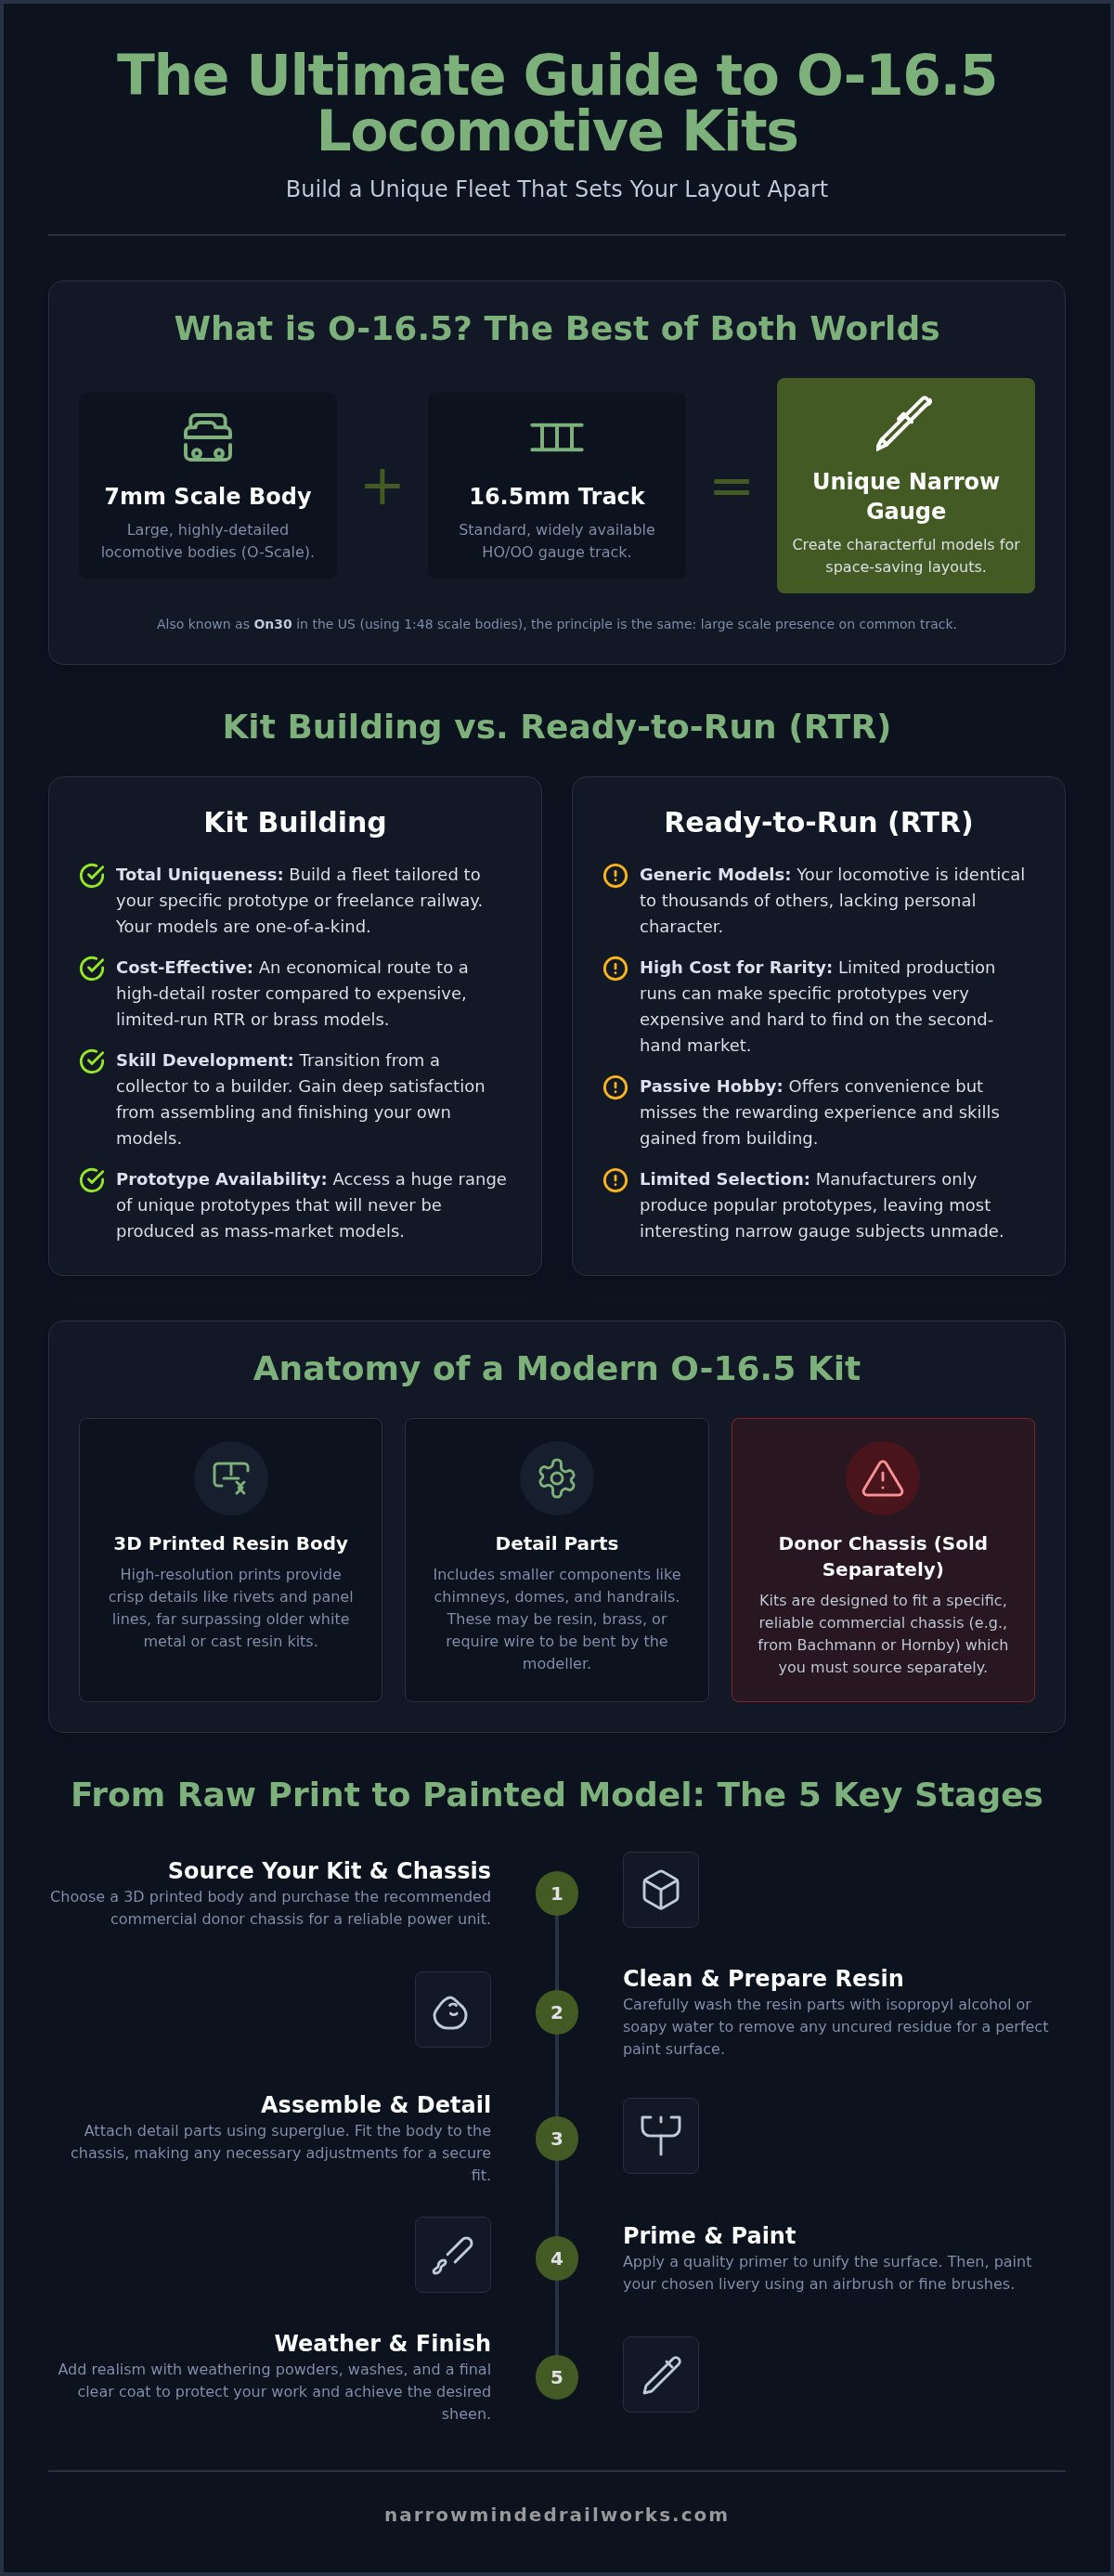
O-16.5 represents a unique intersection in the world of railway modelling. It combines 7mm scale (1:43.5) or O scale (1:48) locomotive bodies with 16.5mm track, which is the standard gauge for HO and OO scales. This combination effectively depicts a narrow gauge prototype, typically representing a 2-foot 3-inch to 3-foot gauge railway. While traditional kits often relied on heavy white metal or complex etched brass, modern o-16.5 locomotive kits have transformed the hobby. These contemporary models frequently utilize high-detail 3D printing, which offers the intricate textures of rivets and boiler bands without the assembly frustrations associated with older materials.
The primary appeal of this scale lies in its character. Narrow gauge railways were often quirky, industrial, and highly localized. Whether you are interested in quarry shunters or forestry diesels, these prototypes offer a level of charm that standard gauge models often lack. Because narrow gauge equipment is designed for tight environments, you can build a functionally complex layout in a much smaller footprint than a standard O gauge equivalent. It's about character. You get the physical presence of a large scale model while maintaining the space-saving benefits of narrower track standards.
O-16.5 vs. On30: Understanding the Gauge Difference
Modellers often encounter terminology that seems interchangeable but has distinct origins. Understanding the relationship between O-16.5 and On30 scales is vital for anyone entering the hobby. O-16.5 is the British designation, usually paired with 7mm scale proportions, while On30 is the American equivalent based on 1/4-inch scale. Both systems utilize 16.5mm track. Sourcing specialized narrow gauge track can be expensive and difficult to find in local shops. By using O-16.5, you can utilize standard HO or OO track and points, which makes the hobby more affordable and accessible for home modellers who want to focus on scenery and kit building rather than complex track laying.
The Benefits of Kit Building Over Ready-to-Run
Ready-to-run (RTR) narrow gauge models are often produced in limited runs, which can make specific prototypes hard to find. Building o-16.5 locomotive kits provides a proactive solution to this scarcity. It allows you to create a unique fleet tailored to your specific freelance or prototype railway. While an RTR model is identical to thousands of others, a kit-built locomotive carries your chosen livery, weathering, and detailing.
Cost is another significant factor. High-end brass imports can be prohibitively expensive for many hobbyists. Kits offer a more economical route to a high-detail roster. Beyond the financial aspect, the process facilitates skill development. Transitioning from a collector to a modeller provides a deep sense of satisfaction. You aren't just buying a product; you're developing the ability to prepare, assemble, and finish a professional-grade locomotive that stands out on any layout.
Anatomy of an O-16.5 Kit: Materials and Components
Understanding the components of o-16.5 locomotive kits is the first step toward a successful build. Most kits contain a primary body shell, specialized detail parts, and mounting hardware. While older kits relied on heavy white metal or brittle cast resin, today's hobbyists benefit from high-resolution 3D prints. These materials offer the crispness of a professional model with the flexibility needed for customization. You aren't just buying a static object; you're acquiring a platform for a functional piece of machinery.
One constraint beginners often face is the absence of a motor or wheels within the kit box. Most manufacturers don't include these to keep costs manageable and allow you to choose your preferred power unit. Instead, kits are designed around a "donor" chassis. By utilizing a reliable mechanism from a major brand, you ensure your locomotive runs smoothly without needing to assemble complex gearboxes from scratch. For those seeking historical accuracy, organizations like the Narrow Gauge Railway Society provide invaluable research to help you match your kit to the correct prototype dimensions.
The Rise of 3D Printed Resin Bodies
3D printing has revolutionized how we produce locomotive shells. It allows for complex internal geometries, such as hollow boilers designed specifically to house DCC decoders or sound speakers. While early prints sometimes suffered from visible layer lines, modern high-resolution printers have largely eliminated this issue. These resin bodies are also easier to drill for handrails or whistles compared to traditional cast resins, which often shattered under the pressure of a pin vice. This durability makes the assembly process much more forgiving for those new to the hobby.
Essential Detail Accessories for Locomotives
A raw body shell is only the beginning of a professional model. To achieve a realistic look, you'll need to add fine-scale details like bells, sand pipes, and prototypical couplers. Adding lead or tungsten weight is a proactive solution for the lighter weight of resin bodies, ensuring your engine has enough traction to pull a full rake of wagons. You can explore a variety of O-16.5 / 7mm scale kits and accessories to find the specific parts that will make your project stand out. Finally, don't overlook cab interiors. Adding a crew and painted backhead details creates a sense of scale that mass-produced models often miss.
The Chassis Challenge: Matching Kits to Power Units
Selecting a power unit is perhaps the most critical decision in your build. While o-16.5 locomotive kits provide the visual character of the model, the chassis provides the mechanical performance. Many modellers find it difficult to source independent motors and gearboxes that offer smooth slow-speed running. A proactive solution is to utilize high-quality donor mechanisms from established manufacturers like Bachmann or Life-Like. These units are engineered for heavy use and offer reliable electrical pickup right out of the box.
When choosing a chassis, the wheel arrangement must match your prototype's requirements. Small 0-4-0 units are ideal for quarry engines, while 0-6-0 and 2-6-0 arrangements support larger tender or tank locomotives. You might need to trim the metal frame or adjust mounting points to ensure the body sits at the correct height. It's essential to check that the resin shell doesn't interfere with the electrical pickups on the wheels. If the body is too low, it can cause short circuits or friction that damages the motor. You should also verify that the internal cab space allows for the original chassis wiring without pinching the cables.
Popular Donor Chassis for O-16.5 Projects
The Bachmann HO 0-6-0 is a staple in the hobby. It's a versatile workhorse that fits many small steam locomotive bodies perfectly. For those building modern or industrial narrow gauge layouts, diesel switchers like the SW1200 offer a reliable, compact alternative. Matching the wheelbase to your prototype is vital. If the wheels are too far apart or too close together, the locomotive won't have the realistic "sit" required for a professional-looking model. Always measure the distance between the axles before committing to a specific body kit.
Securing the Body to the Chassis
A secure fit is non-negotiable for reliable operation. You can create custom mounting lugs using styrene strips or utilize 3D-printed brackets that screw directly into the chassis frame. It's vital to design these mounts so the body remains easily removable. You'll need access for routine maintenance, such as lubrication and cleaning. Finally, pay attention to the center of gravity. If the locomotive is top-heavy, it may wobble or derail on tight curves. Adding low-profile weights near the axles helps stabilize the model and improves overall traction. A well-balanced engine doesn't just look better; it runs with a consistency that out-of-the-box models often lack.
Assembly and Finishing: From Raw Print to Painted Model
While 3D printing delivers exceptional detail, the raw components require specific preparation before they are ready for the layout. Most o-16.5 locomotive kits produced via resin printing arrive with small support marks or a slight tacky residue from the curing process. You should begin by washing the parts in warm, soapy water or a mild degreaser to ensure any remaining resin or release agents are removed. This step is vital. If the surface isn't perfectly clean, your primer won't adhere correctly, which leads to peeling paint later in the build. Use a soft toothbrush to reach into the corners of the cab and around the boiler fittings without damaging the fine details.
Finishing 3D Printed Surfaces
Modern prints are high-resolution, yet subtle layer lines may still appear on curved surfaces like boiler jackets or domes. A proactive solution involves using a high-build primer or a specialized spray filler to level the surface. You can use fine-grit sandpaper, typically around 800 to 1200 grit, to smooth these areas without losing the intricate rivet detail. For more detailed advice on achieving a professional look, see our guide on Painting 3D Printed Models: A Beginner's Guide. Once the surface is smooth, a final coat of light grey primer acts as a diagnostic tool, highlighting any remaining imperfections that need attention before the final livery is applied.
When you're ready for the main color, airbrushing provides the most even finish on large surfaces. However, many industrial narrow gauge engines benefit from the texture of traditional brush painting, which can replicate the look of hand-applied paint found on real-world workhorses. If you're looking for high-quality components to start your project, you can browse our full range of O-16.5 / 7mm scale kits to find your next build. Choosing a matte or satin finish often looks more prototypical than a high-gloss factory shine.
Weathering and Decals for Realism
Realism is achieved through layers. Before applying decals, you must apply a gloss varnish to the specific area. This prevents 'silvering', a common issue where air gets trapped behind the decal film and creates a reflective sheen. Once the transfers are set, a matte coat seals them in place. Weathering is the final stage that transforms a model into a hard-working machine. Use dark washes to accentuate door seams and vent grilles. Powders are excellent for simulating soot around the chimney or rust on the frames. Adding real coal to the tender or fabric curtains in the cab adds a tactile quality that distinguishes your locomotive from a mass-produced model.
Finding Your Next Project: Narrow Minded Railworks Solutions
Many modellers struggle to find characterful prototypes that reflect the true diversity of narrow gauge history. Narrow Minded Railworks provides a proactive solution by specializing in 3D-printed o-16.5 locomotive kits that capture the unique charm of industrial and forestry railways. Our bodies are designed specifically for enthusiasts who want a bespoke fleet without the frustrations of complex metalwork or the limitations of ready-to-run models. Because we ship globally from the UK, these specialized narrow gauge prototypes are now accessible to builders regardless of their location or previous experience with resin. You'll find that our focus on unique subjects helps your layout stand out from generic, out-of-the-box displays.
Our Approach to O-16.5 Kits
We understand that a model is only useful if it runs reliably on your track. Our design philosophy focuses on creating kits that fit seamlessly onto commercially available chassis from major manufacturers. This removes the uncertainty of matching a specialized body to an appropriate motor. Our prints are delivered with exceptionally high resolution, ensuring that surface imperfections are kept to a minimum and detail remains crisp. To learn more about how these standards compare across the industry, you should explore An Introduction to On30 Gauge: Your Complete Guide. By providing these resources, we help you make informed decisions about your next layout project while setting realistic expectations for the build process.
Beyond Locomotives: Completing Your Scene
Creating a convincing railway environment requires more than just a single engine sitting on a piece of track. You'll be able to pair your new locomotive with our range of wagon kits to ensure your rolling stock matches the high-detail aesthetic of your traction. To bring your scenes to life, we offer 3D scanned figures that add a realistic human element to cabs and platforms. These figures are specifically scaled to 7mm proportions to maintain perfect consistency across your entire layout. Finally, our diorama tools and scenery kits allow you to finish your layout with the same professional precision you applied to your locomotive build. This comprehensive approach ensures that every element of your project, from the trackside details to the rolling stock, meets a high standard of quality and reliability.
Build Your Custom Narrow Gauge Future
Transitioning from out-of-the-box models to custom builds allows you to create a layout that is truly one-of-a-kind. While the technical requirements of finding a chassis or preparing resin might seem restrictive, modern o-16.5 locomotive kits provide a proactive solution for the ambitious modeller. You've seen how high-resolution 3D prints remove the traditional barriers of complex brass construction, making it easier than ever to replicate unique industrial prototypes. By matching these bodies with reliable commercial power units and applying professional finishing techniques, you can develop a fleet that runs as well as it looks.
At Narrow Minded Railworks, we specialize in narrow gauge designs that bring character and authenticity to your railway. We offer high-resolution 3D prints with worldwide shipping to support your projects wherever you are. You don't have to settle for generic models when specialized prototypes are within reach. Browse our latest 3D printed locomotive and wagon kits to find the perfect centerpiece for your layout. We look forward to seeing your unique narrow gauge creations come to life on the track.
Frequently Asked Questions
What is the difference between O-16.5 and On30 scale kits?
O-16.5 is the British standard based on 7mm scale, while On30 is the American equivalent utilizing 1/4 inch scale. Both systems run on 16.5mm track, but they represent different regional prototypes. While the track gauge is identical, the physical proportions of the locomotive bodies differ slightly to match their respective scales. You should choose the scale that aligns with the specific regional prototype and scenery you intend to model on your layout.
Do O-16.5 locomotive kits come with motors and wheels?
Most o-16.5 locomotive kits are supplied as body shells only and don't include the motor or wheels. This constraint allows manufacturers to focus on high-detail resin parts while keeping the initial purchase price affordable. A proactive solution is to source a reliable donor chassis from a major manufacturer like Bachmann. This ensures your finished model has a factory-tested mechanism that provides smooth electrical pickup and consistent performance during operation.
Can I use standard HO scale track for my O-16.5 kit-built locomotives?
You can certainly use standard 16.5mm HO or OO gauge track for your O-16.5 models. This is a significant advantage for hobbyists because it removes the need for expensive, specialized narrow gauge track systems. However, standard track sleepers are often spaced too closely for a realistic narrow gauge appearance. A proactive solution is to use specialized narrow gauge flex-track, which features wider sleeper spacing to correctly represent a 2-foot or 3-foot gauge prototype.
What is the best glue to use for 3D printed resin locomotive kits?
Cyanoacrylate, commonly known as super glue, is the only effective adhesive for joining 3D printed resin components. Traditional plastic cement won't work because it cannot melt the surface of the resin to create a bond. You should use a medium-viscosity glue to allow for a few seconds of adjustment during assembly. If you find small gaps between the printed parts, a proactive solution is to use a gap-filling CA glue followed by light sanding for a seamless finish.
How do I know if a specific chassis will fit a locomotive body kit?
Manufacturers generally specify the required donor mechanism in the kit instructions or product description. If you want to use an alternative motor, you should measure the wheelbase and height of the chassis before purchasing. While some o-16.5 locomotive kits require minor trimming of the internal resin supports, a proactive solution is to select kits designed for popular, widely available chassis. This ensures a secure fit and reduces the need for complex mechanical modifications.
Are O-16.5 kits suitable for beginners in the model railway hobby?
These kits are an excellent choice for beginners who want to move beyond ready-to-run models. While building a kit requires more patience than opening a retail box, 3D printed resin is much easier to work with than traditional etched brass. If you feel hesitant about starting your first project, a proactive solution is to build a simple wagon kit first. This allows you to practice resin preparation and painting techniques before moving on to a locomotive.
Do I need to paint my locomotive kit, or does it come pre-colored?
You will need to paint your locomotive, as the resin parts are supplied in a single raw color. This allows you to apply a custom livery that fits your specific railway theme. While the raw resin may have a slight texture, a proactive solution is to apply a high-quality primer designed for resin models. This identifies any surface imperfections that need sanding and provides a stable base for your final choice of colors and weathering.
Can O-16.5 locomotive kits be converted to DCC and sound?
Most modern kits feature hollow boilers and cabs that provide enough space for digital decoders and speakers. While the kits themselves don't include electronic systems, they are designed to be compatible with aftermarket DCC components. If you find that internal space is restricted in a very small shunter, a proactive solution is to hide the decoder and speaker in a permanently coupled wagon. This ensures you can enjoy digital control without compromising the model's scale appearance.