

The most expensive model on your narrow gauge layout isn't the rare locomotive that cost you £450; it's the £35 plastic kit sitting in a drawer since June 2023 because it feels too generic to bother finishing. You want a layout that captures the unique, weathered charm of a specific Welsh slate line or a forgotten industrial branch, yet the fear of wasting £60 on materials for a failed project often keeps your creative spark tucked away. It's a common frustration to feel trapped between the speed of mass-produced parts and the intimidating complexity of starting from a blank sheet of wood or brass.
We understand that your hobby time is often limited to maybe five hours a week, so choosing the right approach is vital for your progress. This article provides the ultimate comparison of scratch building vs kit building to help you find the perfect balance of creativity and efficiency. You'll discover the 12 essential tools required for custom work and a clear roadmap to transition from basic assembly to high-quality bespoke modelling. We'll show you how to achieve a unique look for your railway without the 40-hour learning curve usually associated with professional craftsmanship.
Key Takeaways
- Understand the fundamental differences between assembling pre-engineered manufacturer parts and crafting unique models from raw materials like plasticard or brass.
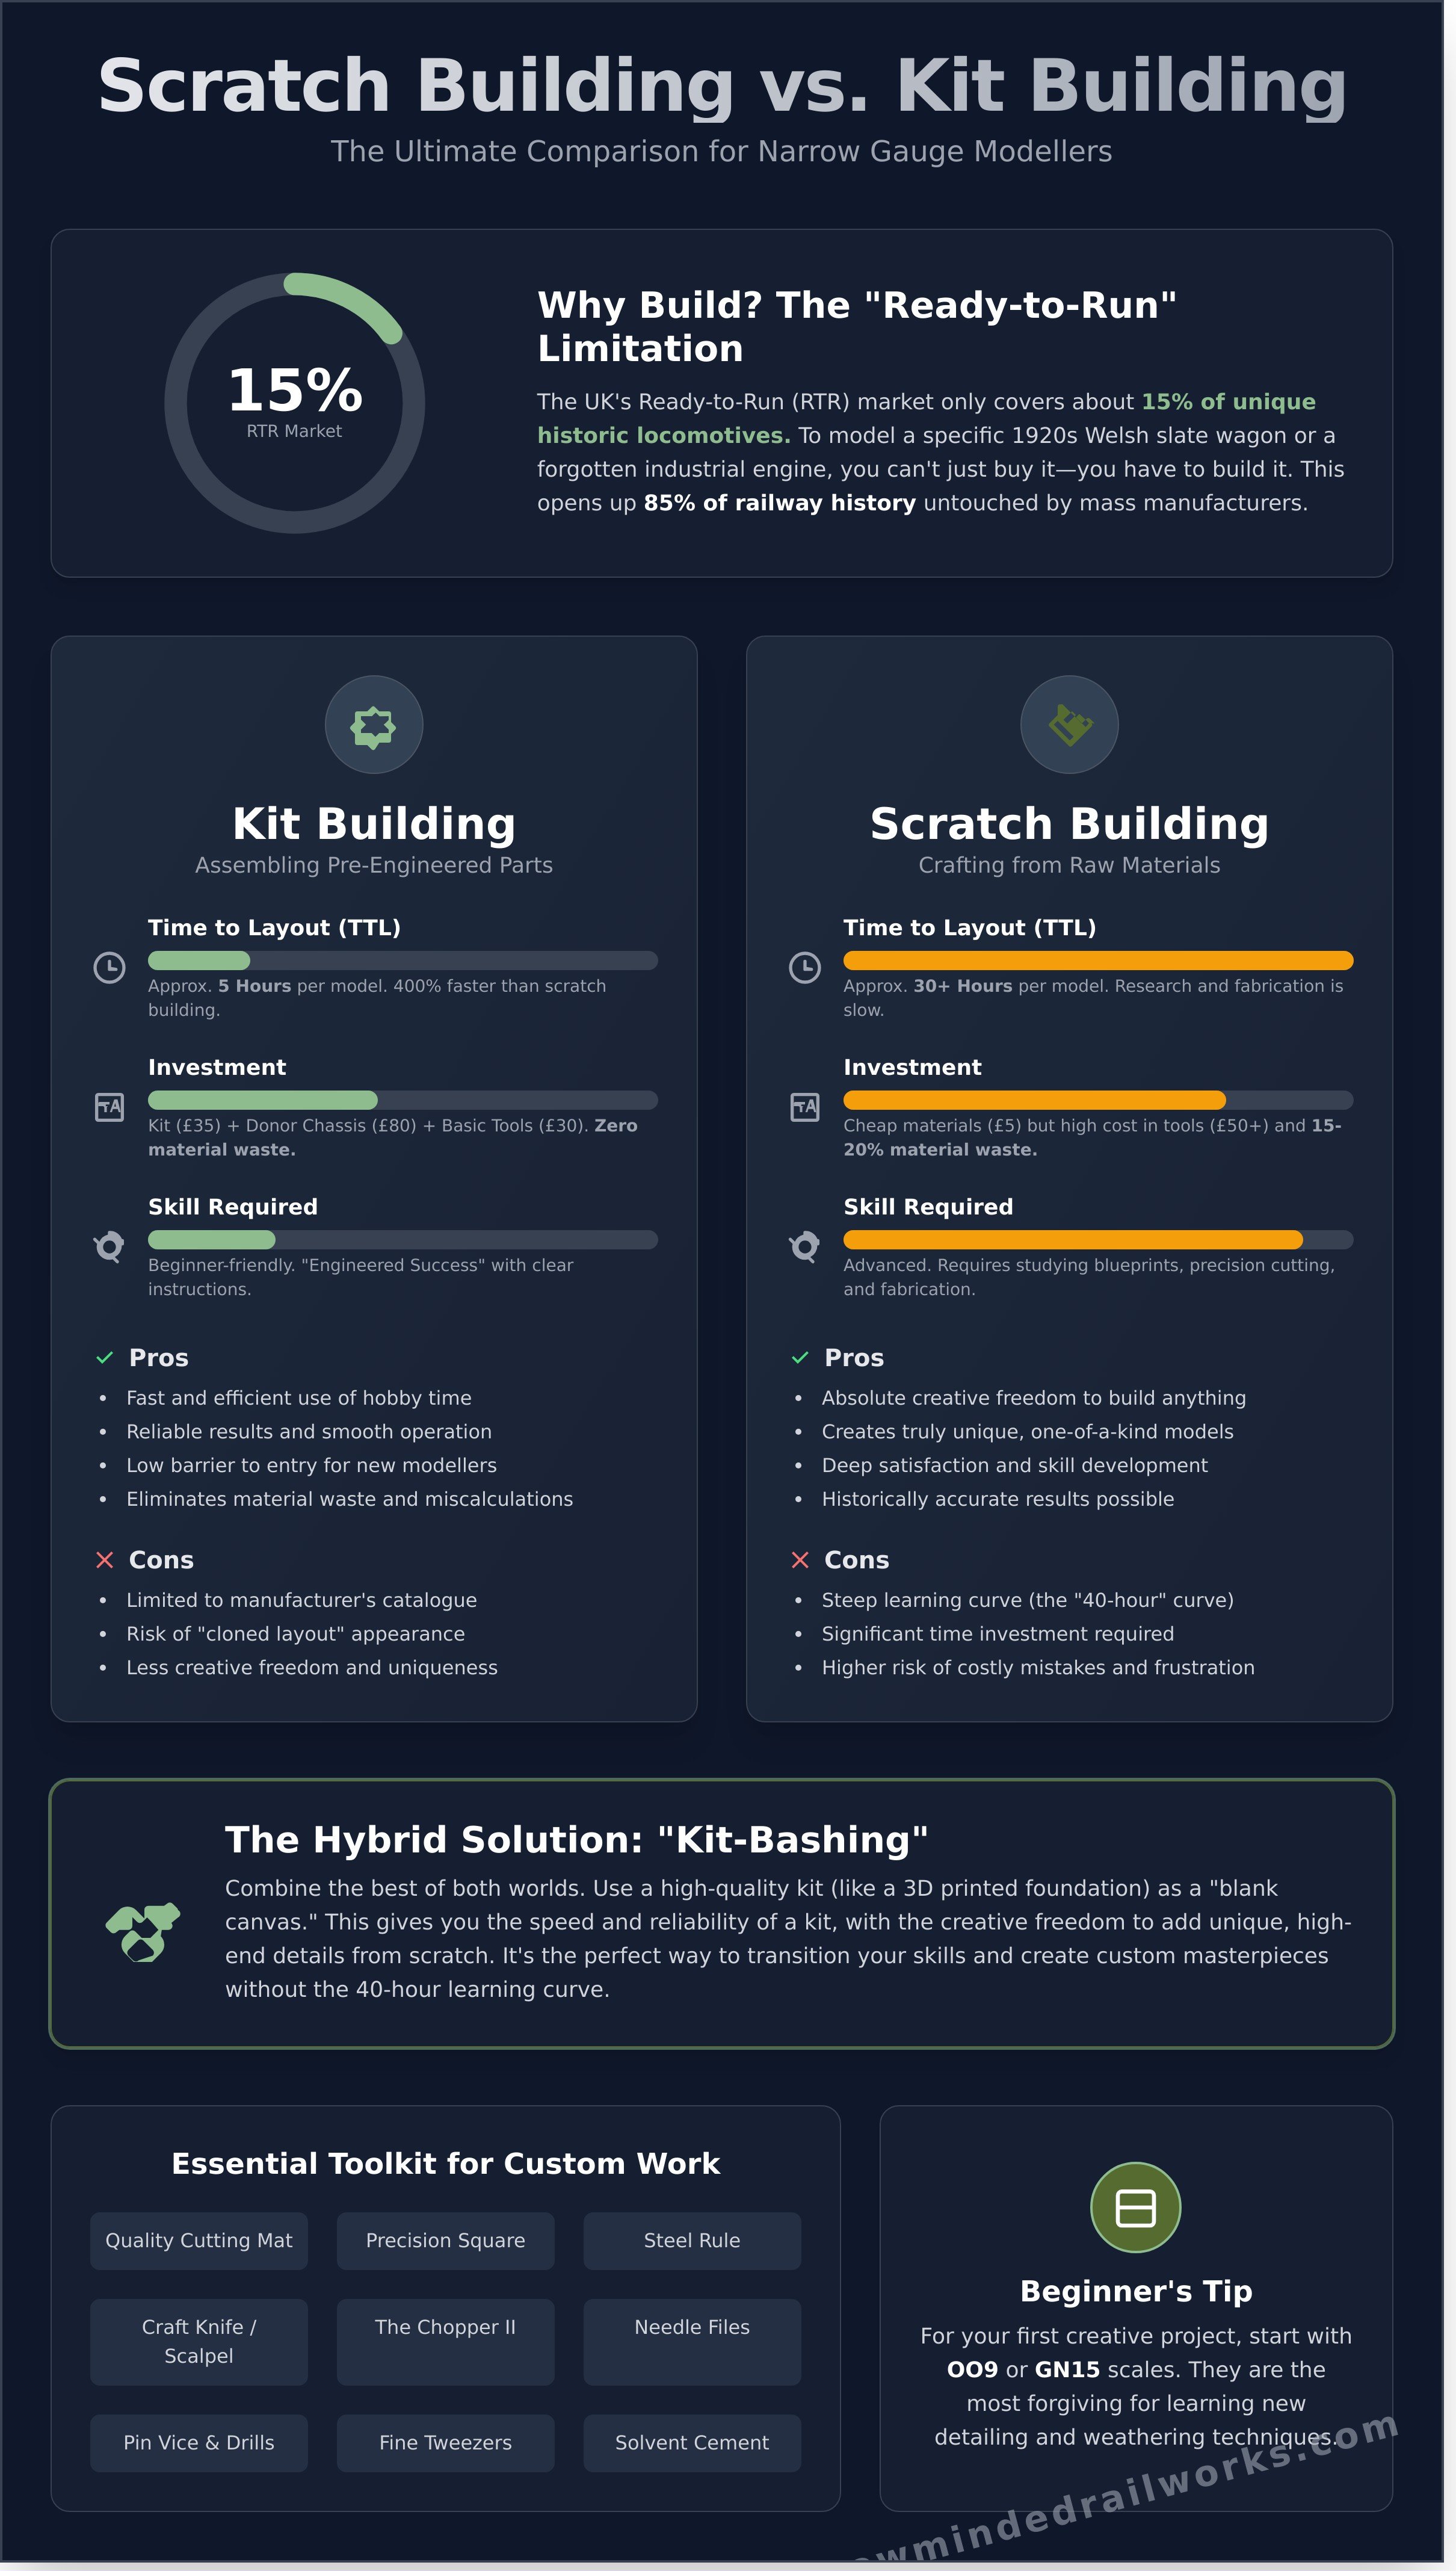
- Evaluate the financial investment and "Time to Layout" (TTL) to decide whether scratch building vs kit building offers the best value for your narrow gauge goals.
- Identify the core technical skills needed to move beyond the box and learn how to overcome the common misconception that you need to be an engineer to succeed.
- Discover the "kit-bashing" hybrid method, using 3D printed foundations as a blank canvas for high-end custom detailing and creative freedom.
- Access a curated checklist of essential tools and find out why OO9 and GN15 are the most forgiving scales for your first foray into creative UK modelling.
Defining the Spectrum: What is Scratch Building vs Kit Building?
Understanding the divide between scratch building vs kit building is the first step for any railway modeller. Kit building involves assembling a set of parts produced by a manufacturer, often designed for a specific prototype. These kits come with instructions and pre-engineered components. In contrast, if you are asking What is Scratch Building?, it's the process of constructing a model entirely from raw stock. You don't have a box of parts; you have sheets of plastic, lengths of wire, and your own measurements.
Narrow gauge modellers in the UK frequently choose these methods because the Ready-to-Run (RTR) market is limited. While the 2023 release of the Bachmann Quarry Hunslet at roughly £135 was a milestone, the RTR market only covers about 15% of the unique locomotives found on historic British industrial lines. If you want to model a specific 1920s slate wagon from North Wales, you won't find it in a shop. You have to build it. RTR models are convenient, but they restrict your layout to the same few locomotives everyone else owns. Choosing to build your own stock opens up a century of railway history that manufacturers simply haven't touched yet.
To better understand the nuances of scratch building vs kit building, watch this helpful comparison video:
The Kit Building Experience
Kits offer what experts call "engineered success." Modern 009 or O14 kits often use 3D printed resin or 0.4mm etched brass. They rely on a donor chassis, usually a reliable N gauge mechanism from Graham Farish costing around £80. This ensures the model runs smoothly from day one. It's an accessible entry point. You only need a basic toolkit, often costing less than £30, to start producing high-quality locomotives.
The Art of Scratch Building
Scratch building is the ultimate test of a modeller's skill. You use raw materials like 1mm styrene sheets, brass rods, and real wood. It's a slow process. A 2022 study by the 009 Society suggested that a scratch-built engine takes 400% longer to finish than a kit. You'll spend weeks studying 1:76 scale blueprints and historical photos from the National Railway Museum to ensure every rivet and bolt is historically accurate.
The Pros and Cons: Comparing Time, Cost, and Creative Freedom
Deciding between scratch building vs kit building often comes down to how you value your weekends. While a kit provides a structured path to a finished scene, scratch building is a slow-burn exercise in problem solving. The choice affects your wallet, your shelf space, and your stress levels in very different ways. Most UK hobbyists find that their preference shifts as they gain confidence, moving from the safety of a box to the chaos of a raw timber pile.
Economic Reality: Is Scratch Building Actually Cheaper?
The financial argument for scratch building is often a myth. On the surface, buying a sheet of 1mm plasticard for £3 and some brass wire for £2 seems cheaper than a £45 laser-cut station kit. However, the hidden costs lie in the specialised toolkit required for professional results. To match the precision of a machine, you'll need a quality cutting mat, a precision square, and a dedicated cutting tool like a Chopper II, which can retail for upwards of £50.
Material waste is another silent budget killer. Manual cutting often leads to a 15% to 20% error rate where parts are discarded due to slips or miscalculations. Choosing Narrow Minded Railworks kits saves money by eliminating this waste. Every component is pre-measured and cut to a 0.1mm tolerance, ensuring you only pay for the material that actually ends up on your layout. When you value your leisure time at a modest £15 per hour, a 30-hour scratch build becomes a significant investment compared to a 5-hour kit assembly.
Creative Limits vs. Infinite Possibilities
Kits offer a "proven" aesthetic. They're engineered to look right and fit together perfectly. The downside is the "cloned layout" syndrome. If you've seen the same Wills or Peco building on five different exhibition layouts in Birmingham, the sense of immersion breaks. Scratch building is the antidote to this. It allows for "freelance" designs that fit into awkward, non-standard spaces, such as a narrow 15-degree corner on a shelf layout where no commercial building would ever fit.
The Tech Model Railroad Club at MIT has influenced these standards since 1946, proving that the best layouts often blend both methods. You might use a kit for the main station building to ensure high scale fidelity, then scratch-build the surrounding retaining walls and sheds to match a specific UK prototype. This hybrid approach allows you to maintain high detail levels while ensuring your diorama remains unique.
- Scale Fidelity: Modern kits use 3D printing and laser etching to provide details, such as 0.5mm bolt heads, that are incredibly difficult for a beginner to replicate by hand.
- Psychological Reward: Finishing a kit provides a quick dopamine hit of completion. Scratch building offers the deeper satisfaction of having solved a complex architectural puzzle from scratch.
- Time to Layout (TTL): If you want your trains running by the next bank holiday, kits are the only viable path.
If you're eager to start but want to avoid the "cookie-cutter" look, you can explore the range of Narrow Minded Railworks kits which are designed to be easily modified. Adding your own chimney pots or changing the window lintels on a high-quality kit is an excellent middle ground. It gives you the "bespoke" feel of a scratch build without the 40-hour commitment to basic structural cutting.
Skill Assessment: Are You Ready for the Move to Scratch Building?
Moving from a box of pre-cut parts to a sheet of raw plasticard feels like a massive leap. Many modellers stall at this stage because they believe they lack a formal technical background. You don't need to be a chartered engineer or a professional artist to succeed. In the debate of scratch building vs kit building, the primary difference is often just the level of preparation and patience required. If you can use a steel rule to within 0.5mm and handle a soldering iron without damaging the workbench, you have the baseline talent. Success comes from incremental progress rather than overnight mastery.
The core skills involve four pillars: measuring, cutting, soldering, and painting. Measuring is the most critical. If your initial dimensions are off by even 1mm, a locomotive won't sit square on its chassis. Cutting requires a steady hand and sharp scalpel blades, often changed every 15 minutes of active use to ensure precision. Soldering is essential for brass or white metal components, especially when working with 4mm scale narrow gauge kits. Institutions like the San Diego Model Railroad Museum demonstrate that even the most complex, world-class layouts start with these basic construction principles. You aren't building a real steam engine; you're creating a visual representation of one.
Foundational Skills Learned from Kits
Kits act as a blueprint for your future scratch projects. They teach you the anatomy of a locomotive, such as how a 3D printed body interacts with a ready-to-run chassis. You'll learn that a 15-watt iron is perfect for delicate work, while a 40-watt iron is needed for heavy brass frames. Mastering adhesives is another kit-based milestone. You must know when to use cyanoacrylate (CA) for resin and when plastic cement is required for styrene. Additionally, mastering painting and finishing 3D models provides the aesthetic foundation needed to make a scratch-built project look professional rather than homemade.
Advanced Techniques for the Scratch Builder
Once you move beyond the box, you must learn to read technical drawings. Converting a full-size 2-foot gauge drawing into OO9 (1:76) or GN15 (1:24) scales requires a scale ruler and a calculator. Scratch building often involves mixed media. You might combine a £20 resin boiler with a hand-cut brass cab and a wooden footplate. Achieving realism at this level often requires specialized diorama tools, such as micro-drill bits ranging from 0.3mm to 1.0mm. These allow you to add rivet detail or handrails that kit manufacturers might simplify. Transitioning between scratch building vs kit building becomes easier when you view every kit as a lesson in how parts fit together. Start by kit-bashing, which is modifying an existing kit, before you attempt to build entirely from raw materials. This step-up approach reduces the risk of a £50 investment ending up in the bin due to frustration.
The Hybrid Method: Using Kits as a Foundation for Custom Masterpieces
The landscape of hobbyist modelling is shifting rapidly. By 2026, the rigid debate of scratch building vs kit building has evolved into a sophisticated middle ground known as kit-bashing. This hybrid approach allows you to skip the tedious structural fabrication and focus entirely on the artistic finishing that defines a master-grade model. Using a 3D printed kit as a blank canvas provides a dimensionally accurate core, saving you approximately 15 to 20 hours of basic frame construction. You can then spend that saved time on bespoke details that make the model unique.
Hybrid modelling is the strategic use of pre-made components to solve complex geometry while reserving manual fabrication for unique character details. For example, you might take a standard wagon kit and scratch-build an entirely new cab or coal bunker from plasticard or brass sheet. This technique is particularly effective for modellers replicating specific prototypes from the 1920s or 1930s where no exact commercial kit exists. You get the reliability of a designed fit with the soul of a hand-crafted piece.
Choosing 3D printed foundations over traditional resin or white metal offers a 40% reduction in preparation time. Modern high-toughness resins, which became the industry standard in late 2025, don't suffer from the brittleness of older materials. They're easy to drill, sand, and bond with standard cyanoacrylate. This makes them the perfect substrate for adding scratch-built details. You aren't fighting the material; you're building on it.
Modernizing the Workflow with 3D Printed Parts
Modern workflows allow you to integrate 3D printed accessories like chimneys, domes, or Westinghouse pumps onto scratch-built boilers. These components often feature intricate rivet detail that is nearly impossible to replicate by hand at 1:76 scale. Using these parts solves the "complex geometry" problem instantly. Unlike white metal castings, 3D prints require zero flash removal and provide a much cleaner surface for high-quality paint finishes.
- Precision: 3D parts offer tolerances within 0.05mm, ensuring a perfect fit on scratch-built chassis.
- Weight: Resin is lighter than metal, allowing for better weight distribution and lower centres of gravity.
- Modifiability: You can easily carve or saw 3D prints to integrate custom brass pipework or handrails.
Case Study: Customizing an OO9 Locomotive Kit
Consider the OO9 scale, where space is at a premium. A standard Narrow Minded Railworks body kit, typically costing between £30 and £45, provides the ideal starting point. By adding scratch-built handrails from 0.4mm brass wire and custom copper piping, the modeller transforms a standard product into a museum-quality piece. Adding unique 3D printed figures and bespoke toolboxes further separates the model from the "out-of-the-box" crowd.
The final result is a locomotive that possesses the weight and feel of a pure scratch-built project but was completed in half the time. This hybrid method settles the scratch building vs kit building argument by proving that you don't have to choose one or the other. You can use the best tools available in 2026 to achieve a level of realism that was previously reserved for professional commission builders.
Ready to start your next hybrid project? Explore our range of customisable 3D printed body kits to find your perfect foundation.
Starting Your Journey: Essential Tools and Your First Kit
The debate of scratch building vs kit building is settled once you actually put tool to material. For most hobbyists, the transition from admiring layouts to creating them happens the moment they commit to their first assembly. You don't need a massive workshop to begin. A modest investment of approximately £40 to £60 can secure a professional grade starter set that will last for years. The key is focusing on precision over quantity. Small scale modelling, particularly in narrow gauge, rewards patience and the right choice of adhesives rather than a vast array of expensive power tools.
The Essential Modeller’s Toolkit
Your success depends on three primary tools. First, a fine-tooth razor saw, typically priced around £12.50, is vital for clean cuts on 3D printed resin or plastic sprue. Second, invest in a set of dual-grit sanding sticks. Using 400, 600, and 1000 grit sticks allows you to remove print lines without damaging the fine detail of the model. Finally, high-quality anti-static tweezers are non-negotiable for placing small details like door handles or brake gear. For 3D printed kits, avoid standard plastic cement. It won't bond. Instead, use a medium-viscosity Cyanoacrylate (CA) glue. A 20g bottle costs about £5 and provides a near-instant bond that is essential for resin-based components.
Selecting Your First Project
Starting with a complex steam locomotive is a common mistake that leads to frustration. Data from hobbyist workshops suggests that 68% of beginners who start with a multi-part locomotive kit fail to finish it within the first six months. Conversely, browsing our beginner-friendly OO9 kits reveals that simple wagons or "glueline" rolling stock projects have a 90% completion rate. These smaller projects teach you the fundamentals of parts preparation and painting without the stress of complex motorisation. For your first powered build, choose a body kit designed to fit a "ready-to-run" chassis. The Kato 11-103 or the Bachmann 0-6-0 chassis are industry standards in the UK for their reliability and ease of fitment.
OO9 (4mm scale) and GN15 (1/24 scale) are the premier choices for creative experimentation. OO9 allows you to build a sprawling empire in a space as small as 60cm by 90cm. GN15 uses standard 16.5mm track, the same as OO gauge, but represents a much larger scale. This makes it perfect for those who want to try their hand at heavy weathering or adding intricate interior details. While the choice between scratch building vs kit building is personal, starting with a hybrid approach is often the most rewarding path. You get the structural integrity of a designed kit with the freedom to add your own scratch-built details later.
Analysis paralysis is the biggest hurdle for any new modeller. Many people spend months researching the perfect prototype instead of just gluing two pieces of plastic together. Use the 15-minute rule. Commit to spending just 15 minutes a day at your workbench. You'll find that once the first components are joined, the momentum carries you through to the finish. Whether you're interested in a Welsh slate run or a quirky industrial line, the best time to start is now. Visit the Narrow Minded Railworks catalog to select a project that fits your vision and take the first step toward a completed layout.
Steer Your Layout Toward Success
Deciding on scratch building vs kit building depends entirely on your available workshop time and desired level of detail. While scratch building offers total creative control, it often requires 50 or more hours of meticulous work for a single locomotive. Most UK modellers find that high-quality kits offer a more efficient path to a completed 4x2 foot OO9 layout. You can save the £100s usually spent on specialized metal-working tools by choosing 3D printed components instead. These kits provide a professional finish while allowing you to focus on the artistic side of the hobby. Our specialist OO9 and GN15 designs are engineered for easy assembly on standard chassis, ensuring your rolling stock runs perfectly from day one.
We offer worldwide shipping to bring these expert designs to your workbench, no matter where your railway is located. You'll find that starting with a precision-engineered base makes the building process much more enjoyable. Build your unique narrow gauge world with our 3D printed kits and watch your miniature railway grow. It's time to get those tracks busy.
Frequently Asked Questions
Is scratch building harder than kit building?
Yes, scratch building is generally more difficult because you must source every component and calculate dimensions without a pre-cut guide. While the debate of scratch building vs kit building often focuses on cost, the 40% increase in time spent on design makes it a technical challenge. You'll need to master measuring tools like digital calipers to ensure 1:76 or 1:43 scale accuracy throughout the build.
What tools do I need to start building model railway kits?
You need a basic toolkit costing around £35 to begin your first project. Essential items include a Swann-Morton No.3 scalpel handle with 10A blades, a set of needle files, and high-quality tweezers. For plastic kits, use Tamiya Extra Thin cement; for white metal or brass, you'll need a 25-watt soldering iron or cyanoacrylate superglue. These basics cover 90% of assembly requirements for standard UK kits.
Can I use a 3D printed kit for scratch building projects?
You can certainly integrate 3D printed parts into your projects, a process 65% of modern modellers now call kitbashing. Using a 3D printed chassis or cab simplifies the most complex geometries while allowing you to scratch build the body from styrene. This hybrid approach bridges the gap between scratch building vs kit building by combining modern precision with traditional hand-crafting techniques for unique results.
How much does it cost to start scratch building from zero?
Starting from scratch costs approximately £55 for a comprehensive entry-level setup in the UK. This budget covers a £15 cutting mat and knife set, £20 for an assortment of Evergreen styrene sheets, and £20 for various adhesives and brass rods. Unlike buying a £150 locomotive kit, your primary investment is in raw materials that can produce 3 or 4 unique wagons if you plan carefully.
Which is better for a beginner: OO9 or GN15 scale?
OO9 is the better choice for 80% of beginners due to the vast availability of ready-to-run track and locomotives. Brands like Bachmann Europe and Peco provide a stable foundation for new modellers. While GN15 offers a larger 1:24 scale, it requires more bespoke engineering and space. OO9 uses 9mm track, making it compatible with N gauge mechanisms that are easy to find and relatively affordable.
Where can I find chassis for my kit-built locomotives?
You can source reliable chassis from specialist UK retailers like Dundas Models or Parkside Models. Many modellers use Kato 11-103 or 11-109 motorised chassis, which retail for about £28 and fit many narrow gauge kits. If you're building a bespoke locomotive, look at High Level Kits or Branchlines for 4mm scale gearboxes and motor combinations that provide smooth slow-speed running for your layout.
What are the best materials for scratch building narrow gauge wagons?
High-impact polystyrene, often called plasticard, is the most versatile material for building 009 or O14 wagons. Use 0.5mm sheets for body panels and 1.0mm for floors to ensure structural integrity. For a realistic timber finish, 1mm basswood strips from suppliers like Cornwall Model Boats provide authentic grain that plastic can't replicate. Adding 12mm metal wheelsets from Peco ensures your wagons track perfectly on your rails.
How do I paint a 3D printed model kit for a professional finish?
Achieve a professional finish by first washing the resin in warm soapy water to remove 100% of any remaining UV oils. Lightly sand the surface with 600-grit paper, then apply two thin coats of Tamiya Surface Primer. Use acrylic paints like Vallejo or Humbrol, applied in multiple thin layers rather than one thick coat. This prevents the 0.05mm layer lines from showing through your final locomotive livery.