

A flawlessly finished narrow gauge locomotive doesn't start with the airbrush; it begins the moment your 3D printer finishes its final layer. Many modellers worry that the delicate details on a 009 or O-16.5 kit are too fragile for rigorous cleaning, or they fear that visible print lines will ruin the realism of their layout. While raw prints often exhibit stubborn surface imperfections, these constraints don't have to define your finished model. By mastering the professional techniques for preparing 3d printed models for painting, you can transform a rough prototype into a masterpiece that looks like injection-moulded plastic.
We understand that the transition from a 3D print to a paint-ready kit involves specific technical hurdles, so we provide proactive solutions to ensure long-lasting paint adhesion and surface smoothness. You'll learn how to safely remove supports without snapping tiny parts and how to sand surfaces without erasing microscopic rivets. This guide covers everything from chemical cleaning to the final primer coat. It gives you the confidence to produce professional-grade narrow gauge rolling stock and scenery that stands the test of time.
Key Takeaways
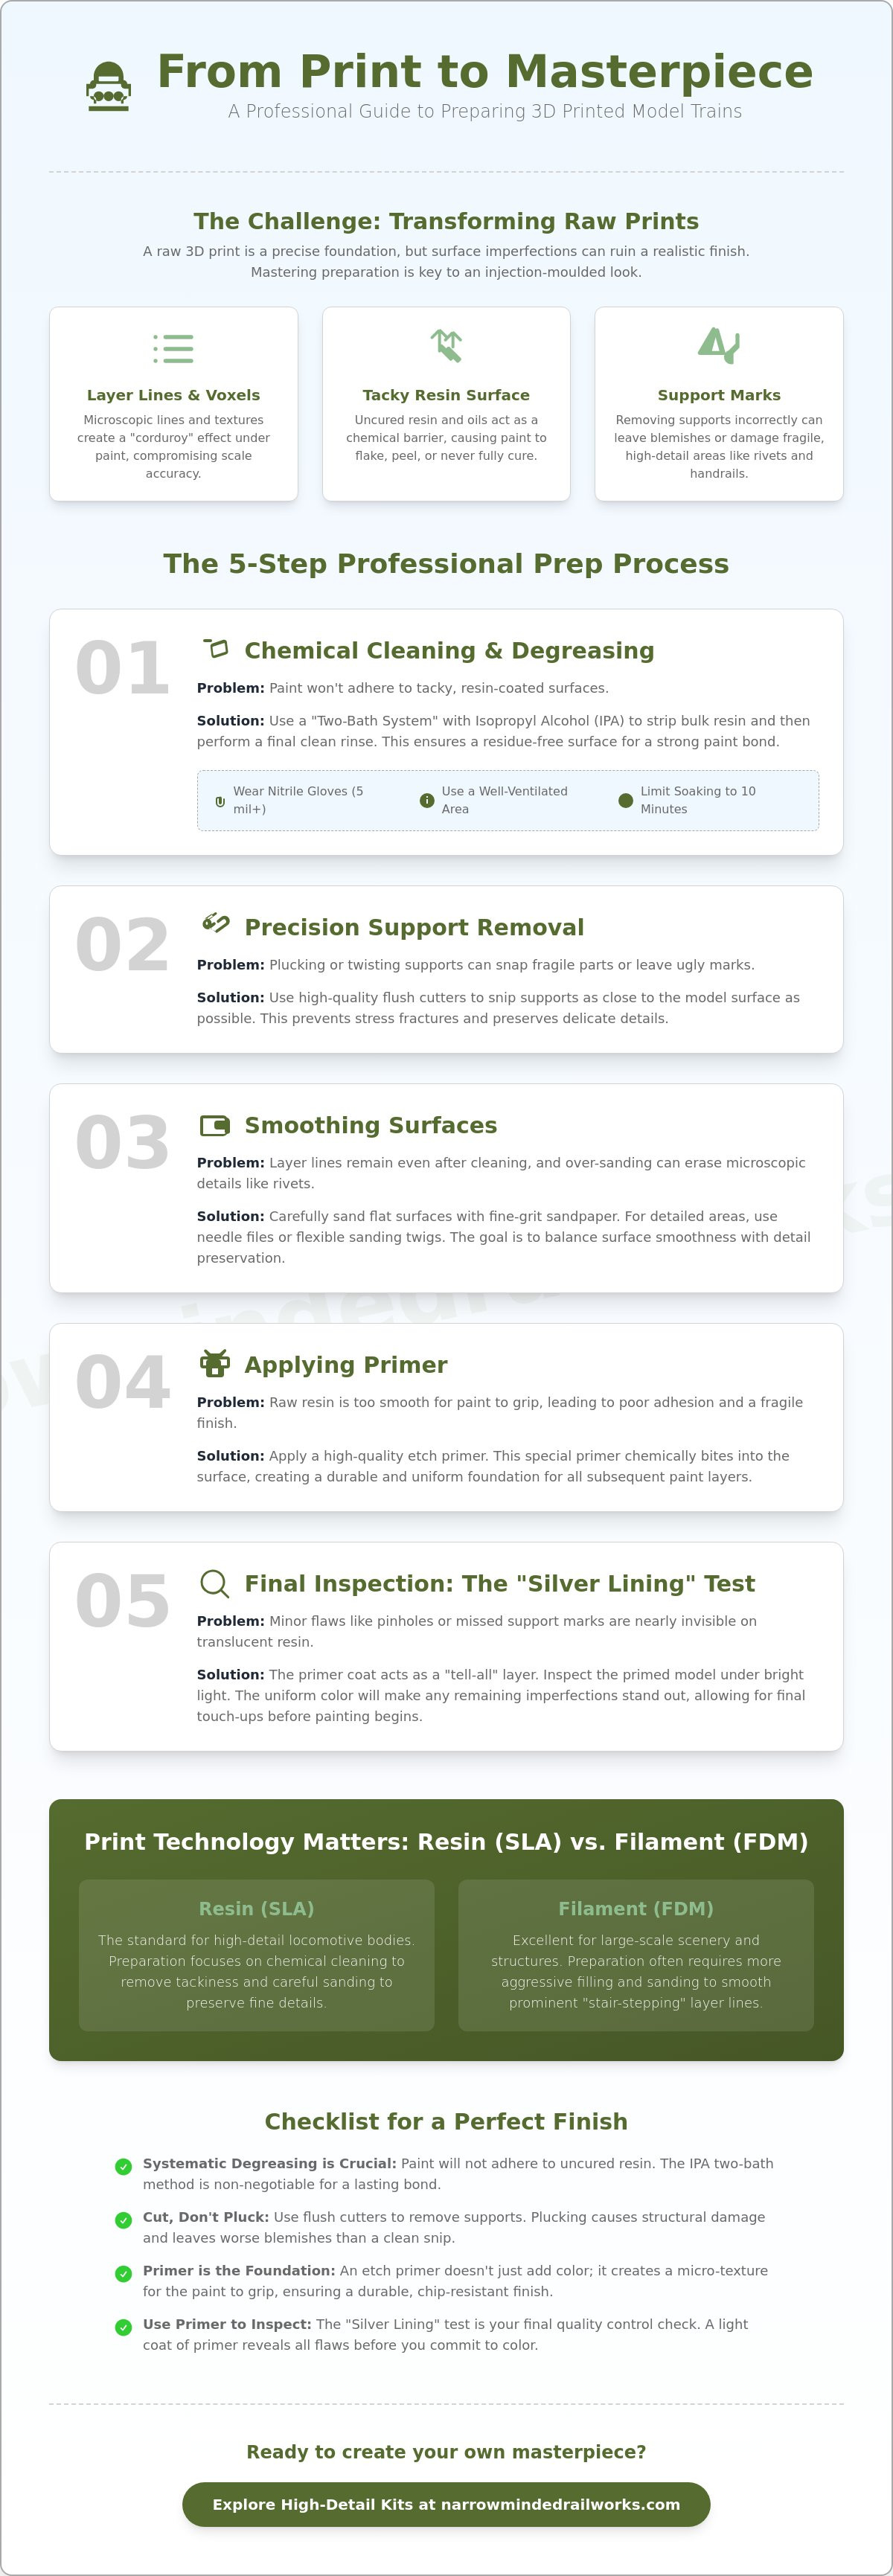
- Layer lines and voxels can compromise scale accuracy; however, understanding their structure allows you to treat them effectively for a smooth finish.
- Paint doesn't adhere to tacky resin surfaces, but systematic degreasing removes the chemical barriers to a professional bond.
- Support marks often hide in conspicuous areas, yet utilizing flush cutters prevents the structural damage caused by plucking delicate parts.
- Raw resin surfaces often lack the texture needed for paint adhesion; therefore, preparing 3d printed models for painting with an etch primer is essential for a durable finish.
- Minor flaws are difficult to spot on raw resin, so the "Silver Lining" test uses light to confirm your model is ready for the paint shop.
Why Surface Prep is the Most Critical Step for 3D Printed Rail Kits
A raw 3D print serves as a high-precision foundation, but it rarely arrives in a condition suitable for immediate finishing. The process of preparing 3d printed models for painting acts as the essential bridge between industrial manufacturing and the artistic assembly of a scale model. While modern printers achieve incredible resolution, they still create surfaces composed of microscopic "voxels" and horizontal layer lines. These artifacts interact poorly with thin scale model paints, often highlighting the very textures you wish to hide.
You might find that your new OO9 locomotive body looks perfect under a desk lamp, yet the first mist of paint reveals a corduroy-like texture across the boiler. This is a common constraint of the medium. However, a structured prep routine ensures your painting 3d printed models efforts aren't wasted on a flawed surface. Understanding the fundamental 3D printing post-processing techniques is the first step toward a museum-quality narrow gauge layout.
To better understand how these preparation steps work in practice, watch this helpful video:
Resin (SLA) vs. Filament (FDM) Prep Requirements
Resin printing has become the standard for narrow gauge locomotive bodies due to its high detail density. While FDM prints are excellent for large-scale diorama scenery, they often suffer from "stair-stepping" on curved surfaces, which requires aggressive filling and sanding. Resin prints present a different challenge. They often feel "tacky" if not properly cured, and they require delicate chemical cleaning rather than heavy-duty abrasion. If you're working with GN15 or O-16.5 kits, you'll likely deal with resin's unique surface chemistry to ensure your primer actually sticks.
The "Scale Detail" Conflict
Preparation becomes increasingly difficult as the scale decreases. In 4mm (OO9) or 7mm (O-16.5) modeling, the rivets, handrails, and boiler bands are incredibly fragile. Scale fidelity in 3D printing represents the preservation of a model's dimensional accuracy and surface features across the specific layer heights chosen for production. A common mistake for beginners is "over-sanding," where the desire for a smooth surface leads to the accidental removal of essential kit details. You must balance the need for smoothness with the preservation of the model's character.
Cleaning and Degreasing: Removing Resin Residue and Oils
Cleaning a fresh print is often the messiest part of the scale modelling hobby. While it feels like a tedious obstacle to the creative process, it's the only way to ensure your hard work isn't wasted later. Uncured resin or leftover release agents create a chemical barrier between the model and the paint. If you skip this step, your paint will likely flake off or "orange-peel" within weeks. Preparing 3d printed models for painting requires a clinical approach to surface cleanliness that goes beyond a simple rinse.
Paint requires a stable, dry surface to form a lasting mechanical bond. Resin prints frequently have a "tacky" feel caused by liquid resin trapped in the surface pores. If you apply primer over this residue, the paint will never fully cure; it remains soft and prone to peeling under light handling. While technical guides for preparing and painting FDM parts focus heavily on physical smoothing, resin rail kits demand a deep chemical purge to be successful.
The IPA Bath Process for Resin Kits
Isopropyl Alcohol (IPA) is the standard solvent for resin removal. We recommend a staged "Two-Bath System" to ensure a residue-free surface. The first bath acts as a "dirty" wash to strip bulk resin, while the second uses fresh IPA for a final rinse. Always wear nitrile gloves with a thickness of at least 5 mil and work in a well-ventilated area. Limit soaking to 10 minutes to avoid making the resin brittle or causing the part to warp.
Ultrasonic Cleaners: Are They Worth It for Modellers?
Ultrasonic cleaners use high-frequency sound waves to reach into tiny cab interiors where brushes often fail. While manual scrubbing with a soft toothbrush works for flat wagon sides, it can snap delicate rivets on O-16.5 / 7mm scale kits. Ultrasonic waves offer a safer, automated solution for intricate parts. Regardless of the method, allow 24 hours for air-drying. This ensures no solvent is trapped in the material, which would otherwise cause the paint to bubble or peel during the finishing stage.
If you're currently preparing one of our GN15 Locomotive & Scenery Kits, following this degreasing protocol will ensure your paint job remains as durable as the model itself.
Removing Support Marks and Smoothing Layer Lines
Support structures are a functional necessity of the 3D printing process, yet they frequently leave unsightly nubs on the most visible surfaces of your OO9 or O-16.5 kits. These marks often hide in awkward locations, such as under the buffer beams or along the delicate boiler bands of a locomotive. While these imperfections are an inevitable constraint of the manufacturing method, they don't have to compromise the final look of your model. When preparing 3d printed models for painting, you must adopt a patient, mechanical approach to support removal to protect the delicate scale geometry.
The temptation to "pluck" supports by hand is strong, but this often leads to disaster. Pulling a support can tear a microscopic "divot" out of the resin, leaving a pit that is far harder to fix than a raised nub. Instead, always use sharp flush cutters to snip the support away. This proactive solution ensures that the stress of the cut is absorbed by the tool rather than the fragile detail of your narrow gauge wagon or locomotive body.
The Progressive Sanding Workflow
Success in smoothing 3D prints depends on a logical progression of grits. While some general hobbyist forums suggest starting with 220 grit, this is far too aggressive for the tiny details found on 4mm scale models. Follow this structured workflow instead:
- Step 1: Use flush cutters to trim the support, leaving approximately 1mm of the nub remaining. This prevents the "pitting" mentioned earlier.
- Step 2: Gently level the remaining material with a fine needle file. Move the file in one direction only to maintain control over the shape.
- Step 3: Wet sand the area using a sequence of 400, 600, and finally 1000 grit sanding sticks. The water acts as a lubricant, preventing the resin dust from clogging the grit and ensuring a polished, paint-ready finish.
Filling Pits and Voids in 3D Prints
Even with careful support removal, you might encounter small voids or "layer gaps" where the print didn't perfectly form. For deep pits, a tiny drop of UV resin cured with a handheld lamp provides a perfect material match. For shallower layer lines, traditional hobby putties or "liquid" fillers are more appropriate. Always apply these fillers with a sharpened cocktail stick to keep the material confined to the gap. Minimizing the amount of filler used ensures you won't have to sand back a large area, which protects nearby rivets and panel lines. This "less is more" philosophy is the best way to maintain scale fidelity while achieving a smooth surface.
Priming: The Secret to a Professional Model Finish
Priming represents the final diagnostic stage in preparing 3d printed models for painting. Raw resin is often translucent or multi-coloured, which makes it difficult to spot remaining layer lines or microscopic support pits. While the model may look smooth after the sanding process, the application of a uniform primer coat often reveals hidden flaws that were invisible to the naked eye. This stage allows you to identify and correct any lingering issues before they are permanently sealed under layers of livery paint.
The science of the "etch" is what separates a professional finish from a temporary one. Resin is a non-porous material, meaning standard acrylic paints struggle to find a mechanical grip on the surface. Primer contains specific solvents and binders that bite into the resin, creating a stable foundation for subsequent layers. Without this chemical bond, even the most expensive hobby paints will peel away when you remove masking tape or handle the model during final assembly.
Choosing the Right Primer for Narrow Gauge Scales
Selecting the correct medium is vital for preserving the integrity of your kit. Rattle cans like Tamiya Fine Surface Primer are popular for their convenience and extremely fine pigment. However, they can be difficult to control in confined spaces. Airbrush primers, such as Stynylrez or Vallejo Surface Primer, allow for lower pressure and more precise application. For OO9 and GN15 kits, a grey primer is the most versatile choice as it provides a neutral base that doesn't distort the final colour. If you're working on a locomotive with a bright livery, a white primer ensures the colours remain vibrant without requiring excessive coats that might clog detail.
Application Techniques for an Even Coat
A common constraint with spray-painting is the risk of "pooling," where paint collects in the corners of cab interiors and obscures rivet detail. To prevent this, utilize a "dusting" technique. Apply multiple thin coats from a distance of 15 to 20 centimetres, allowing each layer to flash off for a few minutes. This proactive approach builds a solid foundation without burying the fine details of your O-16.5 / 7mm scale kits. To avoid fingerprints, secure your model to a wooden dowel or a small box using blue-tack. This allows you to rotate the part 360 degrees without ever touching the prepped surface during the curing process.
If you're ready to start your next project with a perfectly prepped surface, explore our range of OO9 Locomotive & Wagon Kits to put these priming techniques into practice.
Final Inspection and Moving to the Paint Shop
The first coat of primer acts as a high-contrast map of your progress. While you might hope for perfection on the first pass, the reality of preparing 3d printed models for painting is that the primer often highlights missed layer lines or tiny support pits. This is a natural constraint of the medium. However, a proactive final inspection ensures these minor issues don't become permanent eyesores under your final livery. Use the "Silver Lining" test by holding the model under a bright, directional light and rotating it slowly; the shadows will reveal any remaining horizontal textures or uneven surfaces that require one last touch of the sanding stick.
If you're just starting your journey into narrow gauge modelling, choosing your first OO9 loco kit is a critical decision that influences how much preparation work you'll face. Once you have your kit in hand and the primer is dry, use a tack cloth to remove every microscopic particle of sanding dust before the colour coat. Even a single grain of resin dust can create a visible lump in a 4mm scale finish, so this final degreasing step is essential for a professional result.
The Final Checklist
Before you load your airbrush or open a tin of enamel, run through this final diagnostic list to ensure the surface is truly ready:
- Are all support marks flush with the surface? Run your fingernail over them; if you feel a catch, they'll be visible under paint.
- Is the primer smooth to the touch? If you see an "orange peel" texture, the primer may have dried mid-air, requiring a light polish with 1200 grit paper.
- Are the recessed details, such as vents and louvres, clear of dust and excess primer? Use a dry, soft-bristled brush to flick out any debris.
Setting Realistic Expectations
It's helpful to recognize that 3D printed resin has a different surface character than brass or injection-moulded plastic. While we strive for a flawless finish, chasing a 100% smooth surface can sometimes lead to the loss of sharp rivet detail or delicate door handles. Often, a 95% perfect surface that retains all its scale fidelity is superior to a perfectly smooth model that has been sanded into a featureless blob. Focus on the areas where the light hits most directly, such as the tank tops and cab roofs, and allow the final livery to do the rest of the work. Mastering the art of preparing 3d printed models for painting is about finding that balance between smoothness and detail preservation.
Ready to Transform Your Next Narrow Gauge Kit?
Achieving a professional finish on a 3D printed model isn't a matter of luck; it's the result of a disciplined preparation workflow. While raw resin presents specific challenges like surface tackiness and support artifacts, these constraints are easily managed through systematic degreasing and progressive sanding. By mastering the professional techniques for preparing 3d printed models for painting, you bridge the gap between a raw manufacturing output and a museum-quality scale model. The diagnostic power of a fine surface primer ensures that every rivet and panel line remains crisp while eliminating any trace of the horizontal printing process.
Our kits are designed by modellers for modellers, utilizing precision 3D printed resin to capture maximum scale detail for your layout. We provide global shipping on all OO9 and GN15 kits to ensure every modeller has access to high-quality narrow gauge rolling stock. If you're ready to apply these techniques to a fresh project, explore our range of 3D printed narrow gauge kits today. Your next locomotive doesn't have to look like a 3D print; with the right preparation, it'll stand as a testament to your craftsmanship. Happy modelling!
Frequently Asked Questions
Do I really need to wash my 3D printed model if it looks clean?
Yes, you must wash the model because liquid resin residue is often invisible to the naked eye. While the part may appear dry, microscopic oils and uncured resin will prevent paint from bonding. Utilizing a staged solvent bath is the best proactive solution to ensure your primer adheres permanently to the surface.
What is the best grit sandpaper for preparing 3D printed locomotive kits?
For resin kits in 4mm or 7mm scales, use a range between 400 and 1000 grit. Coarser papers like 220 grit might remove material quickly, but they often destroy delicate rivets and boiler bands. A progressive sanding workflow with wet-and-dry paper ensures a smooth finish without compromising the scale fidelity of your kit.
Can I use standard automotive primer on my narrow gauge models?
We don't recommend standard automotive primers for narrow gauge models. These products are designed to fill scratches on full-sized metal car bodies, so they are often too thick for delicate scale kits. Utilizing a hobby-specific "Fine Surface" primer is the proactive way to avoid burying tiny door handles and vents under a heavy layer of paint.
How do I remove support marks from very delicate parts like handrails?
Always use high-quality flush cutters rather than pulling supports by hand. Snapping supports can tear "divots" out of thin handrails, which are nearly impossible to repair. Snip the support 1mm away from the model and then use a fine needle file to level the remaining nub with the surrounding surface.
Why is my paint peeling off my resin 3D print even after priming?
Peeling usually indicates that resin oils or cleaning solvents are still present on the surface. If you don't allow the model to fully degas and dry for at least 24 hours, the paint will struggle to find a mechanical grip. Preparing 3d printed models for painting requires a completely inert and dry surface to be successful.
Should I sand the model before or after I cure it in UV light?
You should sand your model after it has been fully cured in UV light. While "green" resin is softer and easier to cut, handling uncured material poses health risks and can lead to structural warping during the process. Curing the model first ensures the resin is stable and safe to process with files and sanding sticks.
How many coats of primer are necessary for a 3D printed part?
Two or three light "dusting" coats are usually sufficient to create an even base. One heavy coat might cover the model faster, but it significantly increases the risk of the paint pooling in recessed details. Thin layers allow you to inspect the surface for flaws while preparing 3d printed models for painting without losing the kit's sharp edges.
Can I use a hair dryer to speed up the drying process of my 3D printed model?
Avoid using hair dryers or heat guns to dry your prints. High temperatures can cause thin resin walls to warp or become brittle, which ruins the alignment of your locomotive chassis or wagon body. It's better to let the model air-dry naturally at room temperature to maintain its dimensional accuracy and structural integrity.