

What if you could capture the rugged character of a large-scale industrial railway without needing a massive garden plot? This is the unique appeal of GN15 locomotive kits, where G-scale bodies meet the narrow gauge reality of standard 16.5mm track. You likely appreciate the creative freedom of "Rule #1" modelling, yet you might feel frustrated when trying to mate a bulky resin body to a tiny OO gauge power unit. It's a common hurdle to find the perfect donor chassis or to clean up stubborn support marks from a 3D-printed kit without losing fine detail.
This guide promises to help you master the assembly process so you can create a professional-looking industrial "critter" that runs smoothly. We will explore the best ways to prepare resin parts, identify compatible chassis like the Kato 109 or Tenshodo spud, and apply finishing touches that reflect your personal style. From the initial sanding of a Spoorijzer or Pixie model to the final coat of primer, you'll learn how to transform a raw kit into a unique piece of rolling stock for your layout.
Key Takeaways
- Understand the unique appeal of GN15, which combines the impressive detail of G-scale with the space-saving benefits of standard 16.5mm track.
- Learn how to select the correct donor power unit, as GN15 locomotive kits are precision-engineered to fit specific chassis like the Kato 109 or Hornby Smokey Joe.
- Master the essential preparation steps for 3D-printed resin bodies, including safe sanding techniques and thorough cleaning to ensure a professional finish.
- Discover how to add character to your industrial "critters" by incorporating scale figures and intricate cab details that bring your freelance models to life.
- Gain the confidence to apply "Rule #1" to your modelling, allowing you to create unique, high-detail industrial locomotives that reflect your creative personality.
What Makes GN15 Locomotive Kits Unique?
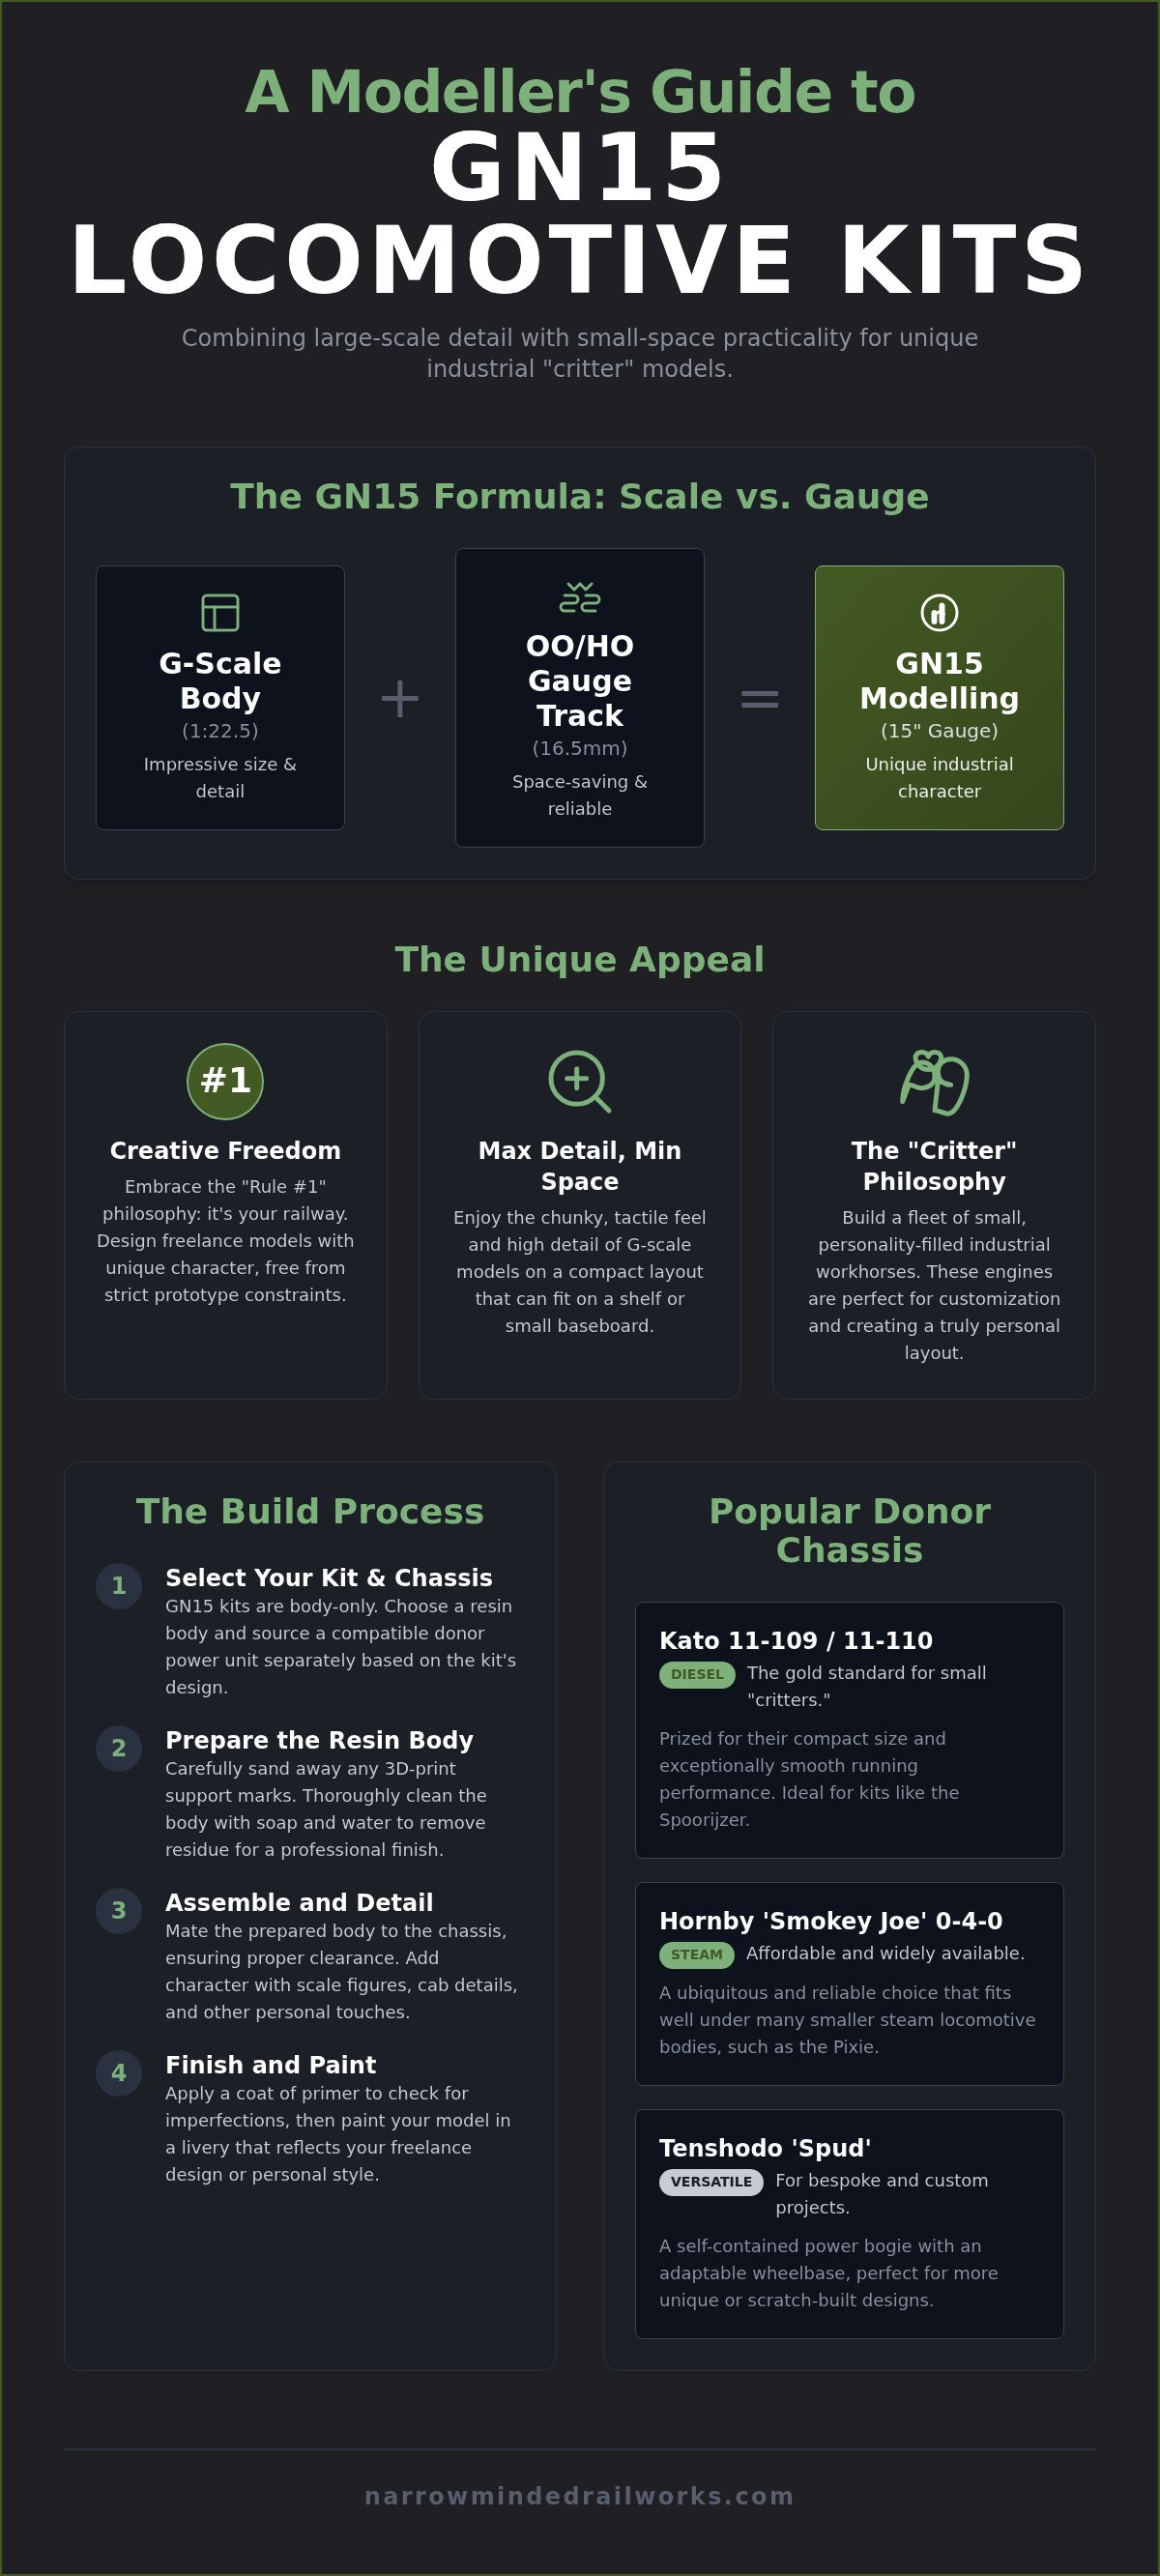
The Gn15 modeling scale represents a fascinating intersection of large-scale detail and small-space practicality. By placing G-scale (1:22.5) models on 16.5mm track, modellers can simulate "minimum gauge" railways that were historically used in industrial or estate settings. These systems, often measuring just 15 inches between the rails, were the lifeblood of British quarrying and agriculture. GN15 locomotive kits provide an accessible way to replicate these quirky systems without the need for a sprawling garden railway.
While traditional modelling scales often demand strict adherence to prototype history, GN15 locomotive kits offer a refreshing alternative by prioritising creative expression. This brings us to the "Rule #1" philosophy: it's your railway, so you can do whatever you like. While standard gauge modelling often requires rigorous research into specific liveries or eras, GN15 encourages a more freelance approach. This freedom allows you to focus on the charm and character of the machinery rather than the constraints of a prototype timetable.
The "Critter" Philosophy in GN15
In the world of narrow gauge, a "critter" refers to a small, often improvised industrial locomotive designed for functionality over aesthetics. These workhorses are the stars of GN15 modelling. Because these engines were frequently modified by their owners in the real world, they are perfect for freelance designs. If you are new to this concept, understanding What is a Narrow Gauge Railway? can help you appreciate why these functional designs are so beloved. By using these kits, you can build a fleet of varied, personality-filled engines that feel grounded in reality despite being entirely fictional.
Scale vs. Gauge: Why G-Scale on OO Track Works
The technical genius of GN15 lies in its use of standard 16.5mm track, which is the same gauge used for OO and HO models. Mathematically, 16.5mm represents approximately 15 inches in 1:22.5 scale. This allows modellers to utilise widely available and reliable track components while enjoying the massive detail afforded by G-scale bodies. While large-scale modelling usually requires significant space, GN15 locomotive kits allow you to build highly detailed scenes on a shelf or a small baseboard. You get the benefit of chunky, tactile models that are easy to handle and detail, paired with the mechanical reliability of standard commercial track.
Choosing the Right Chassis for Your GN15 Kit
Building GN15 locomotive kits requires a shift in mindset from standard ready-to-run models. Narrow Minded Railworks doesn't supply the internal chassis or motors; however, we design our high-detail resin bodies to integrate seamlessly with the most reliable power units available. This constraint means you'll need to source your own donor unit, but it also gives you the freedom to choose a motor that fits your budget and performance needs. 3D printing technology allows us to create internal mounting points that are far more precise than traditional cast resin. This precision ensures that once you've found the correct unit, the body should clip or slide into place with minimal fuss.
Finding reliable chassis often involves searching the secondary market or specialist retailers. Members of the Narrow Gauge Railway Society can access extensive resources on the real-world engines that inspired these models, which helps in selecting a chassis with the correct wheelbase. While sourcing components separately adds a step to the process, it ensures your locomotive has a high-quality mechanical heart that matches the detail of the exterior.
Popular Donor Chassis for GN15 Locos
The Kato 11-109 and 11-110 power units are the gold standard for small diesel "critters." These units are prized for their smooth running and compact dimensions, making them the perfect fit for models like the Spoorijzer. If you prefer steam, the Hornby "Smokey Joe" 0-4-0 chassis is a ubiquitous and affordable choice. It fits well under smaller steam loco bodies such as the Pixie. For more bespoke projects, the Tenshodo "Spud" power bogie offers a self-contained motor and wheelbase that can be adapted to various floor heights. Finding these units can sometimes be a challenge due to limited production runs, but you can usually find them through specialist UK retailers or general online marketplaces. You can explore a variety of GN15 locomotive kits designed specifically for these popular British and Japanese power units.
Mating the Body to the Chassis
Achieving a perfect fit requires careful attention to clearance. Before securing the body, ensure that the wheels and gears can rotate without striking the resin walls. Although some builders prefer permanent screw mounts, using adhesive putties like Blu-Tack allows for easy removal during maintenance. One challenge with resin is its light weight, which can lead to poor traction on inclines or uneven track. While resin is inherently lighter than die-cast metal, you can easily increase traction by adding lead shot or "liquid gravity" to the internal cavities of the body. Securing these weights with PVA glue will significantly improve the pulling power of your locomotive. By balancing the weight directly over the driving wheels, you ensure your industrial workhorse performs as well as it looks.
Preparing and Finishing 3D Printed Resin Bodies
Modern GN15 locomotive kits are primarily produced using high-definition UV resin printing. While this technology captures incredible detail, it requires a different preparation approach than traditional polyurethane cast kits. Before you reach for the glue, you must wash the 3D-printed body in warm, soapy water. This step removes any residual liquid resin or dust from the manufacturing process that might otherwise prevent paint from adhering. Once dry, you should inspect the surface for support marks, which appear as tiny pips or dimples where the model was attached to the print bed. Ignoring these small imperfections now will make them far more obvious once you apply a final coat of gloss or weathered finish.
For those looking to deepen their technical knowledge, the 7mm Narrow Gauge Association offers extensive archives on narrow gauge modelling techniques that can be applied to these larger scales. Proper surface preparation is the foundation of a professional-looking model. If you are unsure about the next steps after cleaning, our guide on Painting 3D Printed Models provides a detailed breakdown of the transition from raw resin to a finished masterpiece.
Essential Tools for Kit Preparation
To achieve a smooth surface without damaging fine details like rivets or hinges, you need the right tools. High-quality flush cutters are essential for snipping away any remaining support stubs. Once removed, use fine-grit sanding sticks, ranging from 400 to 1000 grit, to level the surface. You must wear a dust mask during this process. Resin dust is an irritant, and while wet sanding can minimise airborne particles, a mask provides a necessary layer of protection. Small needle files are also useful for reaching into tight corners around the cab or radiator grills where sanding sticks might be too bulky.
Priming and Basecoating Techniques
Choosing the correct primer is vital for UV resin. Many modellers find that standard automotive plastic primer, readily available at UK retailers like Halfords, provides a robust bond that won't flake off. Apply the primer in multiple thin layers rather than one heavy coat. This method preserves the crispness of 3D-printed vents and bolt heads. A light grey primer is often the best choice because it highlights any remaining print lines or support marks that need further sanding. If you spot a stubborn line, it's better to address it now with a quick sand and a re-prime than to try and hide it with thick layers of topcoat paint.
Assembling and Detailing Your GN15 Locomotive
Assembling GN15 locomotive kits is the stage where your industrial "critter" truly begins to take shape. While many of our designs are printed as single-piece bodies to simplify the process, more complex models like the Pixie steam loco or the Spoorijzer diesel may require the attachment of separate detail parts. You should use a high-quality cyanoacrylate (super glue) for these joins, as standard plastic cement will not bond with UV-cured resin. To ensure a clean finish, apply the adhesive with a needle or a cocktail stick rather than directly from the bottle. This precision prevents excess glue from marring the fine surface detail you worked so hard to prepare in the previous steps.
If you are just beginning your journey into this unique scale, you might find our guide on Getting Started in GN15 Scale helpful for understanding the broader context of these models. Beyond the basic structure, adding metal handrails can significantly improve the durability of your locomotive. While resin is excellent for detail, thin handrails can be fragile. Replacing them with 0.45mm brass wire provides a much sturdier solution. You can also enhance the realism of your kit by fitting standard narrow gauge couplings, ensuring your new engine is ready to haul a train of industrial wagons immediately.
Fitting Cab Details and Controls
Industrial locomotives often have open cabs, making the interior as visible as the exterior. You should paint the footplate and control levers before attaching the roof to avoid awkward brush angles later. Using 3D-printed accessories such as oil cans, toolboxes, or even a discarded shovel adds a narrative to the model. A driver figure is perhaps the most important addition, as it provides an immediate sense of scale. Without a figure, it can be difficult to tell if a locomotive is a tiny 15-inch gauge engine or a larger narrow gauge workhorse. We offer a range of specific figures designed to fit the cramped confines of these industrial cabs.
Weathering Your Industrial Critter
Industrial railways are rarely pristine environments. To make your locomotive look like a hard-working machine, you should apply weathering techniques that highlight the 3D-printed textures. Start with a dark wash to settle into the recesses of vents and rivets, which creates artificial shadows. Once dry, use a dry-brushing technique with a light rust or metallic colour to simulate wear on the edges of the bodywork. While you might worry about overdoing the grime, industrial "critters" were often neglected in real life, so a heavy coat of dirt is often prototypical. Finally, apply a matte varnish to protect your paintwork and remove any unrealistic plastic sheen. You can find everything you need to begin your next project by browsing our collection of GN15 locomotive kits and accessories.
Why Choose Narrow Minded Railworks for Your GN15 Project?
Choosing Narrow Minded Railworks means investing in a brand that lives and breathes narrow gauge. Traditional hobby shops often ignore the niche requirements of 15-inch gauge modelling, but we fill this gap by offering GN15 locomotive kits that you won't find in any ready-to-run catalogue. While we don't manufacture the motors or chassis ourselves, we ensure our 3D-printed resin bodies are engineered for a precise fit with standard commercial units. This approach gives you the mechanical reliability of a mass-produced chassis paired with the unique, hand-crafted look of an industrial workhorse. It's a proactive solution for modellers who want high detail without the complexity of scratch-building every component.
Our commitment to "Rule #1" means we celebrate your creative freedom. Whether you're building a fictional estate railway or a gritty quarry line, our kits serve as the perfect foundation for your imagination. We provide worldwide shipping from our UK base, ensuring that these specialised models are accessible to the global modelling community. By focusing on precision and accessibility, we make it possible for anyone to enter the world of large-scale modelling regardless of their previous experience with resin kits.
From Pixie to Spoorijzer: Our GN15 Range
Our catalogue features a diverse array of body kits designed to suit various tastes and skill levels. The "Pixie" steam locomotive remains a favourite for those wanting a charming, traditional look, while the "Spoorijzer" diesel critter captures the functional, boxy aesthetic of mid-century industrial power. To help you build a complete scene, we also offer matching GN15 wagons and scenery items. This allows you to maintain a consistent scale and level of detail across your entire layout. We are constantly innovating, using the latest 3D printing techniques to bring new, often overlooked prototypes to life for the modern modeller.
Getting Support for Your Build
We know that building a kit can sometimes feel like a solitary challenge. Because we are specialist narrow gauge modellers ourselves, we offer transparent advice on everything from chassis selection to painting techniques. If you're unsure which Kato or Tenshodo unit fits a specific model, we provide the technical specifications to help you buy with confidence from your chosen supplier. This level of specialist support is something you simply won't get from a generic high-street retailer. We want your project to be a success, so we prioritise clarity and realistic expectations in all our communications. If you're ready to start your next industrial masterpiece, Explore our full range of GN15 Locomotive Kits today!
Start Your Next Industrial Miniature Project
Mastering the assembly of GN15 locomotive kits allows you to bridge the gap between large-scale detail and compact layout design. By selecting a reliable donor chassis and applying the careful surface preparation techniques discussed, you can transform a raw resin body into a unique industrial workhorse. Success depends on patience during the sanding stage and a willingness to embrace the creative freedom that narrow gauge modelling provides. While sourcing your own power unit is a necessary step, the resulting freelance model will be a one-of-a-kind reflection of your personal style.
At Narrow Minded Railworks, we offer 3D-printed bodies engineered for a precision fit, ensuring your build process is as smooth as possible. Our designs are created by modellers for modellers, and we provide worldwide shipping to support your hobby regardless of your location. If you're ready to bring a new "critter" to your rails, browse our collection of GN15 Locomotive Kits and start building today. There's never been a better time to explore the character and charm of minimum gauge railways.
Frequently Asked Questions
Do GN15 locomotive kits come with a motor and wheels?
No. Narrow Minded Railworks provides the high-detail 3D-printed body and accessories, but the mechanical components are not included. You must source a separate "donor" chassis. This allows you to choose a power unit that fits your specific budget or performance requirements. Popular choices include the Kato 11-109 for diesels or the Hornby Smokey Joe for steam-outline projects. This approach ensures your locomotive has a reliable, commercially proven motor.
Can I run GN15 locomotives on standard OO or HO gauge track?
Yes. GN15 is specifically designed to use 16.5mm track, which is the same gauge used for standard OO and HO systems. This is a major benefit for modellers because it allows you to use reliable, widely available track and turnouts for a much larger 1:22.5 scale model. You don't need specialised narrow gauge track to enjoy these kits on your existing layout, which keeps the entry cost for large-scale modelling much lower.
What is the best glue to use for 3D printed resin kits?
Cyanoacrylate (super glue) is the only effective adhesive for bonding UV-cured resin parts. Standard plastic cement, which works by melting polystyrene, won't react with 3D-printed materials. For the best results, use a medium-consistency super glue for structural joins and a thin version for capillary action around small details. Always apply the glue sparingly with a needle to avoid damaging the surface finish. This ensures a strong bond that survives the vibrations of a moving chassis.
How do I know which Kato chassis fits my GN15 diesel critter?
We design our GN15 locomotive kits with specific chassis in mind to ensure a precise fit. Most of our small diesel "critters," such as the Spoorijzer, are engineered specifically for the Kato 11-109 or 11-110 power units. We provide clear technical specifications in each product description to confirm which donor unit you need. If you're unsure, checking the wheelbase measurements against the kit's internal dimensions is a reliable method to ensure mechanical compatibility.
Do I need to paint my GN15 kit, or does it come coloured?
All kits from Narrow Minded Railworks are supplied in their raw, unpainted resin state. This gives you the creative freedom to choose your own livery, whether it's a pristine estate engine or a heavily weathered industrial workhorse. You should start with a high-quality automotive plastic primer before applying your chosen acrylic or enamel paints. This ensures a professional finish that won't flake off over time, allowing your custom paintwork to shine on the layout.
Is GN15 scale suitable for beginners in the model railway hobby?
GN15 is an excellent entry point for beginners who want to move beyond ready-to-run models. Because the parts are larger than OO9 or N gauge, they are easier to handle and detail. While you'll need to learn basic kit-building skills like cleaning resin and sourcing a chassis, the "Rule #1" philosophy removes the pressure of historical accuracy. This makes it a stress-free way to develop your modelling talents while creating something entirely unique.
What is Rule #1 in narrow gauge modelling?
Rule #1 simply states: "It's my railway, and I'll do what I want." In the world of GN15 locomotive kits, this means you aren't bound by prototype history or strict railway regulations. If you want to run a fictional steam engine alongside a modern diesel on a fantasy industrial line, you can. This philosophy encourages creativity and ensures the hobby remains fun and personally rewarding for every modeller, regardless of their chosen era or location.
How do I remove the visible print lines from a 3D printed loco body?
While modern high-resolution printing minimises these lines, you can remove any remaining textures with careful sanding. Use fine-grit sanding sticks, starting at 400 grit and working up to 1000 grit for a polished surface. Applying a few thin layers of high-build automotive primer also helps fill the microscopic gaps between print layers. Always sand in a well-ventilated area and wear a mask to avoid inhaling resin dust, as safety is paramount when working with resin.