

You spend hours detailing a delicate narrow gauge locomotive only to have the buffer beam snap during its first run on the layout. It's a common frustration that can make 3D printed kits feel more like fragile ornaments than working rolling stock. We recognize that the intricate nature of OO9 and O-16.5 models often leads to concerns about brittle resin or long-term UV degradation. While 3D printing involves specific material constraints, ensuring 3d printed models are durable is achievable through proactive selection and finishing techniques.
This guide provides a professional roadmap for building railway kits that stand the test of time. You'll learn how to identify high-performance engineering resins and how to use primers that shield against environmental damage. We'll also cover the specific assembly techniques that reinforce fine details without sacrificing scale accuracy. By the end of this article, you'll have the confidence to integrate 3D printed kits into your collection, knowing they're built to withstand the rigours of regular operation.
Key Takeaways
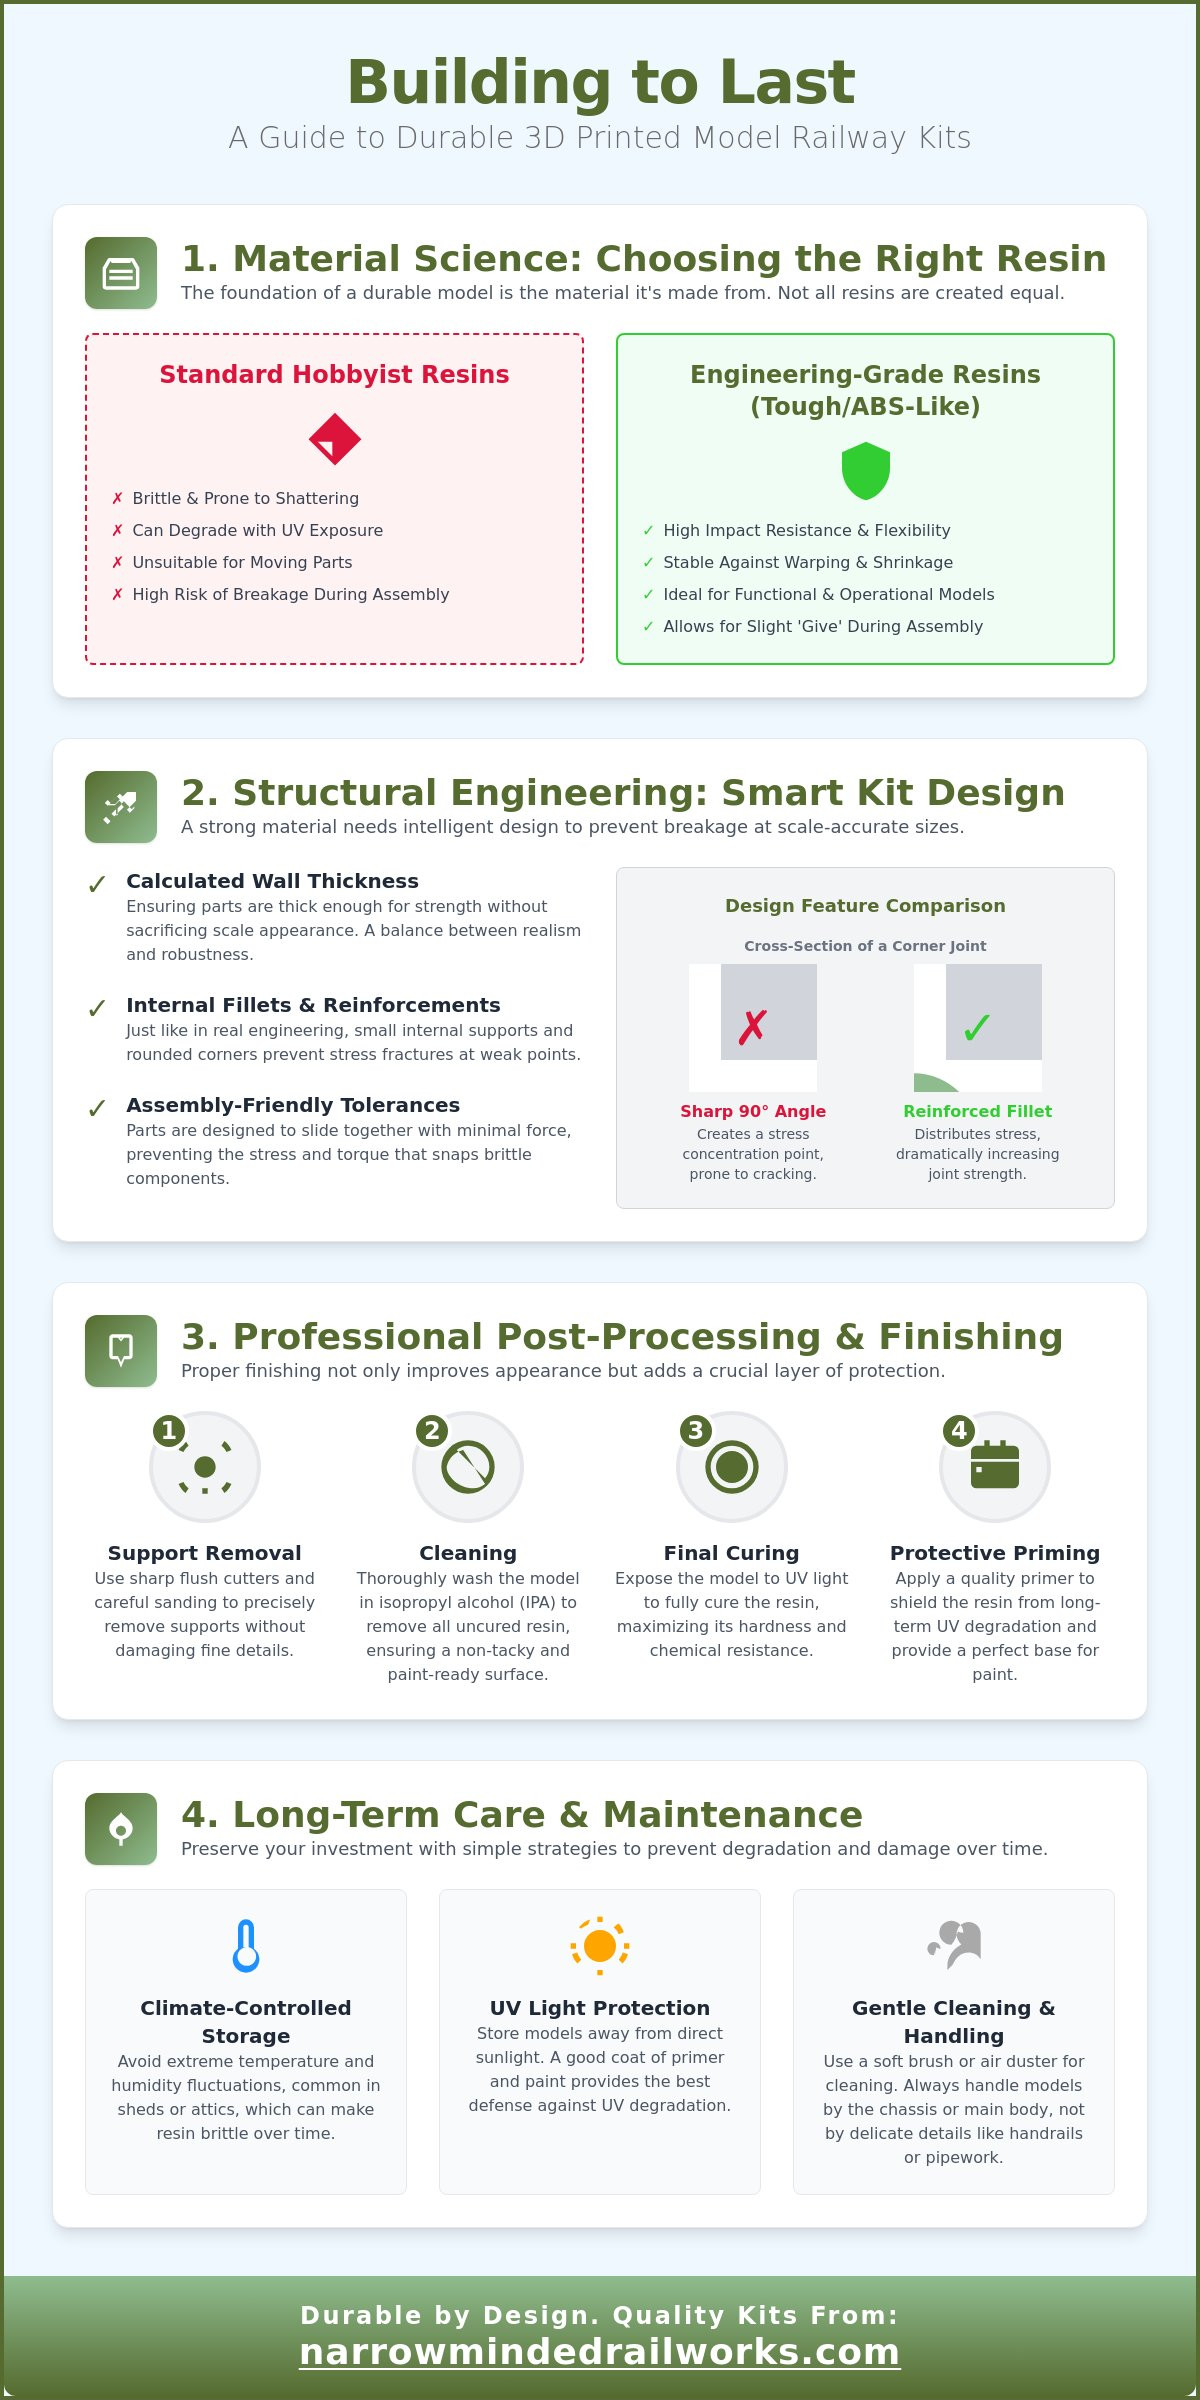
- Learn how selecting engineering-grade resins, such as tough or ABS-like photopolymers, provides the impact resistance required for active model railway layouts.
- Understand the role of structural engineering in kit design, where calculated wall thicknesses and internal fillets are essential for ensuring 3d printed models are durable.
- Implement professional finishing techniques that allow for the precise removal of supports and the application of protective primers without damaging delicate parts.
- Adopt long-term maintenance strategies, including climate-controlled storage and gentle cleaning methods, to prevent resin degradation and detail breakage over time.
Understanding Durability in 3D Printed Railway Kits
Durability for a railway modeller isn't just about surviving a drop to the floor. It's a combination of withstanding the friction of assembly, resisting the heat of a motor, and surviving the humidity changes of a typical shed-based layout. While many hobbyists are familiar with various 3D printing materials like PLA or ABS, resin remains the preferred choice for OO9 and GN15 kits due to its superior surface finish. Ensuring 3d printed models are durable begins with moving past the old stigma that resin is inherently brittle. Early photopolymers were glass-like and prone to shattering, but modern engineering resins offer a level of flexibility that allows them to thrive in an active running environment.
We differentiate between 'shelf-queens' that only look good in a display case and robust models designed for daily operation. A durable kit must accommodate the vibrations of a moving chassis without shedding fine parts or developing stress fractures. To better understand how these prints hold up under pressure, watch this helpful video:
The Difference Between Detail and Strength
High-resolution printing allows for incredibly thin walls, but this creates a natural tension between scale accuracy and structural integrity. In OO9 scale, a handrail might only be 0.4mm thick. While this looks correct, it requires careful handling during the painting and weathering process. The perceived sturdiness changes significantly as you move up to GN15 or O-16.5 scales, where the larger volume of material provides more inherent strength. Modellers must recognize that while the resin itself is strong, the geometry of a part often dictates its survival during a build. Balancing these factors is key to ensuring 3d printed models are durable enough for long-term use.
Handling Stress During Kit Assembly
The most dangerous moment for any kit is fitting the locomotive body to its chassis. Absolute hardness is actually a disadvantage here; you need a material with a slight 'give' to allow for the small adjustments required during assembly. Brittle resins will snap under the slightest torque, whereas modern 'tough' resins will flex and return to their original shape. Narrow Minded Railworks designs kits with assembly-friendly tolerances to ensure parts slide together without excessive force. By prioritizing fit and material flexibility, we ensure the model remains intact through both the building phase and years of layout use.
Material Science: Choosing the Right Resin for Longevity
The landscape of photopolymer resins has shifted from basic, brittle materials to advanced engineering-grade polymers. Early hobbyist resins often suffered from extreme rigidity, which led to fractures during the removal of supports or during basic handling. Today, professional-grade resins are formulated to provide a higher degree of impact resistance, which is vital for locomotive kits that experience mechanical stress. While budget resins might be cost-effective for static dioramas, they often lack the long-term stability required for moving parts. Selecting the correct material is a fundamental step in ensuring 3d printed models are durable enough for years of layout operation.
Tough or 'ABS-like' resins have become the industry standard for functional model railway parts. These materials incorporate specific monomers that allow for a degree of elongation before breaking. This flexibility prevents impact damage if a wagon is accidentally derailed. Additionally, the chemical composition of these resins is designed to be less porous than early formulations. This helps the model hold fine paint detail without the solvent in the paint attacking the resin structure. Understanding 3D printing material science helps modellers appreciate why certain kits feel more like traditional plastic and less like fragile ceramic.
Resistant to Warp and Shrinkage
Material stability is a primary constraint when producing large wagon kits, as uneven shrinkage can cause a model to twist or bow. While all resins experience some contraction during the curing process, professional-grade options minimize this effect to ensure the kit remains square. A significant risk involves 'uncured' resin trapped inside hollow models, which can eventually expand and crack the outer shell. We mitigate this by ensuring all hollowed areas have adequate drain holes and are thoroughly cleaned. High-quality prints are easily identified by a smooth surface finish that lacks the tackiness often associated with under-processed hobby prints.
UV Sensitivity and the 'Resin Rot' Myth
The term 'resin rot' is often used to describe models that crumble over time, but this is usually a result of over-exposure to UV light rather than a natural decay. Sunlight continues the curing process indefinitely, eventually making the resin too brittle to handle. However, proper post-curing in a controlled UV chamber stabilises the molecular structure, preventing further changes. Applying an opaque primer acts as a physical barrier, effectively blocking UV rays from reaching the core material. if you're looking for robust foundations for your next project, exploring our range of OO9 locomotive & wagon kits is an excellent starting point for a long-lasting build.
Structural Engineering: How Kit Design Prevents Breakage
Achieving a balance between scale fidelity and structural integrity is a primary challenge for any kit designer. While we recognize that modellers desire razor-thin detail, the physics of resin printing require a minimum wall thickness to prevent warping or snapping. By utilizing internal fillets and bracing, we can redistribute mechanical stress away from sharp corners. This engineering approach is central to ensuring 3d printed models are durable enough for the vibration and handling of a working layout. Recent academic research into 3D printing resin durability highlights that the geometry of a part significantly influences its resistance to abrasion and impact.
Orientation during the print process also plays a vital role. If a model is printed with layers parallel to the direction of force, it is more likely to suffer from layer shear. We mitigate this by angling the prints during production, which increases the surface area for layer bonding. This is why our 3D printed locomotive bodies are optimized through iterative testing to ensure they maintain their shape even under the load of a heavy chassis.
Designing for Commercial Chassis
Integrating a resin body with a commercial motor unit introduces specific mechanical constraints. Mounting points for screws or clips are often the first parts to fail on poorly designed kits. We address this by reinforcing these attachment zones with additional material, providing a solid foundation for the chassis to bite into. By prioritizing these structural reinforcements, we focus on ensuring 3d printed models are durable enough for the high-stress environment of a motor-driven locomotive. Additionally, we account for the heat generated by small motors by including air gaps in the design to facilitate heat dissipation. We also incorporate sacrificial supports into the packaging to shield delicate components like sand pipes or whistles during shipping.
Wagon and Rolling Stock Geometry
When building OO9 wagon kits, the floor is a critical structural element. Because narrow gauge wagons often require added weight to track properly, we design floors with internal ribbing to prevent bowing under the pressure of lead or steel weights. Axle boxes are another area of concern; they must be thick enough to resist the constant friction of metal wheelsets. By favouring one-piece body prints, we eliminate the weak points common in multi-part assemblies where glue joints can fail over time. This unified structure provides a more robust model that handles the daily shunting tasks of a busy diorama.
Post-Processing: Professional Techniques for a Lasting Finish
Transforming a raw resin component into a robust locomotive body requires more than just a quick rinse in alcohol. While the printing process defines the shape, the post-processing stage determines how that shape survives years of layout use. We recognize that removing supports can be a nerve-wracking task; however, using high-quality flush cutters and fine-grit sandpaper prevents the gouging that often leads to structural failure. This phase is critical for ensuring 3d printed models are durable, as it seals the material against environmental factors and creates a stable foundation for further detailing.
Painting serves as a protective 'skin' for the 3D printed substrate. Without this barrier, the resin remains susceptible to humidity and light. While acrylics are popular for their ease of use, enamels often provide a harder, more abrasion-resistant finish for high-traffic areas like wagon sides. Choosing the right medium ensures the model can be handled frequently without the finish chipping or the underlying resin becoming exposed. A well-applied paint job isn't just about aesthetics; it's a functional layer that preserves the kit's integrity.
The Perfect Post-Cure
Achieving the correct cure is a delicate balance. Over-curing makes a model brittle, while under-curing leaves the surface soft and prone to warping. The 'water-cure' method is a professional technique where the model is submerged in a clear container of water during UV exposure. This process prevents oxygen from inhibiting the curing reaction, resulting in a more uniform and harder surface. You can tell a model is perfectly cured when it loses its initial tackiness and develops a consistent, matte appearance, making it ready for painting 3d printed models.
Priming for Adhesion and Protection
Resin is inherently non-porous, which makes paint adhesion difficult without a specialized 'plastic' primer. These primers are formulated to chemically bond with the resin, creating an even surface that resists moisture. Spraying a light, consistent coat of primer is a proactive solution for revealing hidden print lines or support marks before the final colour is applied. This layer acts as the primary shield for the model, further ensuring 3d printed models are durable by preventing environmental moisture from penetrating the resin. If you're ready to start your next project with a high-quality base, browse our selection of diorama tools & scenery to find the right supplies for a professional finish.
Long-Term Care and Maintenance of Your Models
While high-quality resin kits are resilient, they aren't indestructible. We recognize that layout environments, such as garden sheds or lofts, often experience significant temperature fluctuations. These shifts can lead to micro-expansions in the material. Storing your rolling stock in a consistent, climate-controlled space is a proactive solution for ensuring 3d printed models are durable over several decades. Additionally, humidity can affect the bond of certain adhesives. Keeping your models in a dry environment prevents the structural integrity of your assembly from weakening over time.
Cleaning your models is another area where caution is required. Dust acts as an abrasive and can dull a finish if wiped away with a heavy cloth. We recommend using a soft-bristled makeup brush or low-pressure compressed air to remove debris without putting stress on fine details like lamp irons or vacuum pipes. To protect your paintwork, applying a final layer of matte or gloss clear varnish is essential. This creates a hard shell that resists fingerprints and minor scratches, acting as a final safeguard for the protective 'skin' discussed in previous sections. Interestingly, 3D printed models are often easier to repair than white metal counterparts. While white metal can bend and fatigue, resin typically suffers clean breaks that are simpler to realign and bond permanently.
Safe Handling on the Layout
Safe handling starts with identifying the strongest grip points on your model. For most locomotives, this is the lower chassis or the thickest part of the boiler. You should avoid lifting a model by the cab roof or the footplate edges. When transporting your kits to exhibitions or club meets, we suggest using dedicated storage boxes with custom-cut foam inserts. These inserts provide 360-degree support, which is a proactive solution for ensuring 3d printed models are durable during the vibrations of transit. This prevents delicate parts from rubbing against the sides of the container.
Repairing Accidental Damage
If a detail part does snap, the repair process is straightforward. We recommend using a 'thick' cyanoacrylate (CA) glue for most resin-to-resin bonds. The thicker consistency allows you to bridge small gaps if a tiny sliver of material was lost in the break. For resin-to-metal bonds, such as adding brass handrails, a medium-viscosity CA glue provides the best balance of work time and strength. Once the glue has fully cured, you can gently sand the joint with 1000-grit paper and touch up the paint. This technique results in an invisible fix that restores both the aesthetic and the structural integrity of your kit.
Building a Resilient Narrow Gauge Layout
While 3D printing introduces specific material constraints, it doesn't have to result in a fragile collection. By combining advanced resin selection with professional post-curing and priming, you create a model that rivals traditional materials in both detail and strength. Ensuring 3d printed models are durable is a straightforward process when you prioritize structural engineering and protective finishing. These proactive steps transform a raw print into a reliable piece of rolling stock that handles the daily demands of your layout.
At Narrow Minded Railworks, we believe your models should be built to last. Our kits are designed by modellers for modellers, ensuring every piece is optimised for commercial chassis fitment and long-term stability. We provide worldwide shipping on all 3D printed kits to support your hobby wherever you are. Explore our range of durable OO9 and GN15 kits and start your next build with confidence. Your layout is an investment in time and creativity; let's make sure it stands the test of time.
Frequently Asked Questions
Are 3D printed model railway kits more brittle than plastic ones?
Standard hobby resins can be more brittle than injection-molded polystyrene, but engineering-grade resins effectively close this gap. While early photopolymers were glass-like, modern 'tough' resins provide the flexibility needed for active handling. Ensuring 3d printed models are durable involves selecting kits made from these impact-resistant materials rather than budget alternatives that lack structural give.
How do I stop my 3D printed locomotive from warping over time?
Warping is typically caused by uneven curing or prolonged exposure to direct sunlight. While resin is sensitive to UV light, applying an opaque primer and storing models in a climate-controlled environment provides a proactive solution. You should also ensure that any hollow models have adequate drain holes to prevent internal pressures from distorting the shell as the material settles.
Can I use standard model railway glue on 3D printed resin?
Polystyrene cement won't work on 3D printed resin because it relies on melting the plastic to create a bond. You must use cyanoacrylate (CA) glue or two-part epoxy instead. These adhesives create a strong mechanical bond that's essential for ensuring 3d printed models are durable during the vibrations of layout operation. Thick CA glue is especially useful for filling small gaps during assembly.
What is the best primer for 3D printed model kits?
Automotive-grade plastic primers or specialized hobby primers designed for resin are the most effective choices. These products provide the chemical adhesion that standard acrylic paints lack on non-porous resin surfaces. A proactive solution is to use a spray-on primer, which creates an even, protective barrier that shields the resin from moisture and further UV degradation after the initial curing process.
Will the heat from a model train motor damage a 3D printed body?
Most 3D printed resins have a heat deflection temperature that comfortably exceeds the heat produced by a small DC motor. While extreme heat can eventually soften resin, a well-designed kit includes air gaps for ventilation. If you're using a high-performance motor, ensuring there's at least 1mm of clearance between the motor casing and the resin body will prevent any structural softening during long running sessions.
How long do 3D printed models actually last?
When properly cured and painted, 3D printed models can last for decades without degrading. While raw resin can become brittle over time if exposed to ambient UV light, a painted and varnished model is chemically stable. Following the maintenance practices outlined in this guide ensures your locomotives and wagons remain a permanent and functional part of your narrow gauge collection.
Is it safe to sand 3D printed resin models?
It's perfectly safe to sand resin, provided you use wet-sanding techniques to manage dust. While dry sanding can create fine particles that are best avoided, using water prevents the dust from becoming airborne and keeps the resin cool. This process is vital for removing support marks and achieving the smooth finish required for professional-grade painting and weathering.
Do I need to wash my 3D printed kit before painting it?
You should always wash a new kit in warm, soapy water to remove any residual resin oils or handling grease. While most kits arrive pre-cleaned, a quick wash ensures that your primer bonds perfectly to the surface without bubbling. This simple proactive step prevents paint peeling later and is a fundamental part of the preparation process for any resin-based kit.