
The most frustrating part of building O-16.5 locomotive kits isn't the assembly itself; it's starting with the wrong chassis and realising halfway through a build that nothing quite fits. If you've spent time searching for a specific narrow gauge prototype only to find the ready-to-run market simply doesn't offer it, you already know the problem. The gap between "I want something unique" and "I know how to build it reliably" is where most modellers get stuck.
You're right to feel that way. Scratch-building from brass or white metal demands a level of engineering skill that takes years to develop, and the fear of ruining an expensive kit during painting or final assembly is entirely justified. The good news is that modern 3D-printed O-16.5 locomotive kits have genuinely changed what's possible, bridging the space between complex hand-built models and generic off-the-shelf locomotives.
This guide covers everything you need to choose the right kit, pair it with a compatible commercial chassis, and finish your build to a professional standard. Whether you're adding your first locomotive to a narrow gauge layout or expanding an existing fleet with prototypes you simply can't buy ready-to-run, you'll find clear, practical answers here.
Key Takeaways
- O-16.5 locomotive kits combine O scale detail with HO gauge track, making them ideal for modellers who want characterful narrow gauge prototypes in a compact layout space.
- Most kits require a separate commercial donor chassis — understanding which wheel arrangements are compatible before you buy will save you significant time and money.
- 3D-printed resin bodies offer a practical middle ground between off-the-shelf ready-to-run models and complex scratch-building, but correct preparation and priming are essential for a professional finish.
- Specialist designers like Narrow Minded Railworks focus specifically on unique narrow gauge prototypes that simply aren't available anywhere else in the ready-to-run market.
- By the end of this guide, you'll know exactly how to select, assemble, and finish an O-16.5 locomotive kit that stands apart from anything available on a standard hobby shop shelf.
What are O-16.5 Locomotive Kits and Why Choose This Scale?
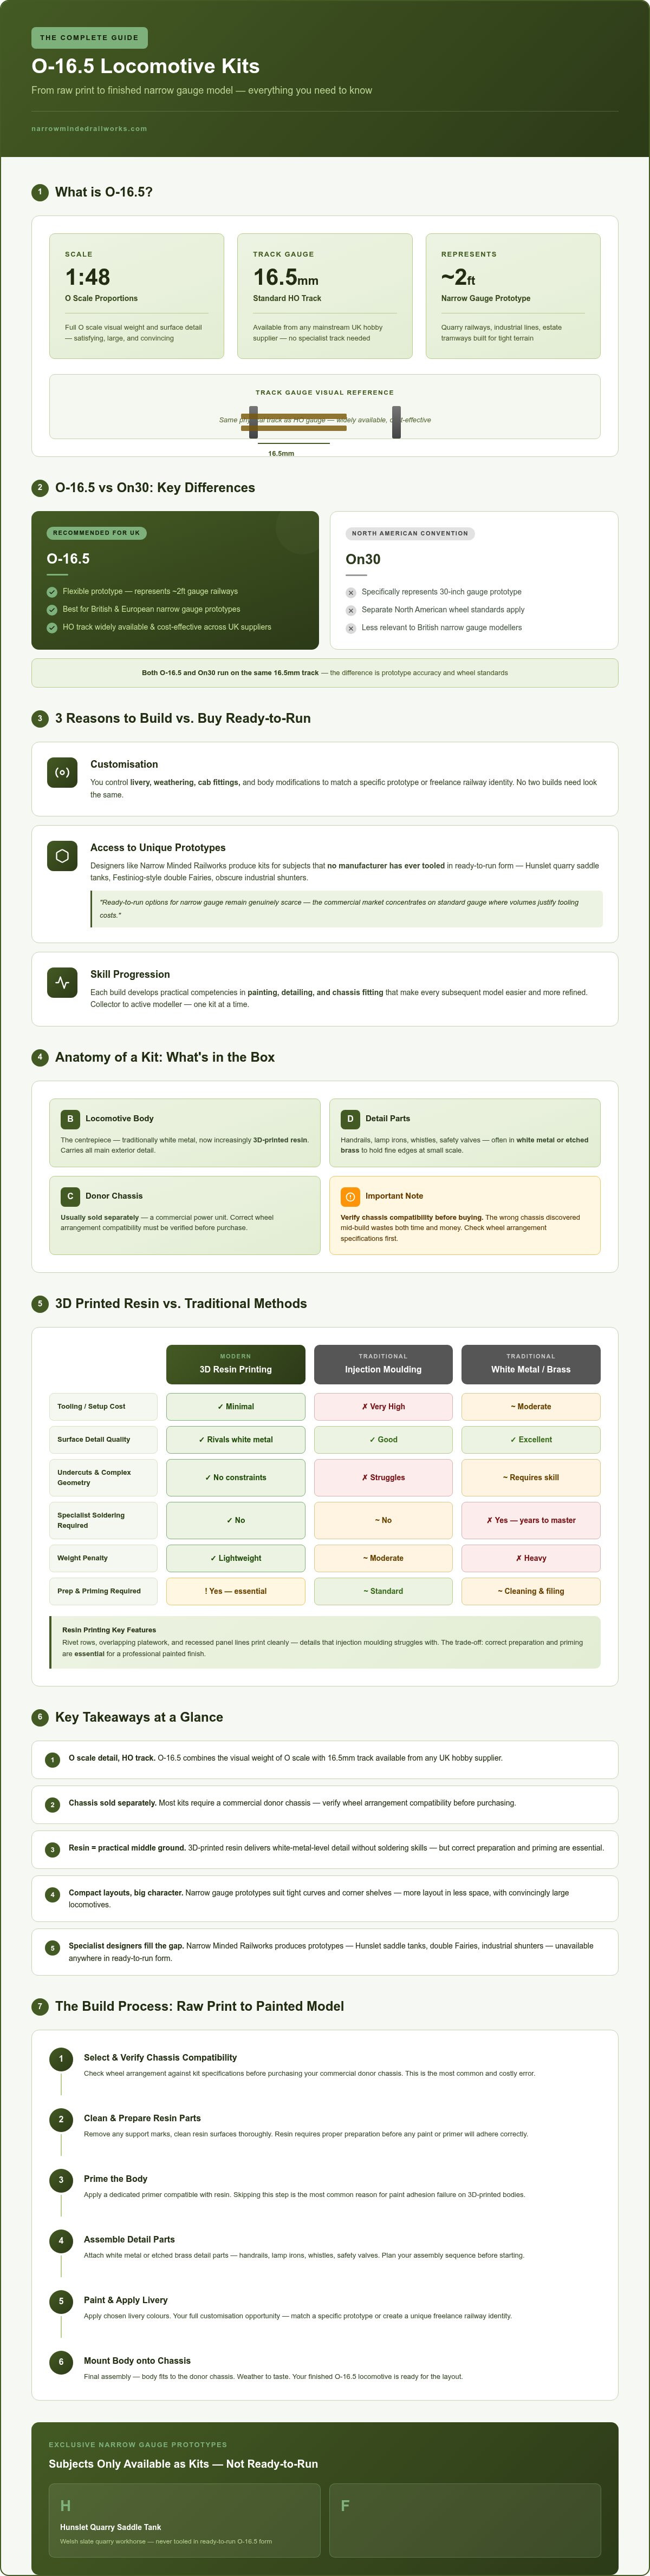
O-16.5 refers to models built to O scale proportions (1:48) that run on standard HO gauge track, which measures 16.5mm between the rails. In prototype terms, this represents a narrow gauge railway of roughly 2 feet gauge when scaled up. The result is a locomotive with the satisfying visual weight and surface detail of O scale modelling, combined with the practical advantage of running on track you can buy from any mainstream hobby supplier in the UK.
The appeal of narrow gauge prototypes goes beyond aesthetics. Industrial lines, quarry railways, and estate tramways were built to tight curves and minimal clearances precisely because the terrain demanded it. That same characteristic translates directly to the layout room: O-16.5 layouts can occupy a corner shelf or a compact baseboard, yet still carry convincingly large, detailed locomotives. The combination of character and practicality is difficult to match in any other scale.
Ready-to-run options for narrow gauge in this scale remain genuinely scarce. The commercial market concentrates on standard gauge models where volumes justify tooling costs. For modellers who want a Hunslet quarry saddle tank, a Festiniog-style double Fairlie, or an obscure industrial shunter, kits are essentially the only realistic path. That's where modern 3D-printed O-16.5 locomotive kits have shifted the landscape considerably. Resin-printed bodies now deliver surface detail that rivals traditional white metal castings, without the weight penalties or the need for specialist soldering skills.
O-16.5 vs. On30: Understanding the Gauge Difference
On30 models also use O scale proportions but run on OO gauge track (16.5mm), which creates some initial confusion. The key distinction is prototype accuracy: On30 represents a 30-inch gauge railway, while O-16.5 is more flexible in its prototype interpretation. Practically speaking, both use the same track, but On30 is a predominantly North American convention with its own wheel standards. UK modellers generally find O-16.5 more relevant to British and European narrow gauge prototypes, and the wider availability of compatible HO track from suppliers across the country makes it the more cost-effective choice for home layouts.
The Benefits of Kit Building Over Ready-to-Run
Choosing to build rather than buy delivers three distinct advantages:
- Customisation: You control livery, weathering, cab fittings, and minor body modifications to match a specific prototype or freelance railway identity.
- Access to unique prototypes: Designers like Narrow Minded Railworks produce O-16.5 locomotive kits for subjects that no manufacturer has ever tooled in ready-to-run form.
- Skill progression: Each build develops practical competencies in painting, detailing, and chassis fitting that make every subsequent model easier and more refined.
The transition from collector to active modeller is rarely dramatic. It typically starts with one kit, one chassis, and a willingness to follow a clear process.
Anatomy of an O-16.5 Kit: Materials and Components
Understanding what's actually inside the box before you buy saves considerable frustration. Most o-16.5 locomotive kits arrive as a collection of distinct component types, each serving a specific purpose in the final model. Getting familiar with those components early means you'll make better purchasing decisions and encounter far fewer surprises during assembly.
The locomotive body is typically the centrepiece of any kit. Traditional kits used white metal castings, which offer excellent surface weight but require careful cleaning, filing, and soldering. Detail parts such as handrails, lamp irons, whistles, and safety valves are often still supplied in white metal or etched brass, because these materials hold fine edges that resin doesn't always replicate cleanly at small scales. Knowing which parts are which helps you plan your assembly sequence correctly.
The Rise of 3D Printed Resin Bodies
High-resolution resin printing has changed what's achievable without specialist tooling. Traditional injection moulding demands significant upfront costs and struggles with undercuts, fine surface texture, and complex internal geometries. Resin printing has none of those constraints. Rivet rows, overlapping platework, and recessed panel lines can all be reproduced accurately in a single printed part.
Layer lines remain a legitimate concern, but modern high-resolution printers operating at fine layer heights produce surfaces that require only light sanding and a good primer coat to eliminate visible stepping. Critically, 3D resin is easier to drill and modify than older polyurethane resins, which were brittle and prone to cracking under pressure. If you need to open a cab window further or drill a hole for a handrail post, modern resin responds well to a sharp pin vice.
The Role of the Donor Chassis
Most kits don't include a motor, wheels, or gearbox. This isn't a cost-cutting measure; it's a deliberate design approach. Commercial chassis from established manufacturers are engineered to reliable electrical and mechanical standards that a small kit producer simply can't replicate economically. By designing the body shell to fit a specific donor chassis, kit designers can focus entirely on prototype accuracy and surface detail. Before purchasing any kit, confirm which chassis it's designed around and check current availability from mainstream UK hobby retailers.
Essential Detail Accessories for Locomotives
The difference between a competent build and a convincing one often comes down to three practical decisions:
- Couplers: Scale couplers such as Kadee or Evolution replacements significantly improve both the visual appearance and the operational reliability of narrow gauge stock. Fit them during the chassis stage, before the body is permanently attached.
- Added weight: 3D printed bodies are light. Fitting small pieces of lead sheet or tungsten putty inside the boiler or firebox improves traction and reduces derailments on gradients.
- Cab interiors and figures: A painted figure seated at the controls, combined with a basic backhead detail, transforms what you see through an open cab doorway. It's a small investment with a disproportionate visual return.
DCC and sound installations follow similar logic. Check whether the boiler barrel or tender body provides enough internal volume to house a decoder and speaker before committing to a specific kit. Many resin-bodied o-16.5 locomotive kits are designed with this in mind, but it's worth confirming with the designer directly. Narrow Minded Railworks designs its bodies specifically to work with commercially available chassis, which simplifies the entire process considerably. Browse the current range of O-16.5 locomotive bodies to see which chassis pairings are supported.
The Chassis Challenge: Matching Kits to Power Units
Choosing the wrong donor chassis is the single most common and most avoidable mistake in narrow gauge kit building. The body shell might be beautifully detailed, the paint scheme perfectly researched, and yet if the wheelbase doesn't match or the motor housing fouls the cab floor, the whole project stalls. Getting this decision right before you spend a penny on either component is what separates a satisfying build from an expensive shelf ornament.
The core principle is straightforward: the kit designer has already done the measurement work, and your job is to buy the chassis they specified. Deviating from that recommendation requires genuine mechanical confidence and the willingness to modify both body and chassis. For most builders, following the designer's guidance is the faster and cheaper route.
Popular Donor Chassis for O-16.5 Projects
The Bachmann HO 0-6-0 is the most widely used donor chassis across the range of available o-16.5 locomotive kits. It offers a compact footprint, reliable electrical pickup across all six wheels, and a motor that fits neatly within most boiler profiles. Its wheelbase suits a broad range of small industrial and quarry steam prototypes, which is precisely why so many kit designers default to it. Availability through UK hobby retailers makes sourcing straightforward, though stock levels fluctuate, so confirming current availability before committing to a specific kit pairing is always sensible.
For industrial or modern narrow gauge subjects, diesel switcher chassis offer a practical alternative. The flat, low-profile motor housing suits industrial shunter body shells particularly well, and the longer wheelbase of certain switcher models matches prototypes that a compact steam chassis simply won't accommodate. When assessing any diesel chassis, check that the fuel tank and underframe detail on the donor won't be visible beneath the new body shell, as these components are rarely designed to be hidden.
Wheelbase matching deserves more attention than most guides give it. A chassis that's too long will push the body upward at the front or rear, creating an unnatural stance that no amount of paint will disguise. Measure the distance between the leading and trailing axle centres on your intended chassis, then compare that figure against the prototype drawings or the kit designer's specification sheet. A difference of more than a couple of millimetres will be visible to any experienced eye.
Securing the Body to the Chassis
Most resin body shells don't arrive with chassis mounting points pre-formed to match a specific donor unit. That's not a design flaw; it's a practical reality of producing kits that might be paired with slightly different chassis versions over time. The solution is to fabricate simple mounting lugs from 1mm styrene sheet or, where the kit designer offers them, 3D-printed bracket inserts. Styrene bonds cleanly to resin with standard plastic cement and can be drilled and tapped for small bolts, which is the preferred approach when you want the body to be removable for maintenance.
Removability matters more than most first-time builders anticipate. Motors need occasional lubrication, wheel treads need cleaning, and decoders occasionally need reflashing. Designing a permanent bond between body and chassis saves time during the initial build and costs that time back repeatedly over the layout's life. A pair of small 12BA bolts through styrene lugs into the chassis frame takes thirty minutes to fit and pays dividends for years.
Weight distribution is the final consideration. Resin bodies are light relative to their visual bulk, and a top-heavy model with poor weight distribution will rock on curves and derail on gradients. Position any added ballast weight, whether lead sheet or tungsten putty, as low as possible within the body cavity and as close to the centre of the wheelbase as the internal geometry allows. This single adjustment has a more direct effect on operational reliability than almost any other modification you can make to o-16.5 locomotive kits during the assembly stage.
Electrical pickup is the one area where body-to-chassis clearance is non-negotiable. Check that no part of the resin shell contacts the chassis frame, pickups, or wiring runs when the body is seated. A single strand of wire pinched between body and frame can short the entire circuit. Test continuity with the body loosely placed before any permanent fixing, and run the locomotive on a short test track to confirm smooth operation before final assembly.
Assembly and Finishing: From Raw Print to Painted Model
Raw resin straight from the printer is not ready to paint. That sounds obvious, but it's the step most first-time builders rush, and it's where the majority of finish quality problems originate. Uncured resin carries a thin film of reactive compounds on its surface that actively repels primer and paint. Wash every part thoroughly in warm water with a small amount of washing-up liquid, scrubbing gently with an old toothbrush, then rinse and allow to dry completely before touching anything else in the process.
Support removal requires patience rather than force. Clip supports as close to the body surface as possible using sharp flush cutters, then address the remaining nub with a fine needle file or a sanding stick. Work across the nub rather than into it to avoid gouging the surrounding surface. On areas with dense rivet detail, a round-section file lets you work between rows without flattening them.
Finishing 3D Printed Surfaces
Layer lines on high-resolution resin prints are subtle, but they become visible under raking light or a gloss finish if you skip proper preparation. The goal is to reduce them without destroying the surface detail that makes these kits worth building in the first place. Start with 400-grit wet-and-dry paper on flat panels, moving to 800-grit for a final pass. Avoid sanding across rivet rows entirely; instead, use a fine-tipped filler such as Mr. Surfacer 500, applied with a cocktail stick, to fill any low spots around support marks before priming.
Primer is not optional and it's not merely cosmetic. A dedicated resin primer, applied in thin coats from roughly 25cm distance, reveals every surface imperfection you missed during preparation. Run your fingertip across the primed surface once it's fully cured. Any roughness you feel will be amplified by topcoats. Address it now, not after colour has been applied. For a detailed walkthrough of this preparation process, Narrow Minded Railworks' guide to painting 3D printed models covers each stage with practical clarity.
Airbrushing delivers the most consistent results for topcoats on o-16.5 locomotive kits, particularly on curved boiler surfaces where brush strokes would be visible. Thin your paint to a semi-skimmed milk consistency and build colour in multiple light passes rather than one heavy coat. Brush painting remains entirely viable for smaller detail parts, cab interiors, and areas where masking an airbrush would take longer than simply painting carefully by hand.
Weathering and Decals for Realism
Apply decals over a gloss coat, not directly over matt paint. Matt surfaces are microscopically rough, and that texture traps air beneath the decal film, creating the silvered halo effect that immediately reads as amateur work. A coat of gloss varnish gives the decal a smooth, continuous surface to bond with. Once decals are fully dry and sealed, you can apply your weathering layers and finish with a final matt varnish to unify the whole surface.
Weathering an industrial narrow gauge locomotive is less about restraint and more about honest storytelling. These machines worked hard in hostile environments. A basic wash of dark brown and black oil paint, diluted with white spirit and applied across the entire model, settles into recesses and panel lines to create instant depth. Rust streaks respond well to AK Interactive or Vallejo rust pigments stippled on with a sponge fragment around boiler fittings, buffer beams, and footplate edges. Soot deposits around the smokebox and chimney base are convincingly replicated with dark grey weathering powder, sealed lightly with matt varnish.
Final touches make a disproportionate difference to perceived quality. A few millimetres of real coal or crushed cork in the bunker, a scrap of fine net fabric as a cab curtain, or a painted crew figure visible through the cab doorway all reward the viewer who looks closely. These additions cost almost nothing and take minutes, but they're what separates a model that looks finished from one that looks alive.
If you're ready to start your next build, browse the current range of 3D-printed narrow gauge locomotive bodies at Narrow Minded Railworks to find a subject worth this level of care.
Finding Your Next Project: Narrow Minded Railworks Solutions
Every kit in the Narrow Minded Railworks range starts with the same question: is this a prototype that modellers actually want but simply can't buy anywhere else? That focus on genuine gaps in the market shapes every design decision, from the choice of subject to the way each body shell is engineered for assembly. The result is a range of o-16.5 locomotive kits built specifically for modellers who've already exhausted what the ready-to-run market offers.
Our Approach to O-16.5 Kits
Compatibility with widely available commercial chassis isn't an afterthought; it's the starting point. Each body is dimensioned around donor chassis that UK modellers can source through mainstream hobby retailers, which means you're not hunting for obscure components before a build can even begin. Prints are produced at high resolution to minimise cleanup time, so the preparation work described earlier in this guide is genuinely light rather than a significant undertaking. If you're also exploring adjacent scales, An Introduction to On30 Gauge: Your Complete Guide explains how the conventions differ and where the two scales overlap in practical terms.
The design philosophy is direct: deliver the surface detail and prototype character that makes a narrow gauge locomotive worth building, then get out of the way and let the modeller do the satisfying parts. Characterful industrial subjects, quarry prototypes, and estate railway locomotives that no manufacturer has tooled in plastic are the focus. That's not a niche position; for a significant portion of the UK narrow gauge modelling community, it's the only realistic option.
Beyond Locomotives: Completing Your Scene
A convincing layout isn't built around a single locomotive. Wagon kits from the Narrow Minded Railworks range are designed to sit aesthetically alongside the locomotive bodies, sharing the same print quality and prototype sensibility. Running a matched set of slate wagons or tip skips behind your quarry saddle tank produces a coherent visual identity that's difficult to achieve when mixing products from different sources.
Figures make an equally significant difference. 3D scanned figures placed in cab openings or alongside the trackwork transform a static model into a scene with implied life. Pair them with diorama tools from the range to work through groundwork and scenic details more efficiently, whether you're building a compact shelf layout or a larger exhibition baseboard.
- Wagon kits: Matched to the same aesthetic standards as the locomotive bodies for a consistent fleet appearance.
- Figures: 3D scanned for accuracy, suitable for cab interiors and lineside positions.
- Diorama tools: Practical aids for faster, more consistent scenic work at any layout scale.
The full current range is available to browse directly. Whether you're starting your first narrow gauge build or adding a new subject to an established fleet, explore the Narrow Minded Railworks range to find your next project.
Your Next Narrow Gauge Build Starts Here
Building o-16.5 locomotive kits is genuinely achievable when you approach each stage with the right information. Match your body shell to a compatible donor chassis before you buy, prepare your resin surfaces properly before priming, and take the time to weather your finished model honestly. Those three principles, more than anything else covered in this guide, will determine whether your completed locomotive looks convincing on the layout.
The ready-to-run market simply doesn't serve modellers who want characterful quarry engines, industrial shunters, or estate railway prototypes. That gap is exactly where specialist 3D-printed kits deliver real value, offering high-resolution surface detail and prototype accuracy that scratch-building demands years to match.
Narrow Minded Railworks produces specialist narrow gauge designs built specifically for modellers who want something unique, with high-resolution 3D prints and worldwide shipping available. Whatever prototype you've been searching for, there's a good chance it's already waiting for you. Browse the latest 3D printed locomotive and wagon kits and find your next project today.
Frequently Asked Questions About O-16.5 Locomotive Kits
What is the difference between O-16.5 and On30 scale kits?
Both scales use O scale proportions and run on 16.5mm track, but they represent different prototype gauges. O-16.5 is a flexible convention suited to British and European narrow gauge prototypes, while On30 is a predominantly North American standard representing 30-inch gauge railways. The wheel standards differ between the two conventions, which matters when sourcing compatible chassis and wheelsets.
For UK modellers, O-16.5 is generally the more relevant choice. HO track is widely stocked by British hobby retailers, and the prototype subjects, quarry lines, industrial tramways, and estate railways, are predominantly drawn from British and European railway history rather than American practice.
Do O-16.5 locomotive kits come with motors and wheels?
Most O-16.5 locomotive kits supply the body shell and detail parts only; motors, wheels, and gearboxes come from a separate commercial donor chassis. This is a deliberate design decision rather than a cost-cutting measure. Established chassis manufacturers engineer their running gear to consistent mechanical and electrical standards that small kit producers can't replicate economically, so pairing a specialist body with a proven commercial chassis produces a more reliable model overall.
Always confirm which donor chassis a kit is designed around before purchasing either component. Narrow Minded Railworks designs its locomotive bodies specifically to fit commercially available chassis that UK modellers can source through mainstream hobby retailers.
Can I use standard HO scale track for my O-16.5 kit-built locomotives?
Yes, standard HO track measuring 16.5mm between the rails is exactly what O-16.5 locomotives are designed to run on. This is one of the practical advantages of the scale: you don't need specialist track. Code 100 and Code 83 HO rail profiles are both compatible, and the broad availability of HO track and pointwork from UK suppliers keeps infrastructure costs manageable compared to scales that require proprietary track systems.
What is the best glue to use for 3D printed resin locomotive kits?
Cyanoacrylate (superglue) is the most reliable adhesive for bonding resin parts to each other and to metal detail components. Thin-viscosity CA wicks cleanly into joints, while medium-viscosity CA suits gap-filling applications around support removal marks. For attaching styrene mounting brackets to the resin body, standard polystyrene cement won't bond resin; use CA or a two-part epoxy for those joints instead.
Avoid using excessive CA on visible surfaces, as blooming (a white haze caused by cyanoacrylate vapour) can cloud fine surface detail. Apply small amounts with a cocktail stick rather than squeezing directly from the bottle, and work in a well-ventilated space.
How do I know if a specific chassis will fit a locomotive body kit?
The most reliable method is to check the kit designer's specification sheet, which should state the intended donor chassis by manufacturer and model number. If that information isn't immediately visible, contact the designer directly before purchasing. The critical measurement is the distance between leading and trailing axle centres: compare this figure against the body kit's internal footprint, because a mismatch of more than a couple of millimetres will produce a visually incorrect stance that paint won't disguise.
Are O-16.5 kits suitable for beginners in the model railway hobby?
O-16.5 kits are more accessible than traditional white metal or brass kits, but they do require basic modelling skills. Resin preparation, priming, and chassis fitting are straightforward processes once you understand the steps involved, and modern high-resolution prints reduce the surface cleanup work considerably compared to older resin technologies. A beginner with patience and a willingness to follow a clear process can produce a convincing result on their first build.
If you're new to kit building, starting with a simple saddle tank or industrial shunter body, rather than a multi-part articulated locomotive, gives you the best chance of a satisfying first project. The skills you develop carry directly into every subsequent build.
Do I need to paint my locomotive kit, or does it come pre-coloured?
O-16.5 locomotive kits arrive unpainted and require full preparation, priming, and painting before they're ready for the layout. Raw resin carries surface compounds that repel paint if skipped, so washing parts thoroughly and applying a dedicated resin primer aren't optional steps. The upside is that you have complete control over livery, weathering, and finish quality, which is a significant part of what makes kit building rewarding compared to buying ready-to-run.
Can O-16.5 locomotive kits be converted to DCC and sound?
Yes, provided the body shell and donor chassis offer sufficient internal volume for a decoder and speaker. Many resin-printed bodies are designed with DCC installation in mind, but internal space varies considerably between subjects. A compact quarry saddle tank will have less room than a larger tender locomotive, so it's worth confirming decoder dimensions against the available cavity before purchasing a sound-fitted decoder. Check with the kit designer if internal dimensions aren't published, and consider a small sugar-cube speaker where space is tight.