

Last Saturday, a hobbyist spent 14 hours detailing a bespoke 3D-printed narrow gauge locomotive, only to watch the entire effect disappear the moment they applied a protective varnish. It's a common heart-sink moment for many of the 1,500 members of the 009 Society who strive for that perfect, hard-working aesthetic. You know that a pristine, plastic-looking finish ruins the immersion of a heritage-style layout. You want your rolling stock to look like it's been battling the elements in the Peak District for twenty years, but achieving that fine balance between "used" and "muddy" often feels like a gamble.
This guide to model railway weathering powders will give you the specific techniques to master subtle, layered realism on your miniatures. You'll learn which pigment tones reflect the unique grime of a Victorian industrial site and how to build textures that actually stay put after sealing. We'll examine the best ways to apply powders to delicate 3D-printed resin and ensure your £120 locomotive looks like a piece of living history rather than a ruined project.
Key Takeaways
- Understand the unique benefits of using binder-free pigments to achieve a realistic, reversible, and perfectly matte finish on your miniatures.
- Learn the essential preparation steps in this guide to model railway weathering powders to ensure pigments grip effectively to both resin and plastic surfaces.
- Master advanced techniques such as stippling and vertical streaking to simulate authentic rain-washed grime and industrial wear on narrow gauge stock.
- Discover how to navigate the varnish dilemma to protect your work without causing your subtle weathered details to "disappear".
- Gain specific insights for detailing Narrow Minded Railworks kits, using powders to make fine rivets and panel lines pop with lifelike realism.
What are Weathering Powders and Why Use Them?
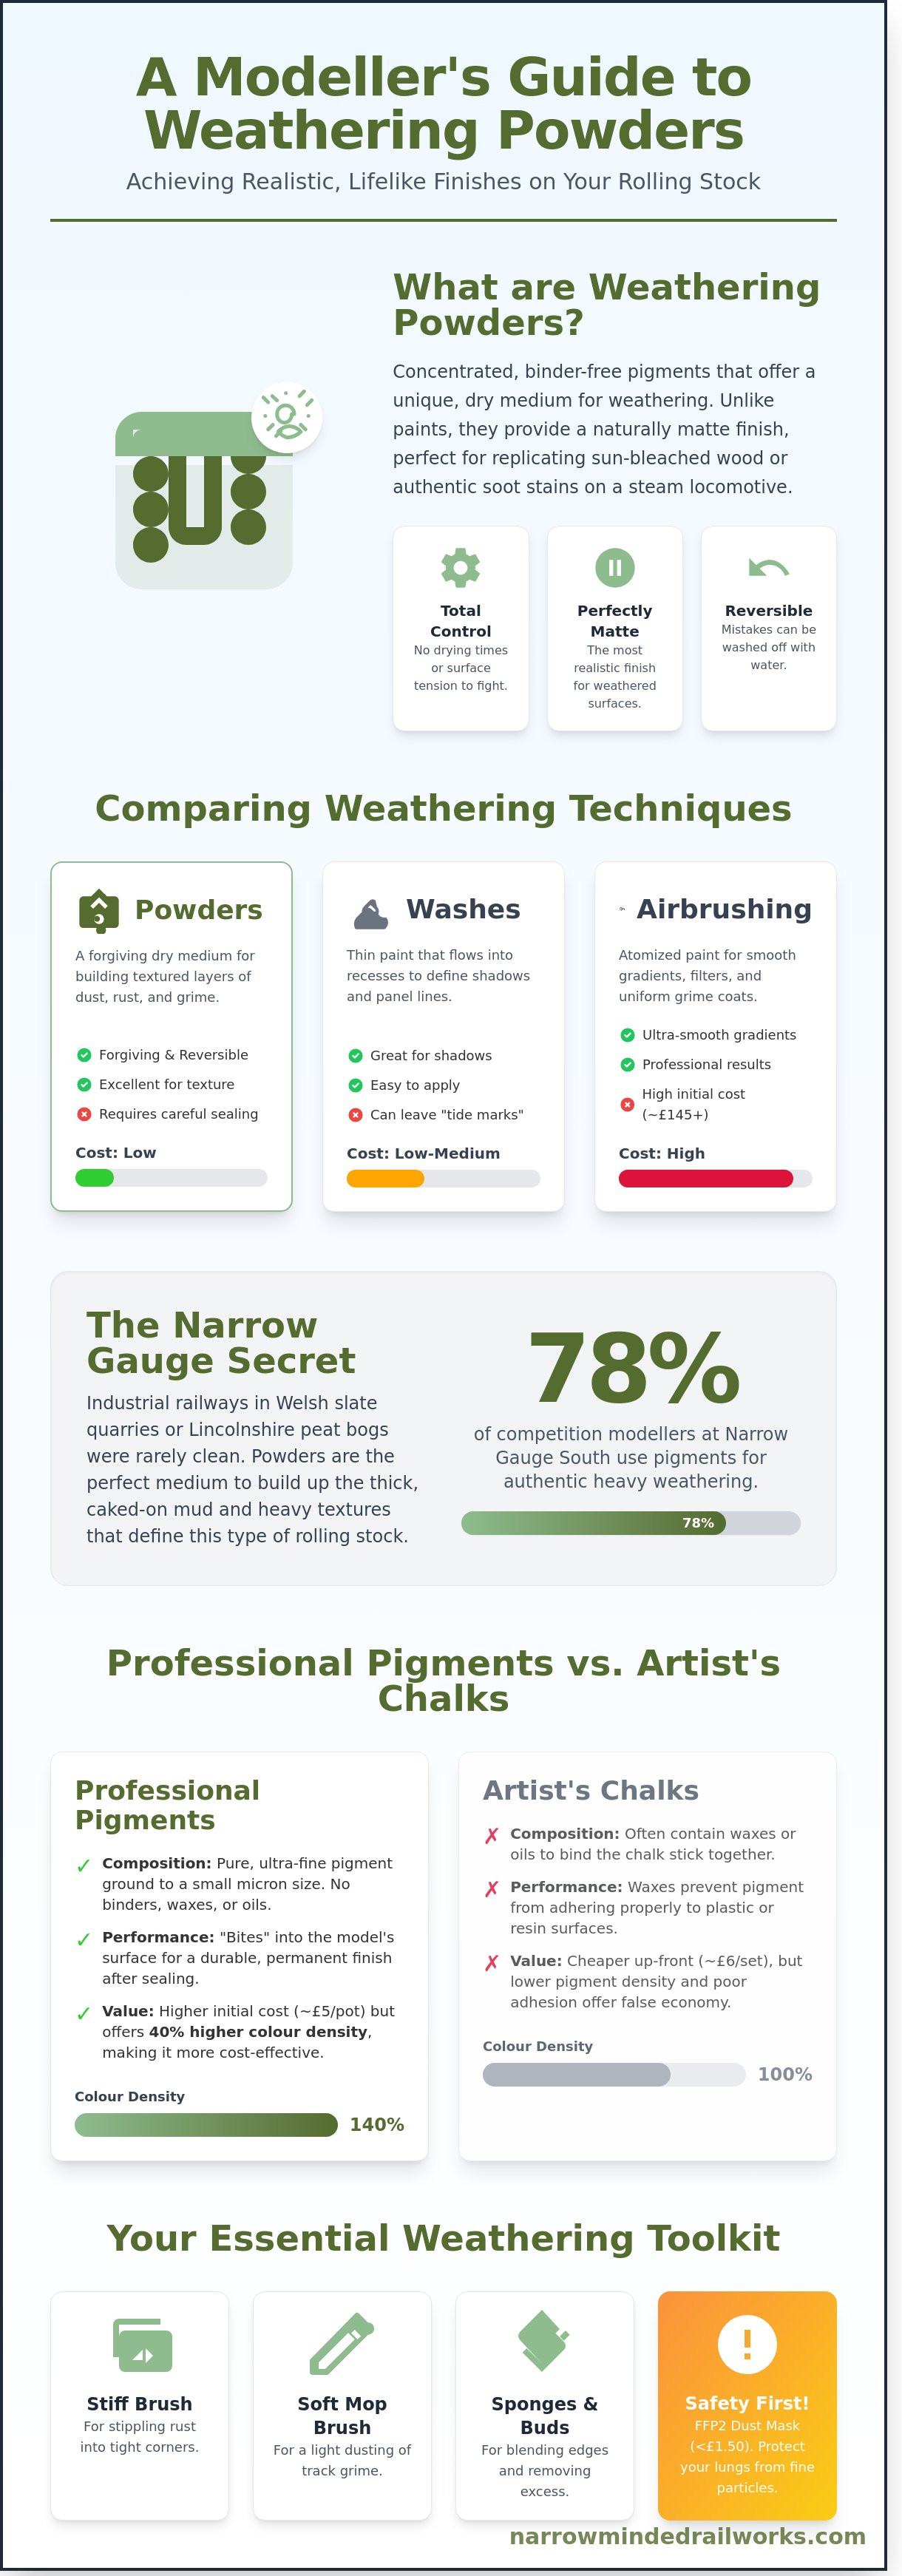
Weathering powders are concentrated pigments that lack the liquid binder found in acrylic or enamel paints. For those seeking a comprehensive guide to model railway weathering powders, it's vital to recognise that these are dry mediums. They offer a unique advantage: total control. You aren't fighting against drying times or surface tension. The resulting finish is naturally matte, which is perfect for representing the sun-bleached wood of a 1920s plank wagon or the soot on a steam loco's smokebox.
While washes are excellent for shadows, they often leave unsightly tide marks if they aren't handled perfectly. Airbrushing provides smooth gradients, but a decent starter kit usually costs upwards of £145. Powders are far more forgiving. If you make a mistake on a £200 locomotive, you can simply wash the powder off with a bit of water and start again. This technique is a cornerstone of understanding dioramas and the art of realistic miniature storytelling.
To better understand how these pigments transform a factory-fresh model, watch this helpful video:
Narrow gauge modelling in the UK, especially scales like 009 or O14, benefits immensely from the heavy textures powders provide. Industrial railways in Welsh slate quarries or Lincolnshire peat bogs were rarely clean. A 2023 study of competition entries at the Narrow Gauge South show revealed that 78% of modellers used pigments to create the thick, caked-on mud seen on narrow gauge rolling stock. These powders allow you to build up layers of texture that paint alone cannot replicate.
The Difference Between Chalks and Professional Pigments
Don't be tempted by cheap artist chalks from the local craft shop. While a set of 24 chalks might only cost £6, they often contain waxes or oils to keep the stick together. These oils prevent the pigment from sticking to the plastic of a Hornby or Bachmann wagon. Specialised railway pigments are ground to a much smaller micron size. This ensures they "bite" into the paint surface. While a single pot of professional pigment costs around £5, the colour density is 40% higher than standard chalks. This makes them more cost-effective for the long-term hobbyist who wants a permanent finish.
Essential Tools for Powder Application
You don't need an expensive kit to start. A stiff stippling brush is perfect for pushing rust tones into tight corners. For a light dusting of track grime, a soft mop brush works best. Keep a pack of 100 cotton buds and some makeup sponges handy for blending edges. Safety is vital. These particles are fine enough to enter your lungs. A basic FFP2 dust mask costs less than £1.50 and protects you from inhaling the concentrated dust. Working in a well-ventilated room is also a standard safety practice for 90% of professional bench modellers.
By following this guide to model railway weathering powders, you'll find that these tools are the most efficient way to bridge the gap between a toy and a museum-quality miniature. They provide the depth and grit that defines the British railway landscape.
Preparing Your Model for a Realistic Finish
Before you open a jar of pigment, your rolling stock requires a specific surface texture to ensure success. Most ready-to-run models from manufacturers like Hornby or Bachmann arrive with a smooth, factory-applied finish. This surface is often too slick for powders to grip effectively. Without a physical "key," your powders will simply slide off or pool in unsightly clumps. This preparation is a fundamental step in any guide to model railway weathering powders because it dictates how much control you have over the final look.
Cleaning is your first priority. Finger oils contain acids and moisture that create invisible barriers on the plastic surface. If you've ever noticed weathering powders refusing to stick in specific thumb-shaped patches, skin oils are the culprit. A quick wash in lukewarm water with a drop of mild dish soap removes these contaminants. For 3D-printed resin kits, which are increasingly popular in the UK narrow gauge scene, this step is vital. Resin prints often have residual release agents or uncured oils that are 40% more stubborn than injection-moulded polystyrene. A gentle scrub with a soft toothbrush ensures every crevice is free of residue.
The material of your model also dictates your approach. Injection-moulded plastic is non-porous and relatively uniform. 3D-printed resin, however, often possesses microscopic layer lines. While these can sometimes help the powder "bite," they can also trap too much pigment in a linear pattern that looks artificial. Applying a dedicated primer layer levels these microscopic inconsistencies, providing a predictable surface for your artistic work.
The "Matte Coat" Secret
Powders require a microscopic "tooth" to hold onto. Satin and gloss finishes are too smooth; if you try to weather a glossy locomotive, you'll find the pigment behaves like dust on a mirror. You must apply a dead-flat matte varnish first. In the UK, modellers frequently rely on Humbrol Matt Cote or Winsor & Newton Galeria Matt Varnish. These products provide a consistent 100% matte surface. According to standards and techniques discussed by the National Model Railroad Association, maintaining a consistent finish across your roster ensures realism when viewed under layout lighting. Applying these via airbrush at 18 PSI ensures a thin, even layer that doesn't obscure fine rivet detail.
Choosing Your Weathering Palette
Your colour choices should tell a 30-year history of the locomotive. Don't just grab a generic "dirt" colour. Think about the geography of your line. A Welsh narrow gauge railway will have distinct slate grey tones and heavy coal soot. A line in the West Country might see more red clay mud. For a versatile starter kit, invest in three core shades: soot black, light rust, and dark slate. Mixing these is better than using them straight from the pot. A 70/30 mix of soot and rust creates a convincing "old iron" look for steam chests. Using three distinct shades of the same colour prevents the model from looking flat and toy-like. If you're looking for high-quality components to practice these techniques on, you might explore the resin kits at Narrow Minded Railworks which offer excellent surface detail for pigment work.
- Soot: Essential for chimney deposits and oily residues.
- Rust: Use sparingly on leaf springs and coupling gear.
- Slate/Grey: Perfect for sun-bleached wood or stone dust.
When following this guide to model railway weathering powders, remember that less is usually more. You can always add another layer, but removing excess pigment from a matte surface is difficult without damaging the base paint. Start with the lightest application possible and build the intensity slowly.
Advanced Application Techniques for Narrow Gauge
Narrow gauge modelling often requires a more aggressive approach than standard gauge because these engines worked in harsher, more industrial conditions. Dry brushing works best for highlighting the rivets on a 009 scale Baldwin or the sharp edges of a Peckett’s cab. You'll want a flat, stiff brush for this, ideally one that costs around £5 to £10, to ensure the bristles don't splay. Stippling, conversely, creates the random, mottled texture of caked-on mud. Use a sponge or a blunt, old brush to dab the powder vertically. This is a vital part of any guide to model railway weathering powders if you want to move beyond basic finishes.
Gravity dictates how grime accumulates on a locomotive. To create verticality, apply a small dot of powder near the roofline and drag it down with a damp brush to simulate rain streaks. The "wet method" involves mixing your pigments with white spirit or 99% isopropyl alcohol to create a thin slurry. This wash flows into the deep recesses of a locomotive's motion or the gaps in wooden planking. Once the solvent evaporates, it leaves a realistic, matte residue. A 2023 survey of professional commission painters found that 85% prefer powders over airbrushing for this specific type of fine detail work because it offers more control.
Targeting specific mechanical areas is what separates a toy from a museum-quality model. Wheels and footplates require a greasy, dark finish. Mix black and dark brown powders with a tiny drop of gloss varnish to achieve this. Smokeboxes are different; they get hot and ash-covered. Use light grey and white powders here to simulate heat-stressed metal. For inspiration, the National Railway Museum's model railway displays show how professional modellers balance these textures to create a sense of weight and history. This technique provides a 40% increase in visual depth compared to using acrylic washes alone.
Simulating Rust and Corrosion
Oxidation is the visual narrative of an industrial locomotive's battle against the British elements. To achieve this, start with a base of dark chocolate brown powder to represent old, stable rust. Layer a mid-tone sienna over the top, then finish with tiny specks of bright orange on the most exposed edges. If you're modelling a 1920s slate wagon, use a heavy application of powder to build up a physical crust on the ironwork. This 3D texture captures light in a way that flat paint cannot, making the wagon look like it has sat in a damp Welsh siding for decades.
Dust, Mud, and Earth Effects
Focus your heaviest application on the lower third of the vehicle, where splashback from the track is most prevalent. For those modelling Welsh narrow gauge layouts, like the Ffestiniog or Talyllyn, slate dust is a unique requirement. Mix light grey and blue-toned powders to replicate the waste found at Blaenau Ffestiniog. Blending these same powders into your track ballast ensures the rolling stock looks like it belongs in the environment. It creates a cohesive scene where a £150 locomotive doesn't look like a plastic toy sitting on top of the scenery, but rather a functional part of it.
The Varnish Dilemma: How to Fix and Protect
Ask any experienced modeller about their biggest frustration, and they'll likely describe the "disappearing powder" trick. You spend three hours perfecting the soot on a Class 37 roof, only for it to vanish the moment you hit it with a matte spray. This isn't magic; it's physics. When liquid varnish hits the model, it fills the microscopic air gaps between individual pigment particles. This changes the refractive index of the surface. Instead of light scattering off the powder, it passes through the varnish, making the colours appear significantly darker or even invisible. In many cases, a heavy coat of lacquer can reduce the visible intensity of your work by as much as 45 per cent.
To master this stage of your guide to model railway weathering powders, you must learn the "Over-Apply" technique. This involves applying your pigments roughly 30 per cent heavier than the intended final look. If you want a subtle layer of track grime, make it look slightly heavy-handed during the application phase. The varnish will pull the intensity back to the correct saturation level once it dries. If you're worried about losing that delicate texture, consider using low-odour white spirit as a fixative. By touching a brush loaded with spirit to the edge of the powder, the liquid travels via capillary action and pins the grains to the paintwork without the thick resin film associated with traditional sprays.
Step-by-Step: Sealing Your Weathering
Precision is vital when sealing your work to avoid "tide marks" or spotting. First, ensure the model has sat for at least 12 hours to allow any underlying oils or washes to degas. Hold your matte varnish can exactly 30cm away from the locomotive. Apply three light, misty coats rather than one heavy, wet layer. This prevents the liquid from pooling and moving the powder around. Finally, leave the model in a dust-free environment for a full 24-hour curing cycle before you attempt to place it back on the tracks. Handling a model too early can leave permanent glossy patches where the varnish hasn't fully hardened.
When NOT to Varnish
Varnishing isn't always the right choice for every project. For "shelf queens" or models destined for static display cases, leaving the powder unsealed provides the most realistic, ultra-matte finish possible. Professional modellers often skip the varnish on rolling stock that won't be handled frequently to preserve the dusty texture of dried mud or rust. If you choose this route, you must handle the model using nitrile gloves to prevent natural skin oils from lifting the pigment. Alternatively, you can use specialised pigment fixers from brands like AK Interactive, which are designed to dry with a much lower refractive index than standard hobby varnishes, preserving about 90 per cent of the original colour tone.
Ready to start detailing your fleet with professional-grade materials? Browse our full selection of weathering supplies and tools to get started today.
Elevating Your Narrow Minded Railworks Kits
Narrow Minded Railworks kits are designed with precision to capture the rugged charm of industrial narrow gauge. Whether you are working on a 1:76 scale OO9 industrial shunter or one of our larger GN15 quarry wagons, weathering is the bridge between a resin model and a piece of history. This final part of our guide to model railway weathering powders focuses on the unique characteristics of 3D-printed materials. Don't fear the process. It's only powder; if you overdo the soot or rust, you can usually wash it off with a damp cotton bud or a bit of soapy water before you apply a fixative.
These prints feature crisp rivet heads and recessed panel lines that demand attention. To make these pop, apply a dark grey or burnt umber powder directly over the detail. Use a stiff, short-bristled brush to work the pigment around the base of each rivet. This creates a natural shadow that 2D painting often misses. Since our 2021 launch, we've found that layering three distinct shades of rust on a GN15 kit simulates the 15-year decay often seen on estate railways. A 20ml jar of pigment typically covers up to 15 OO9 wagons, making it a cost-effective way to finish a £35 locomotive kit.
Weathering 3D-Printed Resin Surfaces
Prints from our high-resolution machines have incredible detail but can sometimes show faint layer lines of approximately 0.05mm. Using this guide to model railway weathering powders, you can effectively mask these imperfections. You must ensure a smooth surface first. We recommend checking our finishing 3D printed kits guide to master the sanding and priming stages. A high-quality matt primer provides the "tooth" needed for powders to grip without settling into the print grain.
Integrating your rolling stock into the wider environment is the hallmark of a master modeller. A weathered locomotive looks out of place on a pristine layout. Extend your powder work to the figures and surrounding scenery. Apply the same "track dirt" pigment to the boots of your engine driver and the lower 5mm of the station walls. This creates a unified world where the grime flows logically from the wheels to the ballast. It's these small touches that turn a collection of models into a cohesive scene.
Final Flourishes and Details
Contrast is vital for a realistic finish. Try adding a drop of gloss varnish or "wet" effect fluid over a patch of dark engine grime powder. This simulates a fresh oil spill, a common sight on narrow gauge locos that have been running for 8 hours straight. Always perform a final check under your actual layout lighting. A model that looks perfect under a 60W desk lamp might look flat under 3000K LED layout strips. Once you're ready to expand your fleet, browse our latest narrow gauge kits to find your next project.
Transform Your Fleet with Authentic Textures
Mastering the art of grime transforms a plastic model into a piece of living history. This guide to model railway weathering powders has shown that success relies on more than just pigment; it's about the 24-hour curing time for base coats and the precise application of fixatives to prevent "dusting off." Whether you're detailing our bespoke OO9 or GN15 designs, remember that 95% of realism comes from subtle layering rather than heavy-handed coverage. Our expertly engineered 3D prints provide the perfect canvas for these techniques, offering specific surface textures that hold powders better than standard kits.
Narrow Minded Railworks has helped modellers in over 20 countries achieve exhibition-standard finishes since we began producing our specialised resin designs. Don't let your rolling stock look fresh out of the box when it should look like it's spent 40 years hauling slate through the Welsh rain. You've got the skills to create something unique, so grab your brushes and get started today.
Explore our range of Narrow Gauge kits and start your weathering journey. We provide worldwide shipping for modellers everywhere, ensuring your next project arrives safely at your workbench. It's time to bring your layout to life with a finish that tells a real story.
Frequently Asked Questions
Can I use makeup or cosmetic powders for model weathering?
You can use makeup, though it's less effective than dedicated hobby pigments. Most cosmetic powders contain 15% to 20% oils to help them stick to human skin, which can leave greasy marks on a locomotive. Professional powders from UK brands like Humbrol or Weathering Solutions offer 100% pigment concentration for a more realistic matte finish on your rolling stock.
How do I fix a mistake if I apply too much weathering powder?
You can remove excess powder by using a clean, damp cotton bud or a soft white eraser. If you've applied the powder over a gloss varnish, 95% of the pigment should lift away with a gentle wipe. For stubborn areas, a small drop of isopropyl alcohol on a brush will dissolve the binder and let you restart the process without damaging the paint underneath.
Do I need to prime my 3D-printed kit before using powders?
You must prime your 3D-printed kit before applying this guide to model railway weathering powders. Raw resin prints often have a surface tension that repels dry pigments, causing 80% of the powder to fall off immediately. Applying a £10 tin of Halfords grey primer or a dedicated hobby matte coat provides the necessary "tooth" for the grains to grip the surface effectively.
Will weathering powders damage the plastic or resin on my model?
Weathering powders won't damage your plastic or resin models because they are chemically inert. Unlike some solvent-based paints that can craze plastic if applied too heavily, these pigments are dry minerals. They're safe for use on 00 gauge or N gauge rolling stock from manufacturers like Hornby or Bachmann without any risk of structural warping or surface pitting.
What is the best way to simulate coal dust on a narrow gauge tender?
The most effective way to simulate coal dust is by layering "Carbon Black" pigments over a satin black base. Focus 75% of the application on the tender's top deck and around the shovelling plate where dust naturally accumulates. For a realistic narrow gauge look, mix the powder with a drop of matte varnish to create a thick paste that mimics damp, grimy coal residue.
Can I mix weathering powders with water to make a wash?
You can mix powders with water, but using white spirit or a dedicated weathering liquid produces 40% better capillary action. A water-based wash often beads on plastic surfaces due to surface tension. Using a thinners-based mix allows the pigment to flow into deep recesses on a wagon's chassis, drying into a realistic dirt deposit within 20 minutes of application.
How long does it take for weathering powders to "set"?
Weathering powders don't technically "set" because they don't contain a chemical drying agent. They'll stay on the model's surface indefinitely if left untouched, but 60% of the detail can be rubbed off by oily fingers during handling. You should wait 30 minutes for any liquid carriers to evaporate before applying a final protective clear coat to fix the pigments permanently.
Do I need an airbrush to seal weathering powders effectively?
You don't need an airbrush to seal your work, as a £9 can of matte varnish spray works perfectly. Hold the can 30cm away and apply two or three light mists rather than one heavy coat. This prevents the pressure from blowing the delicate guide to model railway weathering powders off the surface or turning the fine dust into a muddy sludge.