

What if the locomotive body you like won’t sit properly on the chassis you already own? Choosing OO9 locomotive body kits involves more than comparing prototypes. Compatibility, the locomotive’s role on your layout and the work needed to finish the model all matter. Start by checking what the kit is designed to fit, then plan for the separate chassis and motor needed to make a working locomotive.
Begin with the exact chassis model. Compare its stated compatibility with the kit listing, then check key dimensions such as wheelbase and available clearances. A body kit is not a complete locomotive, so account for the parts you’ll source separately and the assembly involved. With a 3D-printed body, also plan time to inspect and prepare the parts, then prime and paint as appropriate for the kit.
This guide explains how to match a body kit to your chassis, choose a style that suits your layout and assess the build before you commit. Narrow Minded Railworks designs 3D-printed OO9 locomotive bodies for projects built around compatible, separately sourced chassis.
Key Takeaways
- Understand what an OO9 locomotive body kit provides and how it differs from a ready-to-run locomotive.
- Use the exact chassis model named in a product listing as your starting point, then compare dimensions and clearances.
- Choose a body style that suits the look and purpose of your layout.
- Allow time to inspect, dry-fit, assemble and finish the kit.
- Set your layout goal and chassis choice first. Narrow Minded Railworks sells body kits, not chassis or motors.
What an OO9 locomotive body kit gives you, and what it does not
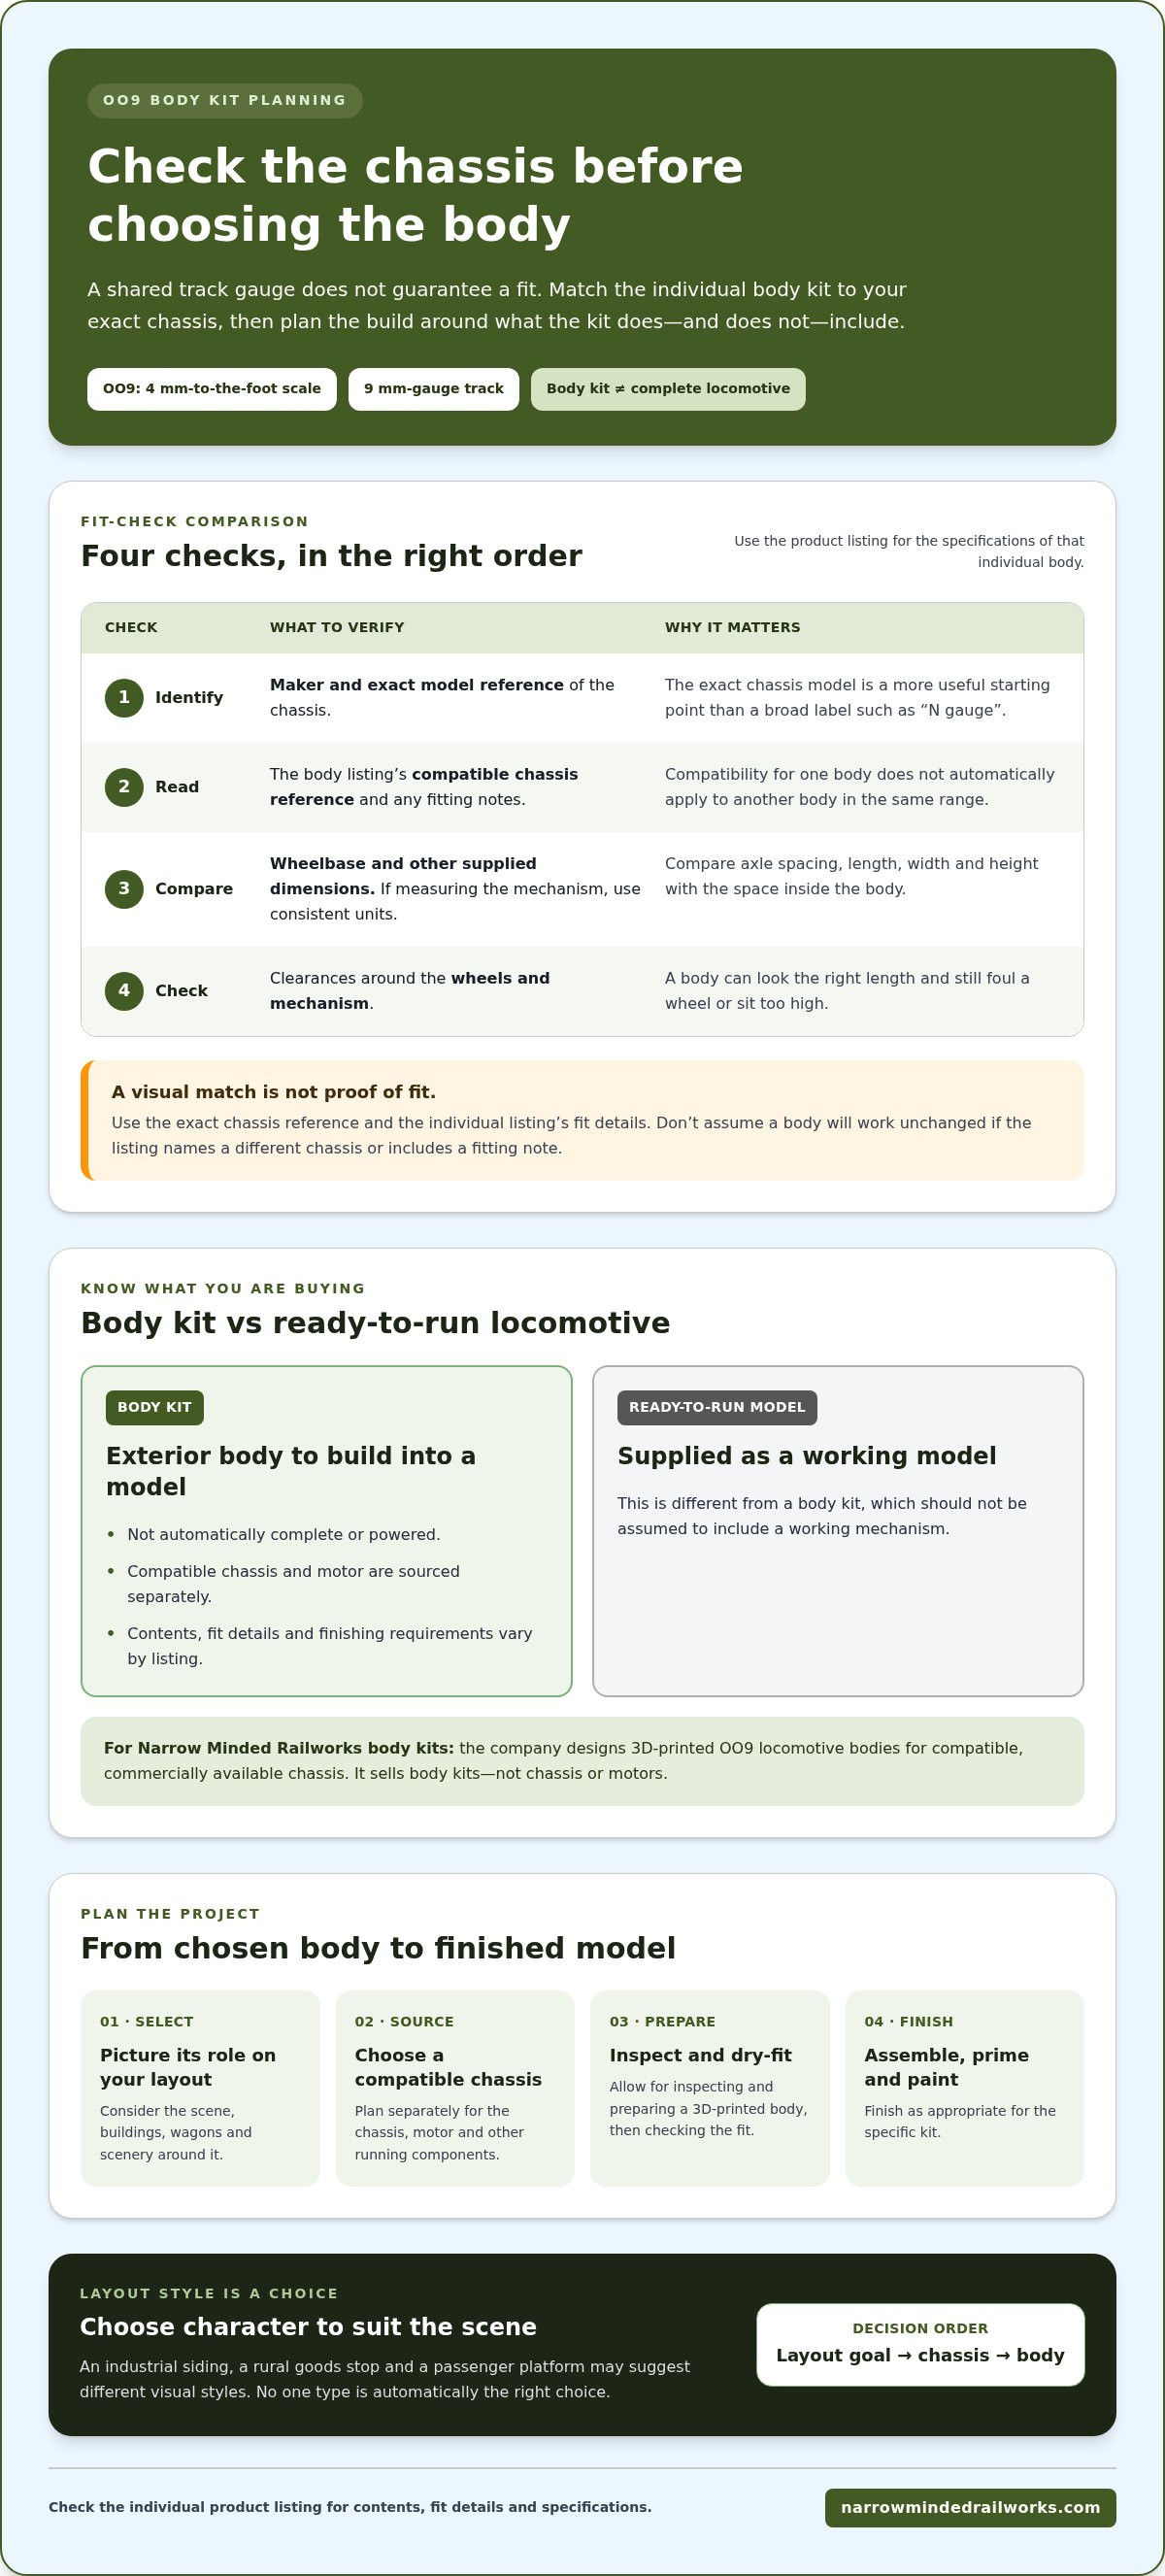
An OO9 locomotive body kit gives you a body to build into a model. It is not automatically a complete, powered locomotive. The chassis, motor and other components needed to make the model run are separate considerations. Narrow Minded Railworks designs 3D-printed locomotive bodies to fit commercially available chassis. The company sells body kits, not chassis or motors.
OO9 combines models in 4 mm-to-the-foot scale with 9 mm-gauge track, providing a way to model narrow-gauge subjects. For a concise explanation of the format, see this guide to OO9 model railway scale and gauge. Kit contents and the work involved vary, so read the individual product listing for details before choosing.
This video offers an example of a modeller working on a locomotive body kit:
Body kit, locomotive kit and ready-to-run model: what is the difference?
A body kit focuses on the locomotive’s exterior. It is not a ready-to-run model and should not be assumed to include a working mechanism. A ready-to-run locomotive is supplied as a working model, while a body kit may need to be combined with a compatible chassis and other running components sourced separately.
Narrow Minded Railworks sells 3D-printed locomotive body kits, not ready-to-run models, chassis or motors. Plan to source a compatible chassis and motor separately. Don’t rely on the word “kit” alone to tell you what is included. Read the specific product listing for its contents, fit details and finishing requirements.
Where an OO9 body kit fits into a modelling project
A body kit lets you choose the locomotive appearance first, then build the model around a compatible chassis. You might want a focal locomotive for a small industrial scene or a body that supports the atmosphere of a rural line. Consider how its shape and character will sit among your buildings, wagons and scenery, and whether the build suits the time and skills you want to put into the project.
This section focuses on what a body kit means for the locomotive itself. If you’re new to choosing a first kit and want wider beginner guidance, including how to approach the buying decision, see the OO9 locomotive kit beginner guide. The practical distinction is simple: the body is one part of the model, while the chassis and finishing plan shape the rest of the build.
How to check OO9 locomotive body kit compatibility with your chassis
A shared track gauge does not guarantee that a locomotive body will fit a particular chassis. The body needs to suit the mechanism’s shape and dimensions, and the wheels need to sit correctly beneath it. For OO9 locomotive body kits, start with the compatibility statement for the individual body, then compare the relevant measurements before choosing.
Follow this sequence:
- Identify the chassis: Record its maker and exact model reference.
- Read the body listing: Find the compatible chassis and any fitting notes.
- Compare dimensions: Check the wheelbase and other dimensions provided for the chassis and body.
- Check clearances: Consider whether the body can sit over the wheels and mechanism without interference.
Which chassis details should you identify first?
Write down the chassis maker and exact model reference before browsing. If you have the mechanism to hand, note its wheel arrangement and axle spacing as well. The wheelbase, or distance between the axles, affects where the wheels sit beneath the body. A mismatch can change the locomotive’s proportions or prevent a suitable fit. Use the listing’s compatibility statement as your starting point rather than choosing by appearance alone.
Don’t substitute a chassis simply because it runs on 9 mm track or looks similar in a photograph. OO9 describes the modelling scale and track gauge, not a universal chassis size or mounting arrangement. Mechanisms can differ in available space, axle positions and clearance needs. The exact chassis model is therefore more useful than a broad label such as “N gauge”.
How to read a body kit compatibility listing
Match the stated chassis reference exactly. Then read any product-specific notes about fitting, clearances or modifications, and compare supplied dimensions with your mechanism. Don’t assume that compatibility for one body applies to another, even if the bodies are in the same range. Different shapes may have different internal space and wheel positions. Use the individual product listing for its fit details and specifications.
When comparing a physical chassis with listing dimensions, measure carefully and use consistent units. Check the distance between axle centres, then compare the mechanism’s length, width and height with the space inside the body. A body can look like the right length and still foul a wheel or sit too high. Treat a close visual match as a reason to inspect the dimensions, not as proof of fit.
Before deciding, note the chassis reference, wheelbase and any clearance information. If the listing names a different chassis or includes a fitting note, don’t assume the body will work unchanged with yours. Use those details to narrow your options, then browse OO9 body kits with your chassis reference in mind.
Choose an OO9 locomotive body style that suits your layout
A locomotive body can establish the character of a scene before a train moves. Instead of choosing only by shape, picture the locomotive’s job on your layout and the setting around it. An industrial siding, a rural goods stop and a passenger platform suggest different visual styles, but no one type is automatically the right choice.
Use this comparison as a starting point, not as a claim about the exact features of a particular kit. Product names, photographs and descriptions can help you judge what each body represents.
| Style | Visual impression | Project fit |
|---|---|---|
| Steam locomotive | A traditional locomotive silhouette, with a prominent boiler and cab shape | Consider for a layout where steam-era character supports the scene |
| Diesel locomotive | A powered industrial or railway appearance shaped by its body and cab design | May suit a scene whose setting or chosen era calls for a diesel subject |
| Tram locomotive or railcar | A distinct form that can suggest tramway or passenger operation | Explore for a layout built around a tram subject or passenger-focused scene |
Match the locomotive body to the scene you are building
Start by deciding what the railway does in your imagined setting. Does it move goods around an industrial site, serve a rural community or carry passengers? Then compare the body with the surrounding buildings, wagons, platforms and scenery. A locomotive that feels at home beside the rest of the layout will make a more coherent scene than one chosen in isolation. Prototype inspiration can guide the mood, but it does not by itself establish exact historical accuracy.
Era is another useful filter. Consider whether your rolling stock and scenery share the period or visual atmosphere you want for the locomotive. If you’re drawn to tram subjects, the tram locomotive modelling guide can help you explore that type of project before settling on a body.
Compare body shape and modelling priorities
Decide what matters most: a compact appearance, a distinctive outline or a body that supports a particular layout era. Cab form can also influence the look, but compare open and enclosed appearances only where the product examples show those differences. Check the individual listing rather than assuming a feature is included or represented in a particular way.
When reviewing OO9 locomotive body kits, consider each product’s photographs and description together. Look at the overall proportions, cab position and visible details, then imagine the body alongside your existing rolling stock. This won’t establish historical fidelity, but it can help you choose a model that supports the scene and priorities you have in mind. Keep your preferred style in view as you compare options, and let the layout guide your decision.
Plan the build: preparation, assembly and finishing for a 3D-printed body
A good finish starts before assembly. Set aside time to inspect the parts, read the kit-specific instructions and plan how you’ll approach painting. Preparation varies between kits, so use general modelling advice as a starting point, not as a substitute for the product guidance. Follow the listing and instructions for the materials, components and preparation steps involved.
A simple build plan can help you spot questions before assembly makes adjustments more difficult:
- Inspect: Review the parts and instructions, noting anything that needs attention.
- Dry-fit: Test how components sit together before committing to assembly.
- Prepare: Gather tools and finishing materials suited to the instructions and your approach.
- Assemble: Follow the kit-specific sequence and fitting guidance.
- Finish: Plan surface preparation, primer, paint and any final details as appropriate.
Inspect and prepare parts before assembly
Begin with a careful visual check under good light. Compare the parts with the instructions and note any areas that may need attention. Don’t cut, trim or alter a part just because a mark or edge looks unexpected. First check the instructions and establish how the component is meant to fit.
Dry-fitting helps you see how parts meet and whether the assembly sequence makes sense before you commit. Handle components carefully and follow the product instructions for kit-dependent steps, including preparation and joining. The method and tools can vary, so don’t apply one kit’s procedure to another without checking its guidance.
Set realistic expectations for painting and finishing
Finishing is part of the project, not an afterthought. Decide how you want the locomotive to look, then allow time to prepare the surface and apply a finish that suits that aim. Choose primer and paint in line with relevant product guidance. Don’t assume that the same cleaner, coating or preparation method is suitable for every 3D-printed body.
For detailed techniques, use this 3D-printed model painting guide. It complements the broader build plan here, but does not replace the instructions for a specific kit. Keep the listing and any included guidance close at hand, especially when a step depends on the parts supplied or how they are designed to fit.
With OO9 locomotive body kits, a measured approach is more useful than rushing straight to paint. Inspect first, test the fit, then assemble and finish in the order recommended for that kit. To explore options for your project, browse OO9 locomotive body kits and use each listing to plan the work ahead.
Select and browse OO9 locomotive body kits with a clear plan
A clear selection process helps you avoid choosing a locomotive body that doesn’t suit your layout or build plans. Decide the locomotive’s role, identify the chassis you intend to use, compare each product description on its own terms, then consider the preparation and finishing involved. This keeps the decision grounded in both appearance and practical fit.
Use a short checklist before choosing a body kit
Before browsing, note down the essentials. A few decisions in advance make it easier to compare options consistently instead of being swayed by a striking shape that may not suit your project.
- Define the role: Decide whether the locomotive belongs in an industrial, rural, goods or passenger scene.
- Choose a visual direction: Consider the body style and era that complement your buildings, scenery and rolling stock.
- Identify the chassis: Have the maker and exact model reference ready, especially if you already own the mechanism.
- Review the work involved: Allow for the preparation, assembly and finishing described for the individual kit.
If you haven’t chosen a chassis yet, first decide how you want to approach the build. The locomotive body and mechanism need to work together, so consider compatibility before settling on a model. Narrow Minded Railworks sells locomotive body kits, not chassis or motors, so plan to source those separately.
Browse the range with compatibility and project fit in mind
Read every product description independently. Compatibility details and specifications apply to the listing in which they appear, so don’t assume one body’s stated fit carries over to another. Use product images to assess appearance and compare shapes, but rely on the individual listing for chassis compatibility and kit-specific information. A photograph can help you judge whether a body suits your scene; it can’t establish a precise fit by itself.
Keep a simple comparison note as you browse: the locomotive’s intended role, the chassis reference, the visual style you prefer and any preparation or finishing guidance in the description. If a kit’s stated compatibility doesn’t match your chassis, pause and review your options rather than assuming every body fits every mechanism. This makes it easier to choose a project that matches both your modelling goals and the chassis you plan to use.
OO9 locomotive body kits let you build a model around a chosen body and a compatible, separately sourced chassis. Narrow Minded Railworks’ 3D-printed kits are designed for modellers taking that approach. Use the relevant product description for fit and specification details, then choose with your layout and build plan in mind. Browse Narrow Minded Railworks to explore the OO9 locomotive and wagon kits.
Make your next build a considered one
Start with a note of the locomotive you want to model, the job it will do on your layout and the chassis you plan to use. Compare product descriptions against that plan instead of choosing by appearance alone. This gives you a practical way to shortlist OO9 locomotive body kits and manage the build from selection through finishing.
You don’t need to settle every detail before starting a model railway project. Begin with one clear idea, then refine it as you compare body styles and review kit-specific information. Narrow Minded Railworks designs and sells 3D-printed model railway products for modellers planning a build around a compatible chassis, with a range that can be explored from the UK and internationally.
Browse OO9 locomotive body kits and choose a body that gives your next layout scene direction. With a clear project in mind, you can move from browsing to building with confidence.
Frequently Asked Questions
Is OO9 the same as 009?
Yes. OO9 and 009 are alternative ways of writing the same modelling format: 4 mm-to-the-foot scale models running on 9 mm-gauge track. The spelling varies between manufacturers, retailers and modellers, so you may see either version in product descriptions or discussions. When comparing listings, focus on the stated scale and gauge rather than assuming a difference in spelling means the model belongs to another format.
Can an OO9 locomotive body kit run on its own?
No. A locomotive body by itself is not a working mechanism. To make a powered model, you’ll need a compatible chassis and motor, along with any other components required by the design. Check the kit’s instructions and product description to understand the project. If you already own a chassis, compare its exact model reference with the kit’s stated compatibility before planning the build.
Are OO9 locomotive body kits ready to run?
No. OO9 locomotive body kits are for modellers building a locomotive, not ready-to-run models that can go straight on the track. Narrow Minded Railworks sells 3D-printed locomotive body kits; chassis and motors are sourced separately. Read the individual product description to see what the body is designed to fit and plan for the remaining parts and work.
Can a beginner build an OO9 locomotive body kit?
Yes. A beginner can take on a kit by following the instructions and allowing time to work carefully. Start by reading the product guidance from beginning to end, then organise your tools and dry-fit the parts where appropriate. If you’re new to model building, choose a project whose listed preparation and finishing steps feel manageable. Taking time to understand each stage can make a first build less daunting.
Do 3D-printed locomotive body kits need painting?
Painting is often part of creating a finished, individual model, but the right preparation and paint approach depend on the specific kit and its guidance. Don’t assume every printed body needs the same cleaning method, primer or paint. Review the product instructions, then choose a finish that suits your intended locomotive and layout. You can also leave the model unfinished while you plan its colours and techniques.
What should I compare in OO9 body kit product photographs?
Use photographs to judge visible appearance. Compare the overall outline, cab shape, proportions and position of prominent details from different views. Consider how the body might look beside your wagons and buildings, too. Photos can help you decide whether a style suits your scene, but they can’t reliably establish chassis fit or show every clearance. For those details, use the product description and its stated compatibility information.