

The most impressive narrow gauge layouts aren't defined by the complexity of their track plans, but by the layers of grime, rust, and life that surround the rails. You've likely spent hours perfecting your gn15 locomotive kits, only to realize the surrounding world feels a bit empty or awkwardly proportioned. It's a common frustration when standard G-scale accessories look bloated next to 15-inch gauge prototypes, while OO scale details simply vanish into the background.
While finding specific scenery that matches the unique G-on-OO proportions is often a challenge, professional 3D-printed kits provide a proactive way to build a believable environment. We understand that finishing resin parts to a professional standard can feel intimidating if you're used to traditional plastic. However, with the right approach to preparation and weathering, these high-fidelity details become the highlight of your workbench.
This guide will help you transform your layout into a realistic, characterful diorama using specialized scenery and 3D-scanned figures. You'll gain the confidence to paint and weather 3D-printed resin until every petrol pump and phone box looks like it has survived decades of industrial use. We'll walk through the essential techniques for creating a cohesive aesthetic that makes your narrow gauge world feel truly alive.
Key Takeaways
- Understand how to master the unique G-scale proportions on OO track by utilizing scenery kits that create a convincing narrow gauge aesthetic.
- Discover why figures 3D-scanned from real people provide a level of realism that traditional molded accessories often lack.
- Learn the specific preparation and priming steps required to transform raw 3D-printed resin into professional-grade layout details.
- Find out how to provide the perfect industrial context for your gn15 locomotive kits using authentic items like petrol pumps and phone boxes.
- Explore weathering techniques that turn clean resin prints into characterful, aged infrastructure for a cohesive railway environment.
Understanding the GN15 Aesthetic: Why Scenery Kits Matter
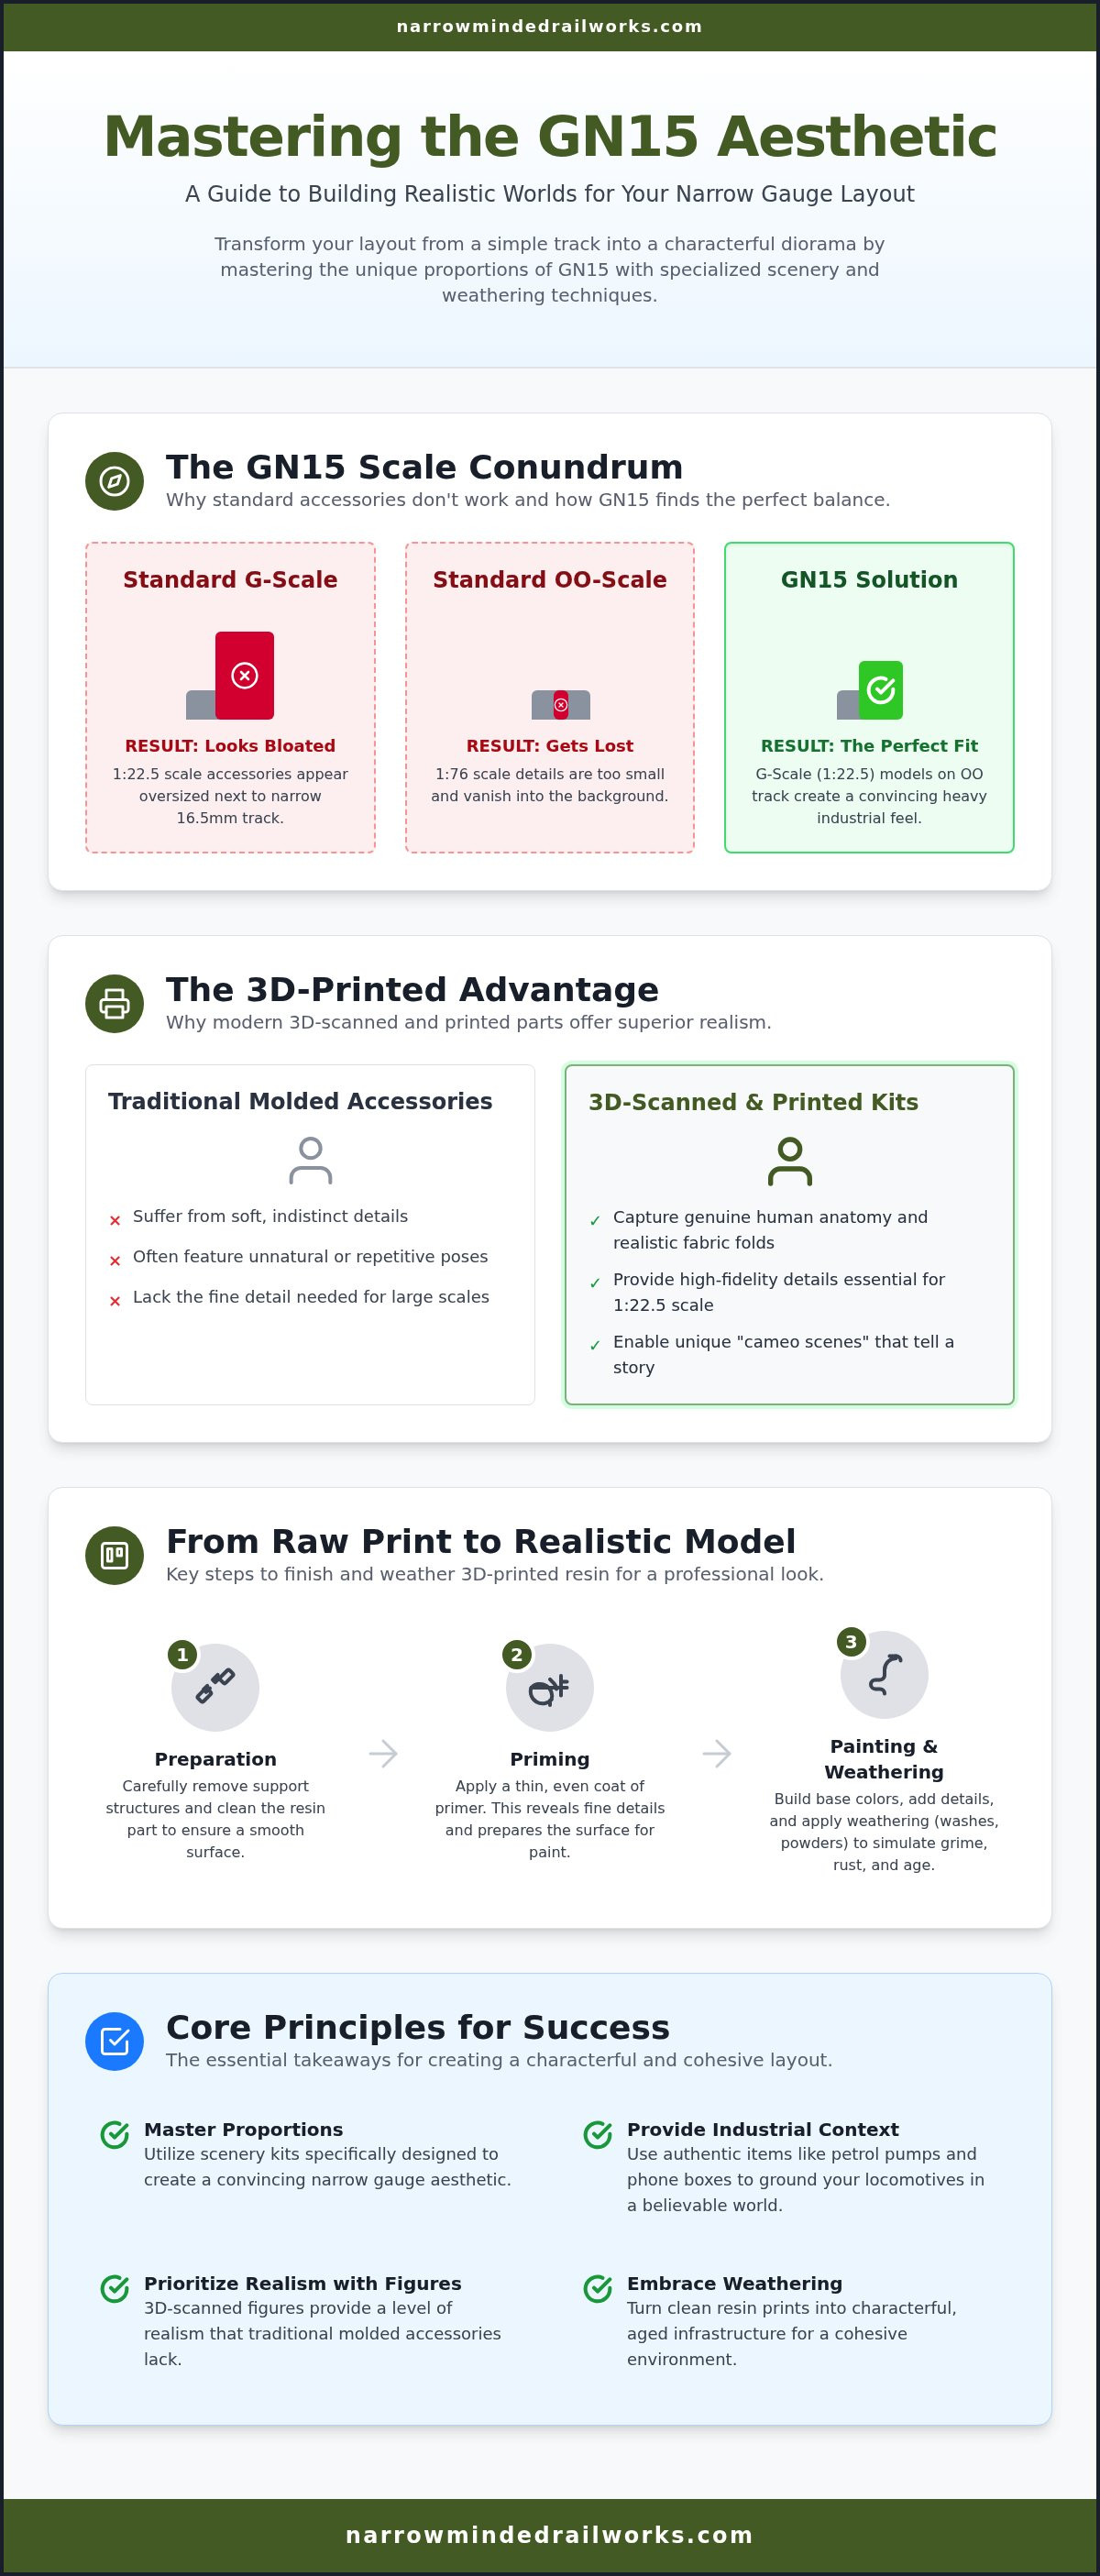
Standard G-scale modeling often requires a significant amount of outdoor space, which isn't always practical for enthusiasts with limited room. GN15 provides a proactive solution by combining 1:22.5 scale details with the space-saving benefits of 16.5mm track. This unique combination allows you to enjoy the heavy-set presence of gn15 locomotive kits within the footprint of a traditional indoor shelf layout. It represents a 15-inch prototype gauge, offering a chunky, industrial look that feels substantial despite the narrow track width.
The aesthetic success of these layouts relies heavily on scale contrast. Because the track is narrow, the locomotives and rolling stock appear purposefully oversized and full of character. However, without high-quality scenery, this contrast can look unconvincing or toy-like. Professional scenery kits provide the necessary visual weight to anchor your locomotives in a believable world. They transform a simple loop of track into a functional industrial environment, such as a remote quarry or a busy rural estate railway.
Industrial vs. Whimsical: Choosing Your Theme
Many modelers embrace the "Minimum Space" philosophy, focusing on highly detailed dioramas rather than sprawling networks. You might choose to highlight realistic industrial decay by adding rusted tools and weathered structures. Alternatively, you can lean into the inherent charm of the scale with a more whimsical, freelance approach. If you're building a working quarry, scenery kits like 3D-printed petrol pumps or scanned figures tell a story of daily labor and mechanical grit that brings your gn15 locomotive kits to life. This narrative approach ensures your layout feels like a living, breathing workspace.
The Role of Narrow Gauge in Modern Modelling
Enthusiasts are increasingly moving away from the rigid prototype requirements of standard gauge in favor of the creative freedom found in narrow gauge. This niche allows for freelance designs where you aren't restricted by specific railway company liveries or strict historical timelines. It's an opportunity to build something truly unique that reflects your own imagination. If you're new to this side of the hobby, understanding what is a narrow gauge railway is the first step toward appreciating why these smaller prototypes offer such immense modeling potential. Narrow gauge modeling prioritizes character and atmosphere over standardized perfection.
Essential GN15 Scenery Kits for a Realistic Layout
Building a believable world for your gn15 locomotive kits requires more than just track and ballast. While the locomotives provide the movement, scenery kits provide the story. Authentic details bridge the gap between a model and a miniature reality. Because GN15 operates at a large 1:22.5 scale, every detail is under closer scrutiny than it would be in smaller scales. This means that generic accessories often fail to provide the necessary fidelity required for a professional finish.
Bringing Life to Your Layout with Figures
Traditional molded figures often suffer from soft details or unnatural, repetitive poses. We provide a proactive solution by offering resin figures 3D scanned from real people. This process captures genuine human anatomy and realistic fabric folds, which is vital in a scale as large as 1:22.5. When placing figures, consider creating "cameo scenes" that suggest a narrative. A driver leaning against a cab or a worker checking a watch leads the viewer's eye and adds a sense of purpose to your railway. It's important to choose figures that match the era of your gn15 locomotive kits to maintain thematic consistency across your diorama.
Industrial Infrastructure and Details
Industrial settings often feel sterile without the right infrastructure to ground them. Unique kits, such as vintage petrol pumps or classic phone boxes, immediately define a 20th-century setting. These items provide a familiar sense of scale and help the viewer process the larger-than-life proportions of GN15 models. The secret to a lived-in atmosphere is the strategic use of clutter. Small details like line-side equipment, point levers, and buffer stops fill the gaps in your track plan. Because GN15 often utilizes tight, small-radius curves, integrating buildings requires careful planning. Using smaller details near the track edge creates depth without crowding the operational areas of your layout.
Freight operations are the heartbeat of any narrow gauge line. Believable wagon loads, such as coal, timber, or industrial crates, turn a simple train into a working transport system. These details ensure that your rolling stock looks like it has a job to do rather than just circulating on a loop. To explore a range of high-fidelity details, you can browse our collection of GN15 scenery and figures designed specifically for the narrow gauge enthusiast. Adding these specific elements is the most effective way to transition from a collection of models to a cohesive, realistic world.
The Benefits of 3D Printed Scenery Kits vs. Traditional Materials
Traditional injection-molded plastic and cast resin have served the hobby well for decades. However, these methods often struggle to reproduce the intricate textures required for the 1:22.5 scale. 3D printing provides a proactive solution for the niche requirements of narrow gauge enthusiasts. It allows for a level of detail density that mass-produced kits simply cannot match. From the subtle pitting of weathered iron to the deep grain of timber sleepers, resin printing captures the complex textures that bring your layout to life.
Precision in Large-Scale Details
The large proportions of GN15 demand high-fidelity mechanical parts. While smaller scales can hide imperfections, 1:22.5 scale requires crisp rivets and clean edges. 3D printing is the preferred method for this scale because it eliminates the "soft" edges often found in old rubber molds. If you're just beginning your journey, reading about Getting Started in GN15 Scale will help you understand how these high-quality components fit into your broader project. This precision ensures that your scenery kits look just as professional as your gn15 locomotive kits. Details define the scale.
The interaction between materials is also vital for a successful build. Modern 3D-printed resin is highly compatible with acrylic paints and cyanoacrylate (CA) glues. Unlike some oily plastics, resin provides a stable surface for primers to "bite" into, which is essential for the heavy weathering common in industrial settings. Additionally, resin components offer a satisfying weight. This stability ensures that small details like point levers or buffer stops stay securely in place on your diorama, even during operation.
Durability and Long-Term Maintenance
Resin offers distinct advantages over traditional materials regarding environmental stability. While thin plastic sheets can warp under extreme temperature changes, cured resin remains structurally sound. This makes it an ideal choice for exhibition layouts that frequently travel between different venues. Maintenance is another area where 3D-printed kits excel. If a part does suffer damage during transport, the repair process is straightforward. Because the material is uniform, you can easily sand, fill, or even re-print specific components to maintain your layout's professional finish. This durability ensures that the time you invest in painting and detailing your gn15 locomotive kits isn't wasted on fragile materials.
Step-by-Step: Finishing and Weathering Your Scenery Kits
Finishing 3D-printed scenery requires a different mindset than working with traditional injection-molded plastic. While resin offers incredible detail for your layout, the surface preparation determines the final quality of the project. Ensuring your scenery matches the high standard of your gn15 locomotive kits starts with a clean foundation. Proper preparation prevents the "plastic" look that can sometimes ruin the immersion of a narrow gauge diorama.
Preparing 3D Printed Surfaces
Before applying any paint, you must address the physical remnants of the printing process. Support pips and minor layer lines are inevitable in high-fidelity resin prints. We recommend using a fine-grit sanding stick to gently remove these marks. If you encounter deep support scars, a small amount of model filler provides a proactive solution. Once the surface is smooth, choosing the right primer is critical. Resin is non-porous, so a specialized tacky primer is necessary to ensure the paint doesn't flake off during heavy weathering. For a deeper dive into these initial steps, our guide on Painting 3D Printed Models offers a comprehensive look at achieving a perfect base.
Weathering for Industrial Realism
Industrial narrow gauge environments are defined by their "controlled grime." To make 3D scanned figures look alive, apply a dark acrylic wash into the deep folds of the clothing. This highlights the organic detail captured during the scanning process. For mechanical parts and buildings, dry-brushing is your most effective tool. Use a stiff brush with a small amount of light gray or rust-colored paint to catch the raised edges of wood grain and rivets. This technique creates an immediate sense of age and exposure to the elements, which is essential for a working quarry or estate railway.
Ground-level items like buffer stops or petrol pumps benefit from "upward weathering." Apply thin layers of matte earth tones or green washes to simulate rising damp and moss. This anchors the object into the scenery and prevents it from looking like a separate piece of material sitting on top of the ballast. To get started with your own project, you can buy GN15 scenery kits and figures that are specifically designed for easy assembly and finishing. By following a structured weathering process, you ensure that every detail on your layout complements your gn15 locomotive kits and contributes to a cohesive, realistic industrial world.
Building Your GN15 World with Narrow Minded Railworks
Narrow Minded Railworks focuses exclusively on the niche requirements of narrow gauge enthusiasts. We recognize that finding high-fidelity components for 15-inch gauge prototypes is often a hurdle for modellers. To solve this, we provide professional 3D-printed solutions that prioritize realism and ease of assembly. Our commitment to the hobby means we don't just produce parts; we create the building blocks for a characterful, immersive world that stands out on any exhibition circuit.
Unique Scenery for Unique Layouts
Our figure collection represents a significant leap forward in layout realism. By utilizing 3D scans of real people, we capture authentic anatomy and natural fabric folds that traditional sculpting methods simply cannot replicate. These figures aren't merely static objects. They are the workers, drivers, and bystanders that give your miniature world its human character. Because our kits are designed by modellers for modellers, we understand the practicalities of the workbench. We provide the high-quality resin "skin" of the model, allowing you to focus your creative energy on the painting and weathering techniques discussed earlier in this guide. We provide the precision, but the creative soul of the diorama remains yours.
Our gn15 locomotive kits are engineered with a proactive focus on compatibility. While we don't sell chassis or motors, we design our locomotive bodies to fit popular, reliable power units used throughout the GN15 community. This approach ensures that you have a stable mechanical foundation while enjoying the unique aesthetic of a Narrow Minded Railworks design. It's a structured way to build a fleet that looks professional and runs consistently without the frustration of mismatched components.
Next Steps for Your GN15 Journey
Building a realistic industrial layout is an ongoing process of refinement and addition. As you complete your current projects, you'll likely look for new ways to expand the narrative of your railway. We invite you to join the growing community of narrow gauge modellers who prioritize detail and atmosphere over standard gauge conventions. Staying updated on our latest releases is the best way to ensure your diorama continues to evolve with fresh, unique content that keeps viewers engaged.
You can browse our latest scenery releases and locomotive bodies through our online store. We frequently add new figures and industrial details to our catalog to help you maintain a lived-in, working environment for your gn15 locomotive kits. If you're looking for specific items to ground your railway in a believable setting, you can View our full GN15 Scenery Collection today. We look forward to seeing how you use our kits to bring your narrow gauge vision to life.
Elevating Your GN15 Diorama Standards
Transitioning from a basic loop of track to a professional industrial diorama requires a focus on context and texture. You've learned how 3D-printed resin captures the fine mechanical details that traditional materials often miss. By combining specific infrastructure like petrol pumps with figures 3D-scanned from real people, you create a believable environment for your gn15 locomotive kits. Proper preparation and weathering are the final steps that turn raw resin into a characterful, aged landscape that feels truly alive.
We understand that building a niche narrow gauge world can be difficult without access to the right scale-specific tools. We provide professional 3D-printed resin solutions and unique accessories designed to help you reach a professional finish on every project. With worldwide shipping available, we ensure that enthusiasts can build their dream layouts regardless of their location. Explore our full range of GN15 scenery kits to find the missing pieces for your workbench. We're excited to support your journey as you transform your layout into a realistic narrow gauge masterpiece that tells a story of industrial history.
Frequently Asked Questions
What scale is GN15 scenery?
GN15 scenery utilizes 1:22.5 scale proportions, which is commonly referred to as G scale. This specific scale is used to represent a 15-inch prototype gauge while running on standard 16.5mm (OO gauge) track. Utilizing the correct scale for your accessories is vital to maintaining the visual balance of your layout. It ensures that your structures and figures don't look awkwardly sized next to your large-scale locomotives and rolling stock.
Do GN15 scenery kits work with OO gauge track?
Yes, these kits are specifically designed for use with 16.5mm track, which is the standard for OO gauge. While the track width is the same as standard gauge OO models, the scenery and gn15 locomotive kits are significantly larger to reflect the 1:22.5 scale. This combination allows you to build a large-scale narrow gauge world within a relatively small footprint, utilizing common track components found in many hobby shops.
How do I paint 3D printed resin scenery?
You should begin with a high-quality, tacky primer designed for non-porous surfaces. Because resin doesn't absorb paint like wood or plaster, the primer provides the necessary "bite" for your base coats. Once primed, you can use standard acrylic model paints for the main colors. We recommend applying thin layers to preserve the fine details. Finishing with washes and dry-brushing techniques will help you achieve a professional, weathered look on your industrial items.
Are GN15 figures compatible with G-scale layouts?
GN15 figures are fully compatible with G-scale layouts because they both share the 1:22.5 scale ratio. Our figures are 3D scanned from real people to provide a level of realism that is often missing from traditional molded G-scale accessories. This makes them an excellent choice for adding human character to any large-scale industrial scene. Whether you're building a 15-inch gauge line or a larger narrow gauge railway, these figures maintain consistent proportions.
What glue is best for 3D printed scenery kits?
Cyanoacrylate, commonly known as super glue, is the most effective adhesive for resin-based 3D printed kits. Traditional plastic cements won't work because they rely on melting the surface of polystyrene, which resin resists. We suggest using a gap-filling CA glue for larger structures to provide a stronger bond and fill minor joins. For smaller details, a thin CA glue allows for precise application without leaving visible residue on the fine textures of your models.
Can I use these scenery kits for outdoor layouts?
While cured resin is structurally stable and resistant to warping, these kits are primarily designed for indoor dioramas. Prolonged exposure to direct sunlight can cause resin to become brittle over time due to UV radiation. If you choose to use them outdoors, we recommend applying a UV-resistant clear coat and bringing the items inside during extreme weather. This proactive approach helps protect the professional finish of your scenery and ensures the longevity of your investment.
How do I remove support marks from my scenery kits?
You can safely remove support marks using fine-grit sanding sticks or a sharp hobby knife. It's best to handle this task before priming, as the marks are easier to identify on the raw resin. Gently sand the "pips" until the surface is flush with the surrounding detail. If a support leaves a small pit, a tiny amount of model filler will solve the issue. This preparation is essential for achieving a smooth, professional-grade surface.
Which GN15 locomotive kits are best for beginners?
We recommend starting with our "easy-build" gn15 locomotive kits, such as the Clayton Electric or simpler diesel critters. These kits are designed with fewer parts to simplify the assembly process for those new to resin modeling. It's important to remember that we provide the locomotive bodies and detail parts, but you'll need to source a compatible chassis separately. This structure allows beginners to focus on mastering the finishing and weathering techniques before tackling complex builds.