

The boxy, industrial aesthetic of a Sentinel locomotive makes it the perfect entry point for anyone intimidated by the complexity of larger scales. You may feel that a 7mm scale sentinel loco kit presents too many hurdles, particularly when it comes to sourcing a compatible chassis or handling 3D printed resin. It's true that 3D materials require a different approach than traditional brass or plastic; however, modern printing techniques provide a level of detail that simplifies the assembly of complex industrial shapes. We understand that finding the right mechanical parts for niche kits can be frustrating, so we focus on proven solutions that ensure your model runs as well as it looks.
You deserve a locomotive that acts as a reliable workhorse on your narrow gauge layout rather than a static display piece. This guide explains how to choose your components, assemble the body with confidence, and overcome the fear of brittle parts. We also provide a clear roadmap for painting and weathering your Sentinel to achieve a professional, hard-worked appearance. By following these structured steps, you'll gain a clear understanding of the assembly process and finish with a smooth-running locomotive that anchors your industrial scene.
Key Takeaways
- While Sentinel designs vary significantly, we provide the clarity needed to distinguish between 100HP and 200HP variants so your model accurately fits your layout's historical era.
- While traditional etched brass has its merits, you will discover why 3D printed resin is an effective choice for a 7mm scale sentinel loco kit by reducing assembly complexity without sacrificing detail.
- While selecting mechanical components can be challenging, you will learn how to identify the exact wheelbase measurements required to source a reliable, smooth-running motor block.
- Although high-detail kits can seem daunting, our guide demonstrates how the Narrow Minded Railworks "Pro-Kit" philosophy provides a structured assembly path that sets realistic expectations for your build.
The Appeal of the 7mm Scale Sentinel Loco Kit
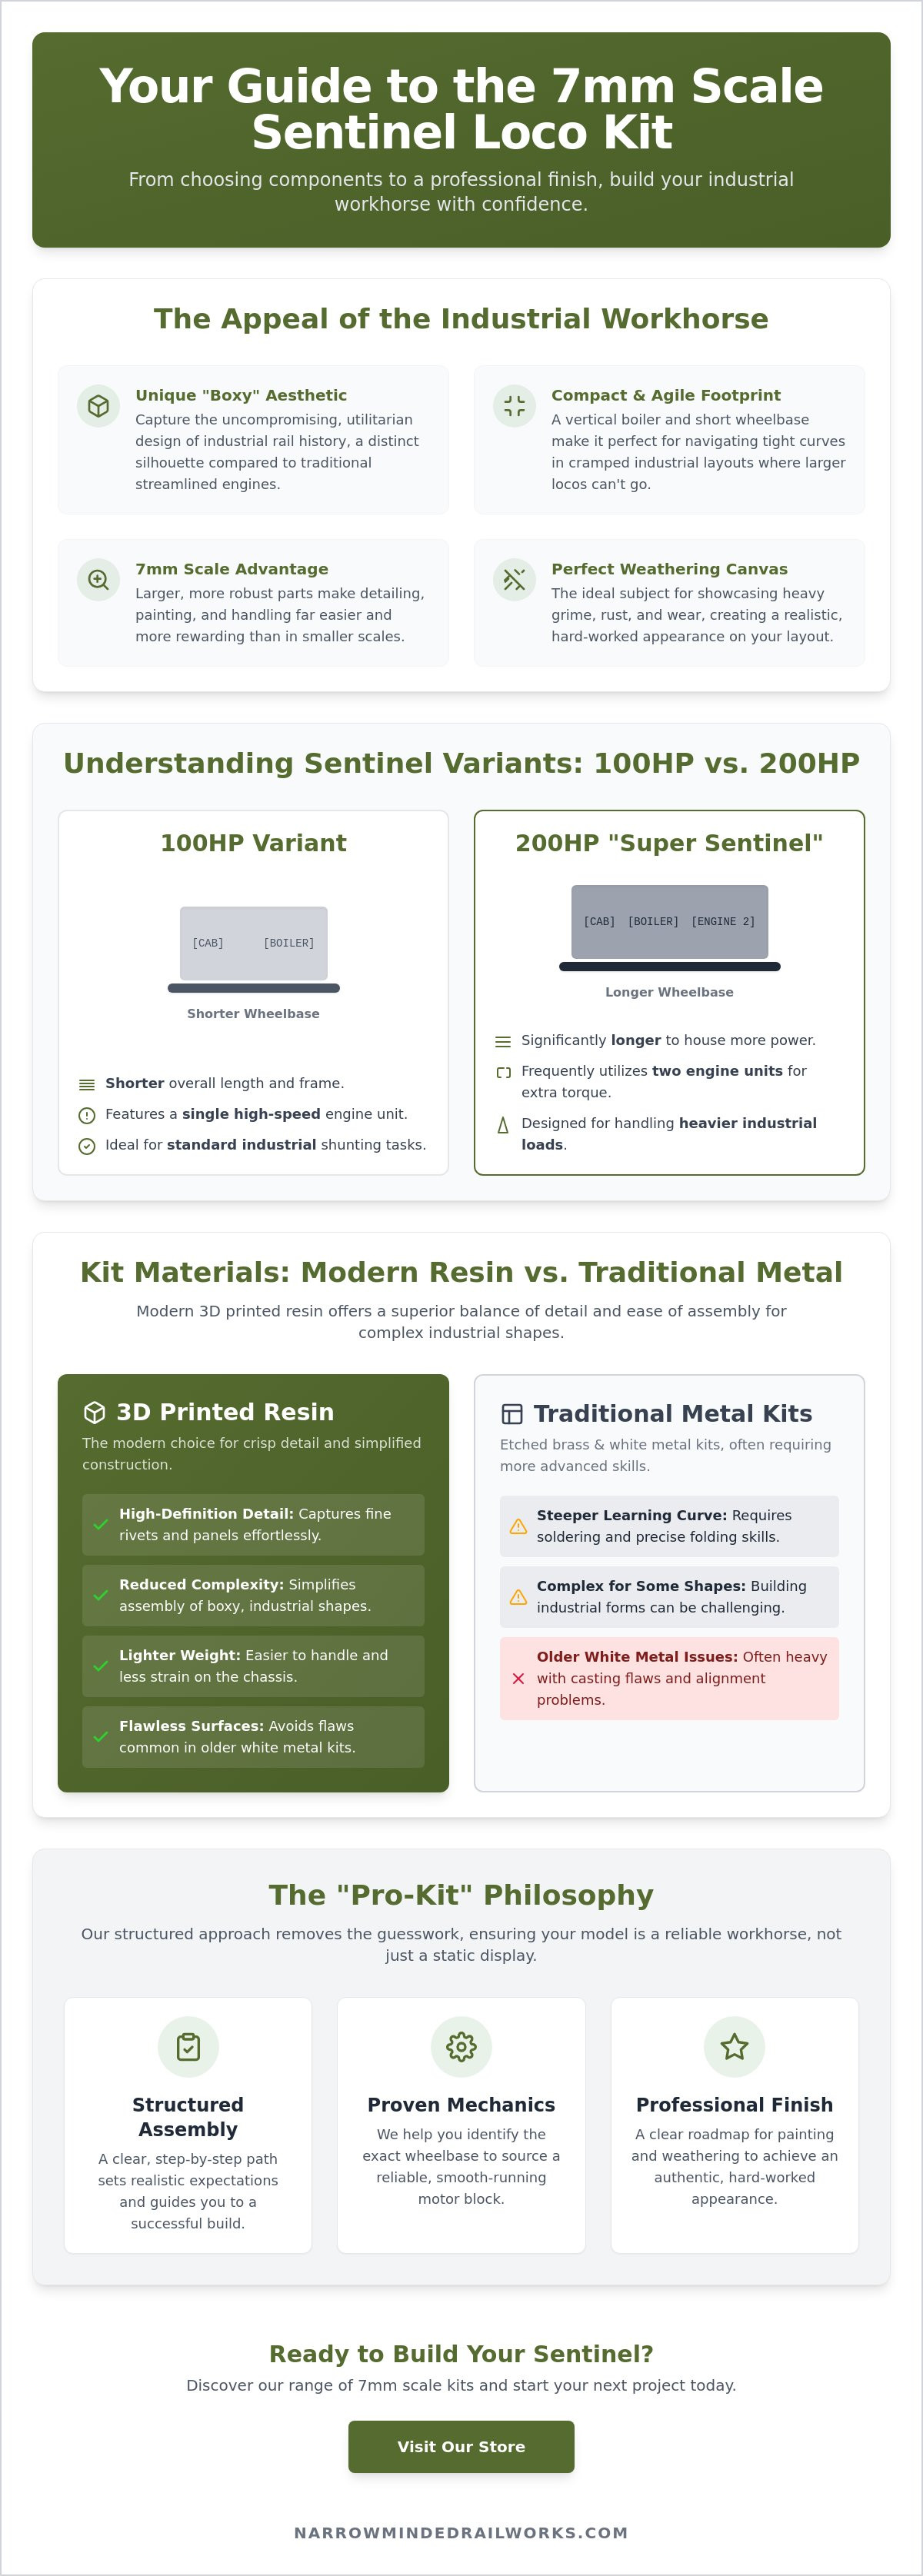
Sentinel locomotives stand out because of their uncompromising, utilitarian design. While many traditional engines favor streamlined curves and horizontal boilers, the designers at Sentinel prioritized efficient steam production and compact footprints. This led to a distinct, "boxy" silhouette that defines industrial rail history. Choosing a 7mm scale sentinel loco kit allows you to capture this unique character with a level of precision that smaller scales often struggle to match. You can explore the full Sentinel Waggon Works history to see how these machines transitioned from road wagons to essential railway assets.
To see how these industrial giants look in O gauge, watch this unboxing and review:
Industrial Charm in a Small Package
The history of Sentinel locomotives is rooted in the gritty environments of quarries, dockyards, and heavy factories. Their vertical boiler design wasn't just a quirk; it allowed for a much shorter wheelbase, making them ideal for navigating tight curves in cramped industrial sidings. Many modellers are drawn to these "ugly-duckling" prototypes because they represent the hardworking reality of the railway. While older white metal kits were often heavy and difficult to align, the industry has shifted toward high-definition 3D printing. We recognize that traditional kits can be intimidating for beginners. Modern 3D printed resin provides a proactive solution, offering crisp detail and easier assembly for your 7mm scale sentinel loco kit without the weight or casting flaws of the past.
Why 7mm Scale Matters for Kit Building
Building in 7mm scale, or O gauge, offers a significant advantage when it comes to detailing. You'll find that rivets, cab interiors, and external control gear are far more visible and easier to paint than in 4mm scales. This scale is a natural fit for narrow gauge railway enthusiasts who want to build a layout with presence. The parts are larger and more robust, which reduces the frustration of handling tiny components. Whether you are modelling a standard gauge branch line or a narrow gauge O-16.5 industrial tramway, the Sentinel provides a versatile platform. It acts as a perfect canvas for heavy weathering, allowing you to showcase the grime and wear expected of an industrial workhorse. By choosing this scale, you set a realistic expectation for a high-detail finish that is both achievable and rewarding.
Understanding Sentinel Designs: From Steam to Diesel
Sentinel locomotives operate on a mechanical principle distinct from traditional Stephenson designs. Instead of a horizontal boiler with large cylinders, they utilize a high-pressure vertical boiler paired with high-speed steam engines. This arrangement allowed for exceptional power within a compact frame, making them the preferred choice for tight industrial sidings. If you want to see a masterclass in how these proportions translate to a physical build, the National Railway Museum's Sentinel model offers a perfect reference point for the level of detail achievable in scale. Understanding these internal mechanics is the first step toward building an accurate model.
When choosing a 7mm scale sentinel loco kit, you'll likely encounter 100HP and 200HP variants. While identifying specific versions from grainy historical photos can be difficult, we provide the key visual markers to ensure your kit matches the prototype. The 100HP version is typically shorter, often featuring a single engine unit. In contrast, the 200HP "Super Sentinel" variants are longer and frequently utilize two engine units to handle heavier industrial loads. Identifying the wheelbase and overall length of your kit will help you determine which power class you are modelling.
Vertical Boiler Steam Locomotives
Industrial steam Sentinels are famous for their gear-driven or chain-driven wheelsets. Unlike standard locomotives with external connecting rods, these mechanisms are often hidden behind valances or located internally. Key visual identifiers include the central chimney placement and the large, slab-sided water tanks. While painting industrial liveries can feel restrictive, most Sentinels wore simple, durable colors like Brunswick Green, Oxford Blue, or plain black. These were often heavily weathered to reflect their working life in harsh environments. A 7mm scale sentinel loco kit provides the surface area needed to replicate these textured, oily finishes effectively.
The Diesel-Mechanical Successors
As industrial requirements evolved, Sentinel transitioned to diesel-mechanical designs. These locomotives retained the rugged, short-wheelbase DNA of their steam predecessors but introduced a more angular cab and a distinct bonnet. Modelling the exposed chain-drive mechanism in 7mm scale provides a unique opportunity to showcase mechanical detail that is often lost in smaller scales. Transitioning your layout from steam to diesel doesn't require a complete overhaul; many factories used both types simultaneously during the mid-20th century. If you're ready to start your next industrial project, exploring our range of O-16.5 / 7mm scale kits can help you find the right prototype for your specific era.
3D Printed Resin vs. Etched Brass Sentinel Kits
Choosing the right material for your 7mm scale sentinel loco kit often involves a trade-off between traditional weight and modern convenience. Etched brass has long been the standard for O gauge enthusiasts, but high-definition 3D printing is rapidly becoming the preferred choice for industrial prototypes. While some modellers worry about the fragility of resin, modern engineering-grade resins are remarkably resilient. We understand that durability is a primary concern for working layouts; therefore, we utilize materials that offer a balance of crisp detail and structural strength. It's a faster path to a finished model that doesn't sacrifice the "heft" expected in larger scales.
Comparing the two materials reveals a significant difference in assembly time. A traditional brass kit can take dozens of hours to fold, jig, and solder. In contrast, a 3D printed resin body can be ready for the paint shop in a single afternoon. This efficiency allows you to focus your energy on the creative aspects of the hobby, such as weathering and detailing, rather than struggling with a hot soldering iron. Looking at a preserved Sentinel locomotive shows just how much complex surface detail these engines possess. Replicating those cast-iron textures and bolted panels is often more straightforward with 3D resin because the printing process reproduces three-dimensional relief that etching cannot easily mimic.
The Advantages of 3D Printed Resin
One-piece body shells are the biggest advantage of resin kits. They eliminate the risk of misaligned panels or visible solder seams that can plague metal builds. Intricate features like rivets, door handles, and cab controls are printed directly onto the 7mm scale sentinel loco kit, ensuring perfect scaling. To achieve a professional surface finish, you'll need to follow the correct preparation steps. We recommend reviewing our guide on painting 3d printed models to learn about degreasing and the best primers for resin surfaces. This proactive approach ensures your industrial workhorse looks as good as it runs.
When to Choose Etched Brass
Etched brass remains a valid choice if you prioritize the maximum possible weight for heavy shunting duties. Metal kits have a natural density that helps with electrical pickup and traction on steep gradients. However, resin kits provide a more accessible entry point for those new to 7mm modelling. You can easily compensate for the lighter weight of resin by adding lead shot or tungsten putty into the internal vertical boiler cavity or the side tanks. This simple solution gives your locomotive the traction it needs while retaining the ease of a 3D printed build. It's about choosing the tool that best fits your skill level and your layout's requirements.
Chassis Selection and Preparation for 7mm Kits
Identifying a compatible chassis is often the most challenging aspect of completing a 7mm scale sentinel loco kit. While we do not supply ready-to-run chassis or motors, we provide the necessary guidance to help you source a reliable power plant from third-party manufacturers. The primary constraint modellers face is the compact, square wheelbase of the Sentinel, which requires a motor block that fits within the narrow confines of the 3D printed shell without obstructing the cab interior. By measuring your kit's internal clearances before purchasing, you can ensure a proactive solution to potential fitment issues.
Many community discussions suggest using standard gauge OO chassis, such as those from small industrial tanks, as donor units. While this is a cost-effective starting point, you must account for the specific modifications required for a 7mm scale model. A standard OO chassis often sits too low in an O gauge body, requiring the addition of plasticard spacers to achieve the correct buffer height. You also need to verify that the wheelbase matches the Sentinel's 100HP or 200HP specifications. If your goal is a narrow gauge (O-16.5) workhorse, you will need to ensure the donor chassis is gauged for 16.5mm track and has sufficient torque for industrial shunting.
Sourcing the Right Power Plant
Popular donor options for 7mm narrow gauge often include heavy-duty motor blocks designed for larger scales or robust OO gauge shunter chassis. It is vital to check the internal width of your 7mm scale sentinel loco kit against the widest part of the motor, usually the gear housing or the motor brushes. If you are looking for inspiration regarding compatible wheelbases and motor types, you can check our guide to On30 gauge. Many of the chassis solutions used in On30 are directly applicable to O-16.5 industrial builds due to their shared track gauge.
Step-by-Step Chassis Fitting
Once you have selected a donor, the first step is removing the original body and any unnecessary detailing parts. You will then need to create secure mounting points within the 3D printed shell. We recommend using small blocks of resin scrap or plasticard glued inside the body to act as screw-fix points for the chassis plate. Because 3D printed resin is lighter than traditional white metal, you should add weight to the chassis to improve electrical pickup and traction. Lead shot or tungsten putty placed low in the frame ensures the locomotive maintains a smooth, jitter-free crawl during shunting operations. If you are ready to begin your build, you can view our O-16.5 / 7mm scale kits to find the perfect industrial prototype for your layout.
Building and Finishing Your Sentinel with Narrow Minded Railworks
Narrow Minded Railworks specializes in providing high-detail 3D printed kits that cater to the specific needs of industrial modellers. Our "Pro-Kit" philosophy recognizes that while you want a professional result, you don't necessarily want to spend months on a single build. We've designed each 7mm scale sentinel loco kit to bridge the gap between complex multi-part builds and basic shells. By integrating many of the smaller details directly into the main print, we reduce the number of components you need to align. This helps you avoid the common pitfalls of traditional kit building while ensuring a high level of accuracy.
Preparing a resin body requires a specific approach to ensure a smooth finish on the Sentinel's large, flat panels. You'll find small marks where the printing supports were attached; however, these are easily managed with a fine-grit sanding stick. We recommend starting with 400 grit and moving to 800 grit for a polished surface. It's vital to sand in a well-ventilated area and wear a mask to avoid inhaling resin dust. This preparation ensures that your primer adheres correctly and that the boxy silhouette of the locomotive remains crisp. We understand that surface prep can feel tedious, but taking this extra time creates a proactive solution for a better final paint job.
Assembly Tips for Our 7mm Kits
Resin components don't react to standard plastic cement. You must use cyanoacrylate (super glue) or a two-part epoxy for a permanent bond, especially when attaching metal handrails or the chassis. For a realistic "lived-in" look, we encourage you to detail the cab before fixing the roof. Adding a crew and painting the vertical boiler controls makes a significant difference in 7mm scale where interiors are highly visible. Before you proceed to the paint shop, perform a final inspection. Check that the body sits square on the chassis and that there is sufficient clearance for your chosen track's curves and pointwork.
The Final Touch: Painting and Weathering
Choosing the right primer is the most important step in finishing a 3D printed model. A high-quality automotive or hobby-specific plastic primer provides the necessary "bite" for your topcoat to stick to the resin. Once your base color is dry, you can apply industrial branding using waterslide decals. Sentinels are the perfect subjects for heavy weathering. You can transform a "factory fresh" model into a "rusty industrial relic" by layering washes of oily black and burnt sienna. This process highlights the rivets and textures that make the Sentinel so iconic. If you're ready to start your industrial masterpiece, browse our full range of 7mm scale kits today to find your next project.
Bring Your Industrial Layout to Life
Building a high-detail industrial workhorse requires more than just a passing interest in railway history; it demands the right materials and a structured assembly plan. You now understand the mechanical differences between steam and diesel prototypes and how 3D printed resin simplifies the path to a finished model. While sourcing a third-party chassis can feel like a significant hurdle, following our guidance on internal measurements ensures your 7mm scale sentinel loco kit runs with the precision your layout deserves.
We provide expertly designed 3D printed bodies that prioritize easy chassis integration, allowing you to focus on the creative joy of painting and weathering. Although international sourcing can sometimes be difficult, we offer worldwide shipping to support modellers wherever they're located. You're now equipped to turn a boxy industrial silhouette into a professional-grade masterpiece. Explore our 7mm scale locomotive kits and start your next build today and watch your industrial scene come alive with authentic character and reliable performance.
Frequently Asked Questions
What scale is 7mm for model railways?
7mm scale refers to a ratio of 7mm to one foot, which translates to a 1:43.5 scale and is the standard for O gauge in the UK. While this scale requires more layout space than 4mm (OO gauge), it provides a significantly larger canvas for industrial detailing and mechanical accuracy. Using this scale for a 7mm scale sentinel loco kit ensures that fine rivets and cab controls are clearly visible and easier to paint.
Do I need to solder a 7mm scale Sentinel kit?
You don't need to solder our 3D printed resin kits because they are designed for adhesive assembly. Traditional brass kits require soldering skills and specialized equipment; however, our resin bodies are best joined using high-quality cyanoacrylate (super glue) or two-part epoxy. This approach eliminates the risk of heat damage to the detailed surfaces while providing a strong, permanent bond for both resin-to-resin and resin-to-metal joints.
Which chassis is best for a 7mm Sentinel body kit?
The best chassis depends on the specific wheelbase of the 100HP or 200HP prototype you are modelling. We don't supply motors or chassis, so you'll need to source a donor unit from a third-party manufacturer. While finding an exact match can be difficult, many modellers successfully adapt short-wheelbase industrial tank chassis from standard OO gauge models. Always verify the internal width of your 7mm scale sentinel loco kit before purchasing a motor block.
How do I remove 3D print supports from my locomotive kit?
Remove the supports by carefully snipping them away with sharp side cutters or a precision hobby knife. While the support structures are necessary for the printing process, they can leave small nibs on the surface of the resin. You can resolve this by gently sanding the area with a 400-grit sanding stick followed by a finer 800-grit finish. This creates a perfectly flat panel ready for priming and painting.
Can I use a 7mm Sentinel kit on O-16.5 track?
Yes, you can use these kits on O-16.5 track as long as you install a chassis gauged for 16.5mm. While the body represents a 7mm scale locomotive, the track gauge is a separate mechanical choice. Many narrow gauge enthusiasts prefer this combination because it allows them to model large, powerful industrial engines on narrow gauge permanent way. It's a proactive way to create a heavy industrial atmosphere within a limited space.
What is the difference between a vertical boiler and a horizontal boiler Sentinel?
A vertical boiler Sentinel features a compact, boxy design where the boiler sits upright in the cab, whereas horizontal versions resemble more traditional steam locomotives. The vertical boiler was the hallmark of the early Sentinel design, allowing for a very short wheelbase and high-pressure steam efficiency. While horizontal boilers were used in later or larger designs, the boxy vertical boiler type is the most iconic for industrial shunting layouts.
Is 3D printed resin strong enough for a working model locomotive?
Modern engineering-grade resin is exceptionally strong and perfectly suitable for daily operation on a working layout. Early 3D prints were sometimes brittle; however, the materials we use today offer high impact resistance and structural integrity. While you should still handle any scale model with care, our resin bodies are designed to withstand the vibrations of a motor and the rigors of industrial shunting without warping or cracking.
How do I add weight to a resin locomotive for better shunting?
While resin is naturally lighter than white metal or brass, you can increase the locomotive's traction by adding lead shot or tungsten putty to the internal cavities. Securing these weights low in the frame or inside the vertical boiler housing increases the downward pressure on the wheels. This proactive solution ensures better electrical pickup and smoother slow-speed running during complex shunting maneuvers on your layout.