

What if the secret to a museum-quality locomotive isn't found in a ready-to-run box, but in the calculated marriage of a 3D-printed shell and a precision donor chassis? While the global model train market is projected to reach over $2.5 billion by 2035, the most rewarding part of the hobby remains the personal challenge of kitbashing narrow gauge models to create something truly unique. You might worry about damaging a delicate resin print or struggle to find a mechanism that fits your specific scale. These constraints are real, but they shouldn't stop you from building the roster of your dreams.
We understand that the transition from a kit of parts to a high-performance model can feel daunting. This guide provides the professional techniques you need to identify compatible chassis across different brands and mount them with confidence. You'll learn how to master cutting and shutting methods while applying finishes that completely hide the kitbashed nature of your work. By the end of this article, you'll have a clear roadmap for creating smooth-running, one-of-a-kind locomotives that look like they rolled straight off a professional production line.
Key Takeaways
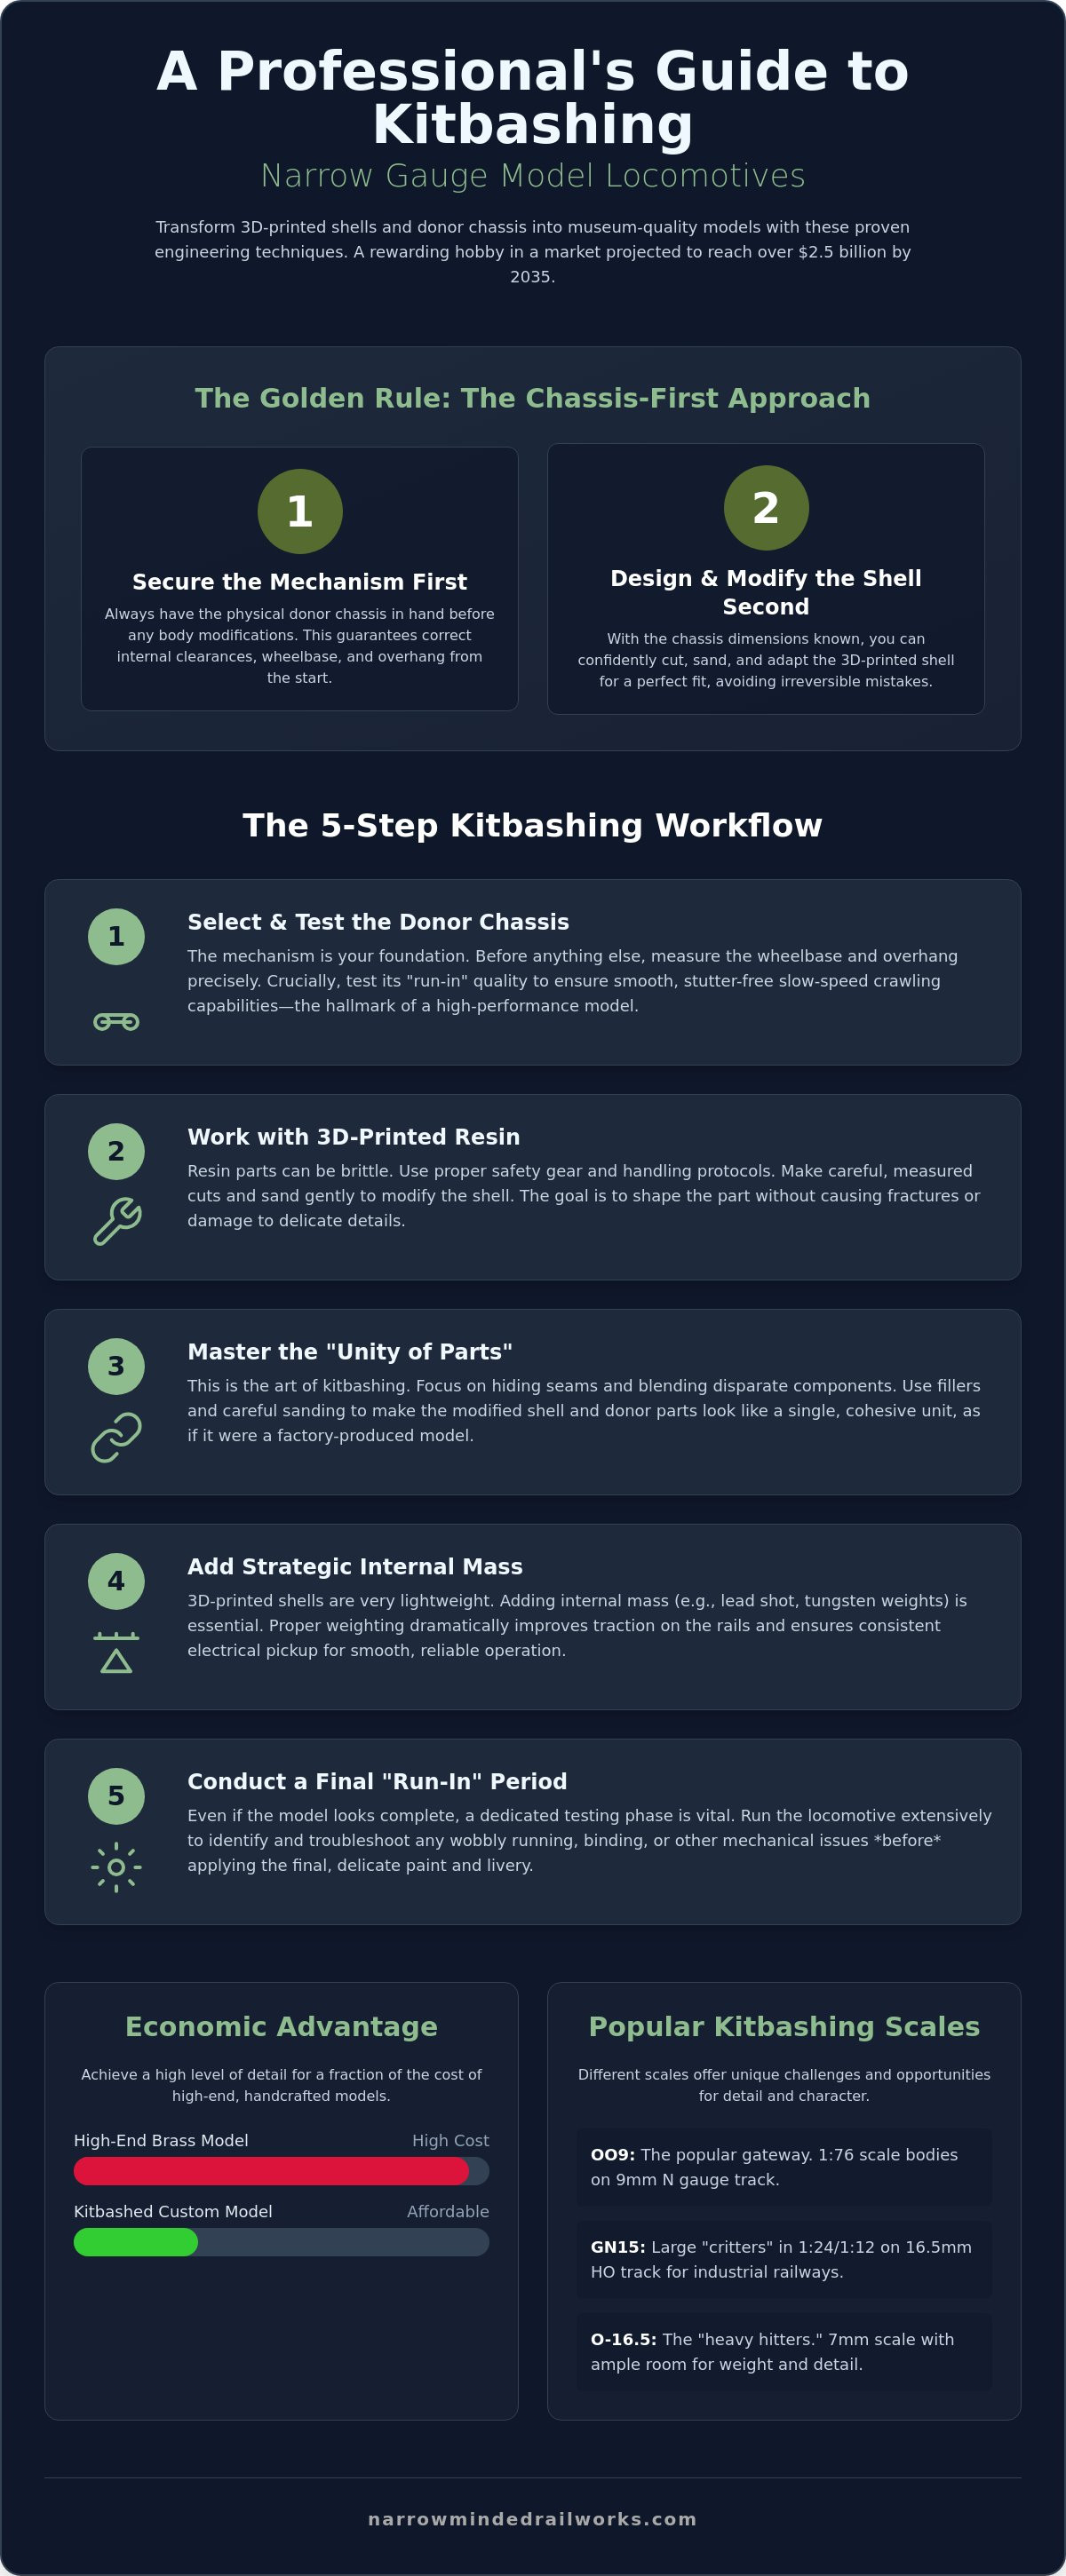
- Adopt a "chassis-first" engineering approach by securing your mechanism before modifying the shell to ensure the wheelbase and overhang align perfectly.
- While 3D-printed resin can be brittle, following specific safety and handling protocols allows you to cut and sand parts without risking damage to the model.
- Master the art of kitbashing narrow gauge models by focusing on the "unity of parts" to hide seams and make disparate components look like a single unit.
- Because 3D-printed shells are often lightweight, adding strategic internal mass is essential for improving traction and electrical pickup on small-scale tracks.
- Although a model may look complete, conducting a dedicated "run-in" period helps you troubleshoot wobbly running and mechanical issues before applying the final livery.
The Art of Narrow Gauge Kitbashing: Why Customise?
Kitbashing narrow gauge models is the creative practice of modifying existing kits or combining disparate parts to create a locomotive or wagon that never existed in a factory box. In the standard gauge world, modelers often strive for "rivet-perfect" accuracy based on rigid prototypes. However, narrow gauge history is filled with "one-off" machines and quirky, locally built repairs. This "freelancing" tradition allows you to prioritize character and creativity without breaking the rules of physics. It's a way to ensure your layout stands out from the crowd.
While the global model train market was valued at approximately $1.2 billion in 2025, much of that growth is driven by enthusiasts looking for deeper customization. You might find that a specific locomotive you desire isn't available as a ready-to-run model. To solve this, you can combine a specialized body kit with a reliable donor mechanism. Understanding the technical foundation of these projects starts with the various model railway scales and gauges that define the hobby's interoperability.
To better understand the possibilities of this approach, watch this helpful video showing a full train built from specialized kits:
There's also a significant economic benefit to this method. High-end, handcrafted brass models can cost hundreds of pounds; however, kitbashing allows you to achieve a similar level of detail for a fraction of the price. By utilizing affordable donor parts from mass-produced N gauge or HO models, you can focus your budget on high-quality 3D-printed shells and specialized detailing parts.
Narrow Gauge Scales and Their Kitbashing Potential
OO9 scale is often the gateway for many, utilizing 1:76 scale bodies on 9mm track. It's popular because it allows for intricate detail within a small footprint. GN15 offers a different challenge, placing large 1:24 or 1:12 scale "critters" on 16.5mm track to simulate estate or industrial railways. For those who prefer a heavier feel, O-16.5 (7mm scale) provides the "heavy hitters" of the narrow gauge world. These larger models offer ample space for adding internal weight and complex detailing that might be too fiddly in smaller scales.
Developing a Kitbashing Design Philosophy
A successful project begins by identifying the "character" of your railway. Is it a struggling slate line or a well-funded colonial branch? This decision dictates how much "weathering" or "cobbling together" is appropriate. You must balance technical constraints, such as the size of your donor chassis, with your aesthetic goals. Often, "less is more" when detailing small-scale locomotives. A few well-placed handrails and a high-quality paint job are more effective than cluttering a small model with oversized accessories. Consistency in your design philosophy ensures that disparate parts eventually look like a single, cohesive unit.
Selecting the "Heart": Donor Chassis and Mechanisms
The chassis is the foundation of any successful project. While it's tempting to start with the aesthetic of a 3D-printed shell, the "Chassis-First" rule is absolute. You must have the physical mechanism in hand before planning any body modifications. This constraint ensures that the internal clearances are accurate from the start. When kitbashing narrow gauge models, if you design a body first, you risk discovering that no existing motor fits the wheelbase or height requirements. Many hobbyists find that a special focus on narrow gauge themes requires unique locomotive shapes that demand specific mechanical layouts.
Measuring the wheelbase and overhang is your first technical task. A donor chassis might have the right length but an incorrect axle spacing, which can ruin the visual balance of a model. High-performance kitbashing narrow gauge models require excellent slow-speed crawling capabilities. If a mechanism stutters at low voltage, no amount of detailing will save the operational experience. Always test the "run-in" quality of a donor before you begin cutting or gluing.
Top Donor Chassis for OO9 and HOn30
The Kato 11-103 and 11-109 motorized chassis remain the standard for small-scale projects. These units are compact and reliable, though they are limited by their rigid wheelbase. For steam outlines, repurposing Graham Farish or Bachmann N gauge locomotives provides a realistic valve gear and wheel arrangement. Tram chassis are another viable option for industrial "critters." While these often have high floors that limit cab detail, they offer a stable platform for short-wheelbase locomotives.
Chassis Options for GN15 and O-16.5
Modelers working in larger scales like GN15 or O-16.5 often face a lack of dedicated mechanisms. You can solve this by repurposing OO or HO gauge diesel shunters as donors for 7mm scale projects. Standard gauge mechanisms from brands like Hornby or Bachmann are excellent for this. They provide the necessary torque and weight to pull heavy trains. If you're building a 1:24 scale project, looking for reliable power units in the standard gauge market is often the most cost-effective solution. If you're ready to start your next project, exploring a range of OO9 Locomotive & Wagon Kits can help you find the perfect shell for your chosen chassis.
Working with 3D Printed Resin Kits
Modern 3D-printed shells are typically composed of UV-cured resin, which behaves differently than the injection-molded polystyrene found in traditional kits. This material is significantly more brittle. It won't flex under pressure; instead, it will snap. You can't use standard plastic cement for these projects because it doesn't create a chemical bond with resin. Instead, you must rely on cyanoacrylate or two-part epoxy for a permanent connection. When kitbashing narrow gauge models, understanding these material constraints is the first step toward a durable finished product.
Safety is a non-negotiable priority. Resin dust is a respiratory irritant, so you should never sand these parts dry. Always use wet-sanding techniques to keep particles out of the air and wear a high-quality respirator. If you're looking for prototype inspiration or technical advice on specific historical designs, the Narrow Gauge Railway Society offers an extensive library of resources for its members. For precision work, skip the heavy-duty hobby knives. Use a fine-tooth razor saw for major cuts and needle files for refined shaping. If a resin part feels too thin or flimsy, don't hesitate to reinforce it with brass rod or plasticard to prevent future warping.
Modifying the Body to Fit the Chassis
You'll often find that the internal walls of a 3D-printed shell are too thick to accommodate a wide motor block. You can carefully thin these walls using a flat-head needle file or a rotary tool on its lowest speed setting. Be cautious not to generate too much heat, as this can soften the resin. Creating secure mounting points is essential for operational stability. You can glue in small plasticard spacers or 3D-printed lugs to provide a solid surface for chassis screws. Always check that the wheels and coupling mechanisms have enough "swing" to handle tight curves without catching on the bodywork.
Cleaning and Preparing for Detail
Identifying and removing support nibs is a tedious but vital part of the process. If you rush this, you'll leave unsightly scars on the model's surface. Use a sharp sprue cutter to nip the supports away from the body, then sand the remaining bumps flush. Every 3D-printed model has a slight residue from the printing process that will repel paint. You must degrease the shell using warm, soapy water or isopropyl alcohol before applying primer. To achieve a smooth locomotive boiler, use a high-build primer to fill microscopic print lines. This ensures your kitbashing narrow gauge models look like professional, factory-made units rather than home-printed prototypes.
Detailing and Finishing Your Custom Model
The final goal of finishing is to achieve the "Unity of Parts," where the donor chassis and the 3D-printed body appear as a single, engineered machine. While locomotives often get the most attention, kitbashing narrow gauge models also extends to rolling stock. You might find a standard wagon chassis that needs a custom body to match a specific industrial prototype. Because 3D-printed resin is inherently lightweight, you must add internal weights to ensure reliable tracking. Lead shot or adhesive-backed tungsten weights are effective solutions for adding the mass required for traction and stability on uneven narrow gauge track.
Integrating couplers is often the most significant mechanical hurdle. The coupler height might be inconsistent across different donor brands, but building a dedicated height gauge provides a proactive solution for reliable shunting. You might choose standard loop couplers or more specific types like those found on a Quarry Hunslet. Beyond the locomotive, adding scale-appropriate accessories like petrol pumps, phone boxes, or trackside clutter helps ground the model in its environment. These small details provide a sense of purpose to your railway's operations and help define the scale for the viewer.
Painting for Professional Results
High-quality priming is the secret to hiding the seams where different materials meet. A high-build primer fills the micro-textures of resin and provides a uniform surface for your chosen livery. When choosing a color scheme, consider the historical context of your line. Hand-painting is useful for fine details, but an airbrush provides the thin, even coats necessary to preserve delicate 3D-printed rivets. If you're looking to start your next build, our collection of OO9 Locomotive & Wagon Kits offers the perfect canvas for these finishing techniques.
The Final Layer: Weathering and Figures
The final layer involves weathering and adding life to the cab. Using dark washes highlights 3D-printed louvres and panel lines that might otherwise look flat under bright layout lighting. Scanned figures are essential for providing a sense of scale, especially in "critter" locomotives where the cab proportions might be deceptive. For branding and numbering, applying decals using Micro Sol ensures the carrier film disappears. This gives the markings a "painted-on" look that withstands the scrutiny of close-up photography. If you want to enhance your scene further, exploring specialized Diorama Tools & Scenery will help you integrate your new model into its permanent home.
Operational Excellence: Testing and Maintenance
While a model may appear complete once the final coat of varnish has dried, it often requires significant track time to ensure long-term mechanical reliability. A proactive solution is to implement a dedicated "run-in" period of at least thirty minutes in each direction. This process allows the donor chassis to settle into its new body shell and reveals any hidden friction points. Mastering the art of kitbashing narrow gauge models involves more than just assembly; it requires rigorous operational testing to identify wobbly running or intermittent stalling before the model enters regular service on your layout.
Troubleshooting common issues often starts with the interface between the body and the mechanism. If you notice a "wobble," it's likely that the chassis isn't sitting perfectly level on the mounting lugs you created in earlier stages. You can solve this by adding thin plasticard shims to level the ride height. Maintenance accessibility is another constraint you must acknowledge. Permanent gluing might seem secure, but it prevents you from oiling the motor or cleaning the gears. Utilizing small screws or magnetic mounts ensures you can remove the shell easily for routine servicing. Final checks should prioritize coupler height and clearance. Narrow gauge curves are notoriously tight, so verify that your rolling stock doesn't bind when traversing your layout's most challenging sections.
Ensuring Reliable Electrical Pickup
The compact nature of narrow gauge mechanisms often leads to poor electrical contact, especially on 9mm track. You can solve this by thoroughly cleaning the donor mechanism with a fiberglass brush to remove any resin dust or paint overspray that may have accumulated during the build. If you're repurposing an N gauge chassis, the wheel wipers might need slight adjustment to maintain constant pressure against the wheel backs. For those seeking the smoothest possible performance over points, adding "stay-alive" capacitors is a common technical solution that provides a small reserve of power to bridge dead spots in the track. These small adjustments ensure your kitbashed locomotive performs as well as it looks.
Next Steps for Your Fleet
Once you've mastered your first locomotive, the next logical step is to expand into wagon kitbashing to create a cohesive train. This allows you to apply the same detailing and weathering techniques to a full rake of rolling stock. You might also consider exploring the GN15 scale for unique garden or indoor dioramas that offer even more creative freedom. As the global model train market continues its growth through July 2026, the demand for unique, handcrafted models has never been higher. To begin your next project with high-quality components, browse our latest 3D printed locomotive bodies and find the perfect match for your next donor chassis.
Elevating Your Railway Through Custom Engineering
The transition from a collection of parts to a fully operational locomotive requires patience and a "chassis-first" mindset. You might find the technical aspects of mounting a shell onto a donor mechanism intimidating; however, following a structured approach to measuring and testing ensures a professional result. By mastering the nuances of working with 3D-printed resin and prioritizing operational excellence, you can create a roster that reflects your railway's specific history. Kitbashing narrow gauge models allows you to bridge the gap between mass-produced components and bespoke, museum-quality replicas.
As a specialist in OO9 and GN15 scales, we provide unique 3D-printed designs that aren't found elsewhere. We offer worldwide shipping for all our model railway parts to ensure you have the tools you need in your workshop. Explore our range of 3D-printed narrow gauge kits and start your kitbashing journey today. Your next project is the perfect opportunity to turn a standard donor chassis into the centerpiece of your layout.
Frequently Asked Questions
What is the best glue for attaching 3D-printed resin to a metal chassis?
Cyanoacrylate or two-part epoxy is the most effective choice for bonding 3D-printed resin to a metal chassis. Standard plastic cement won't work because it doesn't create a chemical bond with resin or metal; however, a five-minute epoxy provides the necessary structural integrity for heavier parts. You should always ensure both surfaces are degreased with isopropyl alcohol before application to prevent the bond from failing under the weight of the model.
Can I kitbash an N gauge locomotive into an OO9 model?
Matching scales can be tricky for beginners; however, kitbashing narrow gauge models using N gauge donors is a standard practice because both share 9mm track. The N gauge donor provides the motor and wheels, while the 3D-printed kit provides the 1:76 scale body. You must ensure the donor's wheelbase matches the kit's design to maintain a realistic appearance and prevent the wheels from catching on the bodywork during operation.
How do I remove support marks from a 3D-printed model kit?
Support marks can easily scar a model if they're removed carelessly; however, using sharp sprue cutters and wet-sanding with fine-grit paper ensures a smooth finish. You should nip the supports a fraction of a millimeter away from the body to avoid pitting the surface. Wet sanding is essential because it prevents hazardous resin dust from entering the air. Once the surface is flush, a high-build primer will fill any remaining microscopic imperfections.
What tools are essential for a beginner narrow gauge kitbasher?
Standard hobby tools are often too aggressive for delicate resin; however, a fine-tooth razor saw and needle files provide the precision needed for these projects. A beginner also needs sprue cutters and a high-quality respirator for safety. You'll also find that a pin vice with small drill bits is necessary for adding handrails or mounting screws. These basic tools allow you to handle both resin and plastic components with confidence.
Is it possible to kitbash a locomotive to run on DCC?
Small locomotive cabs often have limited space for electronics; however, most modern donor mechanisms can be hard-wired with micro-decoders if you verify the motor's current draw. While we don't sell DCC systems, many mechanisms come with isolated motor tabs that simplify the conversion. You must ensure the decoder doesn't overheat within the confined space of a 3D-printed body. Proper internal ventilation is a proactive solution for long-term reliability.
How do I find the right scale figures for my GN15 layout?
Standard OO or HO figures will look far too small on a GN15 layout; however, 1:24 or 1:22.5 scale figures from the large-scale market provide the correct proportions. Because GN15 represents a large scale on narrow track, these figures are essential for grounding the model in its environment. You can also source 1:12 scale figures for estate railway themes. These larger figures provide the correct sense of mass and height for your custom locomotives.
Why does my kitbashed locomotive stall on points?
Small locomotives often lose electrical contact on dead frogs or dirty track; however, kitbashing narrow gauge models with stay-alive capacitors solves most electrical pickup issues. Resin dust or paint overspray can also migrate into the mechanism during the build process. You should clean the wheels with a dedicated track cleaner and check that the wipers are making firm contact. These small adjustments ensure your locomotive performs reliably across the entire layout.
Where can I find replacement parts for second-hand donor chassis?
Replacement parts for older or pre-owned donor chassis can be difficult to source; however, manufacturer service sites and specialized N gauge retailers remain reliable options for spare gears. While many kitbashers use discontinued mechanisms, the secondary market often provides the necessary components for repairs. If a part is no longer in production, hobbyist forums often provide advice on compatible alternatives. Maintaining a stock of common spares ensures your fleet remains operational.