

Why settle for "close enough" G-scale accessories when your GN15 layout demands the precision of true 1:22.5 scale? Many enthusiasts find that standard garden railway items often feel out of place on a compact industrial diorama. While finding high-quality gn15 scenery kits can be challenging due to limited production runs and niche availability, the shift toward 3D-printed components offers a level of detail previously unavailable to the hobby. We recognize that these specialized parts require specific cleanup and preparation, but with the right techniques, they become the heart of a realistic scene.
You likely want your layout to tell a story rather than just serve as a place for trains to run. We'll show you how to transform your miniature world into a character-rich narrative using specialized kits and 3D-printed details. This article provides a clear path to finishing resin models to a professional standard, including techniques for removing support marks without damaging fine surfaces. You will also discover a curated list of essential scenery categories that help turn a simple track plan into a lived-in, realistic environment.
Key Takeaways
- Master the specific 1:22.5 scale requirements of GN15 to ensure your scenery maintains a consistent and realistic appearance.
- Select specialized gn15 scenery kits such as K8 phoneboxes or old-style bicycles to establish a clear narrative for your diorama.
- Compare the benefits of 3D-printed resin against traditional materials to achieve superior texture and detail on small accessories.
- Learn the essential steps for preparing and painting resin kits, from removing support marks to applying high-quality primer.
- Use hero scenery items like beer kegs or milk churns to anchor your theme and create a believable industrial or rural environment.
The GN15 Scale: Why Scenery Kits Matter for 1:22.5 Modelling
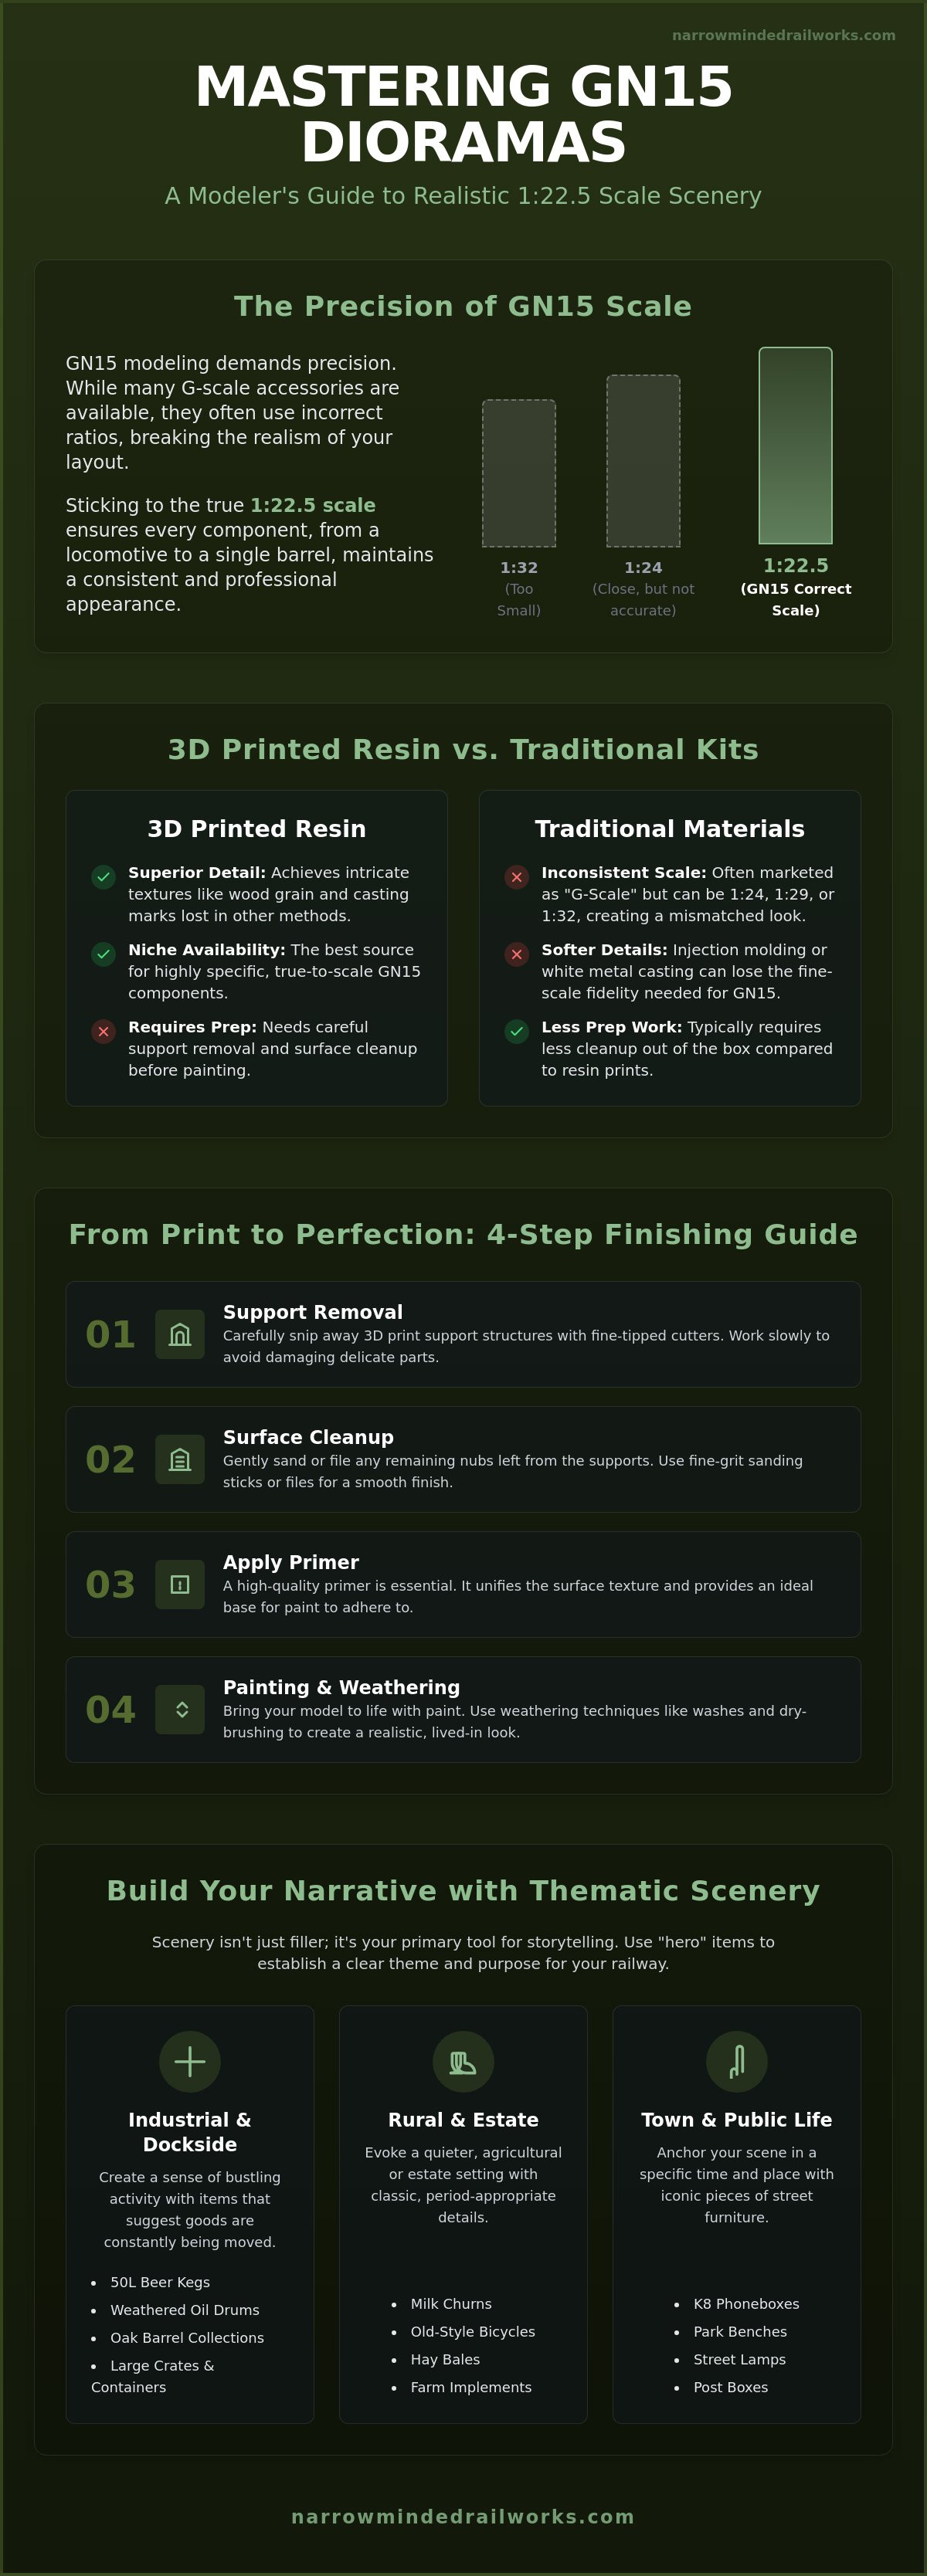
Modeling in GN15 offers a unique creative challenge by combining the large, detailed presence of G scale with the compact convenience of 16.5mm track. This specific Gn15 scale represents a 15-inch gauge prototype railway, typically used for estate work or heavy industrial transport. Because the models are physically larger than standard OO or N gauge counterparts, every detail is under a microscope. While finding items that are exactly 1:22.5 scale can be difficult, utilizing specialized gn15 scenery kits ensures your layout maintains a professional, consistent appearance rather than looking like a collection of mismatched toys.
To better understand the precision required for these designs, watch this helpful video from our workshop:
The "minimum space" philosophy is central to GN15. Many layouts are built as micro-dioramas where the track might only be a few feet long. In these tight confines, scenery isn't just a backdrop; it's the primary tool for creating depth and context. You might encounter G-scale items in local shops, but these are often 1:24 or 1:32 scale. While they seem "close enough," the discrepancy becomes obvious when placed next to a 1:22.5 locomotive. Selecting kits designed specifically for this ratio prevents scale creep and keeps the narrative believable.
The 1:22.5 Ratio Explained
In this context, 1:22.5 scale is the precise ratio required for accurate GN15 modelling. It serves as the sweet spot for detail because it allows for intricate textures, like wood grain on barrels or the metal casting marks on a phonebox, without requiring a massive room to house the layout. When you compare a GN15 milk churn to an OO9 version, the difference in volume and presence is staggering. This larger size means you can focus on high-fidelity 3D-printed gn15 scenery kits that capture nuances often lost in smaller scales. It's about quality of detail over quantity of track.
Building a Narrative with Small Kits
A successful GN15 layout functions as a series of micro-stories. A few well-placed beer kegs near a loading dock or a cluster of milk churns on a platform immediately tell the viewer what the railway's purpose is. These individual items imply a wider industry existing just beyond the edge of the baseboard. To understand the history behind these unique lines, it helps to explore what is a narrow gauge railway and how it differs from mainline operations. By using specialized kits, you anchor your diorama in a specific time and place, turning a simple loop of track into a living, working environment.
Essential GN15 Scenery Kits for Every Theme
Building a layout often feels like a balancing act between limited baseboard space and the desire for a rich, detailed atmosphere. While many enthusiasts struggle to fill empty gaps without creating unnecessary clutter, utilizing thematic gn15 scenery kits allows you to build a cohesive world that feels intentional. Whether you're recreating a sleepy country estate or a bustling industrial dockside, the right accessories provide the visual cues your audience needs to understand the story of your railway.
For those modeling an industrial wharf, the "Container Collection" approach is a highly effective strategy. Large crates and stacked containers are more than just aesthetic additions; they're functional tools for hiding unsightly track ends or motor housings in small dioramas. Integrating 50L beer kegs, weathered oil drums, and oak barrels creates a sense of constant movement and trade. These items suggest a history of deliveries and departures that extends far beyond the physical edges of the layout. Following technical standards from organizations like the National Model Railroad Association (NMRA) ensures your rolling stock performs reliably, but it's the scenery that ultimately sells the illusion of reality.
Industrial Detail: Barrels, Kegs, and Drums
Wagons in GN15 are frequently open-topped, making "loads" a critical part of the modeling process. Using a mix of 50L beer kegs and oak barrel collections provides varied textures that catch the light differently, from the smooth metallic finish of a keg to the rugged wood grain of a barrel. When you group these items near a warehouse door or on a loading platform, you proactively turn a static scene into a working environment. This level of detail is often missing in mass-produced alternatives, but specialized 3D-printed gn15 scenery kits offer the precision needed for a professional finish. If you want to enhance your industrial scenes, you can explore our collection of specialized scenery items to find the perfect cargo for your next train.
Street Furniture and Rural Life
Rural themes benefit from simple, yet highly specific items that anchor the viewer in a particular time and place. Milk churns stacked on a wooden platform immediately evoke the daily rhythm of a mid-century dairy operation. Adding an old-style bicycle leaning against a stone wall provides an instant sense of human scale and everyday life. The BT Phonebox (K8 version) is another powerful narrative tool; because this specific model was introduced in 1968, it helps date your layout to the late 1960s or 70s. These items are difficult to find in an exact 1:22.5 scale, yet they are essential for maintaining a consistent perspective. When you combine these kits with figures scanned from real people, the diorama shifts from a collection of parts into a believable snapshot of a lived-in world—much like how the handcrafted home accents from Lolli's Loops add a touch of authentic, artisanal character to your actual living space.
3D Printed vs. Traditional Scenery: A Comparison
Traditional modeling materials like injection-moulded plastic and resin-cast kits have long served the hobby. While these methods provide durability for mass-produced items, they often lack the fine detail required for the 1:22.5 scale. Injection moulding relies on high-volume sales; consequently, niche British prototypes are rarely produced this way. Resin casting can capture more detail but often suffers from air bubbles or warped parts. In contrast, 3D-printed gn15 scenery kits utilize high-resolution resin to replicate textures that are physically impossible to achieve with standard plastic.
Some modelers worry about visible "print lines" or striations on the surface of 3D prints. While older technology struggled with this, modern high-resolution printing has largely mitigated the issue. Any remaining texture is usually finer than a coat of primer. We recommend a light sanding or a high-build primer for a perfectly smooth finish. This proactive approach ensures you get the unique items you need without sacrificing the professional look of your diorama. 3D designs offer a level of flexibility that mass-market catalogues simply can't match, allowing for one-off items that give your layout a distinct personality.
Why 3D Printing Wins for Narrow Gauge
The primary advantage of 3D printing is its ability to cater to low-volume, specialized needs. Organizations like the Historical Model Railway Society emphasize the importance of accuracy in British prototypes; however, finding these in 1:22.5 was historically nearly impossible. 3D designs can be scaled perfectly to this ratio, ensuring that every crate and barrel fits your layout precisely. Unlike mass-market catalogues that offer generic "G-scale" items, these kits are designed specifically for the narrow gauge enthusiast. The resin used in modern prints is remarkably durable, providing a stable foundation for permanent layouts that will last for years.
Evaluating Kit Quality Before You Buy
Before purchasing your next set of accessories, it's vital to examine the product photos for specific quality markers. Look for sharp, crisp edges and an absence of heavy support marks on visible surfaces. Buying from a specialist like Narrow Minded Railworks ensures that the kits have been designed by people who understand the specific needs of the 1:22.5 scale. If you're new to this aspect of the hobby, reading a guide on getting started in GN15 scale can help you identify which gn15 scenery kits will best suit your initial project goals. A quality kit should require minimal cleanup, allowing you to focus on the creative aspects of weathering and placement.
How to Finish and Weather Your GN15 Scenery Kits
While 3D-printed gn15 scenery kits provide unmatched detail, they do require a methodical approach to finishing. You can't simply apply paint directly to the raw resin and expect a professional result. We recognize that the preparation phase can feel tedious, but following a structured process ensures your accessories look like genuine industrial equipment rather than plastic miniatures. A successful finish relies on a four-step cycle: preparation, priming, painting, and weathering.
First, you must remove the small support structures used during the printing process. Use precision nippers for the bulk of the removal and follow up with fine-grit sandpaper to smooth any remaining "nibs." It's also essential to wash the parts in warm, soapy water. This step removes residual resin or oils that might interfere with paint adhesion. Once dry, your model is ready for a high-quality primer, which provides the necessary "tooth" for your acrylic topcoats to grip the surface.
Removing Support Marks and Finishing
When you're working with resin, safety is a priority. Always wear a dust mask when sanding, or better yet, wet sand the parts to keep particles from becoming airborne. You'll need a set of precision nippers and sandpaper ranging from 400 to 1000 grit for the best results. For a deeper dive into these initial steps, you can read our guide on painting 3D printed models. Taking the time to properly prepare the surface now prevents imperfections from showing up later under a coat of paint.
Advanced Weathering Techniques
Weathering is where your gn15 scenery kits truly come to life. To highlight the realistic wood grain on oak barrels, use a dry-brushing technique with a lighter tan or grey shade. This catches the raised edges and adds depth. For oil drums, you can create rust effects by stippling burnt sienna or specialized weathering pigments onto the rims and base. Don't forget the street furniture; applying a dark wash or "grime" to the base of a K8 phonebox suggests years of exposure to the elements and foot traffic. These small touches transform a clean model into a piece of history that anchors your narrative. If you're ready to start your next project, you can browse our full range of GN15 scenery to find the perfect starting point for your diorama.
Designing Your GN15 Diorama with Narrow Minded Railworks
Designing a layout often begins with a blank baseboard, which can feel overwhelming for many hobbyists. We recognize that selecting from dozens of individual items is difficult without a clear plan. A proactive solution is to choose a "hero" scenery item to anchor your diorama. This focal point, whether it's a prominent K8 phonebox or a unique industrial structure, provides a visual center that dictates the placement of smaller accessories. By establishing this anchor first, you ensure that your gn15 scenery kits work together to support a single, clear narrative rather than competing for attention.
Consistency in scaling remains the most critical factor for a professional finish. While it's tempting to repurpose generic G-scale items, the slight deviations in size can disrupt the forced perspective of a micro-layout. We recommend a balanced mix of industrial cargo and "everyday" street furniture to create a lived-in atmosphere. Combining heavy oil drums with a simple bicycle or a few milk churns suggests a world where people actually work and live. This contrast is what transforms a model railway into a believable miniature environment. For enthusiasts who appreciate fine craftsmanship in all its forms, including the original pop art pieces from Fringe, click here to view their oil on canvas collection.
Curating Your Collection
Starting small is often the most effective way to build a diorama without overextending your budget or space. We suggest a "Starter Pack" approach: focus on a few high-quality barrels, a set of figures, and one focal building or structure. You can then plan your layout around specific scenery "vignettes," which are small, self-contained scenes that tell a story. Because 3D-printed kits are produced on demand, you have the flexibility to expand your collection over time as your layout grows. This modular approach allows for easy customization without the need for massive upfront investment in mass-market plastic.
Next Steps for Your GN15 Journey
Your diorama is a continuous project that evolves with your skills and interests. Beyond scenery, a complete layout requires characterful locomotives and rolling stock that match the high detail of your environment. We invite you to explore our full range of 3D-printed designs to find the next piece of your puzzle. Signing up for our newsletter is the best way to stay informed about new releases and specialized narrow gauge accessories. When you're ready to add the finishing touches to your layout, you can browse our complete GN15 Scenery Collection to discover unique gn15 scenery kits designed specifically for the 1:22.5 scale.
Elevate Your Miniature World with Authentic Detail
Creating a realistic GN15 layout requires more than just track and trains; it demands a commitment to scale fidelity and narrative depth. We've explored how the 1:22.5 ratio serves as the foundation for a believable diorama, ensuring your accessories match your rolling stock perfectly. While finding niche British prototypes was once a significant hurdle, the precision of 3D printing now provides a proactive solution for the modern modeller. By mastering the preparation and weathering of gn15 scenery kits, you can transform a simple industrial scene into a character-rich environment that feels lived-in and authentic.
Our kits are designed by modellers for modellers, focusing on unique 1:22.5 scale prototypes that you won't find in mass-market catalogues. We offer worldwide shipping to ensure narrow gauge enthusiasts everywhere can access these specialized details. Whether you're adding a final K8 phonebox or a cluster of weathered oil drums, every piece contributes to your railway's unique story. Explore our unique 3D-printed GN15 scenery kits today to find the missing piece for your next project. We look forward to seeing how you bring your creative vision to life.
Frequently Asked Questions
Are GN15 scenery kits compatible with G-scale (1:22.5) items?
Yes, these kits are fully compatible because GN15 utilizes the exact 1:22.5 scale ratio found in standard G scale. While the term "G scale" can sometimes refer to a range of ratios from 1:20.3 to 1:32, GN15 specifically adheres to the 1:22.5 standard. Using these specialized kits ensures that your figures, vehicles, and accessories maintain a consistent perspective alongside your locomotives without the jarring size differences often found in generic garden railway items.
How do I remove the support marks from 3D-printed resin scenery?
You can remove support marks by using precision nippers to cut the plastic slightly away from the model's surface. We acknowledge that raw resin is often brittle; therefore, a proactive solution is to use fine-grit sandpaper, typically 400 to 600 grit, to smooth down the remaining "nibs." It's essential to wet sand the parts or wear a dust mask to manage resin particles safely. This process creates a perfectly flush surface ready for the priming stage.
What kind of paint is best for 3D-printed GN15 models?
Water-based acrylic paints are the most effective option for finishing gn15 scenery kits due to their fast drying times and ease of layering. Before you apply any color, you must use a high-quality primer designed for plastic or resin to ensure proper adhesion. Once primed, acrylics allow you to use advanced techniques like washing and dry-brushing to highlight the intricate textures found on items like beer kegs and K8 phoneboxes.
Do GN15 scenery kits come pre-painted or unpainted?
These kits are supplied unpainted and in their raw 3D-printed state. We provide them this way to give you total creative control over the final appearance of your layout. While unpainted models require more preparation time, they allow you to match the weathering and color palette of your specific diorama theme. This flexibility is vital for creating a cohesive narrative where every barrel and crate looks like it belongs in the same environment.
Can I use these scenery items for outdoor garden railways?
Standard 3D-printed resin is primarily designed for indoor dioramas and layouts. While the material is physically robust, long-term exposure to UV rays and extreme temperature fluctuations can cause untreated resin to become brittle. If you intend to use these gn15 scenery kits outdoors, we recommend applying a UV-resistant clear coat after painting. This proactive step helps shield the material and the paint finish from environmental degradation over time.
What is the best way to glue 3D-printed resin kits together?
Cyanoacrylate, commonly known as super glue, is the best adhesive for bonding 3D-printed resin components. You shouldn't use standard plastic cement because it won't react with the cured resin surface to create a bond. For larger scenery items that require a stronger hold, a two-part epoxy or a gap-filling super glue provides excellent structural integrity. Always ensure the bonding surfaces are clean and free from any residual sanding dust before you apply the glue.