

What if you could capture the grit and charm of a narrow gauge railway without surrendering your entire spare room to a sprawling layout? Many enthusiasts find the transition to O scale daunting because of the perceived space requirements, yet the solution lies in the art of the vignette. By focusing on 7mm scale diorama ideas that prioritize character over track mileage, you can build a masterpiece that fits comfortably on a standard bookshelf or within a modest boxfile.
It is true that sourcing unique narrow gauge scenery for larger scales can be difficult, but the availability of production-ready 3D printed parts has simplified the process for 2026. This guide shows you how to select an engaging theme and apply practical techniques to achieve museum-quality results. You'll learn how to leverage specialized locomotive kits and scenery tools to create a professional vignette that emphasizes atmospheric detail and realistic storytelling. Whether you're interested in industrial GN15 scenes or traditional O-16.5 tracks, these strategies help you manage the high level of detail required for larger scales without feeling overwhelmed.
Key Takeaways
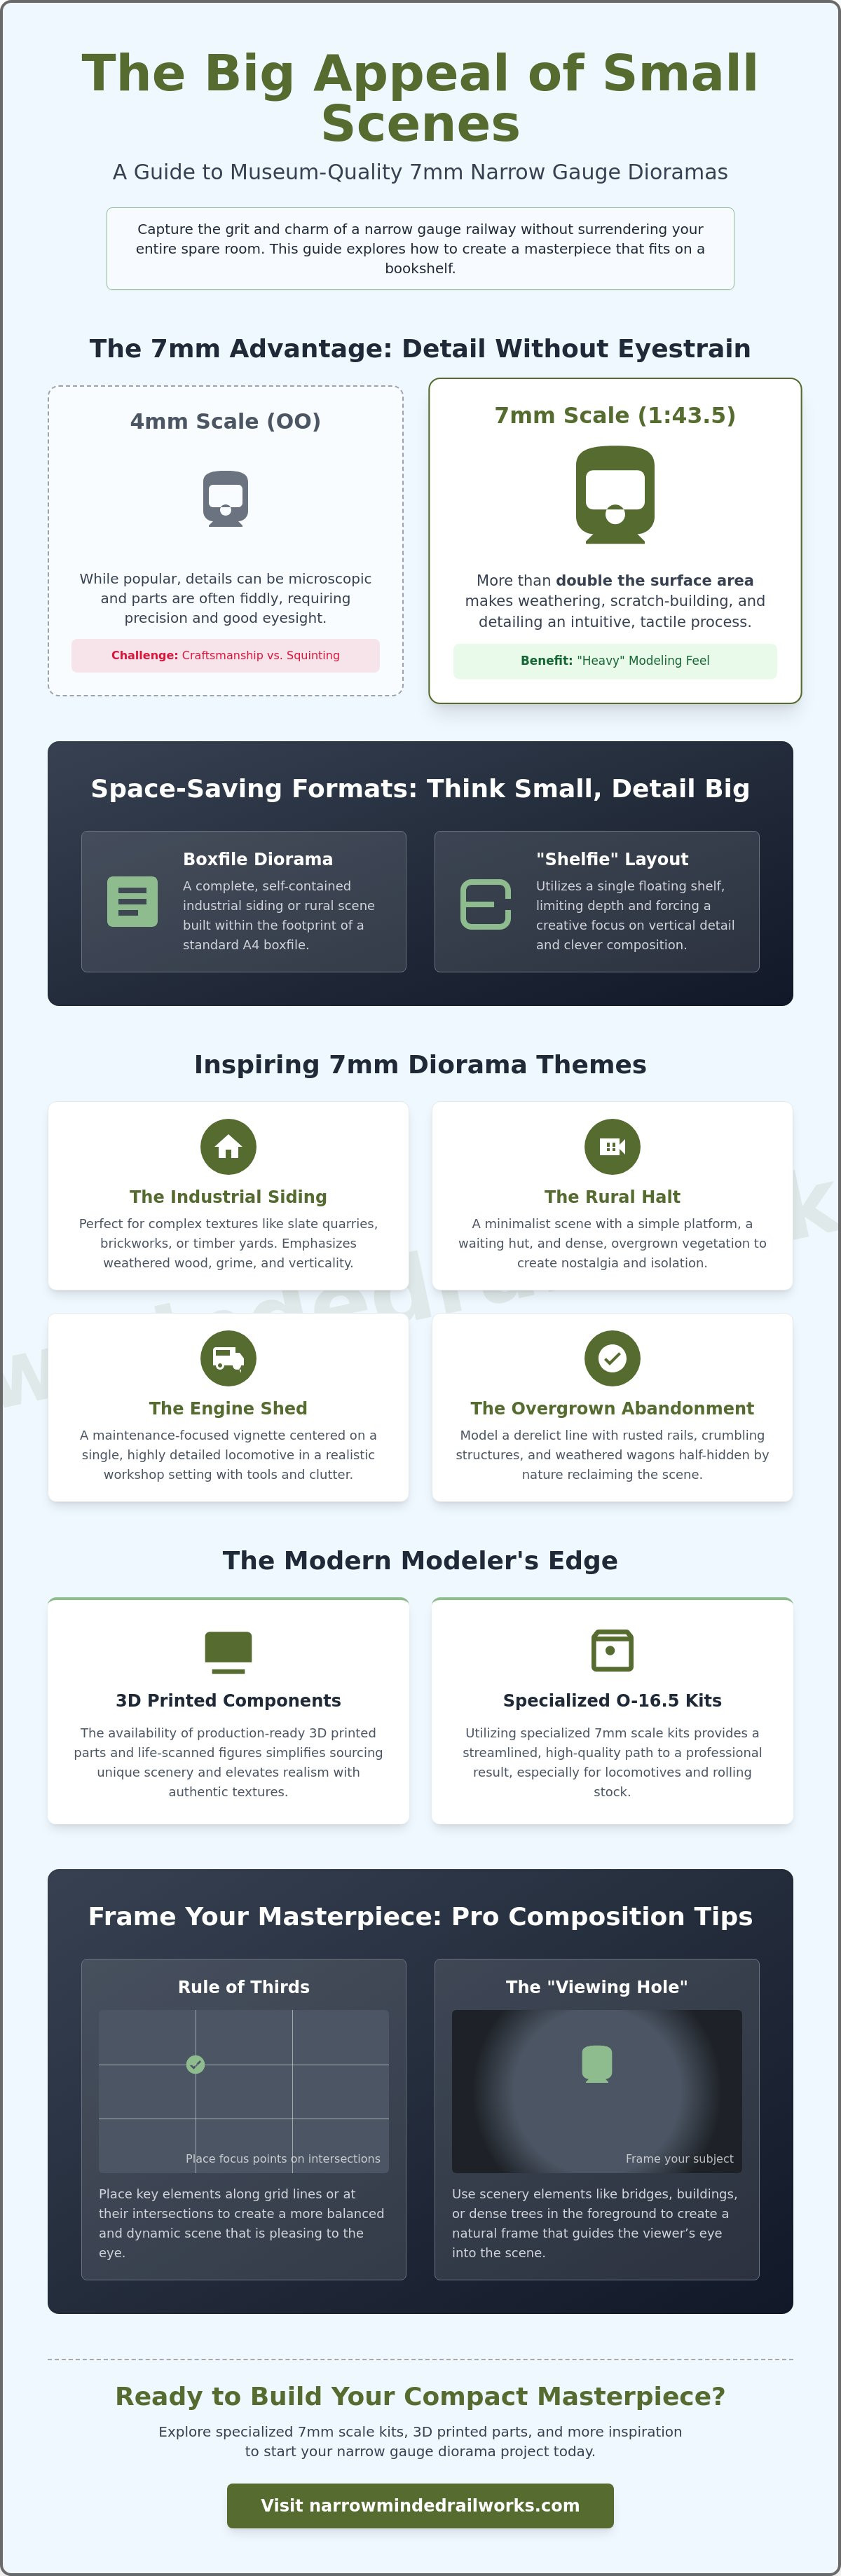
- While space is often a constraint in O scale, you'll discover how 1:43.5 scale vignettes provide museum-quality detail within a compact footprint.
- Explore diverse 7mm scale diorama ideas including industrial slate quarries and rural halts that bring narrow gauge history to life on a bookshelf.
- See how modern 3D printed components and life-scanned figures elevate the realism of your scenes by capturing authentic textures and postures.
- Apply professional composition rules like the "viewing hole" and rule of thirds to frame your vignette and guide the viewer’s eye.
- Finding unique narrow gauge parts can be difficult; however, utilizing specialized O-16.5 and 7mm scale kits provides a streamlined path to a professional result.
Why 7mm Scale is the Ultimate Choice for Dioramas
7mm scale, or 1:43.5, offers a unique presence that smaller scales often struggle to match. While standard gauge O scale can feel overwhelming due to its sheer size, 7mm narrow gauge provides a manageable entry point for those seeking high levels of realism. By modeling narrow gauge prototypes on 16.5mm track (O-16.5) or other specialized gauges, you gain the benefits of a larger scale without the need for a massive workshop. For many enthusiasts, the 7mm Narrow Gauge Association serves as the primary hub for sharing techniques and historical data.
It's common to assume that moving up to 7mm requires a dedicated outbuilding or a large attic. However, focusing on 7mm scale diorama ideas allows you to enjoy the benefits of O scale within the footprint of a traditional OO gauge layout. You aren't building a full network; you're crafting a highly detailed snapshot of a specific moment. This shift in perspective turns a space constraint into a creative opportunity.
To better understand the potential for high-fidelity scenery in this scale, watch this helpful video:
The 1:43 Advantage: Detail Without Eyestrain
The leap from 4mm (OO) to 7mm (O) scale more than doubles the surface area of your models. This extra room makes weathering a far more intuitive process. You can apply rust streaks, oil stains, and chalky paint fades with a level of precision that feels natural rather than microscopic. For modelers who find 4mm parts too fiddly, 7mm scale kits offer a tactile experience that prioritizes craftsmanship over squinting. Scratch-building also becomes more accessible. The physical size of materials like wooden planks or brick sheets allows for authentic textures that look convincing even under macro photography. There's a psychological appeal to "heavy" modeling where the weight and presence of the locomotive feel substantial.
Space-Saving Formats: Boxfiles and Shelves
Traditional layouts often stall because of their complexity, but a 7mm vignette is different. You can utilize a standard boxfile or a single floating shelf to create a "shelfie" layout. These formats limit your depth to just a few inches, which forces a focus on vertical detail and clever forced perspective. If you live in a smaller apartment, these micro-layouts are the proactive solution to your space constraints. You can fit a complete industrial siding or a rural engine shed into a space no larger than a laptop. This approach ensures that your project remains achievable while still delivering the atmospheric narrow gauge feel that makes this scale so addictive. Using 7mm scale diorama ideas focused on micro-formats ensures you finish your projects instead of leaving them as half-built dreams.
Inspiring 7mm Scale Diorama Ideas and Concepts
Selecting a specific theme often feels like a daunting commitment; however, treating your project as a self-contained vignette makes the design process manageable. When you explore 7mm scale diorama ideas, you aren't just choosing a location. You're choosing an atmosphere. The larger scale allows you to focus on the "smallness" of narrow gauge railways, emphasizing the contrast between tiny locomotives and their environment. Whether you prefer the grime of industry or the peace of the countryside, the following concepts offer a structured starting point for your next project.
- The Industrial Siding: Focus on slate quarries, brickworks, or timber yards. These scenes excel in 7mm because they allow for complex, vertical textures like stacked stone and weathered wood.
- The Rural Halt: A minimalist approach can be incredibly effective. A simple platform, a waiting hut, and dense, overgrown vegetation create a sense of nostalgia and isolation.
- The Engine Shed: This maintenance-focused vignette centers on a single locomotive. It is the perfect choice for modelers who want to showcase a highly detailed kit in a realistic workshop setting.
- The Overgrown Abandonment: Modeling a derelict line allows you to experiment with rusted rails and weathered 7mm wagons half-hidden by brambles.
- Coastal Narrow Gauge: Incorporate sand dunes, sea walls, and weathered light railway stock to capture the unique character of seaside lines.
Industrial Narrow Gauge: Grit and Texture
Industrial scenes are naturally suited for O-16.5 / 7mm scale kits because the larger surface area highlights gritty details. You can spend hours perfecting the look of corrugated iron, rusted skips, or oily puddles. These elements provide a visual weight that is difficult to achieve in smaller scales. If you're exploring different track options to fit these industrial scenes, An Introduction to On30 Gauge: Your Complete Guide offers valuable insights into alternative narrow gauge standards. Focusing on these textures ensures your diorama feels functional and historic rather than just a static model.
The Country Station: Character in Miniature
A 7mm station shouldn't just be a building. It needs to feel lived-in. Adding small details like faded posters on a notice board or a weathered bench makes the scene believable. Using unique figures to tell a story, such as a porter moving luggage or a passenger checking their watch, adds a human element that brings the vignette to life. To ensure your track and structures meet professional expectations, consult the Finescale Standards during your planning phase. This attention to detail transforms a simple station into a professional-looking scene. If you are looking for a starting point, our GN15 scenery kits provide excellent components for adding character to your rural platforms.
Maximizing Realism with 3D Printed Details
Traditional white metal and resin castings have served the hobby for decades, yet they often lack the sharp definition required for larger scales. 3D printing provides the proactive solution by delivering parts with unmatched geometric precision and zero assembly requirements. This shift in manufacturing is essential for modern 7mm scale diorama ideas, as it allows you to populate your scene with items that were once too fragile or complex to produce. You no longer have to settle for "close enough" when you can have exact replicas of narrow gauge components.
One of the most significant advancements involves "scanned from life" figures. Unlike traditional hand-sculpted figures, these models capture authentic human postures and the natural drape of period workwear. When these figures are placed next to a locomotive, they provide an immediate sense of scale and life. You can also integrate tiny, high-detail items like oil cans, wrenches, and vintage phone boxes that come as single-piece prints. While resin prints do feature small support marks from the manufacturing process, a few minutes of careful cleanup with a fine file results in a part that is significantly crisper than any traditional casting. This level of detail is what separates a standard layout from a professional vignette.
Precision Scenery: From Petrol Pumps to Poultry
The secret to a successful 7mm vignette often lies in the "clutter"—the small, everyday items that suggest a working environment. 3D printed scenery is superior to traditional materials because it can replicate extremely thin cross-sections. For example, 3D printing allows for complex geometries like realistic chicken wire or the delicate handles on a vintage petrol pump. These details are vital for industrial or rural themes. Adding a 3D printed poultry set with realistic feathers and postures can transform a simple station yard into a vibrant, lived-in space. These small additions are often the most memorable parts of 7mm scale diorama ideas.
Finishing Your 3D Prints
Achieving a professional look requires a structured approach to post-processing. You must remove all support pips and lightly sand the surfaces to eliminate any faint layer lines. Using a high-quality primer is essential to reveal any remaining imperfections before you begin the final coloring. For a detailed walkthrough on this process, see our Painting 3D Printed Models: A Beginner's Guide. In 7mm scale, always prioritize matte or satin finishes. Glossy surfaces often look "plasticky" and unrealistic under diorama lighting, whereas matte textures better represent the weathered, dusty surfaces of a narrow gauge railway.
Planning the Composition of Your 7mm Vignette
Creating a compelling scene involves more than just placing a locomotive on a piece of track. Composition is the bridge between a collection of models and a convincing world. While a small footprint can feel restrictive, following a structured planning process ensures every element serves a purpose. Achieving a balanced look is a common challenge for those exploring 7mm scale diorama ideas; however, utilizing a few classic artistic principles provides a proactive solution to the "cluttered" look often found in larger scales.
To plan your vignette effectively, follow these five steps:
- Step 1: Define your "viewing hole." This is the physical frame or proscenium arch of your diorama. It limits the viewer’s perspective and hides the edges of the world.
- Step 2: Apply the rule of thirds. Avoid placing your main building or locomotive in the dead center. Instead, position focal points one-third of the way from the edge to create a more dynamic and natural flow.
- Step 3: Create vertical interest. Narrow depth can limit your options; however, adding trees, embankments, or tall chimneys provides the verticality your eye craves.
- Step 4: Layer your textures. Start with fine ground cover and soil. Add mid-level weeds and shrubs before finishing with a high-level canopy of trees or structures.
- Step 5: Integrate lighting. Use light to draw the eye toward specific 7mm details, such as the rivet work on a wagon or the texture of a stone wall.
If you are ready to begin your build, our range of diorama tools and scenery provides the essential materials needed to bring these composition steps to life.
The Importance of the "Backscene"
A backscene is not merely a background; it is a tool for creating the illusion of infinite space. In 7mm scale, the transition between the physical diorama and the background is often jarring. Utilizing a curved backscene eliminates sharp corners that break the immersion. Whether you choose a hand-painted sky or a high-resolution photographic background, ensure the colors are slightly more muted than your foreground. This atmospheric perspective prevents the background from overpowering your models and helps the 7mm scale diorama ideas you've implemented stand out as the primary focus.
Lighting Your Scene
Lighting is the final layer of any professional vignette. Modern LED strips allow you to simulate specific times of day, from the warmth of a "golden hour" sunset to the oppressive "industrial gloom" of a rainy morning. Directional lighting is essential in 7mm scale because it casts long shadows that highlight the physical textures of your kits. You might also consider integrating working building lights. These additions offer a "night-time" viewing option that reveals hidden details inside sheds or stations, adding a new dimension to your work without requiring additional floor space.
Essential 7mm Scale Kits for Your Next Project
Building a high-fidelity scene requires specialized components that aren't always available in local hobby shops; however, our range of O-16.5 and 7mm scale kits provides a proactive solution for the discerning modeler. Narrow Minded Railworks focuses on providing the essential building blocks for your narrow gauge projects, ensuring you have access to unique prototypes that capture the imagination. These kits are designed to turn your 7mm scale diorama ideas into tangible, professional-looking vignettes without the need for advanced engineering skills.
While the prospect of scratch-building every detail is appealing, it's often a significant time commitment that can stall a project. We address this by offering a variety of kits and accessories tailored for the 7mm enthusiast:
- 3D Printed Locomotive Bodies: These kits focus on character and external detail, designed to fit existing chassis.
- Industrial Wagon Kits: Essential for adding "bulk" and purpose to your sidings, whether you're modeling slate, timber, or coal.
- GN15 and O-16.5 Kits: Specialized options for those exploring different narrow gauge standards within the 7mm scale.
- Diorama Tools and Scenery: The essential materials needed to bridge the gap between a bare board and a finished world.
7mm Narrow Gauge Locomotives
Locomotives are the heartbeat of any narrow gauge vignette. In 7mm, the unique quirks of steam and diesel prototypes become much more apparent, allowing you to showcase the personality of the line. If you're new to this aspect of the hobby, our guide on What is a Narrow Gauge Railway? provides a helpful foundation. To simplify the modeling process, we offer "body-only" kits. These allow you to mount a highly detailed 3D printed shell onto an existing, reliable chassis. This approach removes the frustration of complex mechanical assembly while giving you a unique locomotive that stands out in a small space.
Wagons and Rolling Stock
Wagons often provide the necessary visual weight for industrial themes. A single, heavily weathered wagon can serve as the primary centerpiece of a compact diorama. Whether you're modeling a slate quarry, a timber yard, or a general goods siding, selecting the right rolling stock is vital for storytelling. You can choose between specialized slate wagons, timber bolsters, or versatile general goods stock to match your chosen theme. Weathering these models is where the 7mm scale truly shines. The larger surface area makes it easier to depict peeling paint, rusted ironwork, and the accumulated grime of years of industrial service. These finishing touches ensure your 7mm scale diorama ideas result in a scene that feels authentically aged and functional.
Bring Your 7mm Narrow Gauge Vision to Life
Transitioning to a larger scale often feels like a trade-off between detail and space; however, focusing on 7mm scale diorama ideas allows you to achieve museum-quality realism within a compact footprint. You've seen how the combination of thoughtful composition, atmospheric lighting, and high-fidelity 3D printed parts can transform a simple shelf into a living snapshot of narrow gauge history. By prioritizing the textures unique to industrial and rural lines, you create a vignette that tells a story far beyond its physical borders.
Finding the right components for these niche projects can be a challenge for many modelers. We provide a proactive solution through our range of specialist 3D printed 7mm kits and scenery accessories, specifically designed for narrow gauge enthusiasts. Whether you are building a slate quarry siding or a coastal halt, we offer global shipping from the UK to support your creative journey. Explore our range of 7mm scale kits and diorama accessories today to begin your next masterpiece. Your perfect narrow gauge scene is closer than you think.
Frequently Asked Questions
What is the difference between O scale and 7mm scale?
7mm scale is the British standard of 7mm to the foot, which results in a precise ratio of 1:43.5. While O scale is often used as a broad term, it can sometimes refer to the American 1:48 ratio. Identifying the correct scale is vital for consistency; however, choosing the 1:43.5 standard ensures your 7mm scale diorama ideas remain compatible with the wide range of British narrow gauge kits and accessories.
How much space do I need for a 7mm scale diorama?
You can build a convincing 7mm vignette in as little as 300mm by 200mm using a standard boxfile. While larger layouts require dedicated rooms, a diorama allows you to focus on a single industrial siding or a small rural halt. A shelf measuring 900mm in length provides enough room for a locomotive, a few wagons, and a scenic backdrop without encroaching on your living space.
Can I use standard O gauge track for a 7mm narrow gauge diorama?
You should avoid standard O gauge track because it represents a 4ft 8.5in prototype gauge, which is too wide for narrow gauge scenes. Narrow gauge modeling in 7mm typically uses 16.5mm or 14mm track to represent gauges like 2ft 3in or 2ft. Using the correct narrow track is a constraint for realism; however, utilizing O-16.5 kits allows you to use readily available 16.5mm track components for your project.
What are the best materials for a 7mm scale diorama baseboard?
High-quality birch plywood or MDF provides the most stable foundation for a permanent diorama. While solid timber can warp over time, a framed plywood box remains rigid and lightweight. If you're building a portable vignette, extruded polystyrene foam offers a proactive solution for keeping the weight down while providing a surface that is easy to carve for embankments or riverbeds without needing heavy power tools.
Are 3D printed 7mm kits suitable for beginners?
3D printed kits are excellent for beginners because they significantly reduce the number of individual parts you need to assemble. Traditional etched brass or white metal kits can be daunting due to the soldering involved; however, a 3D printed body simply requires light sanding and priming. This approach lets you focus on the creative aspects of painting and weathering rather than struggling with complex mechanical construction.
Where can I find 7mm scale figures that look realistic?
Realistic 7mm figures are best sourced from specialist suppliers who offer 3D scanned models rather than hand-sculpted versions. These figures capture natural human movement and authentic clothing textures that traditional alternatives often miss. While finding these niche items can be difficult, searching for "1:43.5 scanned figures" will lead you to manufacturers who prioritize the high level of detail required for professional-looking 7mm scale diorama ideas.
How do I calculate 1:43 scale measurements for scratch-building?
To calculate 1:43.5 scale measurements, you divide the real-world dimension by 43.5. For example, a 3-foot door in real life becomes approximately 21mm in 7mm scale. While manual calculation can be tedious, creating a simple scale ruler or using a digital converter provides a proactive solution that ensures your scratch-built buildings and scenery remain perfectly in proportion with your locomotive and wagon kits.
What is O-16.5 and how does it relate to 7mm scale?
O-16.5 refers to 7mm scale models that run on 16.5mm gauge track, which is the same width as standard OO or HO track. This combination represents a prototype narrow gauge of approximately 2 feet 4 inches. It is a popular choice because it acknowledges the difficulty of hand-laying track by providing a solution where you can use commercially available 16.5mm track with 7mm narrow gauge rolling stock and locomotive bodies.