

What if you could capture the heavy, industrial presence of O scale modelling without the complexity of soldering etched brass or the massive space requirements of standard gauge? Many enthusiasts find themselves drawn to the hobby but feel overwhelmed by the technical jargon surrounding 7mm narrow gauge kits. It is common to feel confused by the differences between O-16.5, O14, and On30, or to worry that you lack the specialised tools required for traditional metalwork.
We understand that these technical barriers can make the jump to O scale feel inaccessible. While we don't sell ready-to-run models or individual chassis, we provide a proactive solution through high-detail 3D printed kits designed for straightforward assembly. This guide will help you master the fundamentals of 7mm narrow gauge modelling, from selecting the correct standards to building your first locomotive. You will learn how to identify reliable sources for bodies and how to effectively integrate them with commercially available chassis to create a professional finish.
Key Takeaways
- Learn to distinguish between scale and gauge to ensure your models accurately represent 1:43.5 proportions on your chosen track.
- Compare the accessibility of O-16.5 track standards against the finescale precision of O14 to find the best fit for your layout.
- Explore why 3D printed 7mm narrow gauge kits provide a more accessible entry point than traditional etched brass or white metal alternatives.
- Understand the "body kit" concept and how to select suitable donor chassis to power your locomotive models effectively.
- Master the essential preparation and finishing techniques required to achieve a professional-grade appearance on 3D printed surfaces.
What is 7mm Narrow Gauge? Understanding Scale and Gauge
7mm narrow gauge modelling offers a unique blend of physical presence and manageable layout size. While standard O gauge often requires extensive room for even basic operations, narrow gauge prototypes allow for tight curves and compact scenes. This makes it an ideal choice for enthusiasts who want the detail of a larger scale without needing a dedicated outbuilding for their track. By focusing on smaller, industrial prototypes, you can create a convincing railway environment on a shelf or a small baseboard.
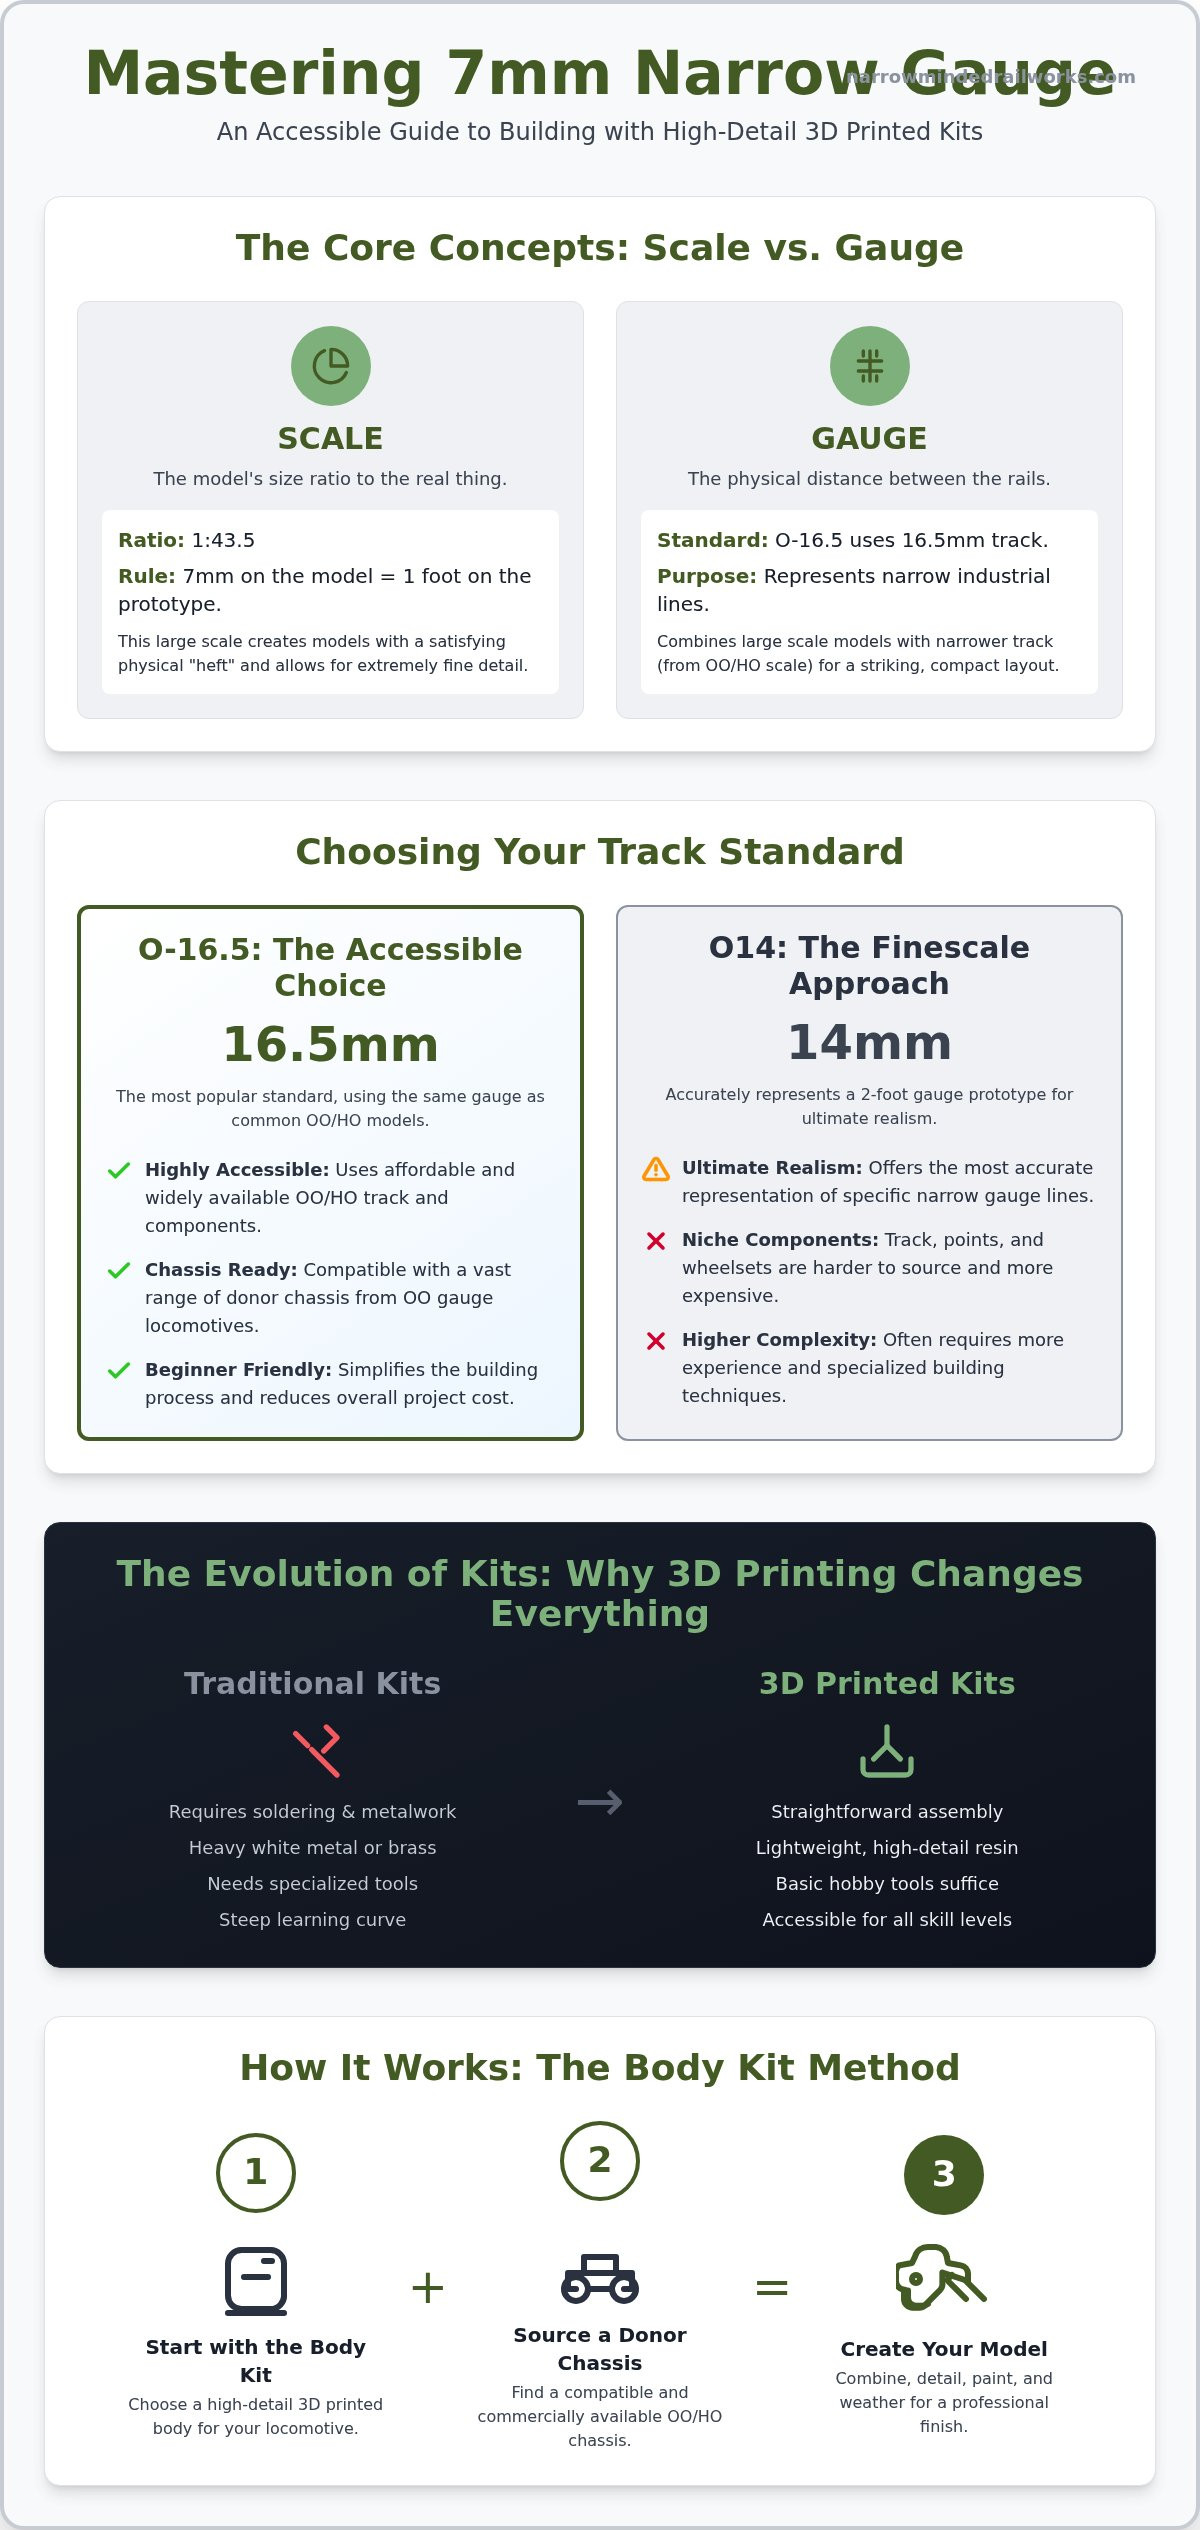
Understanding the distinction between scale and gauge is vital for any beginner. Scale refers to the ratio of the model to the prototype. In this context, we use the 7mm scale, where seven millimetres on the model represents one foot on the real engine. Gauge, conversely, is the physical distance between the rails. By combining a large scale with a narrow gauge, you can fit highly detailed models onto track that would normally be used for much smaller OO or HO scales. This creates a striking visual impact that smaller scales like OO9 simply cannot match.
The physical "heft" of these models is a primary draw. A typical industrial locomotive in this scale might be 100mm to 120mm long. This size allows for intricate details like cab controls, rivet patterns, and realistic weathering that are often difficult to achieve in smaller scales. While we don't sell ready-to-run models, our 7mm narrow gauge kits provide a proactive way to achieve this level of detail through high-resolution 3D printing.
The 7mm to 1 Foot Ratio Explained
7mm narrow gauge is the practice of modelling narrow track prototypes in O scale. The 1:43.5 ratio provides a canvas for high-detail engineering that feels substantial in the hand. This scale differs from standard O gauge because it focuses on the charm of light railways rather than the massive infrastructure of mainline transport. Traditional builders often struggled with the weight and complexity of white metal, but modern 3D printing provides a solution that maintains crisp detail without the frustration of complex metalwork.
Common Prototypes for 7mm Scale
Industrial railways remain the most popular subjects for builders. You might choose to model a rugged slate quarry in North Wales or a busy timber line. Icons like the Talyllyn and Ffestiniog railways offer plenty of inspiration for those who prefer preserved lines. However, many modellers enjoy the freedom of "freelance" designs. Because narrow gauge lines were often built with whatever equipment was available, you can create a unique railway that feels entirely authentic. Using 7mm narrow gauge kits for locomotive and wagon bodies allows you to focus on this creative aspect while ensuring a professional-grade finish for your rolling stock.
O-16.5 vs O14: Choosing the Right Track Standard
Selecting a track standard is the most critical decision you will make before starting your first project. This choice determines not only the realism of your layout but also the availability of components like points and chassis. Most beginners find themselves choosing between O-16.5 and O14. While both represent narrow gauge prototypes in 7mm scale, they offer very different experiences in terms of cost and technical difficulty. The 7mm Narrow Gauge Association provides extensive technical data on these standards, helping modellers navigate the complexities of track geometry and wheel profiles.
O-16.5: The Accessible Choice
O-16.5 is the most popular standard in the UK. It utilizes 16.5mm track, which is the same gauge used for standard OO and HO models. This accessibility is a significant advantage. You can use affordable and widely available track components, though using standard OO track often results in incorrect sleeper spacing. To solve this, many modellers choose Peco O-16.5 Streamline track, which features sleepers spaced appropriately for the larger 7mm scale. This standard is also closely related to the American On30 gauge. If you are curious about how these compare, you might find our article on An Introduction to On30 Gauge: Your Complete Guide particularly useful.
Choosing O-16.5 allows you to utilize a vast range of donor chassis from OO gauge locomotives. While we don't sell motors or chassis, our 7mm narrow gauge kits are specifically engineered to fit these common units. This approach simplifies the building process and reduces the overall cost of your rolling stock.
O14 and Other Niche Gauges
O14 is considered the finescale approach. It uses 14mm track to accurately represent a two foot gauge prototype. While this offers ultimate realism, it comes with constraints. Track and points are harder to source and often require more advanced kit-building skills. You may also encounter O9, which uses 9mm track (N gauge) to model 15 inch minimum gauge railways in 7mm scale. These niche gauges require careful planning to ensure your chosen locomotive bodies are compatible with the narrower wheelsets.
Before purchasing any 7mm narrow gauge kits, you must verify that the body dimensions allow for the wheel clearances of your chosen gauge. If you prioritize ease of assembly and track availability, starting with O-16.5 is the most practical solution. You can explore our range of 7mm scale kits to see how they integrate with these popular standards.
The Evolution of 7mm Kits: Why 3D Printing Changes Everything
The landscape of the hobby has shifted significantly over the last decade. Historically, builders of 7mm narrow gauge kits relied on materials that required significant technical skill and patience. While these traditional methods produced beautiful results, they often acted as a barrier for newcomers who lacked specialised equipment. Modern technology has provided a proactive solution that prioritises both high-end detail and ease of assembly.
There is a common misconception that 3D printed models are always covered in visible "print lines." While this was a valid concern with older FDM (filament) printers, modern resin printing technology produces layers so fine they are virtually invisible to the naked eye. A light coat of primer is usually all that's needed to achieve a smooth, professional finish. This transition from traditional manufacturing to digital precision makes the hobby more accessible than ever before.
Comparing Kit Materials
Etched brass remains a popular choice for experienced modellers because it offers incredible sharpness. However, it requires advanced soldering skills and a steady hand, which can be intimidating for a first project. White metal kits provide a satisfying physical weight, but they often lack the crisp definition found in modern resins. Vacuum-cast resin kits offer good surface texture, yet they can sometimes be prone to air bubbles or warping during the curing process.
High-resolution 3D printed resin represents the 2024 standard for the hobby. It combines the intricate detail of brass with the structural integrity of a single-piece casting. This medium eliminates the need for complex assembly jigs while providing a surface that is easy to prime and paint. By utilising this technology, we ensure that you can achieve professional results without the frustration of complex metalwork.
Why 3D Printing is Beginner-Friendly
One of the most significant advantages of this technology is the drastic reduction in part count. In many cases, a locomotive body is printed as a single, cohesive unit. This approach removes the risk of misaligned panels or messy glue seams that often plague traditional kits. Consistency is another key benefit. Because every kit is produced from a digital master, you can be certain that every rivet and panel line is perfectly positioned. 3D printing allows for complex curves and rivets that are difficult to achieve in other media. Every kit in our range is designed to maintain this level of precision, ensuring that your first build is as successful as your tenth.
Step-by-Step: Building and Finishing Your 7mm Kit
Building 7mm narrow gauge kits doesn't require a workshop full of specialised machinery. While traditional metal kits often demand soldering irons and heavy-duty flux, 3D printed resin kits only require a few basic hand tools. You will need a set of fine-grade needle files, sharp side snips, and high-quality cyanoacrylate (superglue) for any small detail parts. These tools allow you to handle the delicate features of O scale models without the physical strain associated with brass construction.
Preparation is the most important stage of any build. Although we ensure our prints are thoroughly cleaned before dispatch, it's good practice to wash the body in warm, soapy water to remove any residual oils from handling. This simple step ensures that your primer adheres correctly. Once dry, you can begin the assembly process by focusing on the interface between the body and the mechanical components. While we don't sell motors or chassis, our kits are designed for easy integration with common OO gauge donor units.
Preparation and Assembly
Start by removing any remaining support structures using your snips. Cut slightly away from the body to avoid gouging the surface, then gently file the remaining nub until it's flush. It's common to worry about damaging fine details like rivets, but modern resin is surprisingly resilient if handled with care. Before you reach for the paint, always test-fit the body to your chosen chassis. This proactive check ensures that the clearances are correct and that the model sits at the prototypical height. For a deeper dive into the initial stages, you can read our Painting 3D Printed Models: A Beginner's Guide.
Painting and Detailing
A high-quality primer is essential for resin-based kits because it provides the "bite" required for subsequent layers. Acrylic paints are generally preferred for 3D prints as they dry quickly and don't react with the material. To achieve a realistic industrial look, apply thin layers of paint rather than one thick coat. This preserves the crisp rivet detail that makes 7mm scale so appealing. You can add life to your model by installing driver figures and small scenery accessories like oil cans or tools.
Weathering is where your locomotive truly starts to look like a hard-working industrial machine. Use dry-brushing techniques or weathering powders to simulate the rust and grime found in quarries or timber yards. Once you're satisfied with the appearance, a light coat of matt varnish will protect your hard work and secure any decals you've applied. If you're ready to begin your first build, you can browse our range of 7mm scale kits to find the perfect starting point.
Finding the Right Chassis for 7mm Locomotive Kits
The "body kit" concept is central to this branch of the hobby. Most 7mm narrow gauge kits are sold as external shells, which means they do not include the internal mechanical components. While we don't sell chassis or motors, this constraint is actually a proactive benefit for the builder. It gives you the flexibility to choose a drive unit that matches your specific performance requirements and budget. You aren't tied to a proprietary motor that might be difficult to repair or replace in the future. This approach allows you to focus on the aesthetic finish of the model while relying on proven, mass-produced engineering for the movement.
Matching Bodies to Power Units
Bachmann, Hornby, and Kato are the most common donor brands for these projects. For O-16.5 modelling, you will typically look for OO or HO scale locomotive chassis that match the wheelbase of the prototype you're building. It's vital to measure the distance between the axles before purchasing a kit to ensure a prototypical look. While we don't supply the mechanical parts, we provide clear guidance on which specific commercially available units are compatible with our 3D printed bodies. This ensures that the motor fits snugly within the shell without the need for extensive structural modifications.
Whether you prefer a small industrial "critter," a rugged diesel, or a traditional steam locomotive, the process remains the same. You might need to trim small amounts of plastic from the donor chassis to clear the internal walls of the resin body. This is a simple task using basic files or snips. By focusing on kits designed for these common power units, you can build a reliable fleet of locomotives that run as well as any ready-to-run model. This method effectively bridges the gap between high-detail scale modelling and the reliability of modern electronics.
Completing the Scene: Wagons and Scenery
A locomotive alone doesn't make a railway. To create a cohesive feel, you should complement your engines with appropriate rolling stock. Using 7mm scale wagons and scenery items helps establish the size and purpose of your world. Narrow gauge railways are often defined by their specific cargo, whether it's slate from a Welsh quarry or timber from a rural forest. These wagons provide the necessary context for your locomotives and help tell a story through your modelling.
Establishing the correct scale for your scenery is just as important as the locomotives themselves. Items like oil drums, tools, and figures help the viewer understand the 7mm proportions. From rugged rolling stock to industrial clutter, these details turn a simple loop of track into a convincing, lived-in scene. If you're ready to start your project, you can explore our full range of 7mm narrow gauge kits to find everything you need for your next build.
Start Building Your O Scale Narrow Gauge Layout
Mastering the nuances of scale and gauge is the first step toward building a convincing layout. While technical standards like O-16.5 might seem complex at first, choosing the right components provides a proactive way to bypass common frustrations. By utilizing modern 3D printing technology, you can achieve high-detail results without the steep learning curve of traditional metalwork. These 7mm narrow gauge kits offer a straightforward path to creating unique, industrial locomotives that fit reliably on common donor chassis. It's a method that prioritises results over frustration.
Our expertly designed 3D-printed bodies are engineered for easy assembly, allowing you to focus on the creative aspects of painting and weathering. We provide worldwide shipping from the UK to support enthusiasts across the globe. Whether you're building a rugged quarry line or a rural timber railway, we have the resources to help you succeed. Browse our collection of 7mm and O-16.5 narrow gauge kits today and bring your miniature world to life. We look forward to seeing your progress on the workbench.
Frequently Asked Questions
What track does 7mm narrow gauge use?
7mm narrow gauge modelling typically uses track widths that represent narrow prototypes in a 1:43.5 scale. The most common choice is 16.5mm track, often referred to as O-16.5 or 0e. More specialised standards include O14, which uses 14mm track for true two-foot gauge accuracy, and O9, which utilises 9mm track. While standard OO gauge track is physically compatible with O-16.5, dedicated narrow gauge track with wider sleeper spacing provides a more authentic appearance.
Is O-16.5 the same as On30?
No, O-16.5 and On30 are not identical despite using the same 16.5mm track gauge. O-16.5 is a British standard using a 7mm to the foot scale (1:43.5). On30 is an American standard using a 1/4 inch to the foot scale (1:48). While you can run models from both standards on the same track, the physical size difference between the models is noticeable. It is important to check your 7mm narrow gauge kits for scale consistency.
Do 7mm narrow gauge kits come with a motor and wheels?
Most 7mm narrow gauge kits, including those from Narrow Minded Railworks, are sold as body kits and don't include motors, wheels, or chassis. This allows you to choose your own mechanical components based on your budget and performance needs. While we don't sell chassis directly, our kits are designed to fit specific, commercially available power units. This approach ensures you get a high-detail shell that integrates seamlessly with reliable, ready-to-run mechanisms.
Can I use standard OO gauge track for O-16.5 modelling?
You can use standard OO or HO gauge track for O-16.5 modelling because the rail distance is the same 16.5mm. However, the sleeper spacing on standard track is too close for 7mm scale, which can look unrealistic. A proactive solution is to use dedicated O-16.5 track, such as the Peco Streamline range. This track features sleepers that are correctly scaled and spaced for a 7mm narrow gauge environment, enhancing the overall visual impact of your layout.
What is the best glue for 3D printed resin model kits?
High-quality cyanoacrylate (superglue) is the best adhesive for 3D printed resin kits. Because resin doesn't react to the solvent cements used for traditional plastic kits, a mechanical bond is required. We recommend using a gel-based superglue for larger components to allow for small adjustments and a thin-liquid version for fine detail parts. Always ensure the surfaces are clean and free from residual oils before applying the adhesive to ensure a strong, permanent bond.
How do I know which chassis will fit a specific loco body kit?
Identifying the correct chassis involves matching the wheelbase of the donor unit to the internal dimensions of the body kit shell. While we don't sell motors or chassis, we provide specific guidance in our product descriptions regarding which commercially available units fit our 7mm narrow gauge kits. Common donor brands include Bachmann, Hornby, and Kato. It's always best to verify the measurements of your intended power unit before beginning the assembly process to ensure compatibility.
Are 7mm scale kits suitable for beginners?
Yes, modern 3D printed 7mm scale kits are an excellent entry point for beginners. Unlike traditional etched brass or white metal kits that require soldering and complex assembly, 3D printed resin bodies often come as a single piece. This reduces the part count and eliminates the risk of misaligned panels. If you can handle basic cleaning, light sanding, and painting, you can achieve professional results with our kits without needing specialised workshop tools or advanced technical skills.
Do I need to solder 3D printed model kits?
You don't need to solder 3D printed resin kits because the material is not metal and can't be joined using heat. All assembly is performed using adhesives like cyanoacrylate. This makes the building process much safer and more accessible than traditional brass modelling. While some experienced builders might add brass handrails or detail parts that require soldering, the main body and structural components of our kits are designed for straightforward glue assembly, saving you time and frustration.