

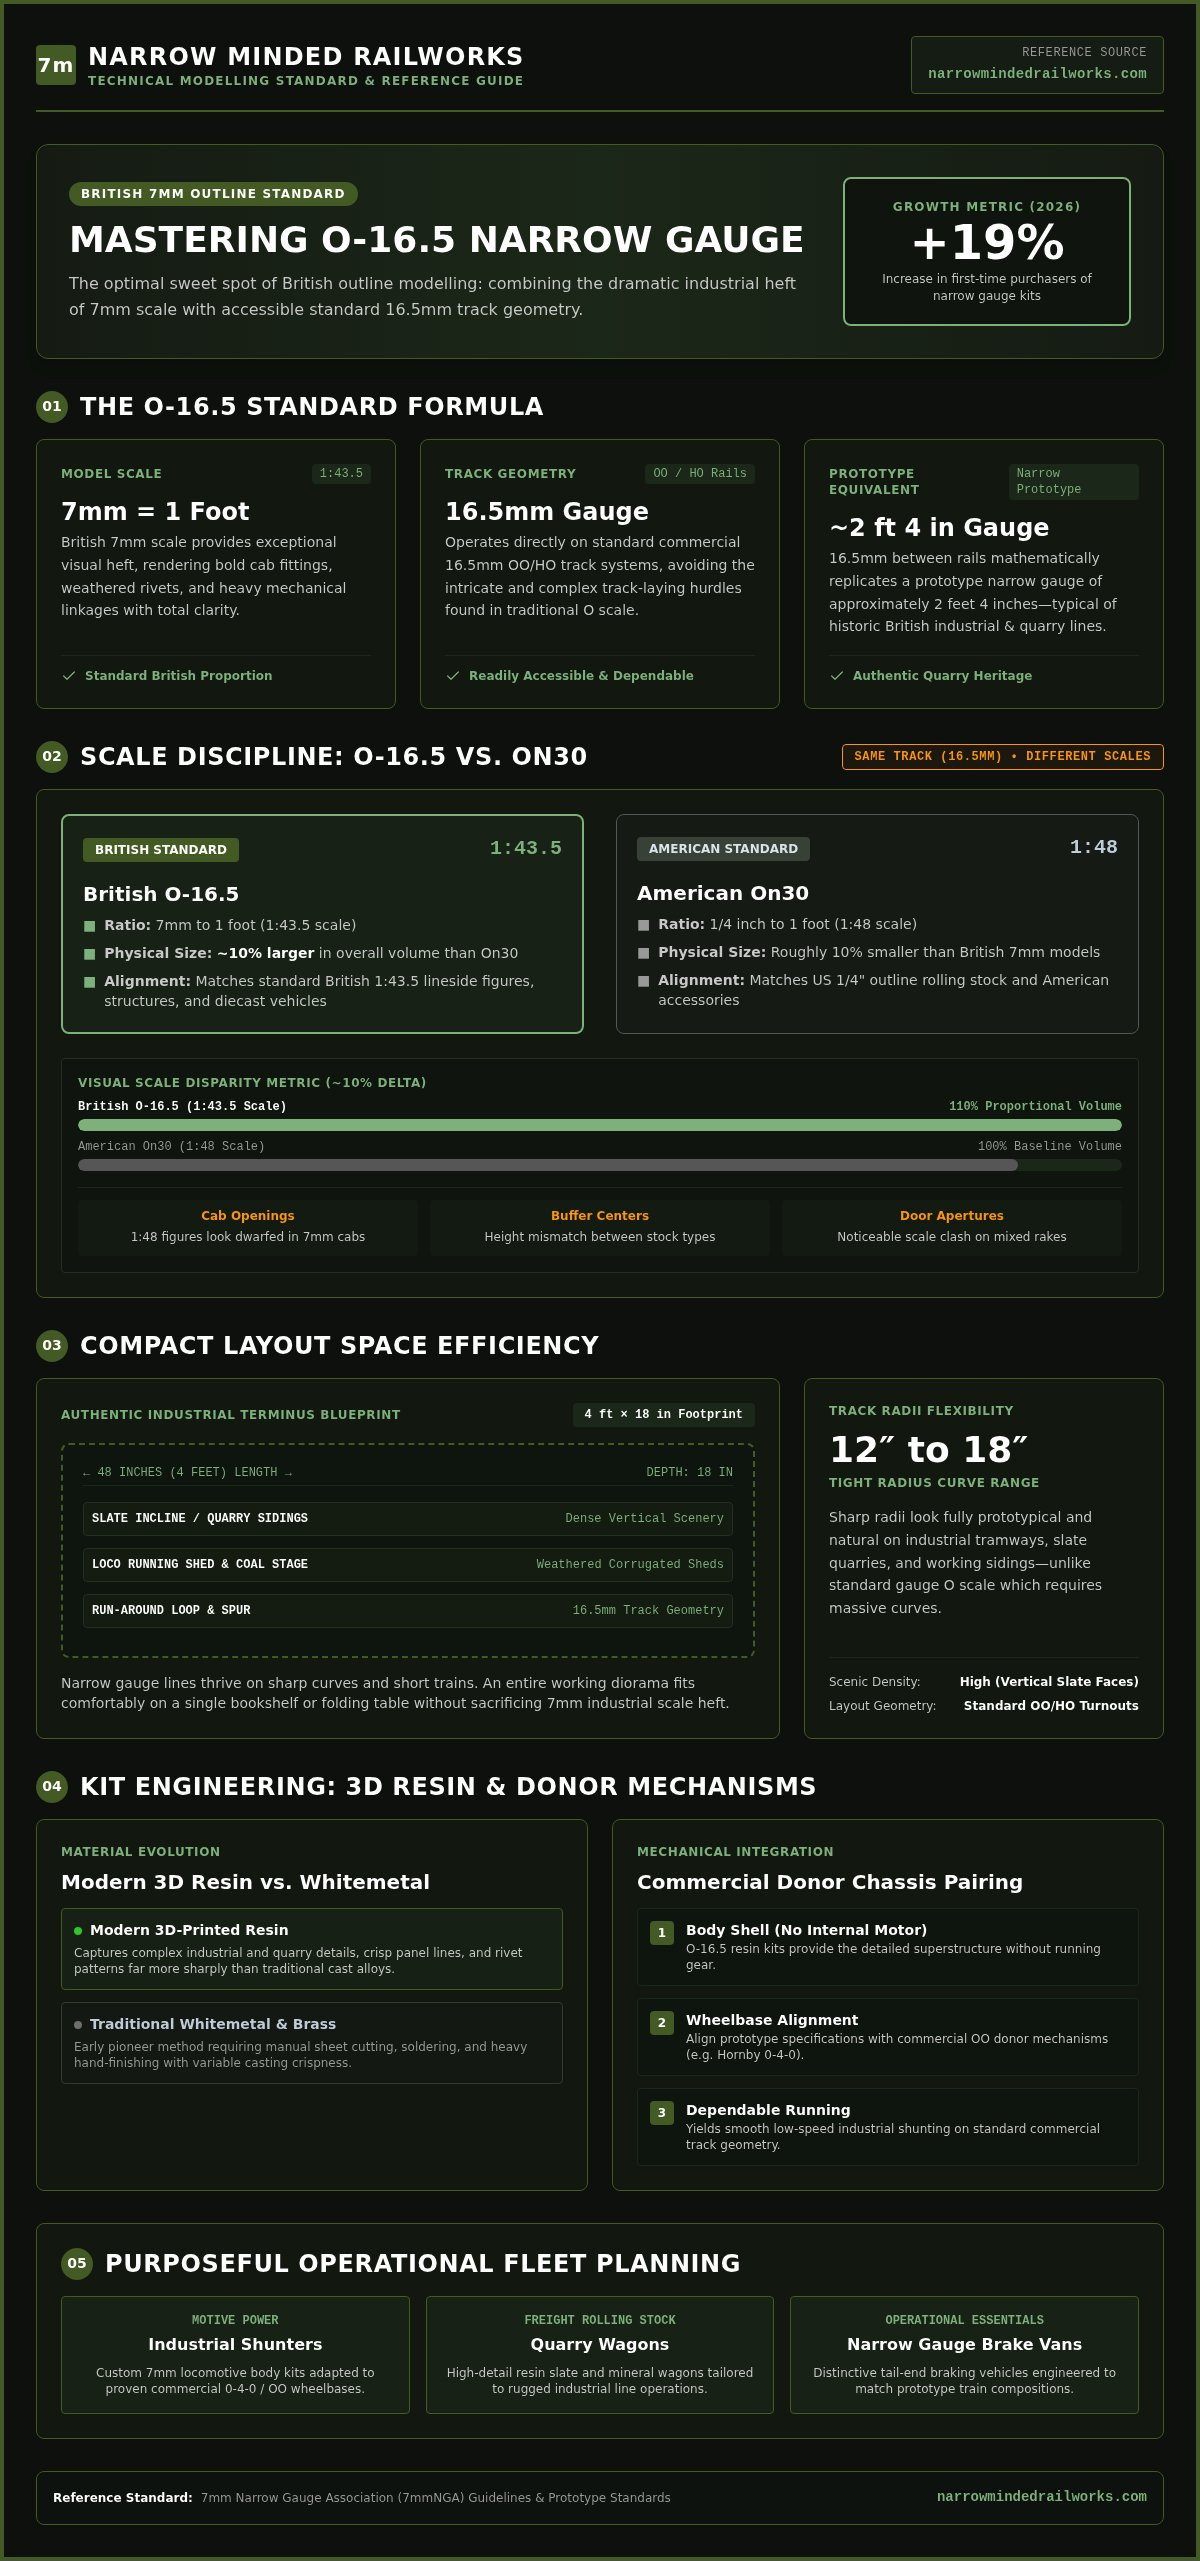
With a 19% increase in first-time purchasers of narrow gauge kits since the beginning of 2026, O-16.5 model railway kits have rapidly become the sweet spot of British outline modelling. Combining the generous proportions of 7mm scale with the convenience of standard 16.5mm track, they deliver big industrial character without demanding vast layout spaces.
Getting started, however, often presents real hurdles. You might wonder how British 7mm narrow gauge differs from American On30, feel hesitant about preparing 3D-printed resin surfaces, or worry about sourcing compatible running gear. While body kits do not supply internal mechanisms or motors, adapting reliable commercial donor chassis is straightforward once you know which wheelbases align with specific prototypes.
This comprehensive guide will help you master the craft of 7mm narrow gauge, showing you how to choose authentic industrial subjects, fit body shells to commercial mechanisms, and paint 3D prints with complete confidence. Ahead, you'll discover the essential standards, donor chassis pairings, and workshop methods required to bring a distinctive narrow gauge railway to life.
Key Takeaways
- Understand the British 7mm standard to see how 1:43.5 scale models run reliably on accessible 16.5mm track geometry without requiring vast layout space.
- Differentiate British O-16.5 from American On30 (1:48 scale) to ensure your rolling stock, structures, and figures maintain consistent visual proportions.
- Discover why modern resin O-16.5 model railway kits capture complex industrial and quarry details far more crisply than traditional whitemetal castings.
- Learn the systematic method for adapting separate commercial donor chassis to 3D-printed locomotive bodies for smooth, dependable running.
- Plan a purposeful operational fleet by combining distinctive quarry wagons and essential narrow gauge brake vans tailored to industrial prototypes.
Understanding O-16.5: The 7mm Narrow Gauge Standard
O-16.5 is the British standard for 7mm narrow gauge modelling on 16.5mm gauge track. Scaled at 7mm to the foot (1:43.5), the standard 16.5mm distance between the rails represents a prototype gauge of roughly 2 feet 4 inches. This allows modelers to build distinctive narrow gauge subjects while using standard OO and HO track systems. By combining a large scale with readily accessible commercial geometry, the format avoids the complex track-laying hurdles often found in larger scales.
The visual presence of 7mm scale gives narrow gauge rolling stock exceptional heft. Industrial locomotives gain bold cab fittings, weathered rivets, and heavy mechanical linkages that disappear in smaller scales. To see how these principles work in practical model making, watch this demonstration of fitting a custom 7mm scale narrow gauge body onto a commercial OO chassis:
The History of 7mm Narrow Gauge in the UK
British 7mm narrow gauge began in the hands of dedicated scratch-builders. Early pioneers had no commercial kits, so they hand-cut brass or plastic sheet to replicate working lines like the Talyllyn Railway and the Ffestiniog Railway. While standard gauge O scale models require massive track radii and cavernous rooms, narrow gauge lines thrive on sharp curves and short trains. As the hobby matured, independent suppliers started producing specialized O-16.5 and On30 standards parts, eventually leading to dedicated body kits designed for commercial chassis.
Why O-16.5 is Perfect for Small Spaces
Space constraints often discourage modelers from working in 7mm scale, but narrow gauge prototypes resolve this limitation directly. Tight radius curves of twelve to eighteen inches look entirely natural on quarry tramways and industrial sidings. You can build an entire working diorama on a bookshelf or a single folding table.
- Compact footprints: A shelf measuring four feet by eighteen inches easily accommodates an authentic industrial terminus.
- Scenic density: The generous scale allows you to build dense, characterful settings with towering slate inclines, weathered corrugated sheds, and detailed figures.
- Simplified mechanics: Standard OO/HO track geometry keeps trackwork affordable and dependable.
To grasp how these small lines fit into real-world transport history, read our guide on What is a Narrow Gauge Railway?. Assembling modern O-16.5 model railway kits lets you combine that rugged industrial heritage with modern resin printing for a truly unique layout.
O-16.5 vs. On30: Choosing the Right 7mm Narrow Gauge Path
Selecting between O-16.5 and On30 often confuses newcomers because both standards run on identical 16.5mm track. While both use 16.5mm track, the O-16.5 scale is roughly 10% larger than On30. That difference might sound modest on paper, but it creates an unmistakable physical disparity on your workbench. British O-16.5 models use a scale of 7mm to the foot (1:43.5), whereas American On30 models scale at 1/4 inch to the foot (1:48). Consequently, placing an On30 boxcar next to a British quarry wagon reveals jarring differences in cab heights, buffer centers, and door apertures.
You can physically run both outlines on the same track without derailment issues. However, mixing them in a single train disrupts visual consistency. For comprehensive modelling standards and technical guidance across these scales, the 7mm Narrow Gauge Association serves as an invaluable reference organization for UK hobbyists.
Scale Prototyping: 1:43.5 vs 1:48
Maintaining scale discipline protects the visual credibility of your entire scene. In the UK, 1:43.5 is the traditional standard for lineside accessories, figures, and diecast road vehicles. Placing a 1:48 scale driver figure beside a 7mm locomotive cab makes the cab opening look oversized, while 1:48 scale buildings dwarf standard British rolling stock. If your focus leans across the Atlantic, explore our detailed breakdown in An Introduction to On30 Gauge to evaluate that system's specific dimensions.
Which One Should You Choose?
Your choice comes down to the narrative and setting you want to recreate on your layout:
- Choose O-16.5: Best for British industrial tramways, Welsh slate quarries, peat bogs, and heritage lines. It allows you to model distinctive prototypes with chunky industrial character.
- Choose On30: Best for North American logging camps, Western mining operations, and prairie short lines that rely on large knuckle couplers and mass-market ready-to-run equipment.
Commercial chassis manufactured for American HO or On30 models frequently provide reliable running gear under British body shells. Although ready-to-run models dominate standard retail shelves, building dedicated O-16.5 model railway kits gives you complete creative freedom over unusual industrial prototypes. While body kits do not include internal motors or chassis, adapting widely available commercial donor mechanisms bridges the gap effectively. If you want to construct distinctive quarry and industrial prototypes designed specifically by hobbyists for hobbyists, explore our range of O-16.5 / 7mm Scale Kits to start your next build.
The Evolution of Kits: 3D Printing vs. Traditional Materials
Historically, constructing narrow gauge stock meant tackling whitemetal castings, etched brass sheets, or injection-moulded plastic. While whitemetal provides useful chassis ballast, the material is notoriously difficult to align, glue, and straighten without specialized low-melt soldering equipment. Injection-moulded styrene delivers sharp edges, but the astronomical tooling costs restrict manufacturers to broad, commercial subjects. This limitation historically forced narrow gauge enthusiasts to compromise on generic rolling stock.
Modern high-resolution 3D printing fundamentally transforms this dynamic. Photopolymer resin captures microscopic surface detail, complex cab curves, and intricate rivet patterns directly in a single, stable shell. Long-term resin durability now easily rivals styrene, provided parts are cured correctly and protected with primer. Organizations like the 7mm Narrow Gauge Association have long documented the shift toward practical scratch-building and low-volume production. Today, modern 3D resin technology makes obscure prototypes commercially viable for independent designers.
At Narrow Minded Railworks, we design our O-16.5 model railway kits specifically around high-resolution resin printing. Because we are modellers designing for fellow enthusiasts, we optimize our shells with integrated cab details, realistic boiler fittings, and mounting points engineered to drop over commercial chassis.
Detailing Industrial Character
Industrial lines were rough, practical environments where rolling stock suffered daily punishment. Replicating warped timber planks, bent strapping, and dented platework on Penrhyn or Dinorwic quarry wagons is nearly impossible with flat laser-cut wood or rigid brass frets. Digital 3D sculpting allows us to bake authentic wear, subtle surface sagging, and heavy foundry lettering straight into the kit master. You achieve genuine character straight out of the box rather than attempting stressful manual distressing.
Preparing 3D Printed Kits for Assembly
Working with resin requires a different workshop discipline than assembling standard plastic sprues. While raw resin components feature small support pips from the printing process, you can clean them up quickly using basic hand tools:
- Support removal: Never snap supports off by hand, as this tears small pits into the model surface. Clip each support strut cleanly with fine flush cutters, leaving a microscopic stub.
- Sanding and cleanup: Gently draw a 600-grit sanding stick across the stubs until the surface sits completely flush with the surrounding detail.
- Washing: Soak the cleaned parts in warm, soapy water and scrub them lightly with a soft toothbrush to strip away any residual release oils or microscopic resin dust.
Once dried thoroughly, the bare model is ready to take paint. Read our practical walkthrough on Painting 3D Printed Models to master proper priming, layering, and realistic weathering techniques.
Building Your First O-16.5 Kit: A Step-by-Step Approach
Starting with an unpowered wagon is the smartest way to tackle O-16.5 model railway kits. Constructing a simple quarry skip or flat wagon lets you master resin cleanup, test bonding agents, and practice weathering techniques without managing delicate mechanical clearances. Once you build confidence on rolling stock, moving on to locomotive conversions feels completely manageable.
Every successful build relies on a small collection of essential bench tools:
- Cutting and abrading: Fine flush sprue cutters, a fresh scalpel blade, and flexible 400- to 800-grit sanding sticks to smooth printing stubs.
- Assembly gear: Precision tweezers, a miniature pin vice, and brass wire for reinforcing small handrails.
- Adhesives: Medium-viscosity cyanoacrylate (super glue) alongside an aerosol activator for instant curing on structural joints.
Finding the Right Chassis
Locomotive body kits do not include chassis or motors. At Narrow Minded Railworks, we focus entirely on high-detail 3D-printed body shells, leaving mechanical propulsion to factory-tested commercial units. We engineer our locomotive designs to drop over widely available OO and HO gauge mechanisms produced by established manufacturers like Hornby and Bachmann.
Adapting these mechanisms is straightforward and rarely requires complex machining. In most cases, you simply unclip the donor locomotive's original plastic body, remove any extraneous cab mouldings, and test-fit the resin shell. You may occasionally need to shave down a minor plastic mounting lug or sand the edges of a metal ballast weight to achieve a seated, level stance across the axles.
Assembly and Painting Tips
Standard liquid plastic cement will not bond photopolymer resin because the material lacks solvent-melt properties. Always join resin components using cyanoacrylate, applying minute drops with a brass wire applicator to keep seams clean.
Because cured resin is naturally lightweight, adding ballast inside your models is crucial for dependable running. Conceal lead sheet, lead shot, or tungsten putty under wagon floors and inside hollow locomotive boiler voids. This extra mass ensures reliable electrical pickup across turnouts and prevents light wagons from hopping off uneven track.
Before applying topcoats, spray a misted layer of automotive or acrylic grey primer over the entire assembly. A good primer provides a tooth for acrylic paints, reveals tiny flaws before final painting, and unifies multi-material assemblies into a cohesive model.
If you are ready to begin, explore our collection of O-16.5 / 7mm Scale Kits to discover distinctive industrial prototypes designed by enthusiasts for reliable layout running.
Expanding Your Fleet: Industrial and Quarry Rolling Stock Solutions
Operating a compelling narrow gauge railway requires more than a single locomotive circling an oval of track. Genuine operational character emerges when you assemble a purposeful fleet matched to an authentic industrial task. While mainline operations rely heavily on standardized box vans and open wagons, narrow gauge systems utilized highly specialized, purpose-built stock. Incorporating an authentic narrow gauge brake van, for example, grounds your train movements in historical reality, providing essential guard control and handbrake safety on steep mineral gradients.
Whether your layout serves a slate quarry, a brickworks, or an inland coal depot, selecting the right mix of wagons defines the line's industrial context. Mass-produced rolling stock often looks too pristine or uniform for rugged work sites. Assembling specialized O-16.5 model railway kits allows you to populate your sidings with distinctive, un-standardized stock that reflects the improvised nature of real industrial lines. You can inspect practical examples in our Showcase: Our O-16.5 Loco and Wagon Kits to see how varied wagon types function together.
Quarry Wagons: The Heart of O-16.5
Quarry operations form the cornerstone of British narrow gauge history. Modeling lines like the Dinorwic or Penrhyn systems demands specific rolling stock, from iron-framed slab wagons to wooden three-plank coal hoppers. Alongside flat slate cars, rugged V-skip tippers and side-tipping tubs provide operational variety during shunting maneuvers. Adding 3D-printed miniature quarrymen and shunters at ground level immediately establishes proper scale perspective, transforming empty rolling stock into an active, bustling workspace.
Designing a Cohesive Layout
A convincing layout balances mechanical diversity with thematic consistency across every train run. To achieve this balance on your workbench, consider three core fleet-planning principles:
- Varied motive power: Pair an industrial steam tank engine for heavy transfers with a small four-wheel diesel mechanical shunter for tight internal yard moves.
- Scenic continuity: Use consistent ballast textures, ground stone spillage, and rusty trackside scrap piles to reinforce the primary mineral your fleet transports.
- Distinctive rolling stock: Avoid identical rakes by mixing weathered wooden-sided wagons with battered metal skips to reflect years of gradual fleet additions.
Every scratch, dent, and coupling chain on your rolling stock helps narrate the working history of your railway. By combining well-chosen O-16.5 model railway kits with thoughtful lineside accessories, you build a cohesive, operational world that feels earned, functional, and completely unique.
Start Building Your 7mm Narrow Gauge Railway Today
Working in 7mm narrow gauge gives you the bold presence of O scale without demanding a massive layout room. By combining standard 16.5mm track geometry with high-resolution resin printing, you can capture the gritty, weathered character of Welsh quarries on a compact shelf. While body kits don't supply internal chassis or motors, pairing these shells with proven commercial OO and HO mechanisms guarantees reliable running from day one.
Selecting the right rolling stock transforms basic track into a living, purposeful industrial line. Whether you're starting with an unpowered quarry skip or converting a detailed steam locomotive body, building O-16.5 model railway kits puts creative control back in your hands. At Narrow Minded Railworks, our kits are designed by enthusiasts for enthusiasts, delivering high-detail 3D resin prints and worldwide shipping straight from the UK. Take the next step on your workbench and browse our range of O-16.5 Locomotive and Wagon Kits to craft a truly distinctive layout.
Frequently Asked Questions
What is the difference between O-16.5 and On30?
The primary difference lies in the scale ratio rather than the track width. O-16.5 represents British narrow gauge at 7mm to the foot (1:43.5 scale), while On30 follows the American standard at 1/4 inch to the foot (1:48 scale). Although both run on standard 16.5mm track, British 7mm models are roughly 10% larger in bulk, making mixed trains look visually mismatched.
Can I use standard OO gauge track for O-16.5 kits?
Yes, you can run O-16.5 stock directly on standard OO or HO gauge track. However, mainline track features closely spaced, uniform sleepers scaled for standard gauge lines. To achieve an authentic industrial appearance, many builders prefer dedicated narrow gauge track systems with irregular sleeper spacing, or they manually space commercial sleepers to reflect rugged quarry tramway conditions.
Do your O-16.5 locomotive kits include the motor and chassis?
No, our locomotive body kits do not include motors, gears, or chassis. Narrow Minded Railworks specializes exclusively in high-detail 3D-printed body shells, rolling stock, and scenic accessories. We intentionally design our locomotive bodies to fit over commercially available donor mechanisms, ensuring you receive smooth, factory-tested electrical performance without paying for costly specialized drivetrains.
What scale are O-16.5 model railway kits?
Authentic British O-16.5 model railway kits are designed to 7mm scale, which translates to a ratio of 1:43.5. Running on 16.5mm gauge track, this scale represents real-world narrow gauge prototypes with track gauges between 2 feet and 2 feet 6 inches, which were standard across Welsh slate quarries and British industrial networks.
How do I paint a 3D printed model railway kit?
Begin by washing cured resin components in warm, soapy water to remove any residual oils. Once completely dry, apply a light, even coat of quality acrylic or automotive surface primer to provide mechanical tooth. After priming, brush or airbrush your chosen model paints using thin layers, finishing with matte varnishes, washes, and weathering powders to reproduce heavy quarry grime.
What glue should I use for resin 3D printed kits?
Always use cyanoacrylate adhesive, commonly known as super glue, when assembling 3D resin kits. Traditional liquid polystyrene cement relies on chemical melting to fuse plastic together, which does not work on cured photopolymer resin. Medium-viscosity super glue gives you a few seconds to align parts accurately, while an aerosol activator sets structural joints instantly.
Are O-16.5 kits suitable for beginners?
Yes, O-16.5 kits offer an excellent entry point for newcomers because their generous 7mm proportions are easier to handle than smaller scales. We recommend starting with an unpowered slate wagon or industrial skip before attempting a locomotive build. This approach lets you master resin cleaning, cyanoacrylate bonding, and realistic painting techniques without worrying about mechanical running clearances.
Where can I find a chassis for my O-16.5 locomotive body?
You can purchase compatible donor mechanisms from model railway shops, online retailers, or second-hand exhibition stalls. Our locomotive body shells are tailored around widely produced commercial OO and HO gauge chassis from major manufacturers like Hornby and Bachmann. Always check the kit's product description for the exact donor model recommended for proper wheelbase alignment.