

Have you ever held a 3D-printed model kit, captivated by the potential but also slightly intimidated by the process? You're not alone. Questions like "Will my chassis actually fit?", "What's the best way to handle these delicate parts?", and "How can I achieve a realistic finish without ruining it?" are common hurdles for many modellers. The allure of adding one of those characterful little engines to your layout is strong, but the uncertainty can often stop a project before it even begins. This is especially true when tackling your first OO9 quarry hunslet kit.
Fear not! This ultimate guide is designed to demystify the entire process and empower you to build a stunning model with confidence. We'll walk you through everything, from selecting the right components and tools to assembling the body, painting, and applying those final, grimy weathering touches. By following our step-by-step advice, you'll transform that box of parts into a reliable, great-running locomotive that will be the pride of your narrow-gauge fleet, and gain the skills to tackle any kit that comes your way.
Key Takeaways
- Learn how to select the best kit by checking for quality materials and ensuring chassis compatibility before you commit to a purchase.
- Get a complete checklist of the essential tools required for the build, plus recommended items to achieve a professional finish.
- Follow a clear, step-by-step process to assemble your quarry hunslet kit, beginning with the crucial preparation of every component.
- Bring your model to life by choosing an authentic livery and applying effective painting and weathering techniques for a stunning result.
What Makes the Quarry Hunslet a Modeller's Favourite?
Few locomotives capture the imagination of narrow gauge modellers quite like the Quarry Hunslet. These small, powerful steam engines are icons of British industrial heritage, instantly recognisable for their rugged, purposeful design and characterful appearance. Originally built to navigate the tight curves and steep inclines of Welsh slate quarries, their charm has translated perfectly into the world of model railways.
To see these distinctive locomotives in both their quarry and mainline forms, this video provides an excellent overview of recently released models:
Whether you prefer the classic, spartan look of an open-cab design or the slightly more protected enclosed-cab variant, a quarry hunslet kit offers a rewarding project. Their enduring popularity stems from a perfect blend of historical significance and modelling potential, making them a staple on layouts across the United Kingdom.
A Brief History of the Real Prototypes
The story of the Quarry Hunslet is intrinsically linked to the great Welsh slate quarries of the late 19th and 20th centuries, most notably the Dinorwic and Penrhyn quarries. Designed by the Hunslet Engine Company of Leeds, these robust tank engines were the workhorses of the industry. The full Hunslet Engine Company history reveals a legacy of building powerful industrial locomotives. Their primary role was to haul heavy trains of slate wagons along precarious ledges and through tight tunnels, a task they performed with remarkable reliability for decades.
Why They're Perfect for OO9 Layouts
The Quarry Hunslet's prototype design makes it an ideal subject for OO9 scale (4mm scale models running on 9mm gauge track). Their popularity on smaller layouts is driven by several key factors:
- Compact Size: Their small wheelbase and overall dimensions allow them to navigate the sharp curves typical of compact and micro-layouts, making them perfect for modellers with limited space.
- Industrial Character: They instantly evoke the classic atmosphere of a British industrial narrow gauge railway, providing a strong theme and operational interest for any layout.
- Scope for Customisation: A basic kit provides a fantastic canvas for personalisation. From simple weathering to adding fine details like tools, crew, and real coal, modellers can easily create a unique locomotive.
- Popular Era: They represent a much-loved period of Britain's industrial past, a theme that continues to be incredibly popular with railway modellers of all ages.
Choosing Your Quarry Hunslet Kit: What to Look For
Selecting the right quarry hunslet kit is the first step towards building a model you can be proud of. With various options on the market, understanding the key differences in materials, mechanics, and detail will save you time and ensure a rewarding experience. A high-quality kit not only looks better but is often far more enjoyable to assemble. Before you add anything to your basket, let's break down what you need to consider.
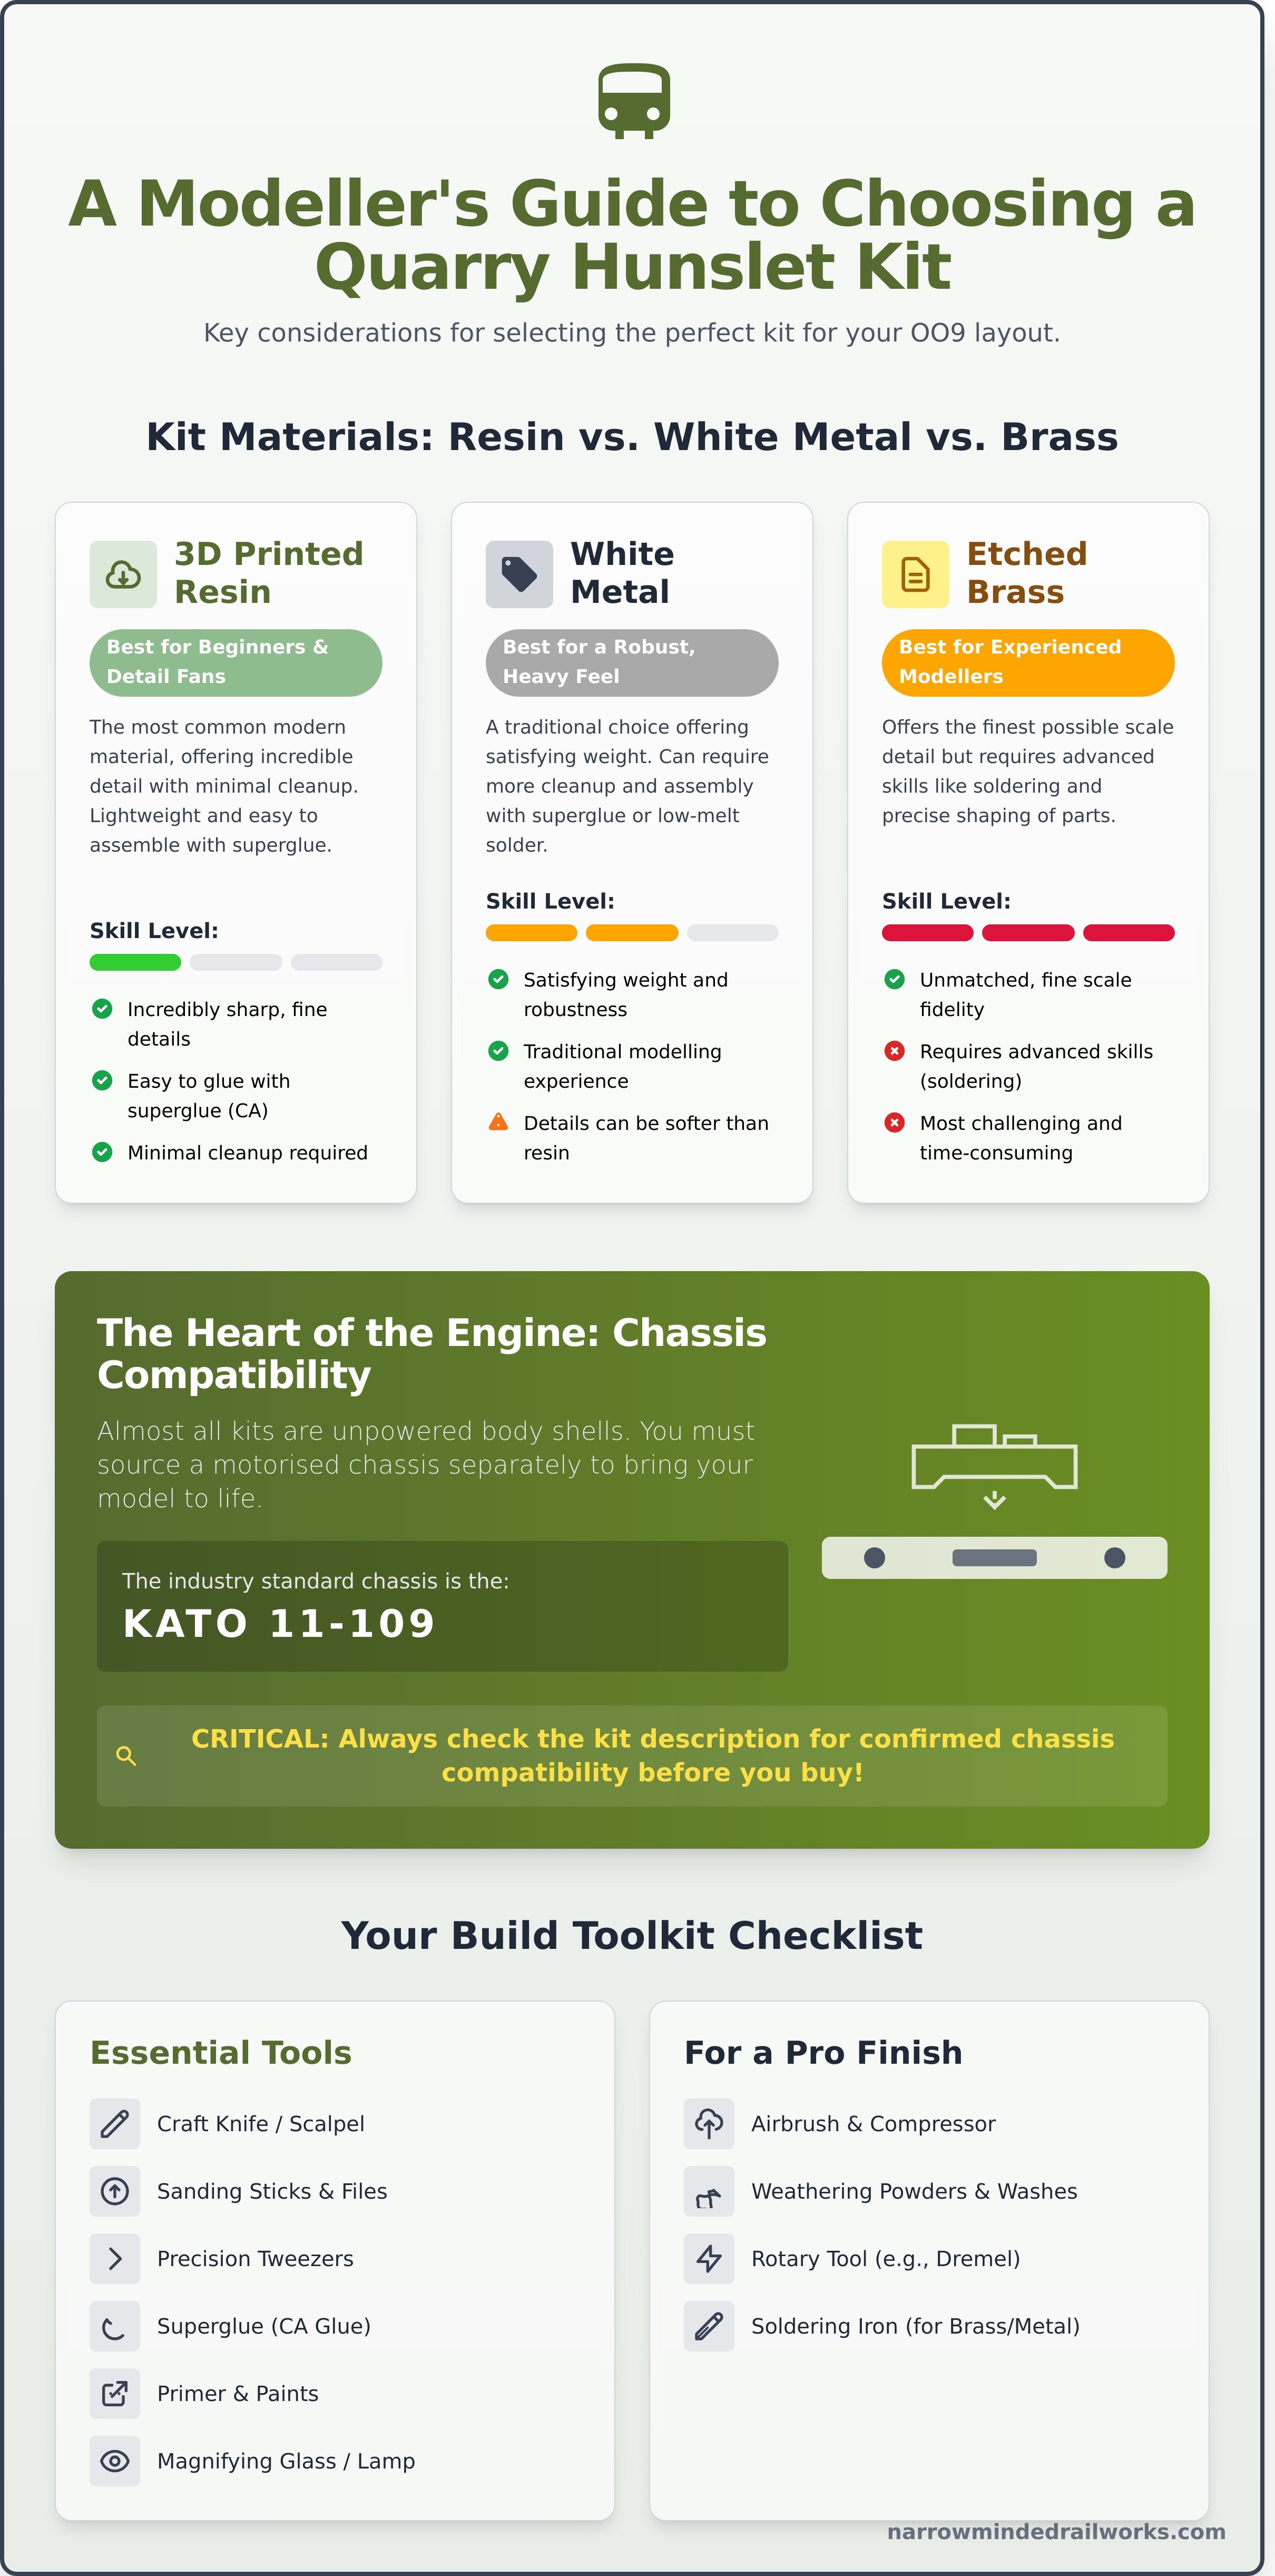
Kit Materials: 3D Resin vs. White Metal vs. Brass
Modern kits are typically offered in one of three materials, each with distinct characteristics:
- 3D Printed Resin: This is the most common material for modern, high-detail kits. Advances in 3D printing technology allow for incredibly sharp and intricate details, such as rivet heads and panel lines, that were once only possible with etched brass. Resin is lightweight, easy to glue with superglue, and requires minimal cleanup, making it an excellent choice for modellers of all skill levels, especially beginners.
- White Metal: A traditional choice, white metal kits provide satisfying weight and robustness. However, the casting process can sometimes result in softer details compared to modern resin. Assembly requires either superglue or low-melt solder, which can be a new skill to learn.
- Etched Brass: Offering the finest scale detail, brass kits are aimed at experienced modellers. They require advanced skills like soldering and careful shaping of parts. While the results can be stunning, they are the most challenging to build.
Chassis Compatibility: The KATO 11-109 Standard
It's crucial to understand that almost every quarry hunslet kit is sold as an unpowered body shell. You will need to source a motorised chassis separately to bring your locomotive to life. The industry standard for 009 scale models of this size is the Japanese-made KATO 11-109 (or its predecessor, the 11-103). This chassis is favoured for its compact size, smooth performance, and reliability. Most kits are specifically designed to be a simple 'clip-on' or screw-fit onto this chassis, making motorisation a quick and easy process. You can find the KATO chassis at most specialist UK model railway shops or online, typically costing around £25-£35.
Detail and Accuracy
The quality of a model is defined by its details. When examining a kit, look for crisp, well-defined features. Are the rivet patterns sharp? Are delicate parts like the chimney, safety valves, and handrails supplied as separate components for added realism? The best kits are designed with careful reference to historical plans and photographs, many of which are preserved by institutions like the National Railway Museum, ensuring an authentic final model. These fine details are what transform a simple kit into a standout piece on your layout. For a perfect example of what to look for, view our highly detailed Quarry Hunslet Kit and see the difference quality makes.
Essential Tools and Materials for Your Build
Before you begin assembling your new quarry hunslet kit, gathering the right tools and materials is crucial for a smooth and rewarding build. A little preparation ensures you won't be scrambling for a specific file or the correct glue mid-assembly. This checklist covers everything you'll need, from basic tools to the essential running gear.
The Basic Toolkit for Kit Assembly
Most experienced modellers will have these items, but it's always worth checking your supplies. For the best results, ensure your tools are clean and in good condition.
- A Sharp Craft Knife: A scalpel with a fresh No. 10A or 11 blade is perfect for carefully removing parts from the printing supports and cleaning up flash.
- Fine-Tipped Tweezers: Essential for handling and positioning the many small, delicate parts included in the kit.
- Needle Files & Sandpaper: A set of fine needle files and some wet-and-dry sandpaper (800-1200 grit) will help you achieve a perfectly smooth finish on mating surfaces.
- Pin Vice: A small hand drill used for clearing out or creating holes for handrails and other fine details.
Glues, Primers, and Paints
The materials you use to join and finish your model are just as important as the tools. Unlike polystyrene kits, resin requires a specific type of adhesive. Standard plastic cement will not work.
For resin, you must use superglue (cyanoacrylate or CA glue). A medium viscosity glue offers a good balance of setting time and gap-filling properties. For finishing, a high-quality model primer is non-negotiable. It creates a uniform surface and ensures your paint adheres properly to the resin. When it comes to paint, the choice between acrylics (water-based, easy cleanup) and enamels (durable, solvent-based) is a personal preference, with both yielding excellent results.
Sourcing Your Chassis and Couplers
It is important to remember that this quarry hunslet kit is a static body kit. To get it running on your OO9 layout, you will need to source a few key components separately.
- Chassis: The body is designed to fit the reliable and widely available KATO 11-109 chassis. This can be purchased from most UK model railway retailers that stock N-gauge products.
- Couplers: You will also need a pair of OO9 scale couplers. Popular choices include Greenwich-style couplings, which are discreet and effective. For advice on coupler standards and compatibility, resources from The 009 Society are invaluable for ensuring your new locomotive runs smoothly with existing rolling stock.
Step-by-Step Assembly Guide: From Box to Running Loco
Bringing your quarry hunslet kit to life is a deeply rewarding process that transforms a collection of parts into a detailed, characterful locomotive. While every kit has its nuances, the core assembly process follows a logical path. This guide provides a high-level overview to ensure you achieve a professional finish, moving from initial preparation to a model that's ready for the rails. Patience and careful work at each stage are the keys to success.
Preparation: Washing and Removing Supports
Before any glue is opened, proper preparation of the 3D-printed parts is essential. This first step ensures that paint and adhesives will bond correctly for a durable, clean finish. Taking the time to do this properly will prevent issues later on.
- Wash Thoroughly: Gently wash all parts in warm, soapy water with a soft brush to remove any residual release agent from the printing process. Rinse well and allow them to air dry completely.
- Remove Supports: Carefully snip away any remaining print supports using a sharp craft knife or a pair of fine modellers' clippers. Work slowly to avoid damaging the delicate details.
- Smooth Finish: Lightly sand any rough areas or support marks with a fine-grit sanding stick or paper. This creates a perfectly smooth surface, which is crucial for an even paint application.
Main Body Construction
With your parts prepped, the main construction can begin. The golden rule here is to 'dry fit' every component before applying adhesive. This means test-fitting parts together without glue to check their alignment and understand how they interact. This simple check prevents misaligned components that are difficult to correct once bonded.
Start by assembling the largest structural elements, such as the footplate, boiler, and water tanks, as these form the core of the locomotive. Once you are confident with the fit, apply a quality plastic cement sparingly. Follow the kit's instructions closely when constructing the cab, as this often involves several smaller parts that must be aligned precisely.
Fitting the Body and Adding Details
This is the stage where your model truly begins to look like a locomotive. Carefully test fit the completed body shell onto your chosen chassis. It should sit level and securely without any rocking. If the fit is too tight, you may need to make minor adjustments by gently filing away a small amount of material from the inside of the body. Once satisfied, you can move on to the final, delicate details. Use tweezers to carefully place and glue smaller items like handrails, whistles, and pipework. These finishing touches are what give your model its unique character and realism.
Ready to start your next build? Get your Quarry Hunslet Kit today!
Bringing Your Hunslet to Life: Painting and Weathering
This is where the real magic happens. While assembly creates the form, the painting and weathering stages breathe character and soul into your model. A well-finished locomotive is the focal point of any layout, transforming from a collection of parts into a miniature machine with a tangible history. This final step is your opportunity to make the model uniquely yours.
Priming and Basecoating
Before applying any colour, a quality primer is essential. It creates a uniform surface for the paint to adhere to, ensuring a smooth and durable finish. Using a rattle can or airbrush, apply a light, even coat, taking care not to obscure fine details like rivets or pipework. It is crucial to let the primer cure fully-often for 24 hours-before applying your main colours in several thin, even layers for the best result.
Choosing a Livery: Authentic vs. Freelance
Deciding on a colour scheme is one of the most enjoyable parts of finishing your quarry hunslet kit. For historical accuracy, research the liveries of famous Welsh quarries like Penrhyn or Dinorwic, which often featured distinctive deep greens, rich maroons, or lined black. Alternatively, a freelance scheme gives you the creative freedom to develop a unique identity that perfectly matches your own model railway. Once painted, high-quality decals for lettering, lining, and builder's plates provide that sharp, professional touch.
A Beginner's Guide to Weathering
A pristine locomotive looks smart, but a weathered one tells a story of hard work in a tough environment. Don't be intimidated; even simple techniques can produce stunning results and add incredible realism to your finished quarry hunslet kit.
- Simple Washes: Apply a thinned-down dark paint (a black or grimy brown "wash") over the model. It will naturally settle into panel lines and around rivets, instantly making the details pop.
- Dry Brushing: Dip an old, flat brush in a lighter colour (like gunmetal or a faded version of your base coat), wipe most of the paint off on a paper towel, and then gently brush it over raised details to simulate wear and highlights.
- Realistic Effects: Use specialist weathering powders or paints to add subtle rust streaks from water tanks, coal dust around the bunker, and an oily sheen to the motion and chassis.
Finally, consider adding crew figures in the cab and a load of realistic coal in the bunker. These small details complete the scene and turn a great model into an exceptional one. For a full range of paints, weathering products, and detailing accessories, visit Narrow Minded Railworks.
From Kit to Classic: Your Quarry Hunslet Journey Starts Here
You've now walked through the entire process, from selecting the right components to applying those final, characterful touches of paint and weathering. This guide has shown that with the right tools and a little patience, assembling your own quarry hunslet kit is an incredibly rewarding experience, transforming a box of parts into a miniature masterpiece for your OO9 layout. The real magic lies in creating a locomotive that is uniquely yours.
Ready to start your build? Our kits provide the perfect foundation. Each model is crafted from high-resolution 3D printed resin for maximum detail, designed and produced by passionate modellers here in the UK. Engineered to perfectly fit the popular KATO 11-109 chassis, you're guaranteed a superb runner. Explore our range of OO9 Quarry Hunslet Kits here.
Happy modelling, and we can't wait to see the stunning locomotive you create!
Frequently Asked Questions
What scale is a Quarry Hunslet kit?
Our Quarry Hunslet kits are designed for OO9 scale. This popular narrow gauge scale represents 2-foot gauge prototypes running on 9mm gauge track, the same as N gauge. This allows you to model Britain's iconic industrial and slate quarry railways in a compact space. The 4mm:1ft scale body on 9mm track accurately captures the characterful proportions of these diminutive locomotives, making them a perfect fit for a small layout or diorama.
Do I need to buy a motor and wheels separately for this kit?
Yes, you will need to source a chassis separately. These kits are designed as a body shell that fits onto a specific, readily available ready-to-run chassis. For most of our Hunslet kits, we recommend the KATO 11-105, 11-106, or 11-107 chassis. This provides a reliable and smooth-running mechanism with the motor, gears, and wheels all included. Sourcing the chassis separately allows modellers to choose their preferred power unit.
Is a 3D printed resin kit difficult to build for a beginner?
A 3D printed resin quarry hunslet kit can be an excellent project for a modeller with some experience, but a complete beginner might find it a gentle challenge. The main skills required are cleaning support marks and using superglue, which differs from traditional plastic kits. We recommend starting with a simple wagon kit to get a feel for the material. With patience and care, even a first-timer can achieve a fantastic result and build a truly unique model.
What is the best glue to use for a resin model kit?
The best adhesive for resin kits is cyanoacrylate, commonly known as superglue. We recommend having two types on hand: a thin, watery superglue that wicks into joints for a strong bond, and a thicker, gap-filling gel version for areas that may not fit perfectly. Using a cyanoacrylate accelerator or 'kicker' can also be helpful to create an instant bond, but use it sparingly as it can sometimes make the join brittle.
How do I remove the support marks from a 3D print?
To remove support marks, first carefully snip the supports close to the model's surface using a sharp pair of flush-cutters. Then, use a new, sharp scalpel or craft knife blade to gently shave the remaining nub flat. Finish by lightly sanding the area smooth with a fine-grit sanding stick or paper (around 800-1200 grit). Always work slowly and carefully to avoid removing any of the model's fine surface detail during this process.
Can I fit DCC (Digital Command Control) to the KATO chassis?
Yes, fitting DCC to the recommended KATO chassis is possible, but it is an advanced task due to the very limited space. You will need a 'nano' or 'micro' sized decoder, such as the Zimo MX616. The installation requires carefully dismantling the chassis, precise soldering of very fine wires directly to the motor contacts and power pickups, and insulating everything to prevent short circuits. This conversion is best attempted by modellers confident with fine electronics work.