

The secret to a perfect solder joint isn't actually how much heat you apply; it is almost entirely about the chemistry and preparation you do before the iron even touches the metal. Many modelers understandably fear that a single slip will melt a 3D printed component or ruin a delicate white metal wagon kit. While these risks are real, following a structured soldering for model railways guide transforms a stressful chore into a rewarding skill. You likely want reliable electrical connections for your locomotives and strong structural joints for your brass kits, yet the confusion over flux types and the July 21, 2026, RoHS lead-free transition often creates hesitation.
We recognize that selecting the right equipment, such as the $26 Pinecil V2 or a $19 Excel 90004 kit, can be confusing when you are focused on the task at hand. This guide provides a proactive solution by detailing the essential techniques, modern tools, and safety protocols you need to solder without fear. We will explore how to achieve "wet" joints that last, which lead-free alloys actually work, and the specific steps to prepare your OO9 or 7mm scale kits for a professional finish. While the July 21, 2026, RoHS lead ban presents a significant shift for the hobby, mastering these new materials ensures your locomotive and wagon kits are assembled with permanent, reliable connections.
Key Takeaways
- Discover how this soldering for model railways guide helps you move beyond unreliable wiring to achieve permanent electrical conductivity across your layout.
- Learn to select the appropriate equipment for your workbench, ranging from fine needle points for wiring to chisel tips for large brass components.
- Understand the critical distinction between high-heat track soldering and the delicate heat management required for structural OO9 or GN15 wagon kits.
- Master the "cleanliness first" rule to prevent messy dry joints and ensure your solder flows correctly across brass, white metal, or nickel silver.
- Gain the confidence to attach metal details to 3D printed resin locomotive bodies without compromising the integrity of the model.
Why Soldering is an Essential Skill for the Modern Modeller
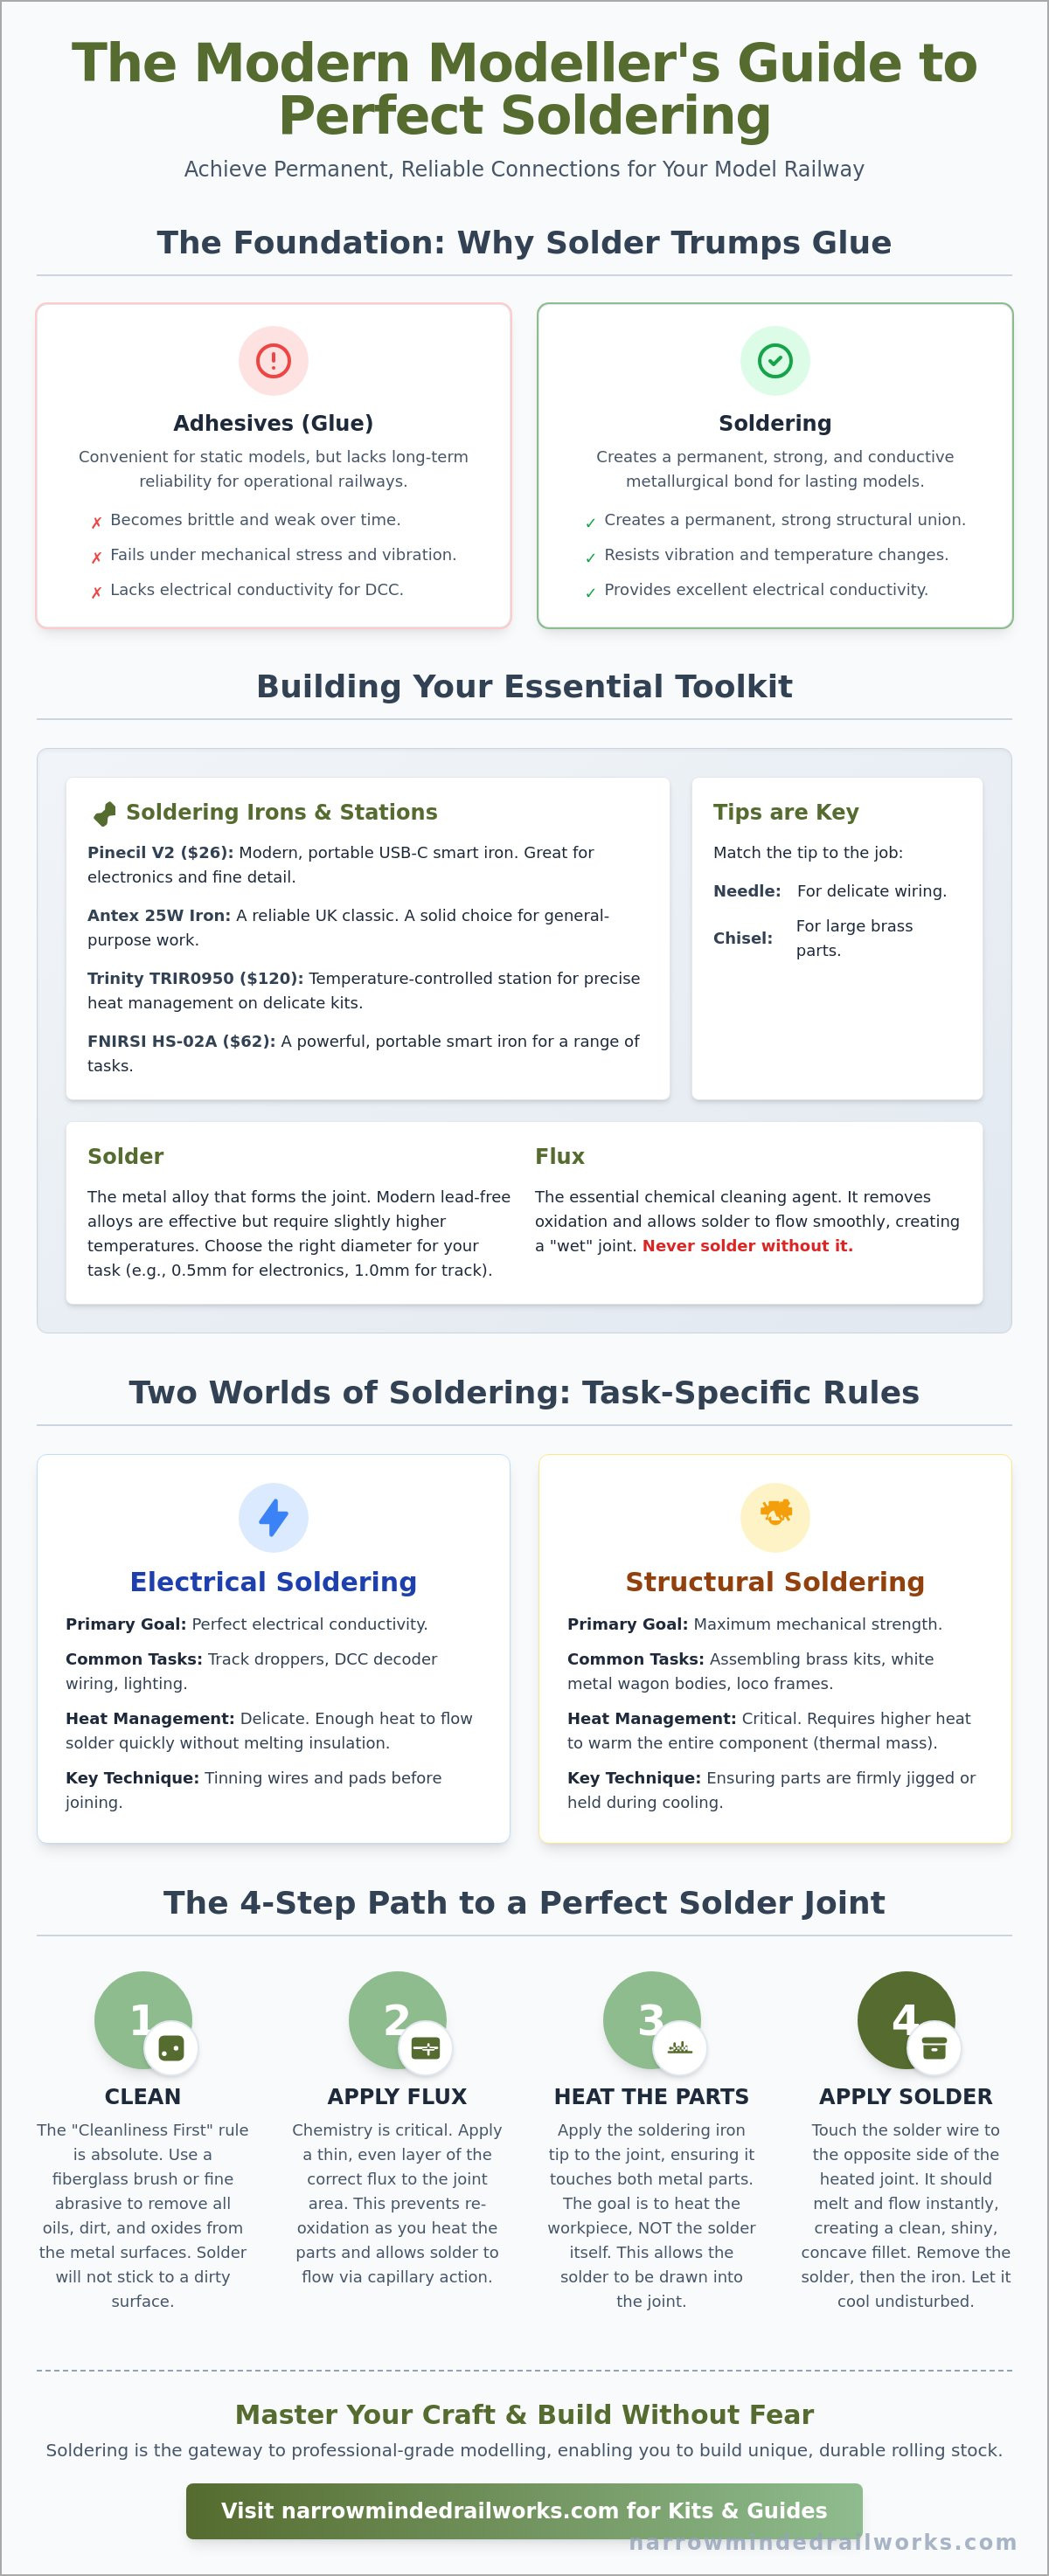
Adhesives are a common starting point for many hobbyists, yet they often struggle with the mechanical stresses of a moving railway. While cyanoacrylate (superglue) is convenient for static dioramas, it lacks the structural integrity required for metal-based locomotive frames or wagon kits. Mastering the fundamentals of soldering is the most effective way to ensure your models don't fall apart during a heavy operating session. This soldering for model railways guide highlights how heat-based bonding creates a permanent union that resists the natural expansion and contraction caused by seasonal temperature changes in your hobby room. It's a proactive solution for any builder looking to move beyond the limitations of basic assembly.
To better understand how these connections work in a practical layout setting, watch this helpful video:
The "Glue vs. Solder" Debate in Kit Building
Adhesives can become brittle over time. When you are assembling O-16.5 or 7mm scale kits, the weight and vibration of the locomotive require a bond that won't snap under pressure. Soldering allows you to use low-melt alloys on white metal or standard lead-free solder on brass; this technique provides a significant weight advantage. A soldered brass kit feels more substantial and tracks better than a glued plastic equivalent. It's the difference between a model that lasts a single season and one that remains a family heirloom for decades. For those building OO9 or GN15 wagon kits, the structural strength of a soldered joint is simply unmatched by modern glues.
Electrical Continuity and the DCC Revolution
Digital layouts require a constant, clean signal to communicate with locomotive decoders. A "twist and tape" connection or a loose rail joiner creates electrical resistance, which leads to the "stuttering" effect that ruins the realism of your layout. Soldering track droppers is the gold standard for permanent layouts because it eliminates the intermittent power loss that plagues many home-built circuits. While you should check with your specific digital system provider for wiring requirements, a well-soldered joint remains the most reliable way to ensure consistent power delivery. This soldering for model railways guide emphasizes that reliability starts at the joint, not the control box.
Moving from ready-to-run models to bespoke kit building opens a new world of narrow gauge modeling. You gain the ability to create unique rolling stock and locomotives that aren't available in standard shops. This transition requires a shift in mindset, but once you trust your iron, you won't look back. Soldering is not just a technical requirement; it's the gateway to professional-grade modelling.
Building Your Soldering Toolkit: The Essential Equipment
Selecting the right tools can feel overwhelming when you are faced with dozens of technical specifications. While a basic iron might suffice for simple track repairs, a modern toolkit provides the precision needed for complex kit assembly. This soldering for model railways guide identifies the specific gear required to handle both delicate electronics and heavy brass frames. Investing in a temperature-controlled station, such as the Trinity/Epic TRIR0950 ($119.99) or the portable FNIRSI HS-02A ($62.00), allows you to adjust heat based on the thermal mass of your model. If you are just starting, a complete beginner's guide to soldering helps demystify the initial setup process, ensuring you don't overheat sensitive parts.
Irons and Stations: What to Buy in 2026
The classic 25W Antex iron remains a staple for many UK modellers because of its reliability. However, modern smart irons like the $26 Pinecil V2 offer USB-C portability and rapid heating that older models cannot match. While fixed-wattage irons are affordable, they lack the flexibility to drop temperature when working near plastic components. You must also prioritize bit maintenance. Modern bits are iron-plated; you should never file them, as this destroys the coating and ruins the heat transfer. Instead, use brass wool or a damp sponge to keep the tip bright. Once your workbench is equipped, you can confidently explore specialized diorama tools and scenery to enhance your layout.
Flux and Solder: The Chemistry of a Good Joint
Effective soldering depends more on chemistry than raw heat. As of July 21, 2026, the RoHS directive has strictly limited lead in electronics, making lead-free solder the industry standard. Options like the Chicago Electric lead-free rosin core ($5.99) or Windy Nation lead-free solder ($29.99) are now highly effective. While lead-free alloys have a higher melting point, the right flux compensates for this. Use phosphoric acid-based flux for brass and nickel silver kits to bite through oxides. For electrical work, stick to non-acidic rosin-based gels to prevent long-term corrosion. This soldering for model railways guide suggests keeping these essentials on hand:
- Solder Alloys: Lead-free rosin core for wiring; low-melt 70-degree solder for white metal kits.
- Flux Types: Liquid acid flux for structural brass; flux pens for delicate electronics.
- Cleaning Supplies: Tip tinner to restore oxidized bits; 99% isopropyl alcohol for removing flux residue.
Choosing the correct bit shape also impacts your success. Fine needle points are excellent for decoder pins, but they struggle to transfer heat to large rails. Chisel tips provide a larger surface area, making them the superior choice for track droppers and kit chassis. By matching your tip and flux to the specific metal, you ensure a strong, professional bond every time.
Electrical vs. Structural Soldering: Different Tasks, Different Rules
Many modellers treat every joint the same, yet wiring a rail requires a completely different technical approach than assembling a brass locomotive frame. This soldering for model railways guide clarifies how to adjust your technique based on the thermal mass and material of your components. While electrical work focuses on conductivity and speed, structural soldering prioritizes mechanical strength and heat management. Understanding these differences is a proactive solution for anyone who has ever accidentally melted a plastic sleeper or watched a brass kit fall apart under its own weight. Successful results depend on matching your iron temperature and solder type to the specific task at hand.
Mastering Track Wiring and Droppers
Wiring droppers to your track is a high-heat, fast-application task. While nickel silver rails are excellent conductors, the plastic sleepers they sit on are incredibly vulnerable to heat soak. Pre-tinning is the essential step here. You should apply a small amount of solder to both the wire and the side of the rail separately before attempting to join them. This allows you to create the final bond in under two seconds, which protects the plastic from melting. If you find the heat is still traveling too far, using a heat sink like a wet cotton wool bud or a metal clip provides a proactive solution to localized warping. For a professional finish, solder your droppers to the underside or the outside face of the rail to keep the joint hidden from view once ballasted.
Structural Soldering for Brass and White Metal Kits
Assembling OO9 or O-16.5 / 7mm scale kits introduces the challenge of heat soak. Brass components act as a giant radiator, pulling heat away from the joint faster than a small iron can supply it. While a standard 25W iron works for wiring, you may need a higher wattage or a temperature-controlled station set to 380°C for large brass chassis. Utilizing 145-degree solder for the main framework provides a strong bond that won't fail during operation. When working with white metal, the stakes are higher because the melting point of the casting is often close to the melting point of the solder. Incorporating essential soldering tips and tricks, such as using 70-degree low-melt solder and a dedicated low-temperature iron setting, prevents your locomotive from turning into a puddle of molten metal.
Precision is also vital when dealing with modern electronics. While we don't sell digital systems, many modellers choose to install decoders into their kits. This work requires anti-static precautions and a very fine needle-point tip to avoid bridging small pins. Regardless of the task, always clean your work afterward. Acid-based fluxes used for brass kits will cause green corrosion over time if they aren't neutralized with a thorough wash in warm, soapy water. By following these distinct rules for electrical and structural tasks, you ensure your models are both electrically reliable and physically robust.
Step-by-Step: How to Make the Perfect Solder Joint
Successful soldering relies on a sequence of precise actions rather than brute force. While many modellers attempt to fix parts together with a large blob of metal, this soldering for model railways guide emphasizes that the strongest bonds use the least amount of solder possible. Achieving a professional finish requires you to manage the surface chemistry and the physical stability of the parts before the iron even leaves its stand. If you follow a structured method, you eliminate the guesswork that leads to failed joints or damaged kits.
The Preparation Phase
Oxidation is the primary enemy of a good joint. Even if a brass wagon kit looks shiny, microscopic oils and oxides will prevent the solder from "wetting" the surface. A proactive solution is to use a fibreglass scratch brush to polish the contact points until they are bright. Once the metal is clean, you must ensure mechanical security. Solder is an electrical and structural bond, not a substitute for a clamp. You should secure your parts using a "third hand" tool or simple wooden clothes pegs so the joint remains perfectly still during the cooling process. Applying flux exactly where you want the solder to flow acts as a guide; the solder will naturally follow the flux and avoid the areas you've left dry.
Executing the Joint
The "3-second rule" is a helpful benchmark for most model railway tasks. While it's tempting to hold the iron against the rail or kit for a long time, this often causes heat soak that damages nearby plastic. A proactive solution is to position your iron tip so it touches both parts of the joint simultaneously. This ensures even heating. Instead of feeding the solder onto the iron tip, feed it directly into the joint where the two metals meet. If the parts are sufficiently hot, the solder will melt instantly and flow into the gap. You must hold the joint completely still until the metal sets. In the post-July 2026 landscape of lead-free alloys, remember that a good joint may appear slightly duller than traditional 60/40 leaded solder, but it should still look smooth and uniform rather than "crumbly" or "bobbily."
- Bright and Smooth: Indicates a successful bond where the solder has flowed correctly.
- Dull and Granular: This "dry" joint suggests the parts moved during cooling or weren't hot enough.
- Excessive Blobs: Usually caused by using too much solder or failing to use enough flux.
Inspecting your work under a magnifying glass helps identify these issues before you move on to the next stage of assembly. For those building complex scenes or narrow gauge layouts, having the right diorama tools and scenery ensures your soldered structures fit perfectly into their final environment. By mastering these steps, you transform soldering from a source of anxiety into a reliable part of your modelling toolkit.
Soldering for Narrow Gauge and 3D Printed Kits
Modern narrow gauge modelling frequently combines traditional metal kits with 3D printed resin components. This hybrid approach presents a challenge because resin does not dissipate heat like brass; it can deform or crack if an iron remains in contact for too long. This soldering for model railways guide provides proactive solutions for these mixed-material projects, ensuring your builds remain structurally sound. Whether you are adding weight to small OO9 wagons or attaching fine details to a locomotive, success depends on using the lowest effective temperature and specialized alloys. By mastering these techniques, you can confidently integrate metal handrails and couplings into your latest prints.
Soldering Near 3D Printed Parts
Resin is sensitive to thermal shock. While you cannot solder directly to resin, you will often need to attach metal details or electrical pickups nearby. A proactive solution for protecting these parts is the "wet tissue" trick; wrap a damp piece of kitchen roll around the resin body to act as a localized heat sink. Utilizing 70-degree low-melt solder is a lifesaver here, as it flows well below the deformation point of most 3D resins. Before you begin painting 3d printed models, ensure all metal add-ons are securely joined and the flux residue is neutralized. This preparation prevents the paint from bubbling or peeling due to trapped chemicals.
Narrow Gauge Specific Challenges
The compact nature of OO9 and O-16.5 / 7mm scale kits requires working in extremely tight spaces. When you are getting started in gn15 scale layouts, you'll find that industrial locomotive interiors leave little room for error. A proactive solution is to use a 0.5mm needle tip for your iron, which allows you to reach deep into a chassis without scorching the exterior. This precision is vital for creating robust handrails and couplings that can withstand the rigors of an industrial narrow gauge railway. A final check of every joint ensures your fleet is electrically "bulletproof," preventing the stalling issues that often plague smaller, lighter models.
Empowering Your Narrow Gauge Workshop
Mastering the art of the iron is a transformative step for any hobbyist. While the July 21, 2026, RoHS transition and the complexities of hybrid 3D printed kits may seem daunting, following a structured soldering for model railways guide provides a proactive solution for your workshop. You now understand that successful joints rely on precise chemistry, proper tool selection, and disciplined heat management. These skills ensure your locomotives run smoothly and your structural kits remain robust for decades.
We recognize that finding high-quality projects to apply these new skills is essential. Our specialist OO9 and GN15 kits are designed by modellers for modellers to ensure every component meets professional standards. We provide worldwide shipping to support your layout wherever you are located. Browse our range of narrow gauge locomotive and wagon kits today to select your next project. With the right techniques and a steady hand, you'll find that no kit is too complex to tackle. Happy building!
Frequently Asked Questions
What is the best wattage for a model railway soldering iron?
A 25W to 40W iron is sufficient for most tasks, although fixed wattage can be limiting for larger projects. A proactive solution is to invest in a temperature-controlled station or a smart iron like the $26 Pinecil V2. These tools allow you to increase the heat for heavy track or decrease it for delicate wiring. This soldering for model railways guide recommends adjustable power to ensure you have enough thermal mass for large brass kits without overheating smaller components.
Can I solder white metal kits with a standard soldering iron?
You should never use a standard soldering iron on white metal as it will melt the casting instantly. A proactive solution is to use 70-degree low-melt solder with an iron set to a very low temperature, typically below 200°C. Many OO9 and GN15 kits contain white metal parts that require this delicate touch. You should always test the temperature on a piece of scrap sprue before touching the actual model to ensure the heat is manageable.
Do I need to use flux if my solder already has a resin core?
Yes, you should use additional flux for the majority of model railway applications. While resin-cored solder is sufficient for basic electronics, it often fails to clean the oxidation found on nickel silver rails or brass kits. A proactive solution is to apply a separate liquid or gel flux to the joint before heating. This ensures the solder flows instantly into the gap, creating a reliable bond that is essential for long-term layout stability.
How do I prevent plastic sleepers from melting when soldering track?
You can prevent melting by pre-tinning your components and using heat sinks to draw away excess heat. Plastic sleepers deform quickly when an iron is held against the rail for more than a few seconds. A proactive solution is to apply solder to the rail and the wire separately before joining them. This technique, highlighted in our soldering for model railways guide, allows you to complete the final connection in under two seconds to protect the plastic.
Is lead-free solder better than leaded solder for model railways?
Lead-free solder is the modern standard and is required for compliance with regulations like the July 21, 2026, RoHS directive. While leaded solder has a lower melting point, a proactive solution is to adopt modern lead-free alloys like SAC305. These alternatives offer comparable performance when paired with the correct flux. Using lead-free materials is a safer choice for your health and ensures your layout complies with the 0.1% lead concentration limit set by law.
How do I fix a "dry" solder joint that keeps failing?
A dry joint is best fixed by removing the old solder and starting the joint again with fresh materials. Dry joints are often brittle and caused by insufficient heat or movement during cooling. A proactive solution is to remove the old solder using a desoldering pump or copper wick. Once the surfaces are clean, reapply fresh flux and heat the joint until the new solder flows smoothly. You must hold the parts still until the solder sets.
What is the best way to clean my soldering iron tip?
The most effective way to clean your iron is using a brass wire wool cleaner. While a damp sponge is a traditional choice, it can cause thermal shock and lower the tip temperature unnecessarily. A proactive solution is to dip the hot tip into brass wool to remove oxides without cooling the metal. You should also "tin" the tip with a small amount of fresh solder immediately after cleaning to prevent the iron-plated surface from oxidizing again.
Is soldering fumes dangerous for indoor modelling?
Soldering fumes contain flux vapors that can be respiratory irritants if inhaled in a confined space. A proactive solution is to use a benchtop fume extractor with a carbon filter or to work near an open window with a fan. While lead-free solder removes lead vapor concerns, the rosin or acid in the flux still produces smoke when heated. Maintaining a well-ventilated workspace is a professional standard that ensures your modelling sessions remain safe and comfortable.