

What if the neatest finish starts with knowing what not to sand? Finishing 3d printed model railway kits can feel uncertain when rough areas, fine details and visible joins all seem to need different treatment. That caution is sensible: preparation that suits one print material or part may damage another.
A clean, convincing result comes from matching each step to the kit, rather than sanding or painting every surface the same way. With a methodical approach, you can reduce avoidable marks and rework while preserving the detail that gives a locomotive, wagon or scenery piece its character.
This guide takes you from the first inspection through preparation, assembly, priming, painting and final checks. You’ll learn what to look for, how to assess joins and rough areas, and why the kit’s guidance matters when choosing cleaning methods, adhesives and paint. Use the same practical sequence for narrow-gauge kits, adapting the details to the material and model in front of you.
Key Takeaways
- Inspect each part before work begins so you can spot surface issues and plan preparation without risking fine details.
- Dry-fit parts and check alignment before assembly, adapting each step to the locomotive, wagon or scenery kit.
- Choose cleaning, smoothing, adhesive and paint methods to suit the print material, and follow the specific kit instructions.
- For finishing 3d printed model railway kits, build up the finish in controlled stages and check the result before moving on.
- Some locomotive kits are designed to fit commercially available chassis, so keep the intended fit in mind during assembly.
What a Good Finish Means for 3D Printed Model Railway Kits
A good finish doesn’t mean removing every trace of how a part was made. The print process, material and kit design all influence the surface, so some texture may remain after careful work. Aim for a model that looks coherent at its intended viewing distance, with clean edges, secure joins and an even appearance that doesn’t obscure fine detail.
Preparation makes parts clean, sound and ready to assemble; the decorative finish gives the completed model its final colour and visual character. Keeping those stages distinct helps you spot what needs attention before paint makes a mark harder to assess. For finishing 3d printed model railway kits, a considered result matters more than sanding every surface to the same degree.
Inspect the printed parts before starting
Begin with the kit instructions and an inventory of the parts. Compare each piece with the guide before removing supports or making changes, and note any areas that may need careful fitting. Under good light, look for damage, warping, residue and roughness. This first check gives you a reference point and helps distinguish an existing issue from a finishing defect later.
Sort surfaces by function. Visible exterior panels on a locomotive body or wagon may need a more even appearance than hidden faces, while mating surfaces need to fit correctly for a sound join. Don’t treat every rough patch as something to remove: some features are intentional, and excessive alteration can soften edges or change how parts meet. Follow the kit instructions for handling and preparation.
Set a realistic finish for the model
Decide how the model will usually be seen. A locomotive running on a layout is often viewed from a distance, while a display model may invite closer inspection. Scale also affects what stands out: small surface irregularities can appear prominent under close lighting yet disappear at normal viewing distance. Aim for an even, convincing appearance rather than an unrealistically flawless surface.
The right target also depends on the kit and its intended use. Unevenness can be easy to spot on a wagon’s broad exterior panels, while scenery may benefit from texture that would look out of place on a smooth body. If you’re still deciding which OO9 project suits your experience and interests, the beginner’s guide to choosing an OO9 loco kit offers useful kit-selection context. Set your finish goal before work begins, then focus on the areas viewers will notice most.
Prepare and Assemble a 3D Printed Railway Kit Without Losing Detail
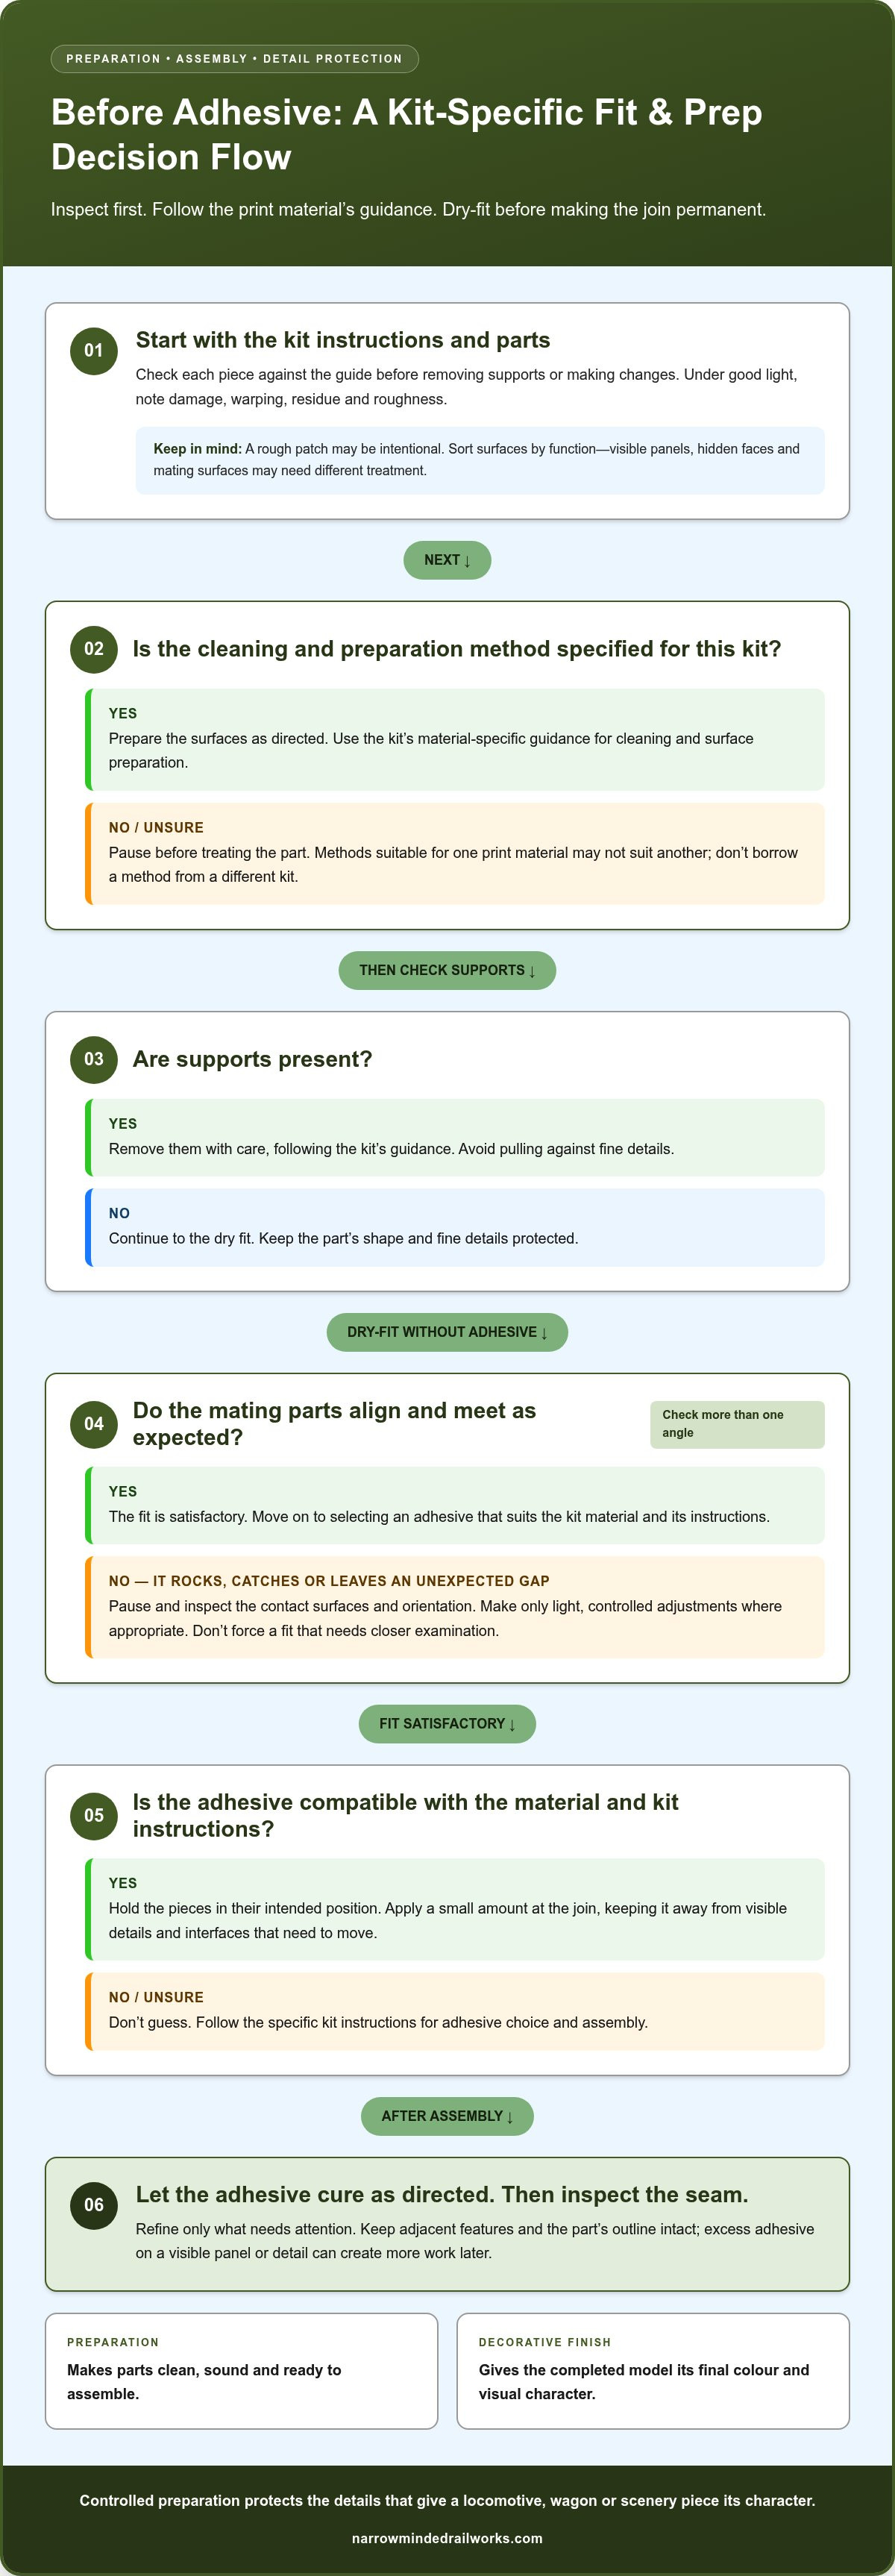
Good preparation is controlled, not aggressive. Before sanding or applying adhesive, establish how the parts are meant to fit and which surfaces should remain untouched. Follow the specific kit’s instructions for cleaning and preparation, since suitable methods can differ between print materials.
Test-fitting parts before using adhesive reveals alignment problems while they’re still easy to correct, reducing avoidable rework. Use this sequence to move from checking the parts to assembling them without rushing into permanent changes:
- Check the parts against the instructions. Confirm that the pieces are present and identify their positions before removing anything or trimming a feature. Note visible damage, warping, residue or rough patches so you can distinguish them from features that are part of the design.
- Prepare the surfaces as directed. Follow the kit’s material-specific instructions for cleaning and surface preparation. Avoid choosing a cleaner or treatment based on another kit’s material. An unsuitable method could affect the surface or complicate assembly.
- Handle supports carefully. If supports are present, remove them with care and avoid pulling against fine details. Follow the kit’s guidance, as support placement and removal needs can vary.
- Dry-fit the components. Bring mating parts together without adhesive and check their alignment, gaps and contact points. Look at the assembly from more than one angle, especially around a locomotive body or wagon where a slight mismatch can make a join conspicuous.
- Assemble and review the joins. Select an adhesive suited to the kit material and its instructions. Apply it sparingly, keeping it away from visible details and interfaces that need to move. Allow it to cure as directed, then inspect the seam.
Dry-fit parts and check alignment first
A dry fit is a diagnostic step, not a test of how much force a part can withstand. If a component rocks, catches or leaves an unexpected gap, pause and inspect the contact surfaces and orientation. Make only light, controlled adjustments where appropriate, preserving the part’s shape and fine detail. Don’t force a fit that needs closer examination.
Join parts and tidy visible seams
Once the fit is satisfactory, hold the pieces in their intended position and apply a small amount of compatible adhesive at the join. Excess adhesive can spread onto a visible panel or detail, creating more work later. After it cures, inspect the seam under good light. Refine only what needs attention, taking care not to flatten adjacent features or alter the outline.
A careful start makes finishing 3d printed model railway kits more predictable, whether you’re assembling a locomotive body, wagon or scenery piece. To choose a project to build, browse the narrow-gauge model railway kits.
Choose Surface Preparation and Finishing Materials for the Print
Choose materials by the job they need to do, not simply because they’re common in modelling. Cleaning removes unwanted residue; surface refinement addresses roughness; primer provides a base and can make flaws easier to see; paint or another suitable coating supplies the final appearance. These steps are related, but one product or method may not be appropriate for every stage.
Print materials respond differently to cleaning products, abrasives, primers and coatings. Start with the instructions supplied for the specific kit, then check product labels for material compatibility and application guidance. Don’t assume a method suitable for another model or print will behave the same way here. If a product is unfamiliar, test it on a small, inconspicuous area or spare piece and assess the result before applying it more widely.
- Cleaning: Use only a method compatible with the kit material and specified in its instructions.
- Smoothing: Refine only areas that need it, using an approach that won’t remove edges or surface detail.
- Priming: Select a compatible primer if the instructions and product guidance support its use.
- Coating: Check that the paint or finish is suitable for both the material and any primer beneath it.
This purpose-led approach helps avoid a common mistake: choosing a strong treatment to solve a minor surface issue, then creating a bigger problem. When finishing 3d printed model railway kits, a cautious test and a material-specific choice are more useful than assuming one preparation routine suits every locomotive, wagon or scenery part.
Match paint and primer to the kit material
Primer can help establish a consistent base, and its surface may make scratches, ridges or uneven joins easier to spot before colour is applied. It isn’t a substitute for suitable preparation, and an incompatible product may affect the finish. Check the kit instructions and the primer and paint labels for compatibility and use guidance. For application technique, the beginner’s guide to painting 3D printed models provides further context.
Decide how much surface refinement is appropriate
Light refinement may improve a noticeable rough patch, but aggressive sanding can flatten fine detail or change a part’s shape. The right level depends on the model’s intended role and viewing distance: a prominent locomotive body may invite closer inspection than a small feature viewed on a layout. Work gradually, checking the surface and edges often. Stop when further abrasion risks altering the part more than improving its appearance.
Make decisions part by part. A broad panel and a finely detailed fitting don’t need the same treatment, even if they belong to one assembly. If you’re unsure whether a mark is a surface flaw or an intentional feature, compare it with the kit instructions before removing material. That pause can preserve the character of the print and keep the finishing process under control.
Follow a Finishing Sequence from First Coat to Final Checks
A repeatable order keeps the work manageable and helps prevent one stage from undoing another. Treat the sequence as flexible: the kit material, design and instructions determine which products are suitable and whether primer is appropriate. When finishing 3d printed model railway kits, build up the result gradually and check each stage before moving on.
- Prepare: Make sure the assembled model is clean and ready for the products you plan to use, following the kit and product instructions.
- Test: Try an unfamiliar paint or coating on an inconspicuous area or spare piece. Check the result before applying it across visible surfaces.
- Prime if appropriate: Use a compatible primer when it suits the kit material and instructions. Let it dry or cure as directed, then inspect the surface for flaws.
- Apply the main colour: Work in controlled, thin coats rather than trying to cover everything at once. Allow each coat to dry as directed before adding another.
- Add details: Apply smaller colour details after the main finish is established, taking care around edges, fittings and areas that need to remain clear.
- Inspect: Check the complete model under good light and correct small defects before display or use.
Apply colour and details in a controlled order
Plan which areas will receive colour and which should remain unpainted, including fitting points and interfaces that need to stay clear. Thin, controlled coats can build an even appearance while helping preserve printed lines and small moulded features. Heavy application may soften detail or interfere with assembly. Follow each product manufacturer’s drying or curing instructions before handling the model or applying another layer. Decals and weathering are optional later steps; treat them as separate finishing techniques rather than rushing to add them.
Check the completed model before display or use
Inspect the finish from several angles. Look for missed patches, uneven coverage, visible joins and loose details. Check fitted parts and chassis interfaces for clearances and alignment, without forcing components into place. If you find a defect, repair it locally and with restraint to avoid damaging or covering the surrounding finish.
Final check: confirm coverage is even, joins look sound, details are secure and moving or fitting clearances remain unobstructed. This review is useful for a locomotive body, wagon or scenery piece, though the areas needing attention will differ with each design.
Ready to put the sequence into practice? Explore narrow-gauge model railway kits and choose a project for your next build.
Finish Narrow-Gauge Kits with a Repeatable, Kit-Specific Workflow
A consistent sequence gives you a useful starting point, but no two parts need exactly the same treatment. A locomotive body, wagon and scenery piece have different shapes, joining faces and viewing roles. Before applying preparation or finish, identify those features on each part and follow its kit instructions. This keeps the process repeatable without treating every surface as interchangeable.
Adapt the workflow to locomotive, wagon and scenery parts
On a locomotive body, protect openings, mating faces and chassis interfaces from excess primer or paint. Some kits are designed to fit commercially available chassis, so keep the intended interface clear and check the fit as directed by the kit instructions. A wagon may need particular care around its visible panels and joins, while scenery can suit a different level of surface refinement depending on its place on the layout.
Before work begins, sort each part into three practical areas: exposed surfaces, joining faces and delicate details. That quick assessment helps you focus effort where it matters. A surface visible at normal layout viewing distance may need a consistent finish, while a hidden face may only need to fit cleanly. Don’t apply the same level of sanding, coating or detail work automatically across the whole assembly.
Use the right next guide for the next finishing stage
Keep the main sequence manageable, then use dedicated guidance when you move into specialist techniques. Painting guidance can help with detailed colour choices and application; decal-setting and wagon-weathering methods are separate topics and are best handled in their dedicated guides. Keeping these stages distinct makes it easier to assess the underlying finish before adding markings or effects.
A short record can make the next build more predictable. Note the kit and material, preparation choices, products tested, areas that needed extra care and what you would change next time. Keep observations practical, such as whether a particular surface needed light refinement or a fitting area required extra protection. Treat each record as kit-specific rather than a universal recipe: materials and designs can differ, even across narrow-gauge projects.
This is especially useful if you build across OO9, GN15 or O-16.5 / 7mm scales. Your experience can guide the next project, but that kit’s instructions should still determine how to prepare and finish its parts. The aim of finishing 3d printed model railway kits is a reliable method that adapts to the model, not a single routine applied without thought.
For your next narrow-gauge project, explore the Narrow Minded Railworks narrow-gauge modelling range and choose a kit that suits the kind of build you want to tackle.
Make Your Next Narrow-Gauge Build Your Own
Every finished model gives you a chance to develop a personal approach to colour, surface texture and detail. Note the choices that suited your layout and the character you wanted to create, then use that experience to guide your next project. With finishing 3d printed model railway kits, a little reflection can help you build confidence and make each new model feel more considered.
Narrow Minded Railworks specialises in 3D-printed narrow-gauge locomotive, wagon and scenery kits, with modelling across OO9, GN15 and O-16.5 / 7mm scales. Choose a project that sparks an idea, then make the finishing decisions your own at a pace that suits your skills and intended result.
Explore Narrow Minded Railworks’ 3D-printed narrow-gauge kits and find inspiration for your next build. Start with the model that excites you most, and enjoy bringing it to life.
Frequently Asked Questions
Can I paint a 3D printed model railway kit without primer?
Yes, if the kit instructions and paint label indicate that direct application is suitable for the material. Primer can help create a consistent base, but it isn’t automatically required. For a small fitting or an area where you want to preserve subtle texture, test the intended paint system on an inconspicuous spot first. This lets you assess coverage and appearance before finishing 3d printed model railway kits more broadly.
How do I know which paint is suitable for a 3D printed kit?
Check the paint label for the surfaces it is intended for, then compare that guidance with the material and finishing instructions for your kit. Don’t rely only on a paint’s general suitability for models, as printed materials can differ. If the guidance allows, test a small area or spare part and let it dry fully. Look for unexpected changes such as tackiness, poor coverage or an unwanted surface appearance.
Is sanding always necessary before finishing a 3D printed model?
No. Sanding is only useful if a specific area needs refinement and the kit instructions allow it. A smooth part or deliberately textured scenery may need no abrasion at all. Inspect the surface under a light held at an angle to reveal ridges without removing material. If sanding near fine lettering, edges or small fittings could alter their shape, leave the area alone and consider whether the mark will be visible at normal viewing distance.
What happens if adhesive leaves a mark on a printed model?
An adhesive mark may remain visible beneath paint or affect the local surface, so don’t cover it before assessing what has happened. Let the adhesive cure for the period stated in its instructions, then examine the area in good light. Don’t try to remove the mark with an unverified solvent or vigorous sanding. If refinement seems necessary, work only on the affected spot and test any surface treatment first.
Can I use the same finishing process for locomotive, wagon and scenery kits?
Use the same broad planning approach, but adapt the work to each part. A locomotive body may have openings or interfaces that must remain unobstructed, while a wagon’s visible panels can draw attention to uneven colour. Scenery may need a different look, with surface texture playing a useful role. Check each component separately rather than assuming identical preparation or coating suits every piece.
How should I test a new paint or cleaning product on a model kit?
Choose a spare piece or a small, hidden area that represents the surface you plan to treat. Apply the product as its label directs, using the intended preparation and application method, then allow it to dry or cure fully. Check for changes in colour, texture, tackiness or surface detail before proceeding. A test on a different material may not predict how your specific kit will respond.
Do I need to seal a finished 3D printed railway model?
Not necessarily. A clear coat or other sealer is an additional finish, not a universal requirement. Consider it only if it suits the paint system, the kit instructions and how you expect to handle or display the model. A coating can change the sheen or soften small details if applied heavily. Check compatibility on a test area first, and follow the manufacturer’s guidance for application and curing.