

Creating realistic water effects on dioramas takes more than a clear pour. A glass-smooth pond, a shallow stream and a choppy shoreline need different materials and surface treatments, so start by matching the technique to the scene.
If you’re unsure whether to use epoxy, UV resin, a texture gel or a non-resin alternative, you’re not alone. The wrong choice, an unprepared base or oversized ripples can leave water cloudy, flat or out of scale. Careful planning helps you avoid those problems and build convincing depth, reflections and movement.
This guide explains how to choose a water-effect material, prepare and colour the bed, and apply the effect in controlled layers. You’ll also learn how to add ripples and flowing movement in proportion, finish the surrounding scenery, and take sensible precautions when working with resin. Whether you’re making still water or a lively stream, the aim is a finish that feels part of the miniature landscape.
Key Takeaways
- Judge realism by how colour, depth, reflections and texture work together under the scene’s lighting and from its intended viewing angle.
- Sketch the shoreline and decide on the water’s apparent depth and finish before selecting a material.
- Compare clear resin, acrylic gel, gloss medium and layered varnish by the scene they suit and the handling each requires.
- Follow the chosen product’s instructions and compatibility guidance at every stage to reduce the risk of uneven results.
- When creating realistic water effects on dioramas, identify whether a flaw comes from the surface or the underlying build before attempting a fix.
What Makes Diorama Water Look Realistic?
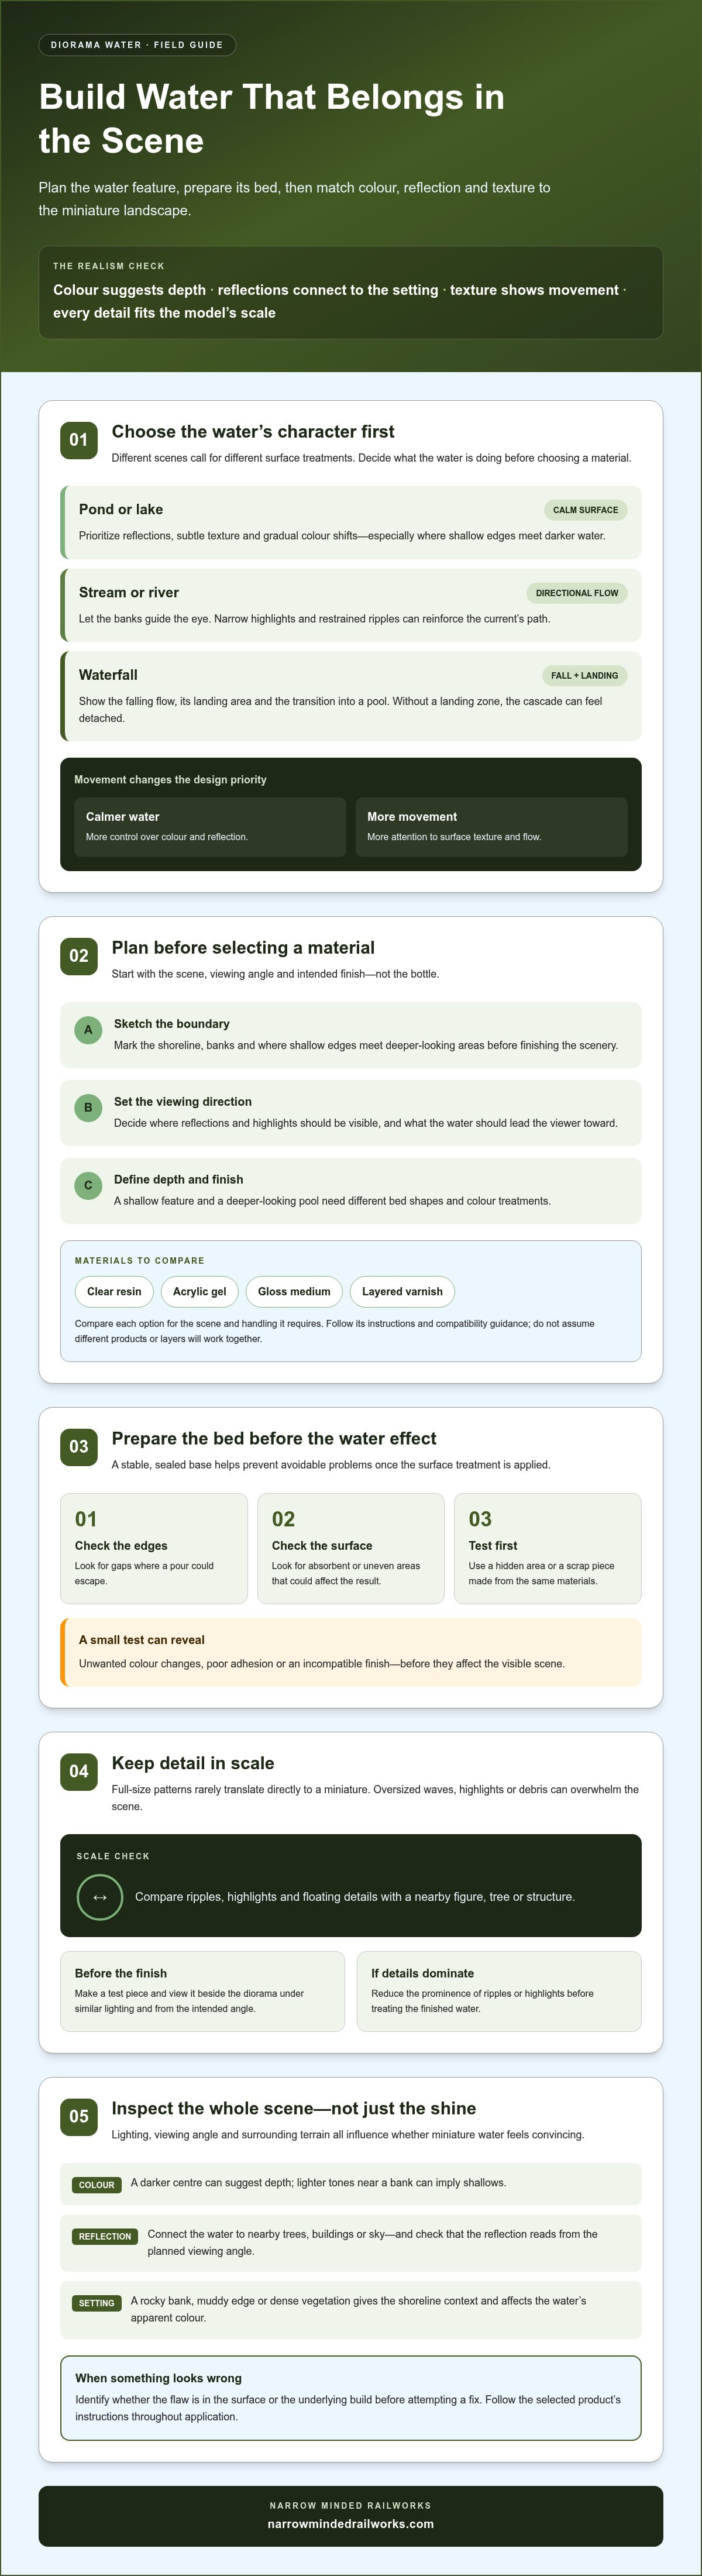
Convincing miniature water isn’t defined by gloss alone. It balances colour, depth cues, reflections and surface texture, with each element supporting the type of water in the scene. A darker centre can suggest depth, while lighter tones near a bank can imply shallows. Reflections connect the water to nearby trees, buildings or sky, and restrained texture signals whether the surface is still or moving.
Quotable rule: Miniature water looks convincing when colour suggests depth, reflections reflect the setting, texture suits the movement and every detail fits the model’s scale.
These cues change with viewing angle and lighting. A reflection that reads clearly from above may disappear from a low angle, while strong light can make a glossy surface look brighter than intended. The surrounding terrain matters too: a rocky bank, muddy edge or dense vegetation affects the water’s apparent colour and gives the shoreline context. For a broader introduction to what is a diorama, consider how the whole scene guides the viewer’s eye. Check the water from the angles at which the finished scene will be viewed.
How Still Water, Flowing Water, and Waterfalls Differ
Ponds and lakes usually need calm reflections, subtle surface texture and gradual colour shifts, especially where shallow edges meet darker water. Streams and rivers need directional cues: the banks guide the eye, narrow highlights suggest a current, and restrained ripples reinforce its path. A waterfall needs a visible falling flow, a landing area and a transition into a pool. Without that landing zone, the cascade can seem detached from the water below.
What Scale Changes in a Water Scene
Full-size water patterns rarely translate directly to a model. Large, sharp waves can overwhelm a small scene, so keep ripples and texture fine enough to suit its scale. Check highlights, floating debris and shoreline details against a nearby figure, tree or structure. A stone that looks small beside a real river may appear enormous beside a miniature person.
Before adding permanent surface detail, make a test piece and view it beside the diorama. Check it from the intended viewing angle and under similar lighting. If the ripples dominate the scene or the highlights look oversized, reduce their prominence before treating the finished water.
Plan the Diorama Water Before Choosing a Material
Start with the scene, not the bottle. Decide whether you’re building a pond, river, stream or waterfall, then set the water’s viewing angle, apparent depth and finish. A still pool viewed from above calls for a different plan from a stream leading the eye towards a bridge or a waterfall seen from the side. These choices affect the shape of the bed, the shoreline and the surface detail you’ll need.
Decision rule: The calmer the water, the more control you need over colour and reflection. The stronger the movement, the more important it is to plan surface texture and flow.
Choose the Water Feature and the Viewing Angle
Mark the main viewing direction before fixing details in place. Reflections and highlights change with the angle, so decide where they should be visible and what the water should lead the viewer towards. A stream might guide the eye between banks and under a crossing; a pond might draw attention to a feature on the shoreline. A sketch helps keep the water shape and surrounding scenery working together. For supporting guidance on terrain, colour and texture, consult the NMRA’s realistic scenery techniques.
Draw the water boundary and shoreline on your plan before constructing the base. This lets you adjust the outline, place banks and decide where shallow edges meet deeper areas before finishing the scenery. Consider the intended depth and final finish too: a shallow feature may need a different bed shape and colour treatment from a deeper-looking pool.
Prepare a Stable, Sealed Water Bed
Shape the bed and check its edges before adding any liquid material. Look for gaps where a pour could escape, absorbent surfaces that may take up material, and uneven areas that could leave the finished surface at an unintended level. Correcting these problems during construction is easier than addressing them after applying the water effect.
Use a small, hidden test area or a scrap piece made from the same materials to check how the surface responds. A test can reveal unwanted colour changes, poor adhesion or an incompatible finish before they affect the visible scene. Follow the chosen material’s instructions for preparation and application, and test compatibility rather than assuming different products or layers will work together.
Plan the surrounding ground as well as the water bed. Diorama tools and scenery can help with broader scene preparation, so you can explore diorama tools and scenery as you plan the build.
Which Diorama Water Materials and Techniques Suit Your Scene?
The right material depends on the effect you want, the shape of the water bed and the finish required. Clear resin, acrylic gel, gloss medium and layered varnish aren’t interchangeable: each behaves differently, and suitability depends on the specific product and its instructions. Use this comparison as a starting point, then check manufacturer guidance before applying anything to your model.
| Material category | May suit | Control and handling considerations |
|---|---|---|
| Clear resin | Some flat or deeper-looking water effects | Can create a clear, level surface when the product and base are suitable. Check pour limits, sealing, ventilation, protective equipment and curing instructions. |
| Acrylic gel | Ripples, small waves and shaped surface texture | Its thicker consistency may allow more control over surface form. Check how it applies, dries and interacts with any underlying layer. |
| Gloss medium | Glossy surface finishes and restrained texture | Useful as a surface treatment where compatible, but gloss alone won’t create convincing depth or colour. |
| Layered varnish | Building a reflective finish through successive coats | Offers a gradual approach, but layers and drying requirements depend on the product. Test for clarity and compatibility first. |
Materials for Flat Water, Ripples, and Flowing Water
A pourable clear material may suit a flat-water effect if the base is sealed, level and compatible with that product. Gel-like materials can be easier to shape into small waves or directional surface texture, though their appearance and handling vary. Gloss finishes can add reflections, but they don’t replace careful bed colouring or other depth cues. For a waterfall, consider how the material will form the falling section as well as the landing area and pool.
How to Choose Between Pouring and Building Up Layers
A single application may be appropriate where the product allows it and the intended effect is shallow and even. Thin layers give you more opportunities to check clarity, colour and embedded details as you build depth, but each stage still needs to follow product-specific instructions. A shallow stream, a deeper-looking pool and a waterfall may need different construction approaches. Don’t assume one method suits all three.
Before committing, test a small sample using the same base, colour and surface treatment planned for the scene. This helps reveal unexpected interactions and lets you judge the finish at viewing distance. Read the manufacturer’s guidance for compatibility, ventilation, protective measures and curing requirements, which vary by product. Careful material choice is central to creating realistic water effects on dioramas, but testing is the best way to check whether a particular product works for your build.
How to Create a Diorama Water Effect Step by Step
A convincing finish starts with preparing the bed before applying a clear surface. Work in stages, and don’t move on until the previous layer is ready according to the product instructions. This gives you a chance to catch leaks, uneven colour or unwanted texture before they become difficult to correct.
In brief: Plan the feature, seal and test the bed, build colour, apply compatible water layers, then add scale-appropriate surface detail.
- 1. Confirm the layout. Mark the water boundary, shoreline and intended viewing direction on the base. Check that the bed shape supports the pond, stream or other feature you planned.
- 2. Seal and inspect the bed. Close gaps, check the edges and make sure the base is stable. Test the seal and chosen water-effect material on a scrap piece made from compatible materials.
- 3. Add colour and depth cues. Paint the bed before applying the clear surface. Use gradual shifts rather than one uniform colour, and keep the shallow edges consistent with the nearby terrain.
- 4. Apply the water material. Follow the manufacturer’s instructions for preparation, compatibility, application and curing. If the product allows layered application, assess each layer before adding the next instead of assuming a particular timing or thickness will suit every project.
- 5. Create surface detail. Add ripples, highlights or directional texture only when the underlying finish is ready for them. Keep details restrained and in proportion to the scene.
- 6. Review before finishing. Check the effect from the intended viewing angle and under the lighting where the diorama will be displayed. Adjust surface details before placing final shoreline elements.
Build Colour and Depth Before Adding the Clear Surface
Think of the painted bed as the visual foundation, not a flat background. A pond might shift from lighter colour near a shallow margin to a darker centre, while a stream can show a subtle change along its channel. Keep the transition believable: abrupt colour bands or a sharp edge at the bank can make the water look painted on rather than integrated into the terrain.
If nearby scenery includes printed elements, painting 3D printed models offers related guidance for preparing their finish.
Add Surface Movement and Let the Finish Develop
Use small ripples to suggest a gentle current, and align them with the stream’s direction rather than scattering them randomly. For a waterfall, connect the falling section visually to its landing pool and onward stream. Check reflections and texture from the main viewing angle, follow the product’s guidance, and allow the finish to develop fully before adding delicate details. For suitable supplies, explore diorama tools and scenery.
Fix Common Diorama Water Problems and Finish the Scene
A flaw in finished water may come from the base, the application or the material itself, so diagnose it before adding another coat. Check the product instructions and your notes on preparation, mixing, application conditions and compatibility. The cause matters: a surface-level issue may be adjustable, while a problem within a cured layer could require product-specific guidance or rebuilding part of the effect.
Diagnose Cloudiness, Uneven Surfaces, and Unconvincing Colour
Cloudiness can relate to preparation, mixing, application or curing conditions, depending on the material. Review the manufacturer’s guidance before attempting a correction, and test any proposed remedy on a sample or inconspicuous area. If the surface is uneven, inspect the base and edges as well as the top layer. Adding more material may not address the underlying cause.
An overly glossy finish can make a scene look artificial, while a flat appearance may result from weak colour variation or missing reflections and surface detail. Check the effect from its intended viewing angle before changing the finish. Oversized ripples or highlights are often a scale issue: reduce or refine surface detail only if it can be altered safely. Don’t assume a coating or sanding method will work across different materials. If the defect is within the cured layer, consult the product guidance before deciding whether repair is possible or a rebuild is more appropriate.
When creating realistic water effects on dioramas, separate reversible surface details from deeper faults. Small additions to a compatible surface may be adjustable; trapped cloudiness, failed adhesion or a distorted base may need a more substantial fix. Test first, and avoid covering a problem until you understand its cause.
Add Shoreline Details Without Overcrowding the Water
Once the water effect is sound, use the banks to connect it to the wider scene. Rocks can define a rugged edge, vegetation can soften a pond margin, and a small amount of debris can suggest a setting. Choose details that fit the model’s scale and place them selectively. Too much material along the bank can hide reflections, interrupt the planned flow direction or make the water feature seem smaller than intended.
Step back and check that the shoreline leads naturally into the surrounding terrain. Leave open areas where the water’s surface needs to remain visible, particularly along a stream’s route or around a waterfall’s landing pool. A few well-placed features often establish context more clearly than a crowded edge.
When you’re ready to plan those supporting details, explore model railway scenery and diorama tools to find supplies for your wider miniature scene.
Bring Your Miniature Water Scene to Life
Convincing water takes more than a glossy finish. Plan the feature and viewing angle first, choose a material suited to the scene, then build colour, depth and surface detail in a controlled sequence. Testing a sample and checking the manufacturer’s guidance can help you avoid compatibility problems and make informed adjustments if the finish doesn’t look as intended.
Whether you’re modelling a still pond or a moving stream, creating realistic water effects on dioramas means balancing the water with its surroundings. Shoreline details should support the scene without overpowering reflections or movement. Assess the result from the intended viewing angle before adding final touches.
Narrow Minded Railworks designs model railway and scenery items for modellers, and offers diorama tools and scenery to support miniature projects. Explore model railway scenery and diorama tools as you plan the details around your water feature. With a suitable technique and patient preparation, you can create a water effect that feels at home in the scene.
Frequently Asked Questions
What is the best material for creating realistic water effects on dioramas?
There’s no single best material; choose according to the water feature and finish you want. A pourable clear resin may suit a flat or deeper-looking surface, while acrylic gel can help shape small ripples and waves. Gloss medium or layered varnish may add sheen, but won’t create depth on their own. Check product instructions and compatibility, then test your planned combination on a sample before applying it to the diorama.
How do you make water look deep in a diorama?
Suggest depth with the painted bed before adding a clear surface. Use gradual colour changes, such as lighter tones near a shallow bank and darker tones towards the centre, rather than one uniform colour. Add details such as stones or vegetation below the surface only if the chosen material can accommodate them. A clear finish can preserve the depth cues, but the base colour and water-bed shape do much of the visual work.
Can you use resin to make water in a diorama?
Yes, resin can create a clear water surface, provided the product is suitable for the project and compatible with the base and other layers. Prepare and seal the bed, check for gaps, and follow the manufacturer’s guidance for mixing, application, ventilation, protective equipment and curing. Resin types and requirements vary, so don’t assume one product’s instructions apply to another. Test the full setup on scrap before pouring over finished scenery.
How do you make realistic ripples on model water?
Use a compatible gel-like material or surface medium to form small, restrained ripples, following its instructions. Align the texture with the water’s movement: marks on a stream should follow its channel, while a still pond needs subtler detail. Keep ripple size proportionate to nearby figures, buildings or trees. Test the texture on a sample and view it from the intended angle; highlights that seem delicate close up can look oversized on the finished scene.
Why did my diorama water effect turn cloudy?
Cloudiness can result from preparation, mixing, application, environmental conditions or incompatibility, depending on the material. Check the product instructions and review each stage rather than immediately adding another coat. If the effect is still curing, follow the manufacturer’s guidance before handling it. There’s no universal remedy: test any proposed correction on a sample or inconspicuous area first, and seek product-specific advice if cloudiness appears trapped within a cured layer.
How do you make a waterfall for a diorama?
Build the waterfall as a connected feature: shape the drop, create a visible falling section, and blend it into a landing pool and onward stream. Use a transparent material or support suited to the scene, then add compatible surface texture to suggest movement. Keep the flow in scale and avoid making the cascade look like a solid block. Test the materials together first, and check the effect from the diorama’s main viewing angle.