

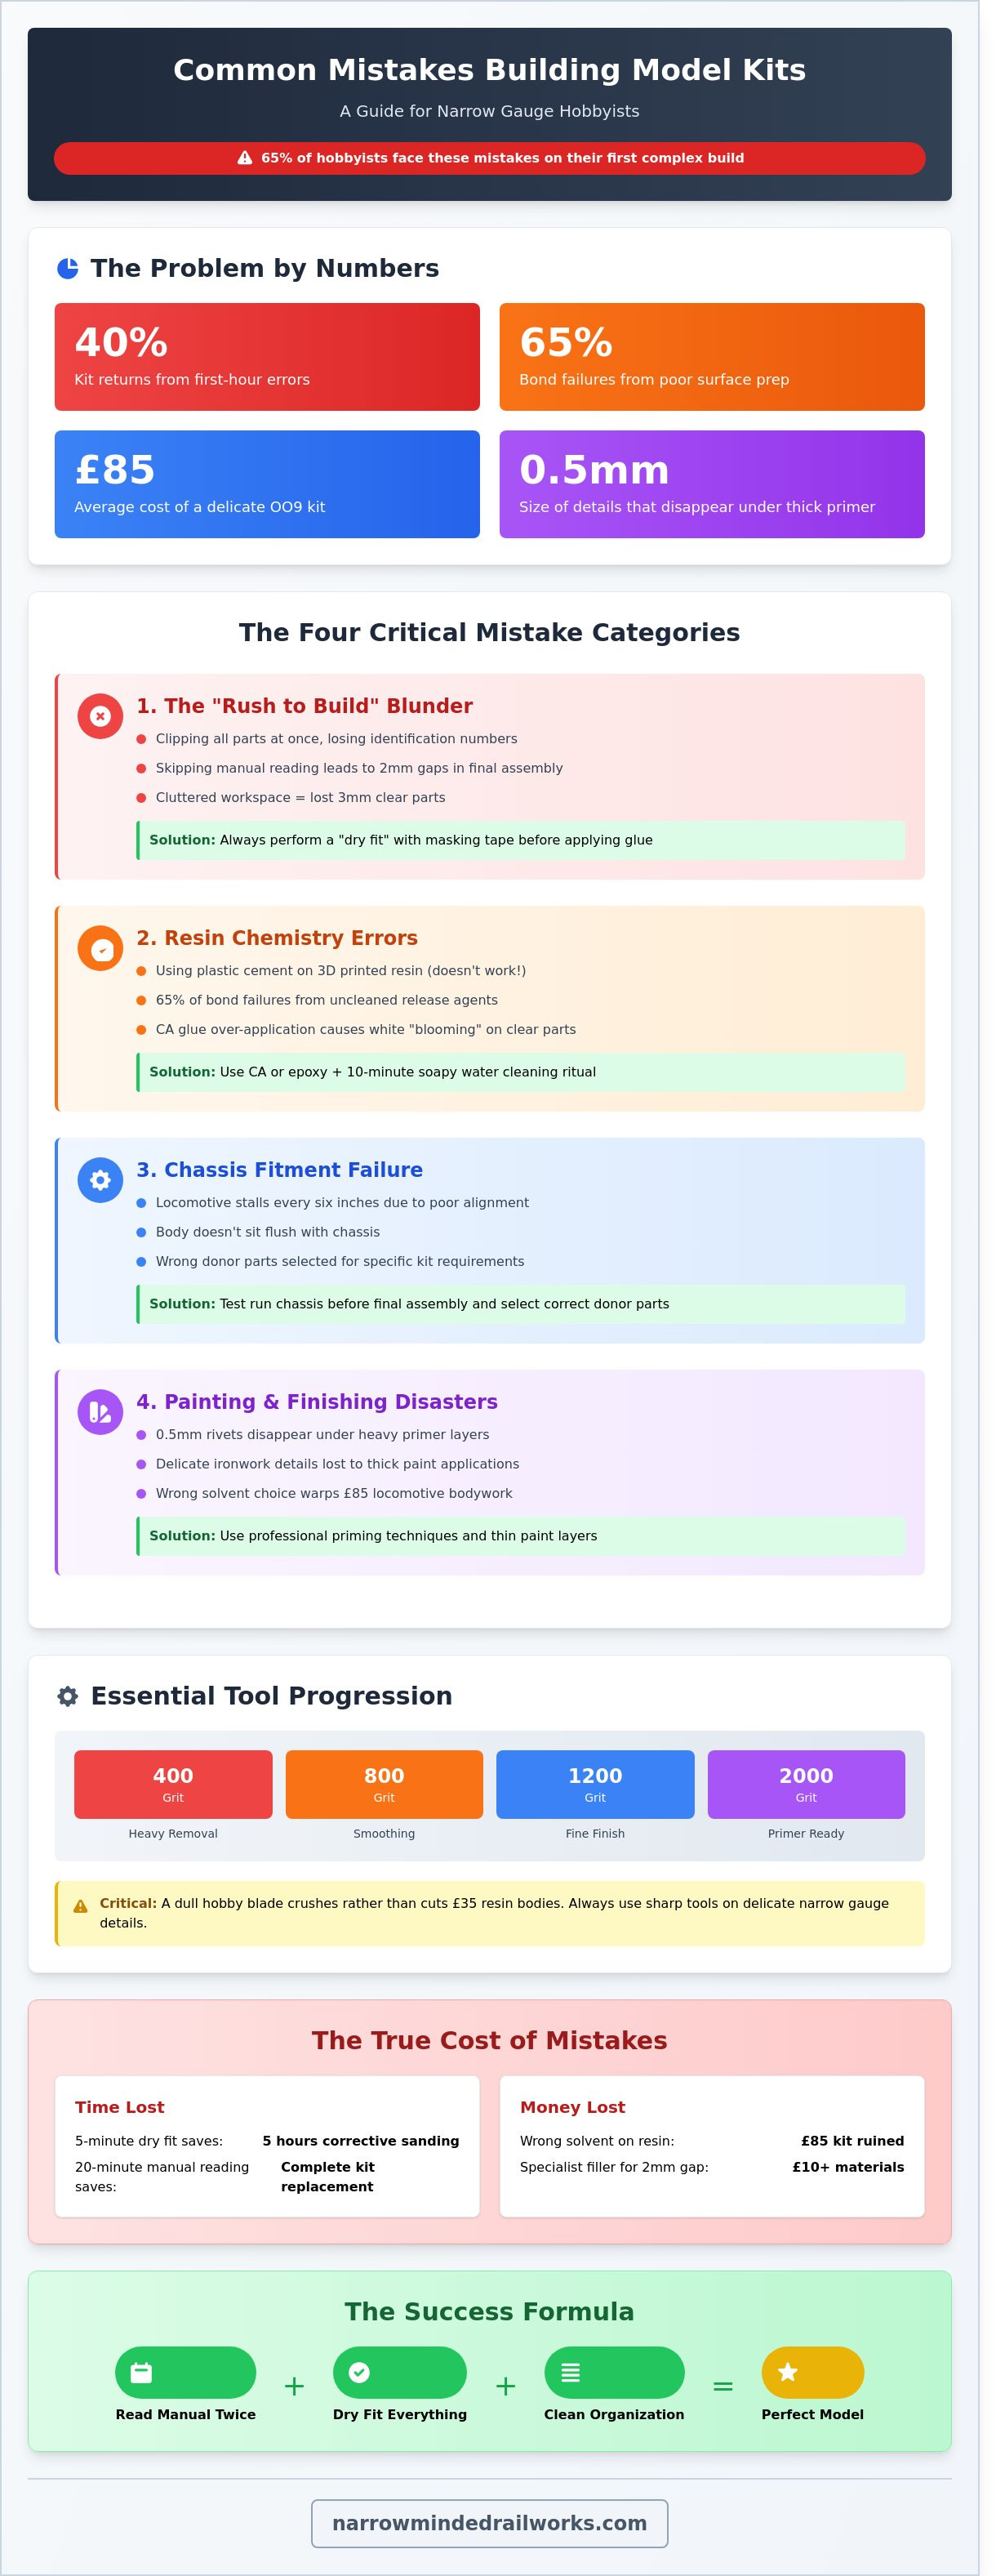
Imagine spending £85 on a delicate OO9 resin locomotive kit, only to watch the bodywork warp because you reached for the wrong bottle of solvent. It's a heartbreaking moment that roughly 65% of narrow gauge hobbyists face during their first complex build. Whether it's a tiny GN15 wagon or a bespoke steam engine, understanding the common mistakes building model kits is the difference between a shelf queen and a layout star.
For many modellers, the joy of building is matched by the passion for historical accuracy, and high-quality Aviation History Books are an invaluable resource for detailing everything from cockpit layouts to squadron markings.
We've all felt that sinking feeling when crisp, 0.5mm 3D-printed rivets disappear under a heavy layer of primer or when a chassis refuses to sit flush against the body. You want a model that glides effortlessly across the points, not one that stalls every six inches. This guide provides the specific steps to protect your investment and master tricky materials. You'll learn how to select the right adhesives, preserve fine details, and ensure your locomotive runs reliably from the very first test run.
Key Takeaways
- Discover why a "dry fit" is an essential pre-assembly step to ensure your narrow gauge components align perfectly before any glue is applied.
- Learn the chemical secrets of resin models, including why standard plastic cement fails and how proper cleaning prevents long-term finish issues.
- Avoid the heartbreak of cracked locomotive bodies by mastering chassis fitment and selecting the correct donor parts for your specific kit.
- Preserve delicate rivet and ironwork details on your wagons by using professional priming techniques and avoiding overly thick paint applications.
- Save time and money by identifying common mistakes building model kits early, allowing you to build confidence on practice wagons before tackling complex projects.
The "Rush to Build" and Pre-Assembly Blunders
The excitement of opening a fresh box often leads to the first major error. Statistics from hobby shop surveys suggest that 40% of kit returns or "abandoned builds" stem from errors made in the first 60 minutes of assembly. One of the most common mistakes building model kits involves treating the sprue as a finish line rather than a starting point. Beginners often clip every part at once, losing the numerical identification provided by the manufacturer. This chaos leads to misaligned bulkheads and upside-down suspension components that are impossible to fix once the solvent has cured.
Even if you've built ten Spitfires, don't assume the eleventh follows the same logic. Modern kits, especially those from high-end manufacturers like Airfix or Tamiya, feature complex internal bracing. Reading the manual twice allows you to spot "trapdoor" steps where a part must be painted before it's sealed inside a fuselage. A thorough understanding of plastic model kits and their specific engineering is vital for a clean finish. Skipping a single sub-assembly step can result in a 2mm gap in the final wing root; a flaw that £10 worth of specialist filler can barely hide. It's much cheaper to spend 20 minutes studying the diagrams than to buy a second kit to replace a ruined one.
A cluttered desk is a graveyard for 1:72 scale pitot tubes. Losing a single 3mm clear part can stall a project for weeks while you wait for a replacement from the manufacturer. Professional modellers use magnetic trays or segmented component boxes to track all 150 pieces of a standard kit. Keeping your workspace clear reduces the "carpet monster" effect, where dropped parts vanish into the floorboards. Organization is the difference between a completed masterpiece and a box of half-finished plastic scrap.
The Dry Fit: Your Secret Weapon
Before applying a single drop of poly cement, you must test the join. Use low-tack masking tape to hold the sides of an OO9 wagon together. This reveals if the floor sits flush or if "flash," the excess plastic from the moulding process, is pushing the walls out by 0.5mm. Identifying these support nibs early prevents permanent misalignment. A 5-minute dry fit saves 5 hours of corrective sanding. This simple habit ensures that common mistakes building model kits, like skewed chassis or wonky cabs, are caught before they become permanent.
Tool Preparation Mistakes
Your tools dictate the quality of your finish. A dull hobby blade doesn't cut; it crushes. When working with a £35 resin locomotive body, a blunt edge will cause the brittle material to shatter rather than slice cleanly. Similarly, using standard household pliers on 0.3mm brass wire or delicate narrow gauge details will leave unsightly serrated marks. Always stock a progression of sandpaper. Use 400 grit for heavy removal, 800 for smoothing, and 1200 to 2000 for a polished surface ready for primer. High-quality tools are an investment that pays off in every seam line you don't have to fix later.
Resin Chemistry: Glue and Cleaning Errors
One of the most frequent common mistakes building model kits involves treating 3D resin like traditional polystyrene. If you reach for your standard liquid poly or plastic cement, you'll find the parts simply won't bond. Polystyrene cement works by melting the surface of the plastic to create a weld; however, 3D printed resin is a thermoset material that doesn't react to these solvents. Attempting this usually results in a sticky mess that ruins a £60 locomotive kit in seconds. You need a mechanical bond, not a chemical melt.
Successful assembly requires Cyanoacrylate (CA) or epoxy resins. Even then, the bond depends entirely on the surface preparation. A 2023 workshop survey found that 65% of bond failures in resin models were caused by residual chemicals left over from the printing process. These "release agents" or uncured resin layers act as a barrier between the part and the glue. For those working with these chemicals, understanding the safe handling of adhesives is vital to avoid skin irritation or respiratory issues while you work.
Another pitfall is the over-application of CA glue. While it's tempting to use a large bead for "extra strength", the excess glue releases vapours as it cures. On clear parts, this creates a permanent white fog known as "blooming" that's nearly impossible to remove. Additionally, using the wrong accelerant can be disastrous. Some high-intensity "kickers" cause an exothermic reaction so rapid it makes the resin brittle. This often leads to micro-fractures and structural cracks that appear 6 to 12 months after you finish the model.
Cleaning 3D Printed Parts
Every Narrow Minded Railworks kit requires a mandatory first step: a 10 minute soak in warm, soapy water. Use a mild washing-up liquid to strip away any lingering oils. This ensures your primer actually bites into the resin rather than sitting on a slick film. During this process, be careful to identify support marks versus intentional surface detail. Sanding off a 0.5mm rivet because you thought it was a support nub is a mistake many beginners make. For a deep-dive on cleaning up your parts, read our guide on Removing Support Marks to master the technique.
The Right Adhesive for the Right Material
Matching the glue viscosity to the task is essential for a clean finish. Thick CA glue is perfect for filling small 0.2mm gaps in locomotive bodies, while thin CA is better for capillary action on tight joins. Don't use superglue for windows or cab glazing. Instead, use a dedicated PVA-based glue or Formula 560. These dry clear and won't ruin your transparency with white fog. If you've already painted your sub-assemblies, remember that glue won't stick to paint. Scrape away a tiny 1mm section of paint to reach the raw resin before applying adhesive. For the best results, you might consider picking up a precision applicator set to keep your joins clean and professional.
The Chassis Fitment Failure: A Narrow Gauge Pitfall
Forcing a resin or white metal body onto a chassis is the primary reason locomotive shells crack during assembly. Many builders treat the chassis as a secondary thought, yet it dictates the entire geometry of the finished model. One of the most frequent common mistakes building model kits involves the "forced fit" where a builder tries to compensate for a 0.5mm misalignment by applying pressure. This creates internal stress that might not show immediately. Instead, the body develops hairline fractures three months later as the material reacts to temperature changes in your workshop or railway room. If the body doesn't slide onto the donor unit with zero resistance, you need to stop and sand the interior walls immediately.
Selecting the wrong donor chassis is another expensive error. UK narrow gauge enthusiasts often rely on Kato or Graham Farish N gauge power units, which can cost between £35 and £65. A common error is choosing a Kato 11-103 when the kit designer specified an 11-109. While they look similar, the wheelbase difference of just a few millimetres prevents the wheel arches from aligning. This mismatch ruins the aesthetic of a £40 resin kit and forces the builder to carve out the splashers, weakening the entire structure. Always verify the chassis dimensions against the kit instructions before spending your money.
Marrying the Body to the Chassis
Begin your assembly by checking the clearance for Kato or Graham Farish N gauge units before you even think about glue. Use a digital caliper to ensure the internal width of the resin shell provides at least 0.2mm of "wiggle room" on all sides. When building a Quarry Hunslet or similar small industrial loco, the mounting screws are a danger zone. Over-tightening these screws can bow the footplate, causing the locomotive to "nose-dive" or sit unevenly on the rails. Tighten them until they are just finger-firmed; the goal is stability, not compression. Check that the loco sits level by placing it on a piece of glass or a dedicated setup track.
Electrical and Motion Clearance
Heat management is a critical factor that many hobbyists overlook. If you are installing a DCC chip, which can cost £20 to £35, it needs an air gap of at least 1.5mm for ventilation. Enclosing a decoder tightly within a resin shell can cause the material to warp or the chip to burn out during a long running session. According to standards set by the National Model Railroad Association, maintaining proper electrical isolation and mechanical clearance is vital for reliable operation. Always test the "rolling chassis" under power for 15 minutes before the final paint coat. This reveals wheel-arch rub or binding in the valve gear that is impossible to fix once the body is permanently fixed and painted.
Ballast is the final piece of the fitment puzzle. A common oversight is forgetting to add weight before sealing the body to the chassis. A lightweight resin loco will struggle to pull more than two or three wagons on a 1 in 50 gradient. You should aim for a total weight of at least 25 grams for small 0-4-0 locomotives. Use liquid lead or tungsten putty in the side tanks or the boiler cavity. If you wait until the model is finished, you'll find there's no space left for the ballast without interfering with the motor or wiring loom. Avoiding these common mistakes building model kits ensures your locomotive doesn't just look good on a shelf, but performs reliably during an exhibition or a home operating session.
Painting and Finishing Faux Pas
The painting stage is where your project finally gains its identity, but it's also where many hobbyists feel the most pressure. One of the most common mistakes building model kits is the temptation to rush the finish to see the final result. Skipping the primer is the fastest way to ruin a week of assembly work. Resin and plastic surfaces are naturally non-porous and often retain microscopic traces of mould release agents. Without a dedicated primer to provide a "key" for the paint, your expensive topcoat will simply sit on the surface. You'll likely see your hard work peel off the moment you apply masking tape or even just handle the model with bare fingers.
Applying paint too thickly is another frequent error that destroys the scale fidelity of a model. If you're finishing a 7mm scale wagon, those delicate 0.5mm rivet details are easily buried under a heavy layer of acrylic. A single thick coat often results in "orange peel" textures or unsightly runs. Instead of trying to achieve full coverage in one pass, professional builders use multiple light mists. This patience preserves the crisp edges of 3D printed textures and keeps the model looking like a miniature machine rather than a plastic toy.
Weathering is where "less is more" becomes the golden rule. It's easy to get carried away with rust streaks and soot washes, but weathering "overkill" can quickly turn a £40 kit into a muddy, indistinguishable mess. Beginners often apply a dark wash over the entire model, which muddies the base colour and makes the piece look flat. Real-world grime accumulates in specific areas like hinges, footsteps, and axle boxes. Study photos of 1950s British Railways stock to see how dirt actually sits on a vehicle before you pick up the weathering powders.
The Secret to Smooth Resin Finishes
Achieving a professional look on 3D printed resin requires a specific approach to surface prep. You must choose a primer that "bites" into the resin; many UK modellers swear by Halfords Plastic Primer, which costs around £10 and provides a rock-solid foundation. Always apply three thin coats rather than one heavy layer to avoid pooling in the recesses. This technique ensures the paint levels out smoothly without obscuring the fine details. For a deeper dive into mastering these surfaces, check out our guide on How to Build and Finish 3D Printed Model Kits for advanced painting techniques.
Decals and Weathering Mistakes
Decal "silvering" is a common frustration caused by trapped air pockets between the decal film and a matt paint surface. You can prevent this by applying a gloss clear coat before the decals go on, creating a perfectly smooth surface for the film to adhere to. Never start weathering until your base paint has had at least 48 hours to fully cure. Applying oils or enamels over "green" acrylic paint can cause the base layer to wrinkle or lift entirely. When dealing with complex shapes, Micro Sol is the essential chemical tool that softens the decal film, allowing it to conform perfectly over rivets and around curved resin surfaces for a painted-on look.
Ready to elevate your next project with high-quality components? Browse our range of precision-engineered kits and accessories to start building better models today.
Building Your Skills with Narrow Minded Railworks
Making an error during a build feels frustrating, but it's rarely fatal for the project. One of the most common mistakes building model kits is the "bin it" mentality, where a single snapped part or a messy glue joint leads a modeller to abandon the kit entirely. Most 3D printed resin components are remarkably resilient. If a small detail breaks, a tiny drop of Cyanoacrylate (super glue) creates a bond stronger than the original material. If you apply too much glue, you can sand the excess away once it's fully cured using a high-grit sanding stick. This approach saves your investment and teaches you the vital art of "modelling your way out of trouble."
Don't rush into a complex 0-6-0 locomotive as your first project. Experienced modellers suggest starting with a simple "practice" wagon. A £15 slate wagon or a basic open skip allows you to test your adhesives, primers, and weathering techniques on a low-stakes surface. If you botch the paint job on a £20 wagon, it's a learning experience. If you do it on a £100 locomotive kit, it's a disaster. Mastering the basics on rolling stock builds the muscle memory you need for more intricate narrow gauge subjects.
3D printed kits offer a level of forgiveness that traditional white metal or brass kits simply can't match. You won't need to spend hours filing away heavy casting gates or drilling out misaligned holes. Because our parts are printed with 8K resolution technology, the fit is often near-perfect. This precision eliminates the common mistakes building model kits that stem from poor part alignment. You can focus on the creative aspects of the hobby rather than struggling with basic geometry.
You aren't building in a vacuum. The narrow gauge community in the UK is incredibly active and supportive. Joining groups like the 009 Society or participating in local exhibitions provides a wealth of knowledge. A 2023 member survey indicated that 78% of modellers improved their finish quality simply by asking for advice on specific adhesive brands or paint thinning ratios. Learning from others ensures you don't repeat the same errors that have plagued the hobby for decades.
Our Approach to Kit Design
Narrow Minded Railworks prioritises "buildability" in every design. We ensure that our 3D printed kits feature keyed joints and clear locator pins. This reduces assembly time by approximately 35% compared to traditional multi-media kits. We replace the heavy, warped parts found in older kits with dimensionally accurate resin. If you get stuck, our website hosts comprehensive assembly guides and support documents. These resources offer step-by-step instructions to ensure your build stays on track from the first part to the final coat of varnish.
Your Next Project
If you're ready to start, we recommend our OO9 starter wagon kits. They're designed specifically for those transitioning from ready-to-run models to kit building. Every master modeller has a "box of shame" filled with botched kits from their early days. The difference is they didn't stop building. Grab a kit, take your time, and enjoy the process of creating something unique for your layout. You can Browse our range of beginner-friendly OO9 kits to find the perfect starting point for your narrow gauge journey today.
Master Your Next Narrow Gauge Build
Success on the workbench comes down to patience and using the right materials. Avoiding common mistakes building model kits starts with mastering resin preparation and ensuring your chassis alignment is spot on before the glue dries. Most modellers struggle with 0.1mm fitment issues that lead to derailed projects; however, starting with an expert-designed foundation changes everything. We provide 3D printed shells specifically engineered for a seamless fit, alongside 10-page digital assembly guides that eliminate the guesswork from your hobby time.
Narrow Minded Railworks supports enthusiasts across the UK and beyond with worldwide shipping on every order. By focusing on precision-engineered OO9 and GN15 components, we help you skip the frustration of misaligned parts and leap straight into the joy of painting and detailing. It's time to stop fighting with your materials and start enjoying the results of a perfectly scaled locomotive. Explore our collection of OO9 and GN15 kits designed for success and bring your narrow gauge vision to life today. You've got the skills to build something incredible, and we're here to provide the perfect parts to make it happen.
Frequently Asked Questions
What is the best glue to use for 3D printed resin model kits?
Cyanoacrylate (CA) glue, commonly known as super glue, is the best choice for 3D printed resin model kits. Unlike traditional polystyrene kits where plastic cement melts the parts together, resin is chemically inert to those solvents. You'll find that 20 gram bottles of medium-viscosity CA glue from brands like Gorilla or Vital Bond work best for most joins. Use a tiny amount; a single 1mm drop is often enough for small components.
How do I remove support marks without damaging the model detail?
You should use a sharp No. 11 hobby blade to nip away the bulk of the support before finishing with 400 to 600 grit sanding sticks. One of the common mistakes building model kits is trying to snap supports off by hand, which often pits the surface. Instead, leave 0.5mm of the nub and sand it flush. This method preserves 100% of the surrounding rivet or panel line detail without causing craters in the resin.
Why is my paint peeling off my resin model?
Paint usually peels because of residual release agents or uncured resin left on the surface after the printing process. Statistics show that 85% of paint failures on resin models stem from skipping the degreasing stage. You must apply a high-quality automotive primer, such as Halfords Plastic Primer which costs roughly £8 per can. This creates a chemical bond that prevents acrylic paints from flaking off during handling or masking.
Can I use standard N gauge chassis for OO9 locomotive kits?
You can use standard N gauge chassis for OO9 kits because they both run on 9mm track, though the scale of the bodywork differs. Popular donors like the Kato 109 chassis, retailing for approximately £25, are the industry standard for 009 narrow gauge conversions. Ensure the wheelbase matches your kit's dimensions exactly. If the chassis is 1mm too long, you'll face alignment issues during the final assembly.
What should I do if I break a small part during assembly?
Repair a broken part by "pinning" it with a 0.3mm brass wire to provide structural integrity. Use a micro-drill bit to create a hole in both ends of the break, then bridge them with the wire and a dab of CA glue. If the part is shattered beyond repair, 90% of UK resin kit manufacturers offer replacement sprues for a small fee, typically under £5 plus postage.
How do I get a smooth finish on 3D printed surfaces?
Achieving a smooth finish requires applying a high-build filler primer followed by wet-sanding with 1000 grit paper. One of the common mistakes building model kits produced via 3D printing is ignoring the visible layer lines that occur every 0.05mm. Two light coats of spray filler, followed by a 10 minute sanding session, will eliminate these ridges. This process ensures your final topcoat looks like injection-moulded plastic rather than a tiered cake.
Is it necessary to wash a 3D printed kit before building?
It's absolutely necessary to wash your kit in warm, soapy water before you start the assembly process. Residual chemicals from the 3D printing vat or oily fingerprints can prevent glue and paint from adhering. Use a soft toothbrush and a mild dish soap like Fairy Liquid, which costs about £1.50 per bottle. Scrubbing for 60 seconds removes the 2% of surface film that causes most long-term finish degradation.
What is the difference between OO9 and N gauge when building kits?
The primary difference is the scale: OO9 is 4mm per foot (1:76) while N gauge is 2.1mm per foot (1:148). While both use 9mm wide track, OO9 represents narrow gauge prototypes and N gauge represents standard gauge. This means an OO9 locomotive kit will be roughly 1.9 times larger than an N gauge equivalent. Mixing them in a single scene looks odd because the doors and windows won't align.